🧢 Beautiful ✨ Detailed πŸ’ Adorable

Kinnedy Nichelle Square Pattern

Kinnedy Nichelle Square Pattern
4.1β˜… Rating
5-7 Hours Time Needed
3.9K Made This
βœ‚οΈ

Intermediate Level

Ideal for those with basic crochet experience, featuring slightly more advanced stitches and techniques to expand your skills.

⏱️

Weekend Treat

Takes 5-7 hours, making it an enjoyable project to finish over a couple of days.

🏑

Cozy Accent

A warm touch for your space that transforms ordinary corners into inviting nooks filled with handmade charm.

About This Kinnedy Nichelle Square Pattern

The Kinnedy Nichelle Square Pattern creates a richly textured decorative square with layered petals, clusters, and post stitches. This intermediate design uses worsted-weight cotton and color changes to create depth and visual interest. You will enjoy the assembly of petals, picots and shells that come together to form a striking motif perfect for blankets and home decor.

Kinnedy Nichelle Square Pattern crochet pattern - detailed view of completed project

The pattern includes full round-by-round instructions, stitch counts, and helpful special notes for colorways. Photos and stitch definitions are referenced throughout to support each step.

Why You'll Love This Kinnedy Nichelle Square Pattern

I absolutely love this pattern because it combines intricate texture with a joyful color palette that really sings. I designed it as part of a legacy series and it feels meaningful to create something that becomes a cherished handmade heirloom. The combination of petals, post stitches, and picots gives each square a lot of visual depth and a tactile quality I enjoy working with. I also love that the pattern is versatile β€” change the colors or yarn weight and you can create many different moods from the same instructions.

Kinnedy Nichelle Square Pattern step 1 - construction progress Kinnedy Nichelle Square Pattern step 2 - assembly progress Kinnedy Nichelle Square Pattern step 3 - details and accessories Kinnedy Nichelle Square Pattern step 4 - final assembly and finishing

Switch Things Up

I love experimenting with colorβ€”try substituting muted neutrals for a modern, subtle version or choose bold contrasting colours for a statement square.

If you want a chunkier look I often use a bulkier cotton or a DK held doubled with a larger hook to create a more substantial square.

I sometimes change the order of the colorways to make the petals pop differently; moving a bright color into the outer rounds can create a striking frame.

Try swapping the HPS rows for regular puff stitches or bobbles if you want more raised texture in those rounds.

For a vintage look, use tonal yarns or a variegated yarn in the center rounds so the petals take on a gradual color shift.

I also like to add a slim contrasting border in a neutral color to make the motif stand out when used in a blanket.

To make a miniature version suitable for coasters or brooches, use fingering weight yarn and an appropriately smaller hook.

If joining squares, alternate colorways or rotate each square 90 degrees for a quilt-like effect that adds visual movement.

I sometimes embroider a small detail on the center after blocking to personalize the square further, such as initials or simple vines.

Don’t be afraid to experiment with different joinsβ€”mattress stitch gives an invisible seam, while slip stitch joins offer a decorative ridge for contrast.

For gifting, consider making a set of four squares with coordinated colorways and finishing them as a placemat or wall hanging.

Common Mistakes & How to Fix Them

βœ— Skipping the standing stitch at the start of a round can make your first stitch count incorrect; always begin each round with the standing stitch as directed to maintain proper stitch alignment. βœ— Not using an invisible join when instructed can leave a visible seam; follow the invisible join instructions carefully or use the chainless starting stitch when changing colors to keep edges neat. βœ— Failing to place stitch markers for reference points (for example the marked stitch in round 10) can make later rounds confusing; place markers as noted to ensure correct placement of complex groups. βœ— Forgetting to weave in ends before blocking will make finishing more cumbersome; weave in all yarn ends as soon as the last round is completed to avoid frustrating finishing work. βœ— Pulling posts or FP/BP stitches too tightly will distort the texture; keep consistent, moderate tension when working FPdc, FPsc, BPsc and HPS to preserve the square's shape.

Kinnedy Nichelle Square Pattern

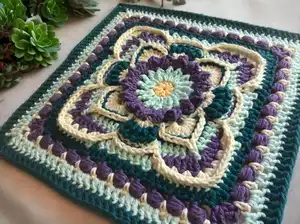
Create a vibrant, textured crochet square with the Kinnedy Nichelle pattern β€” a richly layered design featuring petals, shells, post stitches and decorative picots. This pattern guides you through each round with clear counts and helpful tips so you can recreate the look in your favorite colorways. Perfect for making statement sampler squares, blankets, or home accents, this square adds a handcrafted touch to any project.

Intermediate 5-7 Hours

Materials Needed for Kinnedy Nichelle Square Pattern

β€” Main Fabric

  • 01
    I Love This Cotton (Worsted Weight) 100% cotton - main base yarn
  • 02
    Colorway 1 - A: Buttercup
  • 03
    Colorway 1 - B: Mint
  • 04
    Colorway 1 - C: Amethyst
  • 05
    Colorway 1 - D: Ivory
  • 06
    Colorway 1 - E: Deep Teal
  • 07
    Colorway 2 - A: Pewter
  • 08
    Colorway 2 - B: Tart Orange
  • 09
    Colorway 2 - C: Burnt Sienna
  • 10
    Colorway 2 - D: Olive
  • 11
    Colorway 2 - E: Taupe
  • 12
    Colorway 2 - F: Dove

β€” Tools Required

  • 01
    Crochet hook size 4.5 mm (G) - for finished size 11" when using recommended yarn
  • 02
    Crochet hook size 5 mm (H) - for finished size 12" when using recommended yarn
  • 03
    Stitch markers
  • 04
    Darning/tapestry needle for weaving ends
  • 05
    Scissors
  • 06
    Blocking tools (pins, blocking mat) for wet or steam blocking
  • 07
    Optional: steam iron for gentle steam blocking (use caution on acrylic yarn)

Progress Tracker

0% Complete

β€” General Info :

Infos :

Hook/Finished Size: 4.5 mm, 11"; 5 mm, 12". Crochet Terms: US terminology throughout. Skill Level: Intermediate to Experienced. Yarn and Colors Used: I Love This Cotton (Worsted Weight), 100% cotton. Colorway 1: A - Buttercup; B - Mint; C - Amethyst; D - Ivory; E - Deep Teal. Colorway 2: A - Pewter; B - Tart Orange; C - Burnt Sienna; D - Olive; E - Taupe; F - Dove. Additional Items Needed: Stitch markers and darning needle. STITCHES USED: double magic circle; standing stitch; invisible join (join); st(s) (Stitch/stitches); sp (Space); ch (Chain); yo (Yarn over); rnd (Round); sc (Single crochet); FPsc (Front post single crochet); BPsc (Back post single crochet); long sc (Long single crochet); hdc (Half double crochet); dc (Double crochet); FPdc (Front post double crochet); tr (Treble crochet); 2tr-cluster (2 Treble crochet cluster); picot; back-stitch; HPS (Horizontal puff stitch); shell.

β€” Special Instructions :

Info :

Instructions for ALL rounds start with a standing stitch and end with an invisible join to 2nd st of rnd, and fasten off. If not changing colors, you can opt to finish the previous rnd with a slip stitch join and use the appropriate "ch" or "chainless starting stitch" to begin the next round. Keep in mind that if you choose the slip stitch end, the "ch" or "chainless starting stitch" will replace the first standing st of the round. Navigate between written instructions, stitch definitions, videos, and pictures by clicking on the corresponding links. For example, you can click here to see a picture of the square and then click on the picture to return to the link. To view the yarns and colors used, click here, then click on the "Yarns and Colors Used" link to return. Please be aware that some mobile phone users may experience difficulties.

β€” Rounds :

Round 1 :

In a double magic circle, ch 3 (counts as 1st dc of rnd); 7 dc into double magic circle; cut yarn, invisible join to first true dc. Counts: 8 dc (8 total)

Round 2 :

Starting in any dc, [(2tr-cluster, ch 1, 2tr-cluster) in dc, ch 1] 8 times; cut yarn, invisible join. Counts: 16 2tr-cluster, 16 ch-1 sp (32 total)

Round 3 :

Starting in any ch-1 sp, PETAL as follows: *(hdc, dc, tr), ch 2; fold your work toward you; sc in the previous ch-1 sp (to your right), inserting your hook from front-to-back and behind the ch 2 just made; ch 2, sk NEXT 2tr-cluster (move to your left, sk petal just made); repeat from * around; cut yarn, invisible join. Counts: 16 PETALS

Round 4 :

Starting in ch-2 sp behind any petal, *(sc, ch 3, sc) in ch-2 sp; ch 3, sk ch-2 sp behind NEXT petal; (sc, ch 2, sc) in NEXT ch-2 sp; ch 3, sk NEXT ch-2 sp behind next petal; repeat from * around; cut yarn, invisible join. Counts: 16 sc, 4 ch-2 sps, 12 ch-3 sp (60 total)

Round 5 :

Starting in any ch-2 sp, *(5 dc) in ch-2 sp, sk sc, ch 1; sc in NEXT ch-3 sp, sk sc; shell in NEXT ch-3 sp, sk sc; sc in NEXT ch-3 sp, ch 1, sk NEXT sc; repeat from * around; cut yarn, invisible join. Counts: 8 sc, 20 dc, 4 shells, 8-ch 1 sp (40 total)

Round 6 :

Starting in first tr of any shell, *BPsc around 5 tr, ch 1, sk NEXT picot; BPsc around NEXT 5 tr, ch 1; sk NEXT (sc, ch-1 sp); (FPdc, ch 1, FPdc, ch 1) around each of the NEXT 5 dc; sk NEXT (ch-1 sp, sc); repeat from * around; cut yarn, invisible join. Counts: 40 BPsc, 40 FPdc, 48 ch-1 sp (128 total)

Round 7 :

Starting in the 1st BPsc after any skipped picot and ch-1 sp, *dc in 5 BPsc; ch 1, sk ch-1 sp; [FPsc around NEXT 2 FPdc as one, ch 1] 5 times; sk ch-1 sp, dc in each of the NEXT 5 BPsc, ch 1; dc in ch-3 sp of NEXT rnd 5 picot, ch 1; repeat from * around; cut yarn, invisible join. Counts: 44 dc, 20 FPsc, 32 ch-1 sp (96 total)

Round 8 :

Starting in ch-1 sp before any dc worked in picot, *(3 dc) in ch-1 sp before dc in picot; ch 2 (new corner), sk dc; (3 dc) in NEXT ch-1 sp; dc in NEXT 2 dc, hdc in NEXT dc; sc in NEXT 2 dc and ch-1 sp; [sc in FPsc, sk ch-1 sp] 4 times; sc in NEXT FPsc, ch-1 sp, 2 dc; hdc in NEXT dc, dc in NEXT 2 dc; repeat from * around; cut yarn, invisible join. Counts: 44 sc, 8 hdc, 40 dc, 4 ch-2 corner sp (92 total/23 per side)

Round 9 :

Starting in any ch-2 corner sp, *(5 dc) in ch-2 corner sp, [sk dc, (2 dc) in NEXT dc] 2 times; sk dc, (3 dc) in NEXT hdc; ch 1, sk NEXT 3 sc; hdc in NEXT ch-1 sp of rnd 6 - before the groups of FPdc; ch 1, sc in NEXT 5 sc of rnd 8, ch 1; hdc in NEXT ch-1 sp of rnd 6; ch 1, sk NEXT 3 sc; (3 dc) in hdc; [sk dc, (2 dc) in NEXT st] 2 times, sk dc; repeat from * around; cut yarn, invisible join. Counts: 20 sc, 76 dc, 8 hdc, 16 ch-1 sp (120 total)

Round 10 :

Starting around 1st dc of any (5 dc) group, *BPsc around 11 sts - place stitch marker in 3rd BPsc; ch 1, sk NEXT (dc and skipped sc of rnd 8); dc in NEXT 2 skipped sc; back-stitch dc in each of NEXT 5 sc; dc in NEXT 2 skipped sc; ch 1, sk NEXT (skipped sc of rnd 8 and dc of rnd 9); BPsc around NEXT 6 sts; repeat from * around; cut yarn, invisible join. Counts: 68 BPsc, 16 dc, 20 dc back-stitch, 8 ch-1 sp (112 total)

Round 11 :

Starting in any marked st of rnd 10, *(2 hdc, ch 2, 2 hdc) - in marked dc - remove marker; hdc in NEXT 7 BPsc; ch 1, sk BPsc; (2 hdc) in NEXT ch-1 sp; [sk dc, (2 hdc) in NEXT dc] 4 times; sk dc, (2 hdc) in NEXT ch-1 sp; ch 1, sk BPsc; hdc in NEXT 7 BPsc; repeat from * around; cut yarn, invisible join. Counts: 120 hdc, 8 ch-1 sp, 4 ch-2 corner sp (128 total/32 per side)

Round 12 :

Starting in any ch-2 corner sp, *(2 dc, ch 2, 2 dc) in ch-2 corner sp; ch 1, sk NEXT 2 hdc; [HPS in NEXT hdc; ch 1, sk NEXT 2 hdc] 2 times; HPS in NEXT hdc; ch 1, sk NEXT (ch-1 sp, hdc); [HPS in NEXT hdc; ch 1, sk NEXT 2 hdc] 3 times; HPS in NEXT hdc; ch 1, sk NEXT (hdc, ch-1 sp); [HPS in NEXT hdc; ch 1, sk NEXT 2 hdc] 3 times; repeat from * around; cut yarn, invisible join. Counts: 16 dc, 40 HPS, 44 ch-1 sp, 4 ch-2 corner sp (100 total/25 per side)

Round 13 :

Starting in any ch-2 corner sp, *(sc, ch 2, sc) in ch-2 corner sp; ch 2, sk NEXT 2 dc; [long sc in NEXT ch-1 sp; ch 2, sk NEXT HPS] 10 times; long sc in NEXT ch-1 sp; ch 2, sk NEXT dc; repeat from * around; cut yarn, invisible join. Counts: 8 sc, 44 long sc, 48 ch-2 sp, 4 ch-2 corner sp (148 total/37 per side)

Round 14 :

Starting in any ch-2 corner sp, *(2 dc, ch 2, 2 dc) in ch-2 corner sp; [sk sc, (3 dc) in NEXT ch-2 sp] 2 times; sk sc, (2 dc) in NEXT ch-2 sp 2 times; [sk sc, (2 dc) in NEXT ch-2 sp; {sk sc, (3 dc) in NEXT ch-2 sp} 2 times] 2 times, sk sc; repeat from * around; cut yarn, invisible join. Counts: 144 dc, 4 ch-2 corner sp (144 total/36 per side)

Round 15 :

Starting in any ch-2 corner sp, *(2 dc, ch 2, 2 dc) in ch-2 corner sp; sk dc, dc across to NEXT ch-2 corner sp; repeat from * around; cut yarn, invisible join and weave in ALL yarn ends. Counts: 156 dc, 4 ch-2 corner sp (156 total/39 per side)

Info :

Blocking is a great way to put the finishing touches on your square. It allows you to reach your final shape and size. It also opens up your stitches, making them even and more defined; giving it a more professional appearance. You can either wet block or steam block, but always make sure you are careful when steam blocking acrylic yarn. This pattern and all pictures are copyright protected.

Assembly Instructions

  • Weave in all yarn ends after completing Round 15; trim ends close to the fabric and use a darning needle to tuck tails neatly into the back of the work.
  • Block the square to shape and size using wet blocking or gentle steam blocking; pin to measurements and allow to dry flat to set the edges and open the stitches.
  • If joining multiple squares, align squares with right sides facing and use your preferred joining method (mattress stitch, slip stitch join, or single crochet seam) ensuring corners and stitch counts match for even seams.
  • When attaching to a finished project, stitch evenly through the outermost rounds to avoid pulling the inner motif out of shape and check alignment frequently as you sew or join.

Important Notes

  • πŸ’‘Begin each round with a standing stitch and end with an invisible join to the 2nd stitch of the round unless otherwise directed.
  • πŸ’‘Place stitch markers where indicated (for example, mark the 3rd BPsc in the BPsc group in round 10) to make later rounds and special stitch placements easier to follow.
  • πŸ’‘Weave in ends as you go or immediately after finishing to prevent bulky bundles of yarn from accumulating and to keep the back tidy.
  • πŸ’‘Block your finished square to open up the texture and set the shape; take care when steam blocking acrylic yarn to avoid damage.

This Kinnedy Nichelle Square is designed to bring color and texture to your handmade blankets, cushions, and home accents. Whether you make a single statement square or a full sampler blanket, each motif is full of character and handcrafted charm. Enjoy the layering of petals, posts, and picots β€” happy crocheting! 🧢✨

You ask,

we answer.

FAQs

What size will the finished piece be?

The finished square measures approximately 11" using a 4.5 mm hook and worsted weight cotton, and approximately 12" using a 5 mm hook with the same yarn.

Can I use different yarn weights for this pattern?

Yes, you can use different yarn weights, but this will affect the final size and texture; adjust your hook accordingly and consider making a gauge swatch to achieve desired dimensions.

Do I need prior crochet experience for this pattern?

This pattern is rated intermediate, so familiarity with post stitches, shell clusters, picots, and invisible joins is recommended for best results.

How long does this project typically take to complete?

Most crocheters complete this square in 5-7 hours, depending on experience level, color changes, and whether you follow the optional blocking and finishing steps.

How should I block the finished square?

You can wet block the square by pinning it to the desired shape and allowing it to dry, or use careful steam blocking; avoid direct steam on acrylic and handle gently to preserve texture.