🧢 Beautiful ✨ Detailed πŸ’ Adorable

Ladybug Keychains Amigurumi Pattern

Ladybug Keychains Amigurumi Pattern
4.1β˜… Rating
1-2 Hours Time Needed
2.6K Made This
βœ‚οΈ

Beginner Friendly Level

Perfect for those just starting their crochet journey, with clear instructions and simple techniques

⏱️

Quick Make

Complete in under 2 hoursβ€”lightning fast fun for instant gratification and quick gifts.

🎁

Tiny Treasure

Small, sweet, and gift-worthy creations that fit perfectly in the palm of your hand with detailed charm.

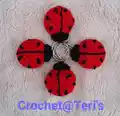
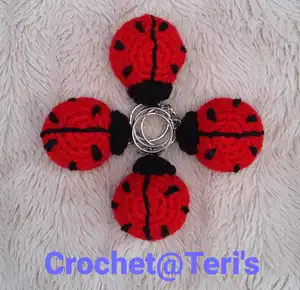
About This Ladybug Keychains Amigurumi Pattern

This pattern creates small ladybug keychains using DK weight yarn and simple round shaping. You will crochet two halves, join them, stuff lightly and add embroidered spots and a central back stripe. The design is compact and perfect for using leftover yarn and making quick gifts or market pieces.

Ladybug Keychains Amigurumi Pattern crochet pattern - detailed view of completed project

Instructions include UK and US term variations and clear joining and finishing steps. Ideal for crafters who want a fast, satisfying small project.

Why You'll Love This Ladybug Keychains Amigurumi Pattern

I absolutely love this pattern because it turns tiny scraps of yarn into a charming finished piece very quickly. I love how the simple embroidery for the stripe and spots adds so much character with almost no extra time required. The small size makes this pattern addictive β€” you can make several in an evening and have a delightful set. I also enjoy that the construction is straightforward, so I can focus on color placement and finishing details. It is one of those projects that brings instant satisfaction and makes lovely gifts.

Ladybug Keychains Amigurumi Pattern step 1 - construction progress Ladybug Keychains Amigurumi Pattern step 2 - assembly progress Ladybug Keychains Amigurumi Pattern step 3 - details and accessories Ladybug Keychains Amigurumi Pattern step 4 - final assembly and finishing

Switch Things Up

I love customizing these ladybugs by changing the yarn colours β€” try pastel pink and grey for a soft, modern look or use bright neons for a fun pop.

You can easily make the keychain bigger or smaller by switching yarn weight and hook size; bulky yarn with a larger hook gives a chunky version, while finer yarn makes a tiny charm.

I often add a tiny bell or bead inside before closing for a soft jingle when used as a keychain.

Try embroidering different spot patterns or numbers of spots to create a family set where each bug has a unique look.

For a more durable finish, reinforce the keychain attachment with an extra row of sewing or a few more back stitches and knot securely before weaving the tail in.

I like to create matching sets by making a mini pair of ladybugs in complementary colours and linking them on the same ring for a statement accessory.

If you want a weighted keychain, add a small plastic pellet pouch or a bit more stuffing at the base before closing to help it hang neatly.

Embellish with tiny felt wings or a crocheted bow sewn to the head for a whimsical touch that personalises each piece.

I sometimes mix yarn textures β€” a smooth DK body with a boucle or novelty yarn for the spots β€” to create interesting tactile contrast.

Don't be afraid to experiment with facial details; a small embroidered smile or bead eyes can change the personality of your ladybug quickly and charmingly.

Common Mistakes & How to Fix Them

βœ— Skipping a stitch marker during continuous rounds can make counting and joins confusing; place a marker at the end of each round to track your starting point and keep rounds aligned. βœ— Overstuffing the ladybug halves causes the stuffing to show through the stitches and distorts the shape; stuff gradually and only enough that each part can be squeezed slightly when pinched. βœ— Forgetting to leave long yarn ends when indicated will make assembly and attaching the keychain difficult; leave the specified lengths (15cm or 50cm) and use them for sewing and embroidery. βœ— Not aligning the two halves exactly before joining can create a lopsided body; pin or hold the halves together wrong sides facing and check stitch counts before slip stitching to join. βœ— Pulling embroidery stitches too tightly will pucker the fabric and change the ladybug's shape; use small running stitches with moderate tension and adjust before securing. βœ— Cutting the end flush too early can leave you without enough yarn for final securing; follow instructions about DO NOT CUT FLUSH and weave ends through the body before trimming.

Ladybug Keychains Amigurumi Pattern

Make a set of adorable ladybug keychains with this compact crochet pattern. You'll create tiny, stuffed ladybug bodies, embroider their spots and attach a keyring for a sweet handmade accessory. The pattern is quick to work up and perfect for using yarn scraps. Clear, photographed steps and simple shaping make this a satisfying little project you can finish in one sitting.

Beginner Friendly 1-2 Hours

Materials Needed for Ladybug Keychains Amigurumi Pattern

β€” Main Fabric

  • 01
    Hayfield Bonus (DK) Ladybird 0698 - 5g (red)
  • 02
    Hayfield Bonus (DK) Black 0965 - oddment (black)
  • 03
    Hi-Loft quality toy stuffing - small amount for each keychain

β€” Tools Required

  • 01
    3mm crochet hook
  • 02
    Wool needle (for sewing and weaving ends)
  • 03
    Keychain (loop or ring)
  • 04
    Stitch marker (to mark last stitch of each round)
  • 05
    Scissors
  • 06
    Pins for assembly (optional)

Progress Tracker

0% Complete

β€” Materials :

Info :

Hayfield Bonus (DK) Ladybird 0698 – 5g. Hayfield Bonus (DK) Black 0965 – Oddment. Hi-Loft Quality Toy Stuffing. Keychain. 3mm Crochet Hook. Wool Needle (for sewing).

β€” Abbreviations :

Infos :

ch – chain. dc – double crochet. htr – half treble crochet. inc – 2 double crochet stitches into next stitch. sl st – slip stitch. f/o – fasten off by slip stitch in next stitch.

β€” Note :

Info :

Unless stated work in continuous rounds marking last stitch of each row with a stitch marker before proceeding with the next.

Info :

When stuffing parts make sure that you don’t overstuff them as you don’t want the stuffing to show through when complete. Each part should be filled just enough that it can be easily squeezed when pinched firmly.

β€” Ladybug Back :

Round 1 :

Row 1: ch2, dc 6 into 2nd st from hook (alternatively dc 6sts into magic ring) (6)

Round 2 :

Row 2: inc x6 (12)

Round 3 :

Row 3: (dc into next st, inc) x6 (18)

Round 4 :

Row 4: dc (18)

Round 5 :

Row 5: (dc into next 2sts, inc) x6 (24)

Round 6 :

Row 6: dc (24)

Info :

F/O leaving a short end. Weave short end through back of bun. DO NOT CUT FLUSH.

β€” Ladybug Tummy :

Round 1 :

Row 1: ch2, dc 6 into 2nd st from hook (alternatively dc 6sts into magic ring) (6)

Round 2 :

Row 2: inc x6 (12)

Round 3 :

Row 3: (dc into next st, inc) x6 (18)

Round 4 :

Row 4: (dc into next 2sts, inc) x6 (24)

β€” Joining Row :

Round 5 :

Row 5: place the 2 halves of the ladybug wrong sides together and sl st to join, ch1, htr into next 23sts (24, ch1 counts as 1st st) sl st to join

Info :

F/O leaving a 15cm end. Secure ends with a couple of small sts. Weave end through body and cut flush to finish.

β€” Ladybug Back :

Round 1 :

Using Ladybird: Row 1: leaving a 15cm end, ch2, sc 6 into 2nd st from hook (alternatively sc 6sts into magic ring) (6)

Round 2 :

Row 2: flip 15cm end to front of work, inc x6 (12)

Round 3 :

Row 3: sc (12)

Info :

F/O leaving a 50cm end.

β€” Attaching Head :

Info :

Using 50cm end from head, thread through tummy section just behind the F/O join. Then working straight up from entry point, come out through the ladybugs back, 3 rows above the htr join row. Catch in opposite edge of head and pull tight to position. Using small mattress sts attach head to body. DO NOT CUT END.

β€” Back Stripe and Spots :

Info :

Using remainder of 50cm end and small running sts, embroider a straight line down the ladybug’s back making sure that you go across the starting circle. Now using a split st (small running sts that catch in each end of previous running st), work back along the back finishing up at head join. Using small embroidery daisy (ch) sts sew 3 spots on each side of back making sure that they are fairly symmetrical. Weave ends through inside of ladybug’s body and cut flush to finish.

β€” Attaching Keychain :

Info :

Thread keychain onto 15cm end. Do 3 small back sts to attach the keychain to top of head. Secure end with a couple of small sts. Weave end through body and cut flush to finish.

Info :

Β© Teri Hamilton (Crochet@Teri's) 2022. This pattern is my original pattern. By purchasing this pattern, you agree to the terms of use: Please do not claim this pattern as your own. You may not sell or distribute the pattern, or any part thereof, without prior permission. It is for personal use only: It is permitted to make items from this pattern to sell for charitable purposes, provided they meet safety guidelines and Crochet at Teri's is accredited.

Assembly Instructions

  • Attach head to body: using the 50cm end from the head, thread through the tummy section just behind the F/O join, come out through the ladybug's back three rows above the htr join, catch in opposite edge of head, pull tight and secure with small mattress stitches.
  • Join the two halves wrong sides together: align halves carefully, sl st to join, ch1, htr into next 23sts (ch1 counts as first stitch) then sl st to join; leave a 15cm end for finishing and securing.
  • Embroider the back stripe: using the remainder of the 50cm end and small running stitches, embroider a straight line down the back crossing the starting circle, then work back with split stitches to finish at the head join.
  • Sew on the spots: using small embroidery daisy (ch) stitches, sew three spots on each side of the back, ensuring they are fairly symmetrical; weave ends through inside the body and cut flush.
  • Attach the keychain: thread the keychain onto the 15cm end, work three small back stitches to attach it to the top of the head, secure with a couple of small stitches and weave the end through the body before cutting flush.

Important Notes

  • πŸ’‘Use a stitch marker to mark the last stitch of each round when working continuous rounds so you always know where the round starts and ends.
  • πŸ’‘Do not overstuff parts; fill each piece just enough so it can be squeezed slightly without stuffing showing through stitches.
  • πŸ’‘Leave the specified yarn tail lengths (15cm and 50cm) before fastening off so you have enough yarn for sewing, attaching the head and embroidering details.
  • πŸ’‘Pin parts together before sewing to confirm placement and symmetry, especially when aligning the two halves and positioning the head.

These ladybug keychains are quick to make and perfect for gifts or market stalls, turning tiny yarn scraps into charming keepsakes. They stitch up fast, embroider easily, and make adorable little presents for friends and family. 🐞🧢

You ask,

we answer.

FAQs

What size will the finished piece be?

The finished keychain measures approximately 3-4 cm in diameter depending on tension and stuffing when using DK yarn and a 3mm hook.

Can I use different yarn weights for this pattern?

Yes, you can use different yarn weights but this will change the final size; use an appropriate hook for your yarn and adjust stuffing and yarn lengths for assembly.

Do I need prior crochet experience for this pattern?

This pattern is beginner friendly and uses basic stitches, but you should be comfortable with working in rounds, increasing and basic embroidery for the spots and stripe.

How long does this project typically take to complete?

Most crocheters can complete one ladybug keychain in about 1-2 hours depending on experience and how much time you spend on embroidery and finishing.

How should I secure the keychain so it doesn't come loose?

Thread the keychain onto the 15cm tail, sew it with three small back stitches and secure with a couple of additional small stitches; weave the tail inside the body before cutting flush to prevent unraveling.