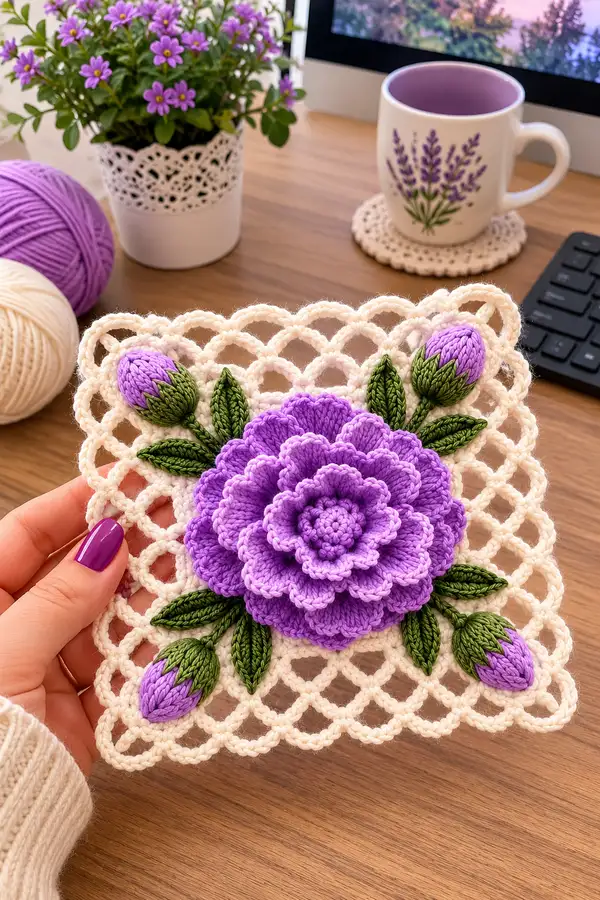
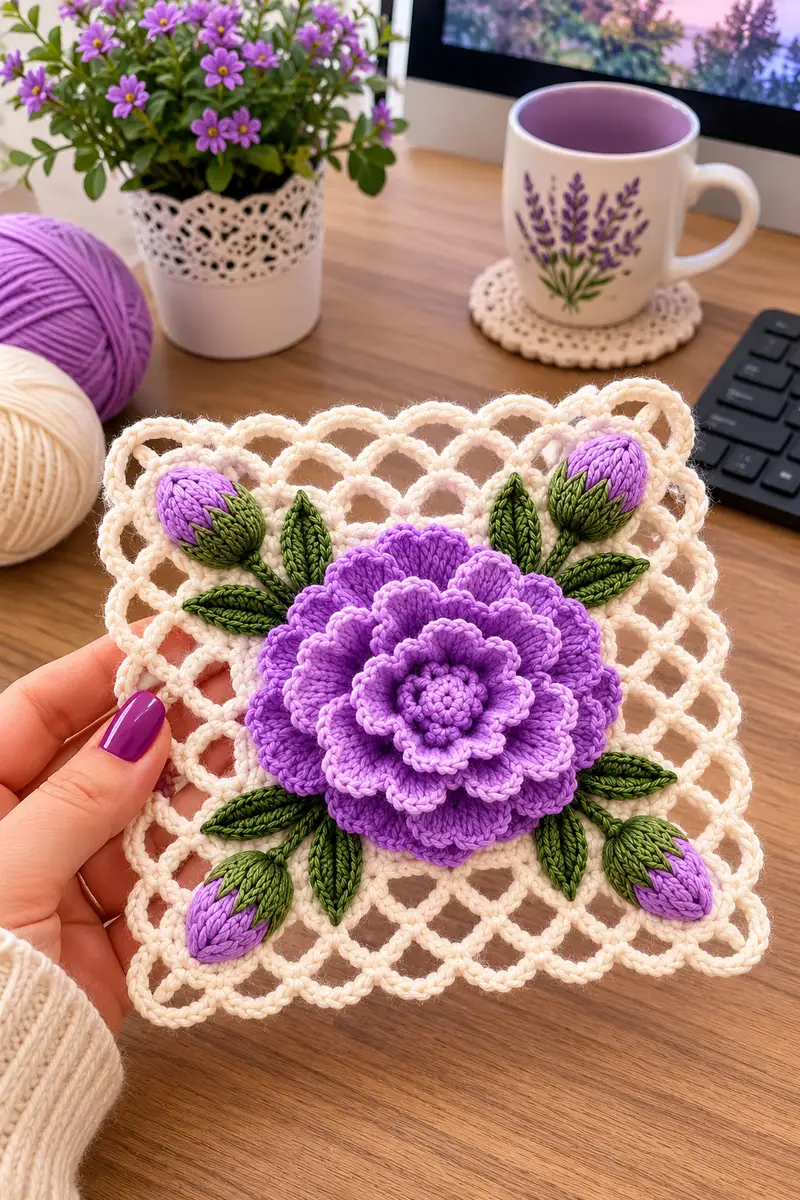
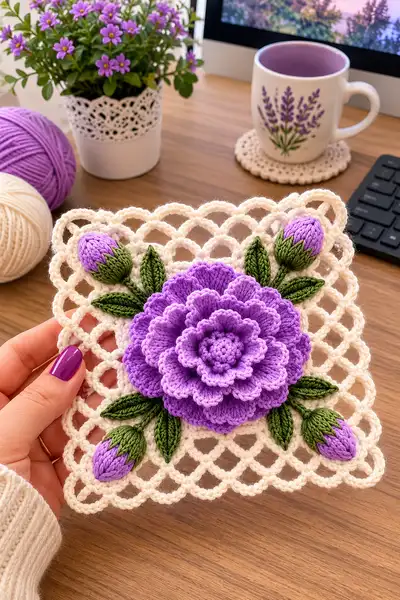
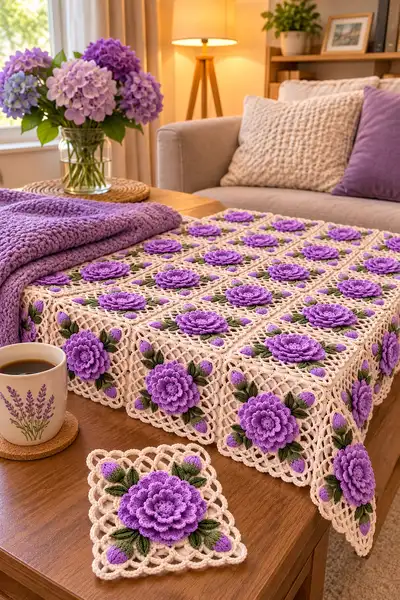
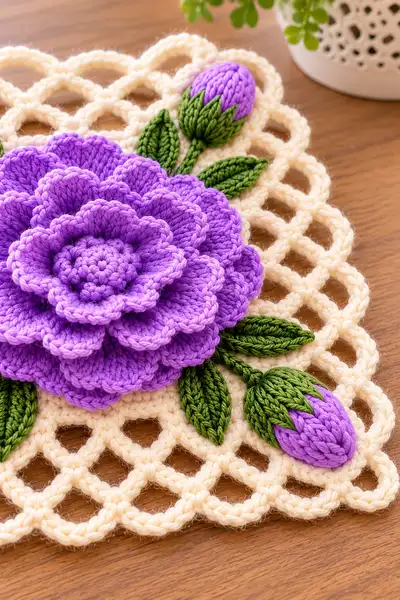
Create a luxurious floral bedspread composed of elegant lattice squares topped with layered 3D lavender flowers and buds. Each square features a raised multi-layer bloom in purple shades, sculpted green leaves and closed buds, all set on a creamy openwork lattice. The pattern explains how to crochet each flower, bud, leaf and the airy square base, then join them into a beautiful bedspread or table covering.
Progress Tracker
0% Complete
— Central Seed / Bud :
Round 1 :
With light purple (accent) yarn, make mr, work 6 sc into ring. Pull tight. (6)
Round 2 :
Inc in each st around (2 sc in each st). (12)
Round 3 :
(1 sc, inc) x 6 (18)
Round 4 :
(2 sc, inc) x 6 (24)
Round 5 :
1 sc in each st (24)
Info :
This small disc is the inner seed/center of the rose-like bloom. Keep tension tight so the center remains compact and slightly raised when petals are attached.
Round 6 :
Working in the back loop only (BLO): 1 sc in each st (24)
Round 7 :
BLO: (3 sc, inc) x 6 (30)
Round 8 :
sl st to next st, fasten off accent color leaving a tail for sewing. Weave the tail under the center and pull slightly to cause a subtle dome; do NOT flatten. (30)
Info :
Do not over-stuff. This center remains unstuffed; its dome is formed by BLO rounds and tension. Secure tail neatly and keep center ready to connect first petal layer.
— Petal Layer 1 (small inner petals) :
Round 1 :
Join main purple color to any st at the edge of the center with sl st. ch1, sc in same st, ch3, sk 1 st, sc in next st, ch3; repeat creating 12 ch-3 loops around (12 loops).
Info :
These loops will form the foundation for short scalloped petals. Keep loops even; mark the first loop with a removable stitch marker.
Round 2 :
In each ch-3 loop work: (3 dc, ch1, 3 dc) to make a small shell. Join with sl st to first dc of first shell. (12 shells)
Round 3 :
Ch2 (counts as hdc), hdc in same st, 2 hdc in center ch-1 space of each shell, ch1 between shells to keep petals defined. (36 total hdc across shells, effectively 3 hdc per shell)
Round 4 :
Working FLO on last round: in each petal top work sc, hdc, sc to give a slight scallop edge. Fasten off and weave in ends. (12 defined petals)
Info :
Maintain slightly tighter tension here so the petals cup up, creating a layered look when other layers are added. Press petals gently with steam if necessary to shape.
— Petal Layer 2 (medium petals) :
Round 1 :
With pale purple (lighter shade), attach in space between two small petals with a sl st. ch1, sc in same sp, ch4, sc in next space; repeat around to create 12 ch-4 loops. (12 loops)
Round 2 :
In each ch-4 loop work (4 dc, ch1, 4 dc) to form larger shells. Join with sl st. (12 shells)
Round 3 :
Ch2, 2 hdc in each shell center space, ch1 between shells; at the end join with sl st. (48 hdc distributed)
Round 4 :
Work 1 sc, 1 hdc, 1 sc in each shell top to produce a fuller rounded petal edge. Fasten off and leave tail for sewing to lower layer if desired. (12 petals)
Info :
Stagger this layer so that each medium petal sits between two inner small petals, giving an overlapping natural bloom effect. Pin layers before sewing to check placement.
— Petal Layer 3 (outer larger petals) :
Round 1 :
Attach main purple color to a st on previous round edge. ch1, sc in same st, *ch5, sc in next petal space; rep from * around to make 12 ch-5 loops. (12 loops)
Round 2 :
In each ch-5 loop make (5 dc, ch1, 5 dc). Join with sl st. (12 shells)
Round 3 :
Ch2, 3 hdc in each shell center, ch1 between shells to keep petals defined. (36 hdc)
Round 4 :
Work the petal edge as follows: sc in next 2 sts, (ch1, sk 1, sc in next) across the top of each shell to create a scalloped crochet picot-like edge; this gives a crisp outer petal rim. Fasten off and weave in ends. (12 outer petals)
Info :
This third layer forms the dominant rounded bloom. Make sure each outer petal overlaps the previous layer slightly for a full, ruffled look.
— Petal Layer 4 (accent ruffle) :
Round 1 :
With the darker purple, join into the top of an outer petal with sl st. ch1, sc across the top of the petal, then ch2 and sc into the neighboring petal top space. Work a tighter shell across the top of each petal: (hdc, 2 dc, hdc) to create a raised ruffle. (12 ruffles)
Round 2 :
BLO: 1 sc in each st around petal bases to tighten and slightly cup the flower, creating the pronounced 3D look. Fasten off. (Stitch count varies by construction, maintain encirclement of the flower base.)
Info :
Use BLO here to pull the petal bases inward. If you prefer a flatter bloom, work regular sc instead of BLO. This round is where much of the 3D shaping is set.
— Flower Assembly and Stabilizing Base :
Info :
Place all petal layers centered over the central seed. Use the tail left on inner layers or a length of matching yarn to sew each layer to the seed disc with small whip stitches at the petal bases. Take care to keep the layers concentric and slightly staggered.
Round 1 :
Once sewn, flip the assembled flower and with cream yarn join to the underside center with sl st and work 6 sc into center to create a small attachment disc to secure flower to lattice base. (6)
Round 2 :
Inc in each st (12). (This little disc will be used to sew the flower onto the square later.)
Info :
Do not leave long tails after sewing; weave tails into the underside of the flower to keep the top neat. The undersized disc provides surface area for secure joining to the lattice square.
— Leaves (Make 6-8) :
Leaf Round 1 :
Using green yarn, ch8. Row 1: sc into 2nd ch from hook, hdc, 2 dc, tr, 2 dc, hdc, sc in last ch. Turn to work down the other side of chain: sc into same st as last, hdc, 2 dc, tr, 2 dc, hdc, sc. Fasten off. (This forms a solid leaf, approximately symmetrical.)
Info :
To achieve the elongated textured leaves in the photo, use FLO on the second round or add a single row of slip-stitch ridges along the center for vein definition.
Leaf Round 2 (optional ridge) :
Join darker green to leaf center base and work fpdc along middle stitch line to create a raised vein. Fasten off and block leaf using light steam if needed.
Info :
Make pairs of leaves in slightly varying lengths (one pair shorter, one pair longer) to achieve the layered look around the bloom as in the image.
— Buds (Make 4, 2 per corner) :
Bud Core Round 1 :
With purple main color, mr, 6 sc into ring. (6)
Round 2 :
Inc around (12).
Round 3 :
(1 sc, inc) x 6 (18)
Info :
This will be a slightly oval closed bud. We will shape the bud by worked-in half-rows and slipped stitches to taper one end.
Round 4 :
Work 6 sc, then ch1, turn work without joining back to create a short tube—work 6 sc back along the row, then fold and join at the base with sl st to form the bud tip. Fasten off leaving a tail for sewing. (18)
Bud Sepal Rounds :
With green yarn, join at bud base and work 6 slip stitches around to anchor. Next round: (sc, ch3, sc) in each anchor to create small triangular sepal flaps; fasten off. Attach a tiny stem: ch6 from sepal base and sl st back to join; fasten off leaving tail for sewing. Stuff bud lightly with tiny polyfill if you want a fuller shape.
Info :
Use tight tension on buds so they keep a closed teardrop appearance. Slightly pinch the tip when sewing to emphasize the bud form.
— Lattice Square Base (cream/ivory) :
Round 1 :
With cream yarn, ch6, join to form ring. ch3 (counts as dc), work 16 dc into ring. Join with sl st to top of ch3. (17 dc)
Round 2 :
Ch4 (counts as dc+ch1), *dc in next st, ch1; rep from * around. Join with sl st to 3rd ch of ch4. (17 dc, 17 ch-1 spaces)
Info :
This establishes a circular grid which will be squared and turned into a lattice. Keep counts exact; each corner later will be formed by groups of loops converted to chain arches.
Round 3 :
In each ch-1 space: (ch6, sl st into next ch-1 space) creating 17 chain arches. Join. (17 arches)
Round 4 :
Working into each ch6 arch: sl st, ch3, dc, tr, dc, ch3, sl st into same arch to create a petal-shaped connector; sl st into next arch and repeat. This increases the overall diameter and gives a motif with 17 'petal' points to shape into a square later. (17 petal arcs)
Round 5 :
Ch1, sc into each stitch around including across arcs to tighten opening (approx stitch count varies — aim for consistent even coverage across arch peaks). Fasten off and block round into a rough square by pinning four sides into approximate corner points.
Info :
Blocking is crucial. Pin the circle into a square, measuring diagonals to keep edges equal. Once blocked to a square, subsequent rounds will build edges that follow your pinned shape.
Round 6 :
After blocking, with cream yarn join at one corner point (where you pinned) and work the border as follows: *ch4, skip 2 sts, sc in next st; rep across the side to form chain-lattice loops. At corner work (ch4, sc) three times to create a rounded corner. Continue for all four sides and join. (This forms the first row of square lattice loops.)
Round 7 :
Work into each ch-4 loop: (sc, ch3, sc) to create larger looped lattice. Join across sides, ensuring even loop spacing. (Number of loops per side approx 6-7 depending on blocking size.)
Info :
The lattice spacing determines the scale of the finished square; keep counts equal on opposite sides. If your loops spread further, add an extra loop on that side to match dimensions.
Round 8 :
Repeat Round 7 to build three tiers of lattice loops. After third tier, join neatly and fasten off. The finished square should measure approximately 13-15cm across for coaster-sized sample; scale larger by using more rounds of lattice loops or thicker yarn.
Info :
For the bedspread in the photo the squares are likely 20-25cm when worked with worsted yarn and a 3.5mm hook; increase loop tiers as needed to achieve your desired size before placing the flower.
— Attaching Flower, Leaves and Buds to Lattice Square :
Info :
Position the assembled flower centrally on the lattice square. Pin into place so that petals sit slightly above the lattice edge. Arrange leaves and buds symmetrically: 3 leaves on the lower edge and 2 buds with leaves on upper diagonal positions as shown in the picture. Adjust for your taste.
Attachment Round 1 :
Using cream yarn and tapestry needle, sew underside attachment disc of flower to lattice by passing needle through lattice junctions and disc rounds with small whip stitches; make 12-16 evenly spaced stitches to anchor securely. Knot and weave in tails.
Attachment Round 2 :
Sew each leaf into place using matching green tails. Use small whip or ladder stitches along leaf midrib and base so leaf tips remain free and sculpted. Sew buds at corner loops so their stems align with leaf placements. Fasten off and weave ends.
Info :
To maintain the floating look of the petals, attach only at underside disc points and leave petal edges unsewn. Sew leaves and buds only at their bases so they can be shaped outward from the square surface.
— Square Border Finishing Rounds :
Round 1 :
With cream yarn join at any corner loop. Work *ch5, sc into next lattice loop; rep across the edge forming airy scallops. At corners work (ch5, sc) three times for a shaped corner. Join and fasten off.
Round 2 :
Join and work into each ch5 scallop: (sl st, ch3, 4 dc, ch3, sl st) to give rounded scallop edges. This creates the scalloped frame seen around the image squares. Fasten off and weave ends. Block square again to shape scallops neatly.
Info :
Blocking after attaching the flower helps the scallops sit evenly and gives the whole square a clean finished look. Use damp blocking and pins shaped to scallop edges if necessary.
— Joining Squares into a Bedspread :
Info :
Squares are joined by sewing or crocheting along their lattice edges. For a visible seam like the image, use whip stitch with cream yarn or slip-stitch join for a firmer edge. Measure and layout squares first.
Joining Method A (Whip Stitch) :
Place two squares right sides up, align edges. Using cream yarn, whip stitch through outer loops of both squares evenly. Use 6-8 stitches per side loop for stability. Continue joining across row and then join rows together. Knot and weave ends securely.
Joining Method B (Crochet Seam) :
With cream yarn and a hook, hold two squares wrong sides together and work sc through both loops around the perimeter, placing sc at each lattice peak to create a small raised seam. For a decorative join, work crab stitch (reverse sc) around joined edges for a subtle corded finish.
Info :
For a bedspread, reinforce joins at intersections (where 4 squares meet) with a few extra securing stitches to prevent gaps and strengthen the blanket structure. Consider using a slightly stronger yarn for joining if the bedspread will be heavily used.
— Large-Scale Assembly and Edge Finish :
Round 1 :
Once all motif squares are joined to your desired width and length, work an outer border around the entire assembled blanket. Join cream yarn at a corner and work 2 rounds of sc across outer loops to give uniform edges.
Round 2 :
Work decorative outer scallop as follows: *ch5, sl st into 3rd chain to make small picot, sc into next stitch; rep around to produce consistent scalloped edge. Block entire bedspread flat and allow to dry thoroughly before use.
Info :
Blocking the full spread is time-consuming but transforms the finished piece, opening lattice holes evenly and flattening joined seams for a professional finish. Use a steam iron held slightly above fibers or wet-block depending on yarn fiber instructions.
— Finishing Touches and Maintenance :
Info :
Trim any remaining tails flush into joins. If you desire extra security for floral attachments, sew a few extra stitches through the underside of flower discs into the lattice. Hand-wash or gentle machine wash depending on yarn fiber; reshape while damp. Store flat when not in use to avoid distortion.
Completing this floral bedspread is a true labor of love — each square is a tiny piece of textile art that comes together into a stunning whole. The layered 3D flowers and airy lattice create depth and elegance perfect for a cozy bedroom or elegant living space. Enjoy the meditative joy of crocheting each motif and the thrill of assembling them into a gift-worthy heirloom. 🧶💜🌿