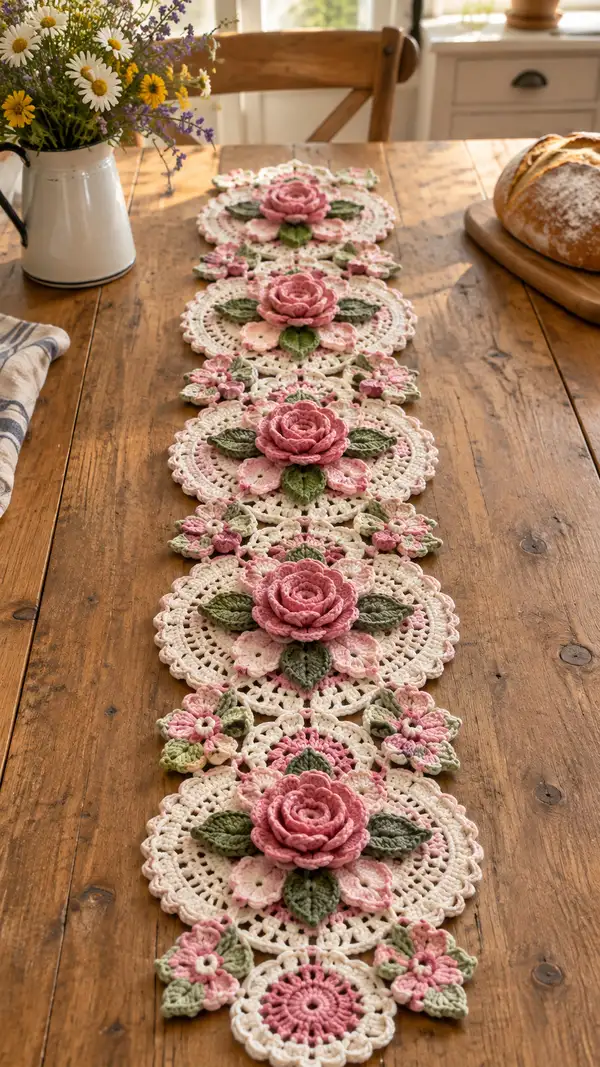
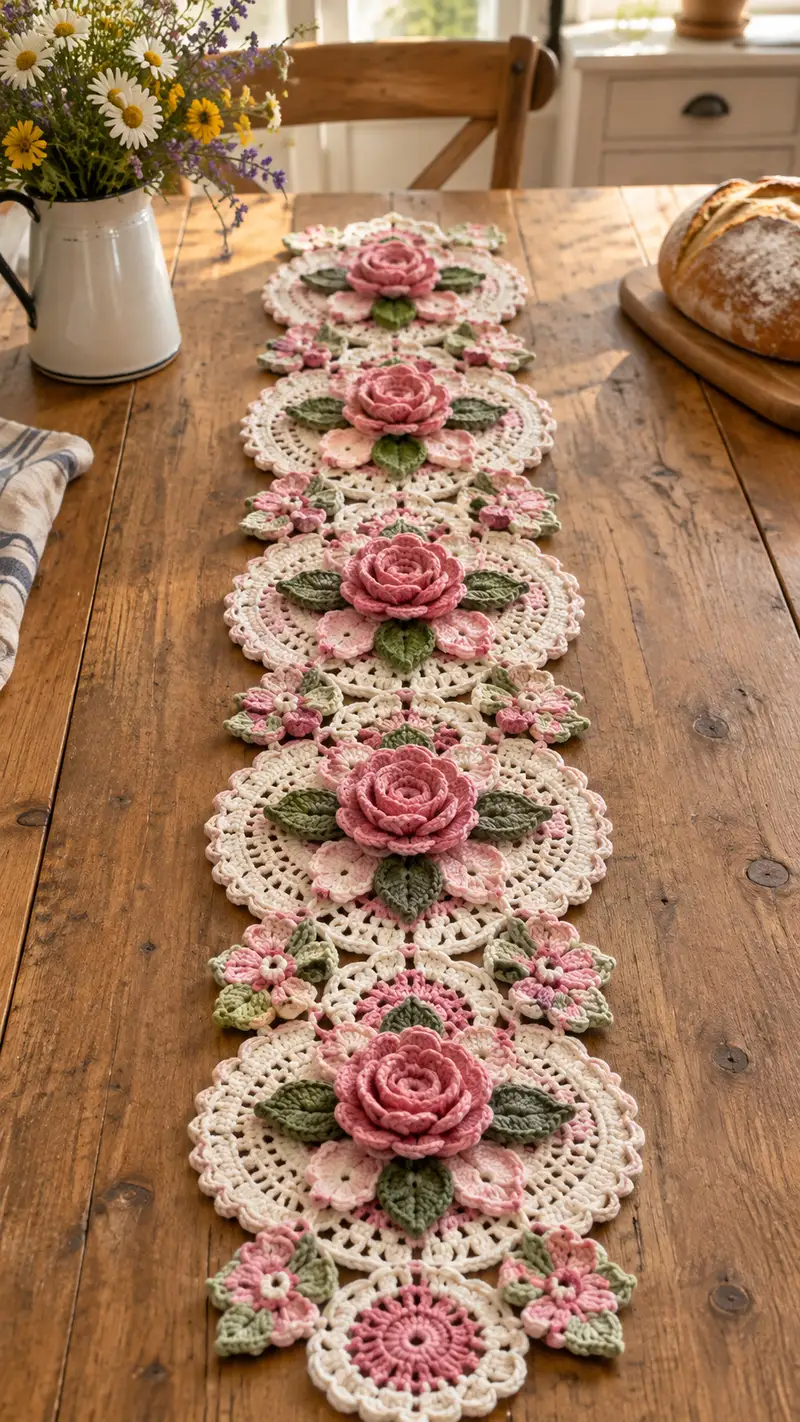
Create a romantic vintage-inspired table runner featuring raised 3D dusty pink roses, layered petals, and sculpted green leaves set on a delicate cream doily background. This pattern guides you through each motif, leaf and connector with clear rounds and assembly instructions. Perfect for special occasions, tea tables, or as a thoughtful handmade gift that becomes a treasured heirloom.
Progress Tracker
0% Complete
— Central Rose (Make 1 per large medallion) :
Round 1 :
6 sc in magic ring (6)
Round 3 :
(1 sc, 1 inc) x 6 (18)
Round 4 :
(2 sc, 1 inc) x 6 (24)
Round 5 :
(3 sc, 1 inc) x 6 (30)
Info :
Keep rounds worked in continuous spiral for a smooth central cup; place a scrap stitch marker into the first stitch if you prefer to mark rounds
Round 6 :
(4 sc, 1 inc) x 6 (36)
Round 7 :
(5 sc, 1 inc) x 6 (42)
Round 8 :
(6 sc, 1 inc) x 6 (48)
Round 9 :
1 sc in each st (48)
Round 10 :
1 sc in each st (48)
Info :
Change to dusty rose yarn now for building the inner layered petals. Fasten securely and weave tail along wrong side if needed
Round 11 :
(7 sc, 1 inc) x 6 (54)
Round 12 :
1 sc in each st (54)
Round 13 :
(2 sc, 1 inc) x 18 (72)
Info :
Rounds 11-13 build a slightly taller central disc; work tightly so petals will cling when added. Keep tension consistent to avoid rippling.
Round 14 :
1 sc in each st (72)
Round 15 :
(2 sc, shell) x 18 = 18 shells and 36 sc where shell = 5 dc in next st; total stitches crocheted this round = (2*18)+(5*18)=36+90=126 (126)
Info :
Shells create the first visible petal row. Count stitches after this round: you will have crocheted 126 stitches in this round; remember shells are multiple stitches worked in a single base stitch.
Round 16 :
Ch1, 1 sc in each stitch around working into each dc and sc from previous round (126)
Round 17 :
(3 sc, 1 inc every 9 sts) x 14 approximately to slightly fan petals (estimate 140) - work even adjustments to keep rose round
Info :
Round 17 is intentionally slightly shaping to widen the petal bed; if your petals appear too crowded, skip the inc repeats and work even sc around instead.
Round 18 :
(1 sc, ch3, sl st in same base) x 42 to create small anchor loops for second petal layer (126 loops formed; total stitches crocheted this round = 126 sc+42ch slip sequences counted as 168 actions)
Round 19 :
Switch to working petal clusters: *ch1, in the next loop work (sc, hdc, 3 dc, hdc, sc)*; rep around into each loop to form full rounded petals (42 petals; total stitches per petal = 1 sc +1 hdc +3 dc +1 hdc +1 sc =7 stitches; total stitched this round = 42*7 =294 (294)
Info :
These are inner petals. Use a tapestry needle to coax petals upward and slightly overlap as you complete each petal so the rose begins to ripple naturally.
Round 20 :
Work 1 sc around each stitch and petal top to secure petals into a continuous round; count = 294 sc (294)
Round 21 :
Form layered outer petals by working into the base row between petals: *(sk 2 sc, in next st work shell of 5 dc, ch1)* rep around; number of shells = approximate 98 shells; total stitches crocheted this round = 5*98 +98 ch1 =490+98 =588 (588)
Info :
Round 21 produces pronounced ruffled outer petals. If you prefer fewer outer petals, work every third or fourth base stitch instead to reduce density.
Round 22 :
1 sc in each stitch around securing outer petals (approx 588 sc)
Round 23 :
Optional: Work decorative picot edging around petals: *(1 sc, ch3, sl st into top of same sc)* rep around petal tops for a lacy finish. Count will vary; work evenly.
Info :
Fasten off and weave ends. Lightly block petals if necessary, shaping them outward to mimic a rose bloom. Use a small amount of spray starch if you want crisper petals for display.
— Rose Petal Layer / Secondary Petals (Make 1 per rose) :
Round 1 :
Using dusty rose (or pale blush for accent) ch 6, join to form a ring, 12 dc into ring (12)
Round 2 :
1 sc in each around (12)
Round 3 :
(1 sc, inc) x 6 (18)
Round 4 :
1 sc in each st (18)
Info :
This small petal disc will be attached around the rose base to soften the transition to the doily; stitch counts must match attachment points on the doily base.
Round 5 :
(2 sc, inc) x 6 (24)
Round 6 :
1 sc around (24)
Round 7 :
(3 sc, shell) x 6 where shell = 5 dc in next st; total stitches crocheted = (3*6)+(5*6)=18+30=48 (48)
Round 8 :
1 sc around (48)
Round 9 :
Optional decorative round: *(sc, ch2, skip 1)* around to create small scallops (approx 32 scallops depending on tension)
Info :
Fasten off leaving long tail for sewing to the underside of the central rose base. This layer should sit slightly beneath the first petal rows to create fullness.
— Doily Circle Base (Make 1 per large medallion) :
Round 1 :
ch 4, join to ring, work 12 dc into ring (12)
Round 2 :
1 dc in same st, 2 dc in each st around (24)
Round 3 :
(1 dc, 1 inc) x 12 (36)
Round 4 :
(2 dc, 1 inc) x 12 (48)
Round 5 :
(3 dc, 1 inc) x 12 (60)
Info :
Use cream yarn for the doily base. This creates a sturdy round foundation that will be embellished with lace rounds and openings for leaves and small flowers.
Round 6 :
1 dc in each st (60)
Round 7 :
*(dc in next 4 sts, ch3, skip 3)* rep around to create 12 ch3 spaces for attaching decorative elements; stitch count crocheted = 60 dc + 12 ch1 sequences = 72 actions
Round 8 :
Work into ch3 spaces: *(sc, hdc, 3 dc, hdc, sc) in each ch3 space* making 12 fan petals around the inner circle; total stitches crocheted = (1+1+3+1+1)*12 =7*12 =84 (84)
Round 9 :
1 sc around entire round into each stitch and top of fans: total = 84 sc (84)
Round 10 :
*(3 dc, ch2, 3 dc) in next space to form a raised cluster then ch3, sk 3* rep around to create lacy arches; count will vary; aim for 12 arches
Info :
These early lace rounds create the openwork pattern that contrasts with the lush roses. Keep tension even so the medallion lies flat when blocked.
Round 11 :
Work 1 sc in each stitch and in each ch space to tidy the base (approx 120 sc depending on your arch counts)
Round 12 :
*(ch5, skip 3, sc) around to create decorative outer loops; tailor ch length to match arch widths (approx 24 loops)
Round 13 :
Into each loop work a shell: (5 dc, ch2, 5 dc) to form scallops; total shells = 24 shells; stitches crocheted = (5+5)*24 +24 ch2 =240+48 =288 stitches/actions
Round 14 :
1 sc around to secure scallops (approx 288 sc)
Round 15 :
Optional: Work picot edge or *(sc, ch3, sl st)* edging to finish the doily rim; count will vary based on chosen edge
Info :
Block the doily to a consistent diameter before assembly. Use pins and a spray bottle to lightly dampen, then pin to shape and allow to dry. Each doily should measure roughly 16-18 cm across unstretched depending on yarn tension.
— Leaf (Make 6 per large medallion or adjust as desired) :
Round 1 :
Using sage green ch 8, 1 sc in 2nd ch from hook, hdc, 3 dc, hdc, 1 sc, ch 1, turn other side of chain and mirror stitches back along chain (create symmetrical leaf) — total stitches worked around = count depending on chosen chain length (approx 14-16)
Round 2 :
Work 1 sc around entire leaf edge to neaten; stitch count ~16 sc
Round 3 :
In BLO work: *ch2, 1 hdc in next st, sl st* around the center line to create a ridge; count = ~8 ridges actions
Info :
Leaves can be shaped using a damp block and pinning. Work a central row of slip stitches or hdc in BLO to create a visible midrib that will allow the leaf to curl slightly upward.
Round 4 :
Optional: add small picot edging: *(sc, ch3, sl st into same)* around if you prefer a frilled leaf edge; keep counts even
Round 5 :
Fasten off leaving long tail for sewing. Make 6 leaves for each medallion for layered placement under the rose.
Info :
Alternate leaf shapes: ch 10 base for larger leaves; ch 6 for small accent leaves. Make a variety so arrangement reads natural when placed under petals.
— Small Flower Motif (Connector Flower - Make 2 between medallions) :
Round 1 :
ch 6, join to ring, 12 dc into ring (12)
Round 2 :
1 sc in each st (12)
Round 3 :
*(ch3, sl st in next st) around to create 6 loops for petals (12 loops created)
Round 4 :
Into each loop: (sl st, ch1, 5 dc, ch1, sl st) creating 6 small petals; stitches per petal = 5 dc +2 slst/ch actions =5; total crocheted this round = 30 dc plus joins
Round 5 :
1 sc around to secure petals (approx 30 sc)
Info :
These small flowers act as decorative connectors between main medallions. Use a contrasting pale blush to add color interest.
Round 6 :
Make small leaflets attached directly in gaps by working 3 sc, ch2, 3 sc into side spaces to form tiny trefoil accents (count variable)
Round 7 :
Fasten off leaving tail to sew to medallion join points. Each connector flower anchors two medallions together and fills the gap so the runner reads as a continuous design.
— Small Centered Round Medallion (Joiner Disc - optional small medallions along runner ends/edges) :
Round 1 :
ch 6, join, 12 dc in ring (12)
Round 2 :
1 sc in each st (12)
Round 3 :
(1 sc, inc) x 6 (18)
Round 4 :
1 sc around (18)
Round 5 :
Work decorative shell into every 3rd stitch: (shell 5 dc) x 6 producing 6 scallops; total stitches crocheted this round = 5*6 =30 plus joins
Info :
Fasten off leaving tail for sewing. These small medallions act as transitional pieces between the large doilies and the floral connectors to create a flowing runner.
— Joining Motifs & Assembly Prep :
Info :
Before joining, block every piece to consistent sizes. Arrange medallions on a flat surface in the desired order. For the pictured runner the sequence is: small semicircle cluster at the end, large medallion + connector + large medallion + connector … culminating in symmetrical end pieces. Leave spacing approximately 2-3 cm between medallions before joining to allow for a little overlap when sewing on leaves and petals.
Round 1 :
Sew the secondary petal layer to the underside of the central rose using a whip stitch with the long tail; space stitches evenly across the inner base so petal layer sits flush against the rose base (sewing actions - count not required)
Round 2 :
Position the rose assembly in the center of the doily base; pin through the underside of the doily and then through the rose base at 6 equidistant points. Using mattress or whip stitch, sew rose to doily pulling slightly to shape and keep it centered (assembly actions)
Info :
Sew leaves under and around the rose center: place three leaves pointing outward at 120 degree intervals and stagger the remaining leaves between them to create a full under-leaf display. Use the long tails to secure with hidden stitches to the underside of the rose base and to the doily base for stability.
Round 3 :
Sew small flower connectors into the outer ch3 spaces on the doily or between medallions to create a continuous runner chain. Use color contrast tails to pick out small blossoms or center french knots with a contrasting thread if desired.
Info :
For a stable runner, overlap adjacent doilies by about 1-2 cm and sew through both layers in multiple passes; this avoids lifting when laid on a table surface. Reinforce the central join area under the rose where repeated wear could stress seams.
— Edging & Final Border (Work across assembled runner) :
Round 1 :
With cream yarn join at one end seam, work 1 sc evenly around the perimeter of the entire assembled runner to provide a neat working edge; stitch count will equal sum of perimeter stitches (variable)
Round 2 :
*(sc in next 3 sts, ch3, sc in next 3 sts, shell in next st)* rep along edges where shells fall into spaces created between medallions to create a consistent scalloped look; count varies by runner length
Round 3 :
Work a lacy scallop finish along entire border: *(ch5, sl st 2 sc back, sl st in next)* rep to end creating even scallops. Adjust ch length for scale.
Info :
Edge should be visually balanced; if scallops sink inward over gaps, add an extra picot or ch extension to open them back up. Block finished runner again after edging to set shape.
Round 4 :
Optional decorative row: work a tiny raised bead row between scallops using puff stitches: *in space work (yo, insert, pull up loop) 4 times, yo and draw through 8 loops, ch1 to close*; this will create small raised beads along the border.
Info :
Fasten off and securely weave in all ends on the wrong side. Trim any tails flush after weaving through several stitches to secure. If you used different hooks for petals, ensure the border rounds use the same tension as the main doilies to prevent edge mismatch.
— Final Finishing & Pressing :
Info :
Once assembled, block the entire runner gently: dampen with a spray bottle, pin to the desired shape on a blocking board, paying special attention to petals, leaves and scallops. Allow to dry completely. Optionally use very light spray starch only on petals to keep them shaped upright for display.
Info :
If the runner will be used on a dining surface, consider cutting a slim non-slip felt strip to sew underneath central medallions to prevent sliding. For a long-term heirloom, store flat between sheets of acid free tissue paper to protect the petals.
Completing this Dusty Pink Rose and Cream Table Runner is a joyful mix of lacework and sculpted floral elements. Each medallion you crochet becomes a little garden bloom that, when joined, reads like a continuous floral path down your table. The finished runner brings a soft, romantic atmosphere to dining and display areas — perfect for brunches, holidays, or simply brightening everyday meals. I hope you enjoy making it as much as you enjoy seeing it on your table! 🧶🌸