🧢 Beautiful ✨ Detailed πŸ’ Adorable

Leaf Garland Pattern

Leaf Garland Pattern
4.1β˜… Rating
2-3 Hours Time Needed
1.4K Made This
βœ‚οΈ

Beginner Friendly Level

Perfect for those just starting their crochet journey, with clear instructions and simple techniques

⏱️

Bite-Sized Project

Finishes in 2-4 hoursβ€”perfect for an afternoon of creative relaxation.

🏑

Cozy Accent

A warm touch for your space that transforms ordinary corners into inviting nooks filled with handmade charm.

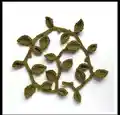
About This Leaf Garland Pattern

This pattern produces a leafy vine garland made from repeating motifs: small leaves, large leaves and little nodules. You can make long or short lengths to suit seasons, use different yarns for different effects, and adapt spacing for napkin rings or necklaces. The pattern includes variants for UK and US terminology and simple finishing options.

Leaf Garland Pattern crochet pattern - detailed view of completed project

Worked right-side facing throughout, the garland is created from chain foundation and back-loop-only stitches for organic texture. Choose non-stretchy yarns like cotton, linen or hemp for hanging uses.

Why You'll Love This Leaf Garland Pattern

I absolutely love this pattern because it is endlessly adaptable and quick to stitch up. I find the small repeating motif relaxing to make and it works beautifully in different yarns and weights. The pattern lets me experiment with spacing and finish β€” sometimes I make a delicate necklace, other times a chunky winter scarf. It always looks charming on a mantel, wrapped around jars, or used as gift trimming.

Leaf Garland Pattern step 1 - construction progress Leaf Garland Pattern step 2 - assembly progress Leaf Garland Pattern step 3 - details and accessories Leaf Garland Pattern step 4 - final assembly and finishing

Switch Things Up

I love altering this pattern to make different looks; change the yarn and hook size for dramatic differences in scale and texture.

You can make a delicate necklace by using a finer cotton thread and a smaller hook, or a chunky, rustic vine using a bulky wool or aran weight yarn.

I often change the spacing between leaves by working longer or shorter chains between repeats to create a looser or denser vine.

Try metallic or glitter yarn for holiday garlands to add sparkle and shine to your mantelpiece.

I sometimes crochet extra tiny leaves and sew them on as overlays for a fuller, layered effect.

You can add beads or tiny bells between repeats for a decorative or musical element when the garland moves.

For napkin rings or jewellery, shorten the vine and trim ends carefully, then use a small snap or button closure for reusability.

If you want a sturdier hanging piece, work slip stitches back along the length to thicken the vine and then add more leaves as you go.

I also embroider small veins on the leaves with a contrasting color for extra detail and interest.

Swap the leaf shapes by altering stitch counts in the leaf sides β€” more stitches will make broader leaves, fewer stitches will make narrow leaves.

Don’t be afraid to combine yarns in a single garland β€” a contrast border or mixed-fiber vine can be very attractive.

I recommend testing a short sample before committing to a long garland to ensure you like the scale and spacing.

Common Mistakes & How to Fix Them

βœ— Skipping the back loop only (BLO) instruction will flatten the leaves and lose the textured ridge; always work the BLO where instructed to form the leaf shape. βœ— Turning your work when the pattern asks you to rotate will flip the right-side facing and result in incorrect leaf shaping; rotate your work but keep the right-side facing at all times. βœ— Not counting the initial chains between motifs can make the spacing inconsistent; count your chains each repeat and make longer or shorter chains intentionally to control spacing. βœ— Fastening off too early when you plan to work back along the vine prevents making a thicker vine; either keep working or cut and weave in ends only when you are sure you will not add slip-stitching back along the chain.

Leaf Garland Pattern

Make a delicate, organic leaf garland using a simple repeating crochet motif. This pattern gives step-by-step instructions for small and large leaves, nodules, and finishing options so you can create garlands, napkin rings, necklaces or home decor. Use thicker yarn for a chunky vine or fine cotton for a delicate, wearable piece.

Beginner Friendly 2-3 Hours

Materials Needed for Leaf Garland Pattern

β€” Main Fabric

  • 01
    Organic cotton light worsted weight (DK, Category 3) yarn (used in sample photos) - amount as required for desired garland length
  • 02
    Alternative: cotton, linen or hemp non-stretchy yarns for long garlands or hanging projects
  • 03
    Optional: metallic yarn for festive garlands or household string for rustic effect

β€” Tools Required

  • 01
    Crochet hook size 3.5mm (US E-4)
  • 02
    Scissors
  • 03
    Yarn needle for weaving in ends

Progress Tracker

0% Complete

β€” The pattern :

Start :

* Make 9ch.

Make a Small Leaf (UK version) :

6ch, sl st in the back loop only (BLO) of the second ch from the hook and the next 4 ch – 5 sl st. Rotate your work (do not turn over, keep the right-side facing) and now work in the unworked loops of the 5 ch you just worked into: 1dc, 3htr, 1dc (first side of leaf formed). 2ch, sl st into the BLO of the second chain from hook (point of leaf formed). Now working into the BLO of the slip stitches, work: 1dc, 3htr, 1 sl st (second side of leaf formed). Sl st again where the base of the leaf meets the long chain.

Make a Small Leaf (US version) :

6ch, sl st in the back loop only (BLO) of the second ch from the hook and the next 4 ch – 5 sl st. Rotate your work (do not turn over, keep the right-side facing) and now work in the unworked loops of the 5 ch you just worked into: 1sc, 3hdc, 1sc (first side of leaf formed). 2ch, sl st into the BLO of the second chain from hook (point of leaf formed). Now working into the BLO of the slip stitches, work: 1sc, 3hdc, 1 sl st (second side of leaf formed). Sl st again where the base of the leaf meets the long chain.

Make a Nodule :

Make 3ch. Make a Nodule as follows: 2ch, sl st in BLO of second chain from hook.

Repeat Pattern :

Repeat this whole pattern from * to ** (beginning with the 9ch) until the garland is the length you require.

Make a Large Leaf (UK version) :

Make 14ch. Make a Large Leaf as follows: 8ch, sl st in BLO of second ch from hook and next 6 ch – 7 sl st. Working in unworked loops: 1dc, 1htr, 2tr, 2htr, 1dc. 2ch, sl st in BLO of second chain from hook. Working into BLO of slip stitches: 1dc, 2htr, 2tr, 1dc, 1 sl st. Sl st again where base of leaf meets chain.

Make a Large Leaf (US version) :

Make 14ch. Make a Large Leaf as follows: 8ch, sl st in BLO of second ch from hook and next 6 ch – 7 sl st. Working in unworked loops: 1sc, 1hdc, 2dc, 2hdc, 1sc. 2ch, sl st in BLO of second chain from hook. Working into BLO of slip stitches: 1sc, 2hdc, 2dc, 1sc, 1 sl st. Sl st again where base of leaf meets chain.

Spacing and Finish :

Instead of repeating the pattern identically, you can vary the spacing of the leaves by working longer/shorter chains between them, according to the effect you want to achieve. Make 10ch to finish the vine.

Example Length Info :

In my example, I have worked 5 identical repeats + 10ch, and my garland is about 65cm long. (US version note: In my example, I have worked 5 identical repeats + 10ch, and my garland is about 25 inches long.)

Option - Work Back Along Vine :

Now you can choose EITHER to fasten off at this point OR to start working back along the length of the vine as given below. Working slip stitches back along the length of the chain creates a thicker vine, and you can work more leaves and nodules (or none) as you wish.

Work Back - Begin :

Make 5ch. In the BLO of the chain, starting in the second ch from hook, work as follows: 12 sl st.

Work Back - Make a Small Leaf (sl st counts) :

Make a Small Leaf. Continuing in the next chain of the main vine, 12 sl st.

Work Back - Make a Large Leaf (sl st counts) :

Make a Large Leaf. Continuing in the next chain of the main vine, 10 sl st.

Work Back - Make a Nodule (sl st counts) :

Make a Nodule. Continuing in the next chain of the main vine, 4 sl st.

Repeat Back Option :

As before, you can now choose whether to work identical repeats of the pattern from the start marker to the end marker, or to improvise with different leaf spacing on the way back along the chain. In the example the designer worked 5 identical repeats on the way back along the chain.

Finish :

Now continue slip-stitching to the end of your vine as necessary. Cut your yarn, fasten off and weave in the ends. All done!

Infos :

The whole piece is worked with right-side facing throughout. Unless otherwise stated, work through both loops of any given stitch. Note that if you are making a long garland, or something you are going to hang something else from, it is best to choose a non-stretchy yarn - cotton, linen, hemp, etc are perfect.

Assembly Instructions

  • Decide whether to fasten off after working the vine or to work slip stitches back along the chain to create a thicker vine; if you want a chunkier vine skip fastening off and follow the 'Work Back' instructions.
  • If working back, use the BLO of the chain and work the specified slip stitch counts and then make leaves and nodules in the next chains as listed (12 sl st for small leaf area, 10 sl st for large leaf area, 4 sl st for nodules).
  • Weave in all ends neatly with a yarn needle after cutting your yarn; hide ends on the wrong side of the vine wherever possible to keep the front tidy.
  • Block or gently shape leaves by pinning and steam blocking (if yarn allows) to flatten and shape leaves, particularly if using cotton or linen.
  • Vary the chain length between repeats to adjust leaf spacing before attaching any additional decorations or hanging hardware.
  • Trim any long tails and secure with invisible knots on the wrong side to prevent slippage when the garland is handled or hung.

Important Notes

  • πŸ’‘Choose a non-stretchy yarn (cotton, linen or hemp) for garlands that will be hung or take weight to avoid stretching over time.
  • πŸ’‘Work through both loops unless instructed BLO; the BLO creates the ridged leaf shape and is critical to the pattern's look.
  • πŸ’‘Keep the right-side facing throughout and 'rotate' rather than 'turn' your work when the instructions say to rotate for consistent leaf shaping.
  • πŸ’‘Weave in ends as you go where possible to keep the vine tidy and reduce finishing time at the end of the project.

This Leaf Garland Pattern is a versatile, quick project that can decorate your home, table settings, or gifts with handmade charm. πŸƒ Make it in cotton for a crisp, natural look or try metallic yarn for festive sparkle. 🎁 Have fun exploring yarns and spacing to create a garland that is uniquely yours!

You ask,

we answer.

FAQs

What size will the finished piece be?

The finished length depends on how many repeats you make; the designer example used 5 repeats + 10 ch and measured about 65 cm (approximately 25 inches).

Can I use different yarn weights for this pattern?

Yes, you can use different yarn weights; heavier yarn with a larger hook will make a chunkier garland while finer yarn makes a daintier piece. Adjust chain lengths and spacing to suit the yarn.

Do I need prior crochet experience for this pattern?

No advanced skills are required; basic stitches (chain, slip stitch, single/half double/double depending on UK/US terminology) are used, so this is suitable for confident beginners.

How long does this project typically take to complete?

Most crafters complete a short garland in 2-3 hours, though longer garlands or versions with added slip-stitch backing may take longer depending on length and details.