🧢 Beautiful ✨ Detailed πŸ’ Adorable

Leaf Garland Pattern

Leaf Garland Pattern
4.3β˜… Rating
2-4 Hours Time Needed
3.4K Made This
βœ‚οΈ

Beginner Friendly Level

Perfect for those just starting their crochet journey, with clear instructions and simple techniques

⏱️

Bite-Sized Project

Finishes in 2-4 hoursβ€”perfect for an afternoon of creative relaxation.

🏑

Cozy Accent

A warm touch for your space that transforms ordinary corners into inviting nooks filled with handmade charm.

About This Leaf Garland Pattern

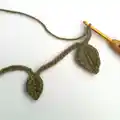
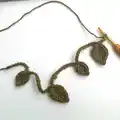
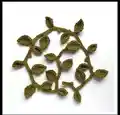
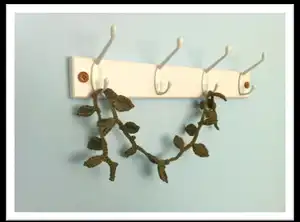
This pattern creates a lovely decorative leaf garland made from a repeating small leaf, large leaf and nodules. Its flexible and playful β€” you can alter yarn, spacing and length to make napkin rings, scarves, necklaces or long hanging garlands. The pattern uses simple chains, slip stitches and worked-in-loop stitches for a delicate, organic finish.

Leaf Garland Pattern crochet pattern - detailed view of completed project

Work in either UK or US terminology as shown in the notes, and choose a non-stretchy yarn for long hanging pieces. The design is quick to learn and easy to repeat to any length you require.

Why You'll Love This Leaf Garland Pattern

I absolutely love this pattern because it turns a very small set of stitches into something unexpectedly elegant and versatile. I find the repeat structure relaxing and satisfying, and it is easy to adapt for different yarn weights and projects. The leaves form quickly and look lovely in clusters, and I enjoy experimenting with spacing to change the overall rhythm of the garland. This pattern always gives me a lovely handmade accent I can gift or style in my home.

Leaf Garland Pattern step 1 - construction progress Leaf Garland Pattern step 2 - assembly progress Leaf Garland Pattern step 3 - details and accessories Leaf Garland Pattern step 4 - final assembly and finishing

Switch Things Up

I love how easy it is to customise this garland β€” change yarn weight and hook size to make minis for keyrings or big chunky vines for home styling.

I often swap the DK cotton for metallic yarn at Christmastime to add sparkle and a festive mood to my decorations.

If youd like a necklace-style garland, try fine cobweb yarn with a smaller hook for delicate leaves that sit softly around the neckline.

For a cosy winter look, use bulky wool and a larger hook; the leaves become chunky and sculptural and the vine is wonderfully tactile.

You can vary the spacing between leaves by working longer or shorter chains β€” closer spacing gives a lush look, while long chains give a minimalist vine.

I sometimes add tiny embroidered veins with contrast yarn on each leaf to increase the detail and personalise the design.

Want a two-tone effect? Work the vine in one colour and change colour just for the leaves to make them pop against the background.

Try making all small leaves, or alternate small and large leaves for a rhythmic, natural feel β€” it changes the vibe completely.

If you want the vine to hold a shape, slip a thin wire inside the chain before closing or after finishing to make it posable.

I also enjoy making matching napkin rings or a table runner edging using the same motif; it creates a coordinated handmade set thats perfect to gift.

Common Mistakes & How to Fix Them

βœ— Not working into the back loop only when instructed leads to a flat or misshapen leaf; be sure to place your slip stitches and chains into the BLO as directed to form the leaf shape. βœ— Forgetting to rotate and keep the right-side facing when forming the leaf will reverse the stitch placement; rotate your work exactly as stated so the unworked loops form the first side correctly. βœ— Skipping the slip stitch where the base of the leaf meets the chain can leave a gap; always sl st again at the base of the leaf to secure it neatly to the vine. βœ— Using a stretchy yarn for a long hanging garland can make it sag and distort over time; choose non-stretchy fibres such as cotton, linen or hemp for long garlands. βœ— Not counting chains between leaves leads to uneven spacing along the vine; decide on your spacing plan and count chains consistently or measure sections as you go.

Leaf Garland Pattern

Create a charming leafy crochet garland that can be used as home decor, table edging, napkin rings or a delicate necklace. This versatile pattern uses a simple repeating motif so you can make short or very long lengths to suit your project. Youll enjoy the organic look of the leaves and the freedom to vary spacing, yarn and colour to suit the season or mood.

Beginner Friendly 2-4 Hours

Materials Needed for Leaf Garland Pattern

β€” Main Fabric

  • 01
    Organic cotton double-knitting (DK, Category 3, light worsted weight) yarn (sample used in photos)
  • 02
    Non-stretchy yarn options for long garlands: cotton, linen, hemp (amount depends on garland length)
  • 03
    Thick woolen yarn (optional if you want a chunky, scarf-like vine)
  • 04
    Fine cotton or cobweb yarn (optional for necklace-style garlands)
  • 05
    Metallic yarn (optional for festive/Christmas garlands)

β€” Tools Required

  • 01
    Crochet hook 3.5mm (US E-4)
  • 02
    Scissors
  • 03
    Yarn needle for weaving in ends
  • 04
    Stitch markers (optional, helpful for long repeats)
  • 05
    Pins for blocking or positioning (optional)
  • 06
    Tape measure or ruler to check finished length (optional)

Progress Tracker

0% Complete

β€” The pattern :

Info :

* Make 9ch.

Make a Small Leaf (UK terms) :

6ch, sl st in the back loop only (BLO) of the second ch from the hook and the next 4 ch –5 sl st. Rotate your work (do not turn over, keep the right-side facing) and now work in the unworked loops of the 5 ch you just worked into: 1dc, 3htr, 1dc (first side of leaf formed). 2ch, sl st into the BLO of the second chain from hook (point of leaf formed). Now working into the BLO of the slip stitches, work: 1dc, 3htr, 1 sl st (second side of leaf formed). Sl st again where the base of the leaf meets the long chain.

Make a Small Leaf (US terms) :

6ch, sl st in the back loop only (BLO) of the second ch from the hook and the next 4 ch –5 sl st. Rotate your work (do not turn over, keep the right-side facing) and now work in the unworked loops of the 5 ch you just worked into: 1sc, 3hdc, 1sc (first side of leaf formed). 2ch, sl st into the BLO of the second chain from hook (point of leaf formed). Now working into the BLO of the slip stitches, work: 1sc, 3hdc, 1 sl st (second side of leaf formed). Sl st again where the base of the leaf meets the long chain.

Info :

Make 3ch.

Make a Nodule :

2ch, sl st in BLO of second chain from hook. **

Info :

Repeat this whole pattern from * to ** (beginning with the 9ch) until the garland is the length you require.

Make a Large Leaf (UK terms) :

Make 14ch. Make a Large Leaf as follows: 8ch, sl st in BLO of second ch from hook and next 6 ch –7 sl st. Working in unworked loops: 1dc, 1htr, 2tr, 2htr, 1dc. 2ch, sl st in BLO of second chain from hook. Working into BLO of slip stitches: 1dc, 2htr, 2tr, 1dc, 1 sl st. Sl st again where base of leaf meets chain.

Make a Large Leaf (US terms) :

Make 14ch. Make a Large Leaf as follows: 8ch, sl st in BLO of second ch from hook and next 6 ch –7 sl st. Working in unworked loops: 1sc, 1hdc, 2dc, 2hdc, 1sc. 2ch, sl st in BLO of second chain from hook. Working into BLO of slip stitches: 1sc, 2hdc, 2dc, 1sc, 1 sl st. Sl st again where base of leaf meets chain.

Info :

Instead of repeating the pattern identically, however, you can vary the spacing of the leaves by working longer/shorter chains between them, according to the effect you want to achieve. Make 10ch to finish the vine.

Info :

In my example, I have worked 5 identical repeats + 10ch, and my garland is about 65cm long.

Info :

Now you can choose EITHER to fasten off at this point OR to start working back along the length of the vine as given below. Working slip stitches back along the length of the chain creates a thicker vine, and you can work more leaves and nodules (or none) as you wish.

Info :

Make 5ch.

In the BLO of the chain :

Starting in the second ch from hook, work as follows: 12 sl st.

Make a Small Leaf (on return) :

Continuing in the next chain of the main vine, 12 sl st.

Make a Large Leaf (on return) :

Continuing in the next chain of the main vine, 10 sl st.

Make a Nodule (on return) :

Continuing in the next chain of the main vine, 4 sl st.

Info :

As before, you can now choose whether to work identical repeats of the pattern from β—† to β—†β—†, or to improvise with different leaf spacing.

Info :

In my example I have worked 5 identical repeats on the way back along the chain.

Info :

Now continue slip-stitching to the end of your vine as necessary. Cut your yarn, fasten off and weave in the ends.

Info :

All done!

Assembly Instructions

  • Repeat the motif from the initial * (9ch) to ** (nodule) until the garland reaches your desired length, then finish with 10ch to complete the vine.
  • To create a thicker vine, work slip stitches back along the length of the chain in the BLO; this also allows you to add additional leaves and nodules on the return pass.
  • When placing leaves, sl st again where the base of the leaf meets the long chain to secure each leaf firmly and neatly without gaps.
  • After completing the vine, cut your yarn, fasten off securely and weave in all ends with a yarn needle to tidy the work and prevent unravelling.

Important Notes

  • πŸ’‘Use a non-stretchy yarn such as cotton, linen or hemp if youre making a long hanging garland to avoid sagging over time.
  • πŸ’‘Work through the back loop only (BLO) for the specified chains and slip stitches to create the defined leaf edges.
  • πŸ’‘Keep the right-side facing throughout and rotate your work as instructed when forming each leaf for consistent shaping.
  • πŸ’‘Tension and size are not critical β€” select the hook that gives you the look you want with the yarn youre using.

This pretty Leaf Garland pattern is flexible, quick and endlessly adaptable β€” make napkin rings, a necklace, a table edging or a long hanging vine. Choose cotton for a crisp finish, or try metallic yarn for a festive sparkle. Have fun experimenting with colour, spacing and yarn weight to make it truly yours. 🧢🌿

You ask,

we answer.

FAQs

What size will the finished piece be?

The finished garland length depends on how many repeats you make; the example in the pattern uses 5 repeats plus 10 chains and measures about 65 cm (about 25 inches).

Can I use different yarn weights for this pattern?

Yes, you can use different yarn weights β€” bulky yarn will give a chunkier, larger leaf and vine, while fine or cobweb yarn will produce a daintier garland; adjust hook size accordingly.

Do I need prior crochet experience for this pattern?

This pattern is beginner friendly and uses basic stitches (chains and slip stitches) plus working in the back loop only; simple knowledge of crochet will be enough to follow along.

How long does this project typically take to complete?

Most crafters can finish a short garland in a couple of hours; expect 2-4 hours for the sample shown, though time varies with length and yarn choice.