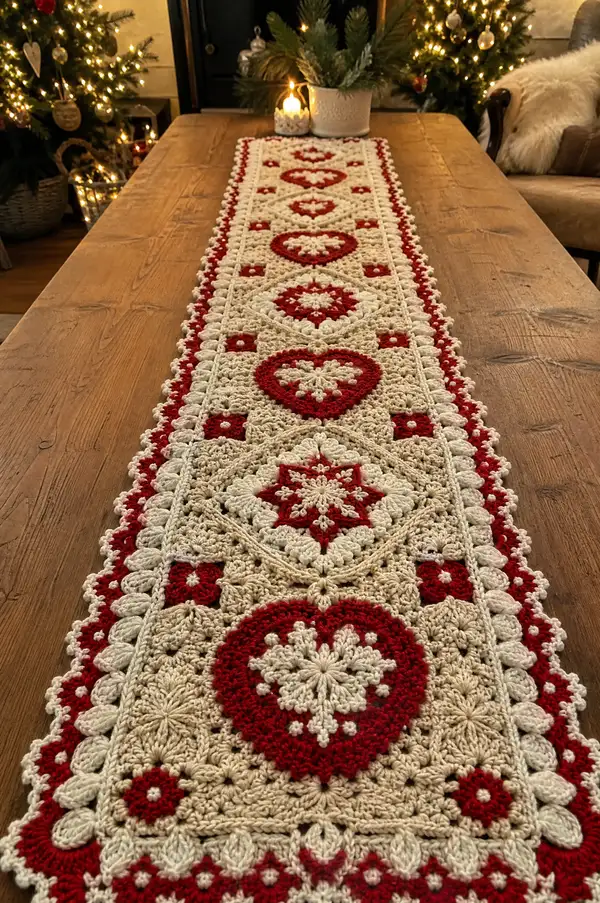
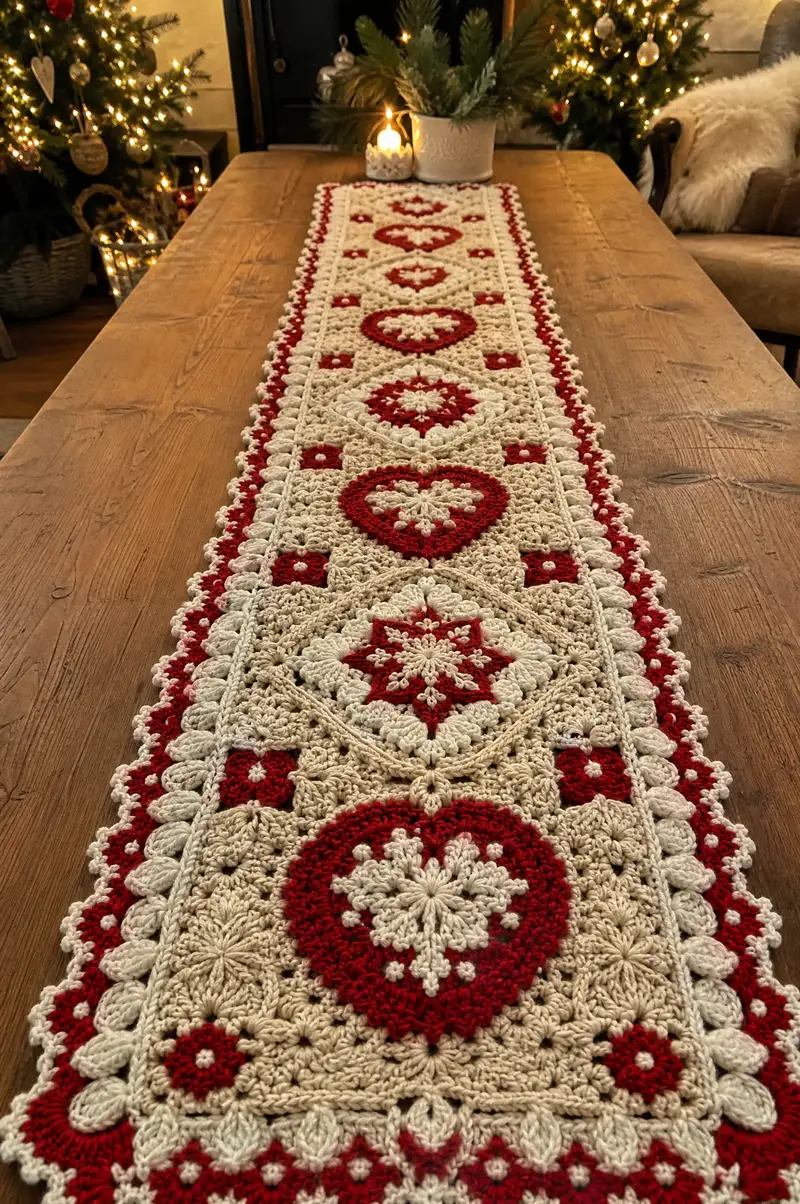
A classic long Nordic-inspired table runner featuring alternating star and heart medallion motifs in warm cream and festive red. Worked in joined squares with textured puff and cluster stitches, this runner brings heirloom charm to your holiday table. The pattern uses repeatable motifs so you can lengthen or shorten it to suit any table. Detailed instructions, color changes, and a decorative scalloped edge included for a polished, professional finish.
Progress Tracker
0% Complete
— Star Medallion Motif :
Round 1 :
Start with cream. 8 sc in magic ring (8)
Round 2 :
Inc in each st around (16)
Round 3 :
(1 sc, inc) x 8 (24)
Round 4 :
(2 sc, inc) x 8 (32)
Info :
Keep tension even; this establishes the center. Use a stitch marker at the start of the round to avoid drift.
Round 5 :
Change to red. (3 sc, inc) x 8 (40)
Round 6 :
Ch3 (counts as dc), *ch2, sk 2 sts, dc in next st* repeat around to form 8 ch-2 loops for star points; join with sl st to top of ch3 (40 loops counted as decorative point anchors)
Info :
When changing to red, leave a 6" tail to weave in; carry cream inside if you prefer fewer ends to weave later.
Round 7 :
In each ch-2 loop: (sc, hdc, 3 dc, hdc, sc) to form a pointed petal (8 petals). Work 1 sl st to join (40 stitches counted by petals)
Round 8 :
Change to cream. 1 sc in each dc and st around to round out petals (40)
Round 9 :
(3 sc, dec) x 8 (32)
Info :
Begin shaping outer star frame: count petals and ensure each petal base aligns with decreases. Use a marker at every fourth petal for symmetry.
Round 10 :
(2 sc, dec) x 8 (24)
Round 11 :
1 sc in each st (24)
Round 12 :
(1 sc, dec) x 8 (16)
Round 13 :
Change to red. (1 sc, inc) x 8 (24) — this creates a slim red ring around the star center for contrast
Round 14 :
1 sc in each st (24)
Round 15 :
Work puff clusters to create texture edge: *ch1, (yarn over, insert, pull up loop) 3 times, yarn over and pull through 6 loops, ch1, sl st into same stitch* repeat around into each st (24 clusters)
Info :
Puff cluster counts as one decorative stitch; keep loops at even height for a uniform texture. Tighten each puff uniformly before closing the stitch.
Round 16 :
Change to cream. 1 sc in each cluster around (24)
Round 17 :
(2 sc, inc) x 6 then (1 sc, inc) x 4 — redistribute to make square-ish outer edge (32)
Round 18 :
Switch to BLO for a ridge: 1 sc in each st BLO (32). Fasten off leaving tail for joining (weave in later)
Info :
Block each star motif lightly to a 7.5" square (or size you prefer) to square edges before joining. Pin points flat while dampening slightly.
— Heart Medallion Motif :
Round 1 :
Begin in red. 10 sc in magic ring (10)
Round 2 :
Inc in each st (20)
Round 3 :
(1 sc, inc) x 10 (30)
Round 4 :
Change to cream. (2 sc, inc) x 10 (40)
Info :
This motif is worked round-to-round to build a round medallion which will be shaped into a heart in later rounds using strategic clusters and chain spaces.
Round 5 :
Ch3, *(dc cluster of 3) in next st, ch2, sk 2, dc cluster in next 4 sts* repeat for 5 sets to create 5 lobes (40 counted as cluster anchors)
Round 6 :
Work into cluster anchors: in each anchor work (sc, hdc, 5 dc, hdc, sc) to puff up lobes. Join with sl st (40)
Round 7 :
Change to red. Even round: 1 sc in each st around (40)
Round 8 :
(3 sc, dec) x 8 (32) to begin shaping out small sides of heart
Round 9 :
(2 sc, dec) x 8 (24)
Info :
To form the heart lobes, special shaping is done next: you will create two raised lobes at top and a taper toward the bottom point.
Round 10 :
In next 6 sts create top-left lobe: (sc, puff, sc, ch3, sc, puff, sc) working puff = (yo, insert, pull up loop) x3, close; skip 2 sts; repeat for top-right lobe in mirrored placement (24)
Round 11 :
Even round in cream: 1 sc in each st (24)
Round 12 :
(1 sc, dec) x 6 (18)
Round 13 :
Change to red. (2 sc, dec) x 3 (15)
Round 14 :
1 sc in each st (15)
Round 15 :
(1 sc, dec) x 5 (10)
Round 16 :
Work a final decorative picot round: *sc, ch3, sl st into tip of ch3 to form picot* around into each st to create delicate heart scallop (10 picots)
Info :
After this round block to square with the star motifs. You will join the heart medallions into the runner in the join section. Fasten off, leaving long tail for join.
Round 17 :
Optional: Add cream small cluster at heart center — join cream and work a central 6-pop popcorn cluster: *ch2, (dc 5 together) in center, ch2, sl st* then weave tail through back (counts as decorative center)
Round 18 :
Edge frame: change to cream and work (sc, ch2, sc) into each picot to create small square frame foundation (approx 30-32 stitches depending on count). Fasten off.
— Small Accent Square Motif :
Round 1 :
With red. 6 sc in magic ring (6)
Round 2 :
Inc in each st (12)
Round 3 :
(1 sc, inc) x 6 (18)
Round 4 :
Change to cream. (2 sc, inc) x 6 (24)
Round 5 :
Form tiny puff frame: *ch2, sk1, sc in next* repeat around creating 12 ch-2 loops; join (24 counted)
Round 6 :
Into each ch-2 loop work (sc, hdc, 3 dc, hdc, sc) to form decorative dot squares (12 clusters)
Round 7 :
Change to red. 1 sc in each st around (24)
Round 8 :
BLO 1 sc in each st BLO to provide a ridge for joining (24)
Round 9 :
1 sc in each st (24)
Round 10 :
Edge: (sc, ch1, sc) into every 3rd st to create small scallops (approx 8 scallops)
Info :
These small accent squares are used in the runner's lattice between main motifs. Make as many as needed to match length of runner; in the photo there are small squares between each large motif.
Round 11 :
Fasten off leaving long tail for join-as-you-go. Lightly block to square.
— Connector Diamond / Lattice Panel :
Round 1 :
With cream. Ch 10, sl st to first ch to make ring, ch1, 16 sc evenly around foundation ring (16)
Round 2 :
(1 sc, inc) x 8 (24)
Round 3 :
Change to red. Work diagonal lines: ch4, sl st into stitch 4 sts ahead to create raised diagonal cord across face; repeat creating 4 diagonal cords forming a loose diamond lattice across motif
Info :
These connectors are narrow and shallow but establish the X-shaped lattice visible between main motifs. Keep cords even tension so the squares sit flat.
Round 4 :
Change to cream. 1 sc around including cords to flatten motif (24)
Round 5 :
Work a puff cluster border: *ch2, sk1, puff in next, ch1* around to provide texture (12 puffs)
Round 6 :
1 sc in each st (24). Fasten off leaving long tail for join.
Round 7 :
Make as many diamonds as required to fit between star and heart squares; these will be joined diagonally to create the woven lattice seen in the runner photo.
— Join-As-You-Go Sequence (Joining Squares into Runner) :
Info :
Layout your motifs in the order you wish (photo order alternates star, diamond frame, heart, diamond, star etc.). Join squares one at a time using a join-as-you-go (JAYG) slip-stitch method: align edges, insert hook through edge of completed motif and corresponding edge of next motif, sl st through both to join. Work through corresponding BLO or edge picots depending on motif type.
Round 1 :
To join first two squares: hold them RS together, insert hook through ch-2 picot on square A and corresponding picot on square B, sl st to join, *ch1, sl st in next picot pair* across full edge. End with 1 sl st to secure (edge joined)
Round 2 :
After joining long edges, connect short edges of small accent squares into corner spaces between large motifs using the same sl st pair method. Reinforce corners with an additional sc around the corner intersection (counts variable by motif)
Info :
Pin every motif in position before joining to keep alignment. Work central row first, then add side rows. Keep joins loose enough to lie flat but firm enough to not gap.
Round 3 :
Continue joining motifs until runner reaches desired length. The photographed runner contains 8 large motif units (alternating star and heart) with diamonds and small squares between; adjust counts to fit your table.
— Foundation Row and Rectangular Shaping :
Round 1 :
Once motifs are joined into a single long strip, work a round of cream around the entire assembled strip to even edges: join cream at one corner, sc evenly around working 3 sc in each corner to keep runner flat. Count across long edge and down short ends to maintain symmetry (approx 6-8 sc per large motif side depending on your gauge).
Round 2 :
Even round: 1 sc in each st (this evens the seam and preps edge for decorative border)
Info :
If your join creates slight ripples, work a BLO round to create a subtle ridge which visually camouflages minor unevenness before the decorative border.
— Decorative Scalloped Border (Deep Edging) :
Round 1 :
With red. Join at center long side. *Ch3, sk 2, sc in next 2 sts, ch3, sl st into base to form small arch* repeat along the length to create red arches (count depends on length).
Round 2 :
Change to cream. In each red arch work (sc, hdc, 5 dc, hdc, sc) to form full scallop shell (this uses 8-10 stitches per shell depending on arch spacing)
Info :
Spacing is critical for even scallops. Measure distance between centers of shells and adjust number of ch or sc between shells if needed to get even distribution. Pin shells after making a few to check curvature.
Round 3 :
Work a picot and bead round in cream: *sc in top of scallop, ch3, sl st in third ch to form picot, sc in next 2 stitches* repeat to create delicate points between shells
Round 4 :
For final flourish: in red, work a tiny popcorn into the tip of every second scallop to echo the motif centers: *yo, insert hook, pull up loop 4 times, yo, pull through all loops, ch1, sl st into next st* — placement variable but aim for even spacing
Round 5 :
Fasten off and weave in all ends. Lightly steam block the entire runner, pinning scallops so they set in shape.
Info :
Blocking is the final step to get square motifs and even borders. Use pins to stretch motifs slightly to shape; allow to dry fully before use so scallops hold their form.
— Alternate Border Option (Lace & Chain Mesh) :
Round 1 :
Change to cream. *ch5, sk 4 sts, sc in next* to create chain mesh around runner for a lighter, airier border alternative
Round 2 :
Work small shell into each ch-5 loop: (sc, hdc, 3 dc, hdc, sc) to produce compact shells (adapt counts to length)
Info :
This version is less heavy and suits modern farmhouse or minimalist tablescapes. Choose this if you prefer a delicate finish over bold scallops.
This Nordic Scandi table runner brings classic holiday charm to your table with every stitch. The repeating star and heart medallions, textured clusters and scalloped edging create a timeless look that becomes a holiday heirloom. Each motif is satisfying to crochet and the join-as-you-go method makes assembly smooth and seamless. Wrap it up as a thoughtful gift or keep it for your own cozy gatherings. 🧶🎁✨