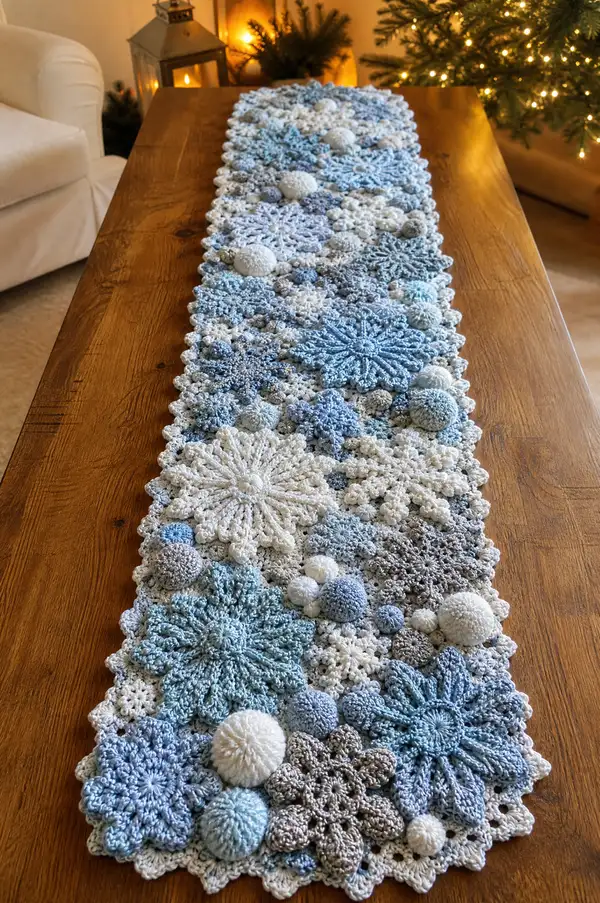
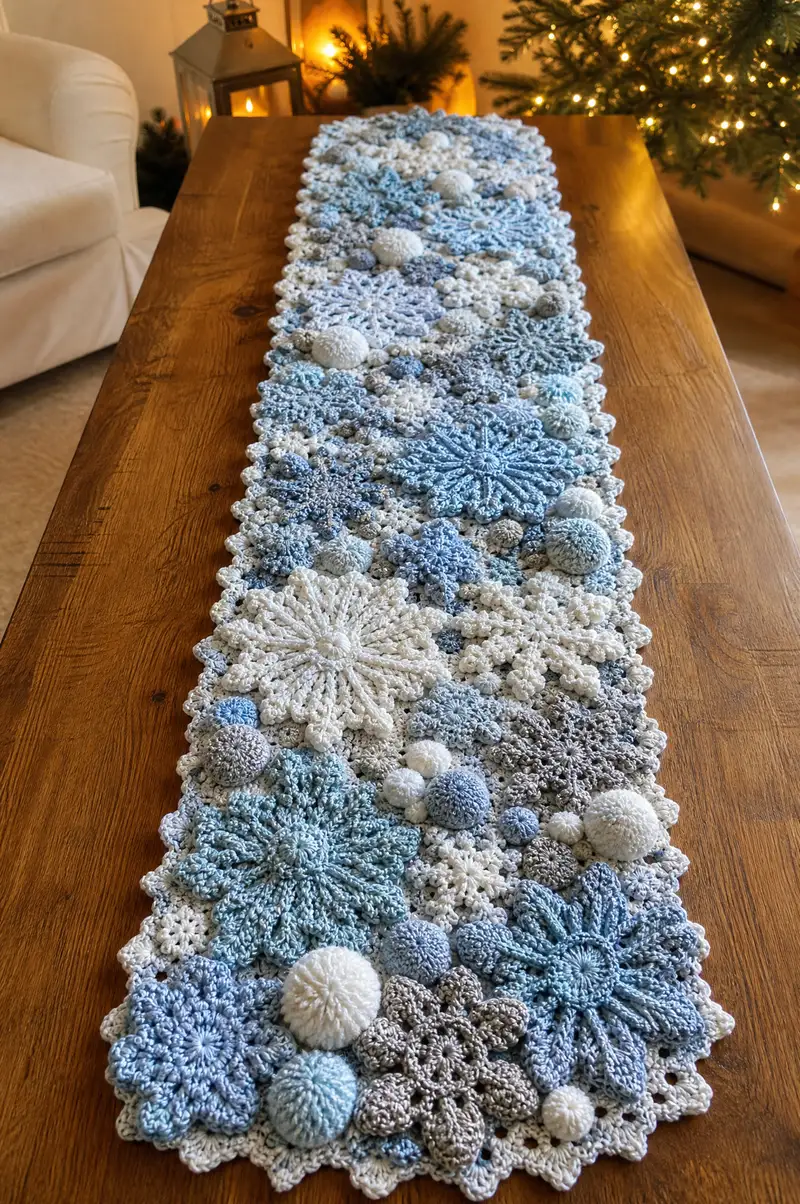
Create a stunning, textured winter table runner inspired by frosty snowflakes and cozy bobbles. This pattern combines large lacy snowflake motifs, medium and small floral-snow motifs, and 3D bobble domes worked in cool icy blues, soft greys and cream. Modular motifs are joined into a long runner with a delicate scalloped edge for a handmade holiday centerpiece. The finished runner is decorative, dimensional and perfect for seasonal tables or mantel displays.
Progress Tracker
0% Complete
— Gauge & Notes :
Info :
Gauge is flexible for this decorative runner. Use a hook that gives a firm, defined stitch for motifs. Keep tension consistent between motifs. Work with right side facing when joining motifs unless instructed otherwise.
Info :
Read through entire pattern before beginning. Many motifs are worked in the round and finished with picots or scallops. Use stitch markers on the first stitch of rounds where a single count matters.
— Large Snowflake Motif (make multiple, approx 20-25 cm diameter) :
Round 1 :
Make a magic ring, ch 3 (counts as dc), 11 dc into ring, join with sl st to top ch-3 (12)
Round 2 :
(ch 3, dc in same st, ch 3, sl st in next dc) x 6 to create 6 petal starting points (6 ch-3 loops)
Round 3 :
Work in each ch-3 loop: (sc, hdc, 3 dc, hdc, sc) in each loop, sl st to join between petals (6 petals; total stitches this round 6x7=42)
Info :
Make sure petals are evenly tensioned. Pin out and block lightly if you want sharper petal points before continuing.
Round 4 :
Between each petal, ch 4, sl st into space between petal bases to form connecting arches (6 arches)
Round 5 :
In each ch-4 arch: (sc, hdc, 2 dc, hdc, sc) then sl st to next petal base (6 petals expanded; added 6x7=42 sts; running total visible around motif)
Round 6 :
ch 1, sc evenly around working 1 sc in top of each dc and in each sc (count will be approximately 84); sl st to join (84)
Round 7 :
(2 dc, ch 2, 2 dc) in every 7th stitch to create a raised cluster point; place these clusters to correspond with each petal tip (6 cluster-points)
Info :
BLO or FLO can be used in this round on alternate rounds to create texture. If you prefer raised ridges, work the sc round in BLO to create a ridge under the next ornamental round.
Round 8 :
Around each cluster point: ch 5, sl st into center of cluster, repeat to make 6 decorative loops (6 loops)
Round 9 :
Work into each ch-5 loop: (sc, hdc, dc, tr, dc, hdc, sc) creating elongated lacey points. Each point = 7 sts × 6 points = 42 (42)
Round 10 :
ch 1, sc in each stitch around to create a firm frame; (approx 84) sl st to join
Round 11 :
Picot round: (sc 5, picot (ch 3, sl st in 3rd ch from hook)) x around, sl st to join. This creates small scallops on each point tip
Round 12 :
Decorative post-stitch: *fpdc around two stitches at petal valley to push petals forward*, repeat at each valley (6 visible fpdc clusters). Finish with sl st
Round 13 :
Overlay round: ch 1, sc around in the back loops only to create a textured foundation for attachment (approx 84)
Info :
If making a multi-colored snowflake, change color before Round 9 and carry yarn carefully or fasten off and sew in ends; color placement shown uses contrast on the points.
Round 14 :
Decorative rope: (ch 6, sl st into valley between two points) x 6 creating an airy ring around the snowflake (6 loops)
Round 15 :
Work into each ch-6 loop: (sc, 3 tr, sc) to produce raised spokes; join with sl st (6 spokes total)
Round 16 :
Final edging: (sc 2, picot) around entire motif to tidy edges; fasten off and weave ends. Block to shape.
Info :
Each large motif measures roughly 20-25 cm after blocking depending on yarn and tension. Make as many as you like for your runner layout.
— Medium Star Snowflake Motif (make many, approx 12-16 cm diameter) :
Round 1 :
mr, ch 2 (counts as hdc), 11 hdc in ring, join with sl st (12)
Round 2 :
(ch 4, sl st in next st) x 6 to create 6 loop foundations (6 loops)
Round 3 :
In each loop: (sc, 2 hdc, 3 dc, 2 hdc, sc) sl st between loops (6 petals; 6x9=54)
Info :
Use a slightly smaller hook for medium motifs to keep them proportionally smaller than large snowflakes.
Round 4 :
ch 1, sc around each stitch and into spaces to flatten (54)
Round 5 :
(ch 3, sl st in center of petal) x 6 to form decorative picot loops on each petal (6 loops)
Round 6 :
Work into each ch-3 loop: (sc, hdc, 3 dc, hdc, sc) finish with sl st (6x7=42)
Round 7 :
Ch 1, sc in each st around (42) sl st to join
Round 8 :
(fpdc around base of petals 6 times to push petals up) then sc to join; fasten off or continue to Round 9 for optional border
Round 9 :
Border: (sc 3, picot) around motif to create small scallops; fasten off. Block lightly.
Info :
These medium motifs are excellent to cluster around large snowflakes to fill space. Make several color variations for visual interest.
— Small Star/Floret Motif (make many, approx 6-9 cm diameter) :
Round 1 :
mr, ch 1, 8 sc into ring, join (8)
Round 2 :
(ch 3, sl st in next st) x 8 forming 8 small loops (8 loops)
Round 3 :
In each loop: (sc, hdc, 2 dc, hdc, sc) sl st between loops (8x6=48)
Round 4 :
ch 1, sc around to tidy (48)
Round 5 :
(sc 2, picot) around forming tiny scallops; sl st to join
Round 6 :
Optional: work BLO sc round to create a ridge on the underside for joining; fasten off and weave ends
Info :
Small motifs work as fillers between larger pieces and help produce the dense collage effect in the photo. Make many in each color used.
— Puff/Bobble Dome Motif (3D puff dome, make many small and medium domes) :
Round 1 :
ch 2, 6 sc in 2nd ch from hook, join with sl st (6)
Round 3 :
(sc, inc) x 6 (18)
Round 4 :
Switch to puff stitch round: *puff in next st (yarn over, insert hook, yarn over and pull up loop 4 times, yarn over and pull through all loops), ch 1*; repeat around to create dense textured round (18 puffs)
Info :
Puff stitch note: wrap yarn over and pull up loop 3-5 times depending on yarn to create a full puff. Keep loops uniform. Close puff by yarn over and draw through all loops then ch 1 to secure.
Round 5 :
Work (sc around between puffs) to create structure (18 sc) Do not fasten off. Start stuffing lightly through the back; add small amount of fiberfill to form a dome. Stuff gradually to avoid lumps.
Round 6 :
Decrease round: (sc 1, dec) x 6 (12) Continue stuffing as you close
Round 7 :
(dec) x 6 (6) Fasten off leaving long tail for closing and sewing. Close remaining opening by weaving tail through remaining sts and pulling tight; weave end inside dome
Info :
Make several sizes by working an extra increase round before puff round for medium domes (for example add Round: (2 sc, inc) x 6 = 24 before puff round). Small domes use fewer rounds and fewer puff stitches.
— Mini Pom-Puff (flat puff disk for texture, make many) :
Round 1 :
mr, ch 1, 6 sc in ring, join (6)
Round 3 :
Work puff stitch across each st: *puff, ch 1* x 12 to make a textured disk. Fasten off and weave ends (12 puffs)
Info :
These are flat and can be sewn between motifs to give bumpy texture. No stuffing required.
— Base Join Square Motif (foundation motif used to link clusters) :
Round 1 :
mr, ch 3 (counts as dc), 11 dc in ring, join (12)
Round 2 :
(ch 2, dc in next 2 sts, ch 2, sl st) x 3 to create triangular lobes that become corners (6 lobes)
Round 3 :
Work in each lobe: (sc, hdc, 3 dc, hdc, sc) then sl st into adjacent lobe to form a star-like square (6x7=42)
Round 4 :
ch 1, sc around to even out edges (42)
Round 5 :
Corner formation: (sc 2, ch 3, sc 2) in each corner lobe to create a square outline (4 corners)
Round 6 :
sc around including corner chains to keep motif flat (approx 56) Fasten off leaving a long tail for joining
Info :
These base motifs are worked in a neutral cream color to provide a consistent background and to make joining easier. Make several to be the negative space between snowflake clusters.
— Joining & Assembly Plan (layout, join technique, and step-by-step joining rounds) :
Info :
Lay out your motifs on a large flat surface or blocking board before joining. Arrange large snowflakes spaced evenly with medium and small motifs filling the gaps. Place puff domes where you want 3D texture. Pin motifs in place.
Round 1 :
Select two motifs to join: with right sides facing up, hold motifs adjacent so an edge sc round lines up. Using background color and yarn needle or slip-stitch join, work sl st through both loops of matching sts across edges until motifs are joined by a row of sl sts (count depends on motif edges, usually 12-18 sl sts for medium joins)
Info :
When joining, prefer whip stitch with a yarn needle for an invisible seam or use single crochet join for a more decorative ridge. The sample runner uses slip-stitch join worked on the right side for a smooth connection and extra texture added later.
Round 2 :
After joining two motifs, continue to attach a third by aligning edge stitches and joining at every other stitch if counts differ. Use short bridging chains (ch 1 or ch 2) in places where there is a gap to keep runner density consistent.
Round 3 :
For clusters where three motifs meet at a junction, secure the third motif first to one motif and then to the second, finishing by weaving a small sl st through all three centers to anchor them. Repeat across layout.
Info :
Maintain tension on joining yarn. If the join pulls motifs inwards, loosen your stitches or add small ch loops to relax the seam. Conversely, if the join is too loose, add extra sl sts or small sc posts to snug them up.
Round 4 :
Attach puff domes by sewing through the back of the dome into the motif base using a tapestry needle and the long tail left from finishing the dome; sew around base with 8-10 secure passes and knot inside dome. Space domes to create natural clusters.
Round 5 :
Assemble motif strips: join motifs into strips 3-5 motifs wide depending on your chosen layout. Then join strips end-to-end to reach room or table length. The sample runner comprises staggered clusters to create an organic arrangement.
Round 6 :
To create a seamless field, use small filler motifs (small star/floret) sewn into gaps with a needle and short whip stitch. Keep edges and gaps tight for full coverage.
Info :
Pin motifs before sewing for best placement. Work in stages: join central motif clusters first, then work outward to edges to keep density even.
Round 7 :
After all motifs are joined into a rectangular runner layout, crochet a linking round around the whole assembly: attach yarn at any edge point, ch 1, sc evenly around the perimeter placing 3 sc in outer corners and sc in each joining gap to create a firm base for the border (approx stitch count will vary by runner size)
Round 8 :
Work a second even sc round to tidy edges and ensure a firm base for scalloped border (same stitch count as previous round). Fasten off and weave ends.
Info :
This base linking round is critical for stabilizing the runner. It also hides some of the less tidy joining seams and provides a continuous edge to attach the scallop border.
— Scalloped Edge Border :
Round 1 :
Join yarn in any outside sc, ch 1, *skip 2 sc, (5 dc, sl st in same sc) to create a large scallop* repeat around; place (3 sc) in corners if needed. Finish with sl st; fasten off (number of scallops depends on runner length)
Round 2 :
Optional decorative picot: Join yarn in back loop of each scallop peak, *sc 2, picot, sc 2* across scallop peaks, sl st to join; weave ends
Info :
Adjust scallop size by increasing or decreasing number of dc in each shell. For a lacy look use (3 dc shell), for a bolder scallop use (7 dc shell).
— Final Finishing & Blocking :
Round 1 :
Wet block or steam-block the entire runner: pin motifs to shape on a blocking mat using rust-proof pins, shaping snowflake points and scallops. Allow to dry fully.
Info :
Blocking is essential to open up lacy points and ensure an even long runner. Use gentle steam or a wet-block method for cotton-blend yarns. Pin points and scallops to desired sharpness.
Round 2 :
Weave in all loose ends using a yarn needle, then check all sewn joins for security; add reinforcing stitches in high-usage areas.
Info :
Trim any stray fibers and brush puff domes lightly with a lint brush for a fluffy look. Store the runner folded with acid-free tissue to preserve blocking shape between uses.
Info :
Estimated totals: For a runner roughly 30 x 150 cm you will likely need 20-25 large motifs, 30-40 medium motifs, 60-80 small motifs and 40-60 puff domes depending on density and layout.
You now have a beautiful heirloom-quality runner that combines airy lace with cozy textured bobbles. Every motif you crochet and join builds toward a festive, tactile centerpiece that will brighten holiday tables for years. I love how the snowy palette gives a serene wintry feel, and the 3D domes add playful depth and warmth. Enjoy the satisfaction of blocking the final assembly and seeing the motifs bloom into crisp snowflakes. 🧶❄️✨