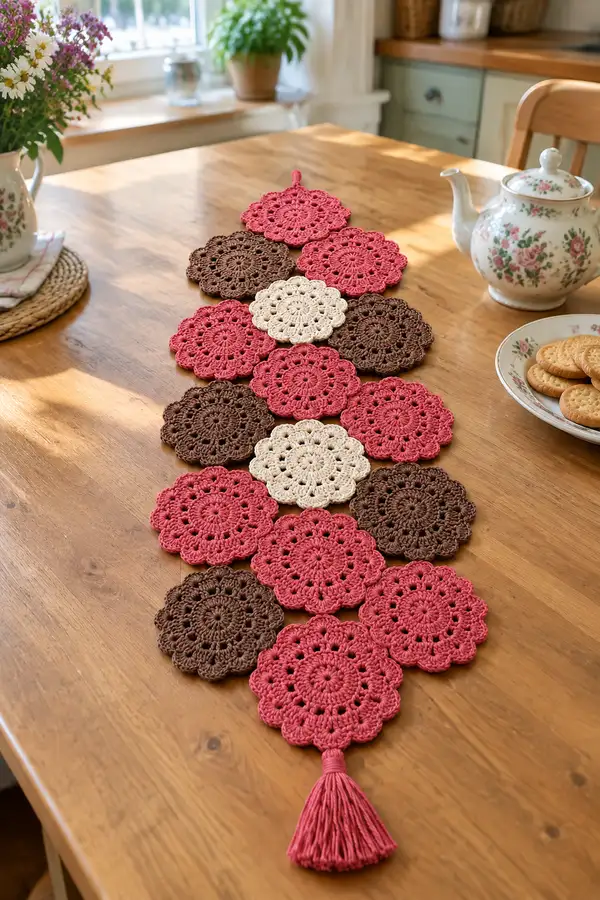
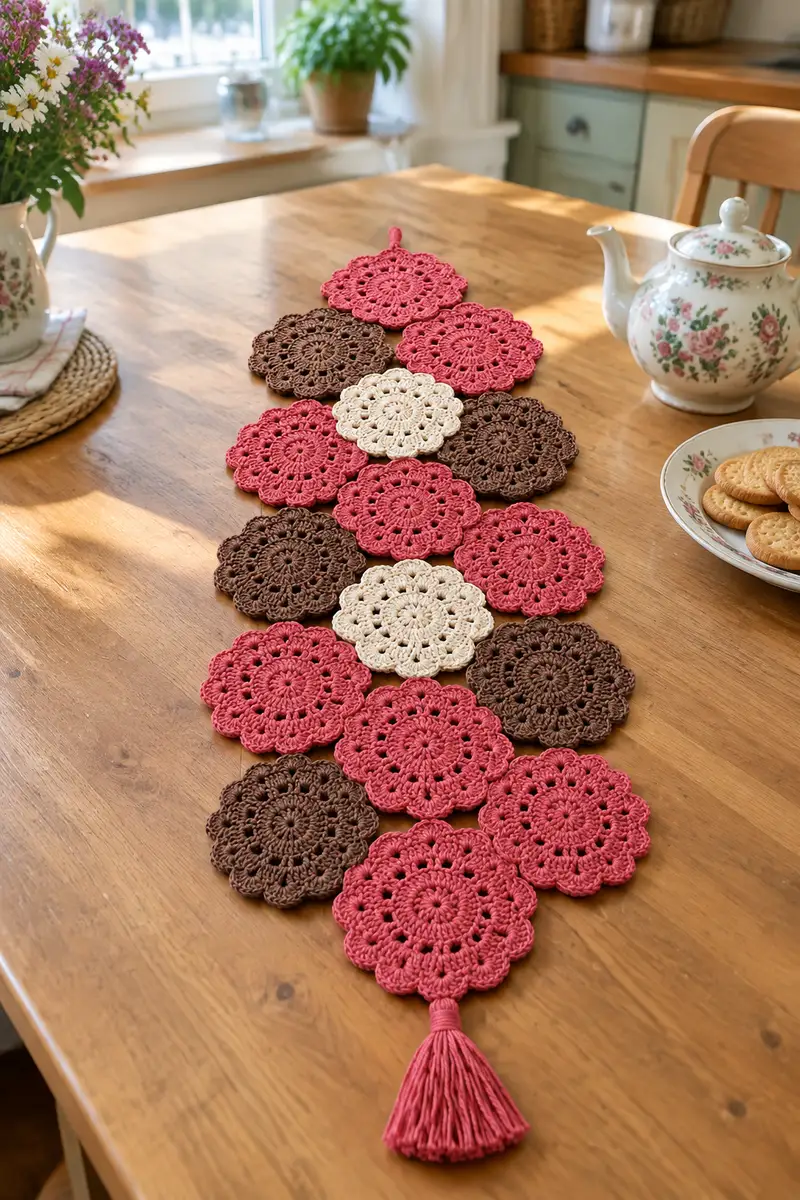
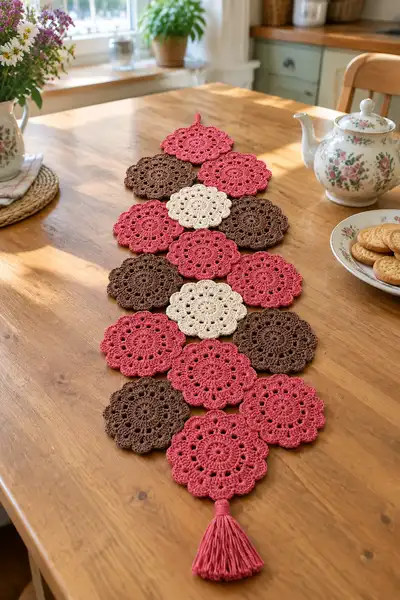
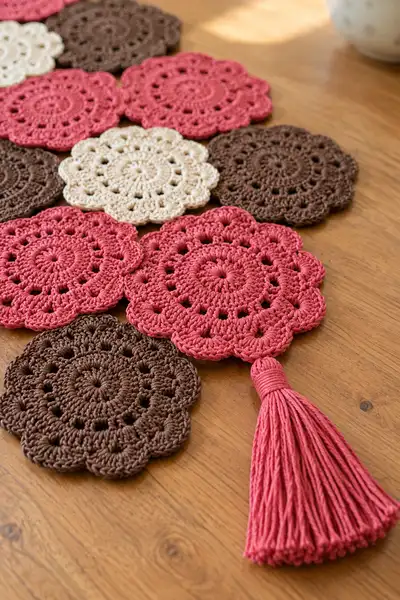
Create a warm, vintage-inspired table runner built from joined scalloped doily motifs in rose, chocolate brown and cream. This pattern teaches two motif variations, a neat joining method, a decorative border and a long tassel finish — resulting in a charming runner perfect for a kitchen table or dresser. The motifs are worked flat in the round with lacy chain-spaces and scalloped edges, then joined in a staggered honeycomb layout. Detailed instructions guide placement, joining and finishing touches.
Progress Tracker
0% Complete
— Motif A (Scalloped Doily, 10-petal) :
Round 1 :
Work a magic ring, ch1, 10 sc into ring. Pull ring closed tightly. (10)
Round 2 :
Inc in each st around (work 2 sc in each st) to create a flat base. (20)
Round 3 :
(1 sc, inc) x 10. This distributes increases evenly to keep the disc flat. (30)
Round 4 :
(2 sc, inc) x 10. Continue even spacing so round grows without rippling. (40)
Info :
Check your work on a flat surface after this round; if the disc is cupping or ruffling, adjust tension or add/subtract a few stitches in the next increase round to flatten.
Round 5 :
(3 sc, inc) x 10. (50)
Round 6 :
(4 sc, inc) x 10. (60)
Round 7 :
(5 sc, inc) x 10. (70)
Info :
From this stage you will begin to form the lacy rounds; keep tension even to let chains form clean openings in later rounds.
Round 8 :
(6 sc, inc) x 10. (80)
Round 9 :
Ch1, 1 sc in next 4 sts, *ch2, skip 2 sts, 1 sc in next 6 sts; rep from * around to create evenly spaced ch-2 loops for shell anchors. You should have 10 ch-2 spaces and a total of 80 sc placed across non-ch sections (chains not counted as sc). (80 sc + 10 ch-2 spaces)
Round 10 :
Join shells: *Into next ch-2 space: (ch3 counts as first dc) work 2 dc, ch2, 3 dc to form a shell, sl st into the 1st sc after the shell to stabilize; rep from * around in each ch-2 space. You will make 10 shells and the base stitch count remains visually 10 shell groups.
Info :
Shells form the beginning of the petals. Make sure each shell sits centrally over its ch-2 space so petals lay flat; if a shell twists, tug lightly and adjust.
Round 11 :
Ch1, sc in top of first shell (top of center dc), then *(ch4, sc in top of next shell) repeat around to create tall arches between shells, ending with sc in last shell top. You will have 10 ch-4 arches and 10 sc anchor points.
Round 12 :
Into each ch-4 arch: (sc, hdc, 3 dc, hdc, sc) to form a fuller petal. Work this sequence into each ch-4 arch around; total petals = 10. This substantially increases the visual stitch count but is grouped into 10 petals.
Round 13 :
Ch1, sc in first st, *ch3, sk to middle dc of petal, sc between petals to anchor; rep around. This forms small eyelet spaces between petals. Continue to have 10 anchor points and 10 ch-3 loops.
Info :
If your petals appear small, make your next petal round with an extra dc in the cluster (add +1 dc in the center) to increase fullness. Always preserve the 10-repeat structure for symmetry.
Round 14 :
Into each petal top: (ch1, sc, ch1, 5 dc cluster, ch1, sc, ch1) all worked into the same top point to create a scallop texture. Do this 10 times around. Petal tops become slightly raised; do not pull the clusters too tight. (10 scallops)
Round 15 :
Working in the back loops of the previous round's scallop base only (BLO): 1 sc in each st and in sc anchor points to create a defined ridge between scallops. This will shorten the fabric and help motifs sit flat. Count is variable by stitch but you will have 10 ridge anchors.
Round 16 :
Ch1, sc in next 2 sts, *(ch2, sc in next 6 sts) across each scallop to create decorative holes that echo earlier motifs; repeat across all 10 sections. This prepares the final scalloped edge.
Info :
If you plan to join motifs as-you-go, leave a long tail now (approx. 40-60cm) in the color you will use for joining; it will be used to whip-stitch or slip-stitch the motifs together cleanly.
Round 17 :
Final scallop: Into each scallop top work (sl st, ch2, 3 dc, ch2, sl st) evenly spaced to create 10 well-formed scallops around the edge. Adjust spacing so scallops are even and the motif remains circular.
Round 18 :
Reverse picot finish: *sl st into the center dc of scallop, ch3, sl st back into the first chain to create a tiny picot; rep around to add a delicate edge. This is optional for a vintage look.
Round 19 :
Fasten off and weave in ends leaving a long tail if you will use it for sewing/joining; block motif flat using pins and light steam or wet-blocking to set scallops in shape.
Round 20 :
Info : Repeat motif to create the required number of motifs for your runner. Photographed runner uses 15 full motifs: 8 Dusty Rose, 5 Chocolate Brown, 2 Soft Cream in a staggered column layout. Swap colors in Round 1 for each motif as desired.
— Motif B (Textured Doily Variant, 10-petal) :
Round 1 :
mr, ch1, 10 sc into ring; pull closed tightly. (10)
Round 2 :
Inc around (2 sc in each st) to make 20. (20)
Round 3 :
(1 sc, inc) x10 = 30 sts. (30)
Round 4 :
(2 sc, inc) x10 = 40 sts. (40)
Info :
Motif B uses a puff-stitch round to add texture, so keep tension slightly looser for puff stitches to sit nicely above the fabric.
Round 5 :
Ch1, *sc in next 3 sts, ch2; rep around to create 10 ch-2 spaces for puff clusters. (40 sc + 10 ch-2 spaces)
Round 6 :
Into each ch-2 sp: make a 3-loop puff stitch: (yo, insert hook, yo pull through, yo, insert hook same sp, yo pull through, yo insert hook same sp, yo pull through) then close puff by yarning over and pulling through all loops, ch1 to secure. After each puff, sl st into next sc. Repeat around to make 10 puffs (10 puff clusters anchored between sc groups).
Round 7 :
Ch1, sc in each sc and sc into top of each puff to even out fabric. Work the round to create a stable base for petal shaping. (stitch count visually matches base but grouped into 10 puff anchor points)
Round 8 :
Ch3 (counts as dc), dc in next 4 sts, *(ch2, dc5 in next anchor region) repeat around to create tall petal bases. You will produce 10 dc-5 blocks separated by ch-2 spaces.
Info :
Puff stitches give a gently raised center to each petal; if a puff is too flat, make it with an extra loop (4-loop puff) and adjust in the next round to keep symmetry.
Round 9 :
Into each dc5 block: (ch1, sc, hdc, 5 dc, hdc, sc, ch1) to form rounded petals. Repeat 10 times. Petal count = 10.
Round 10 :
Ch1, sc in next 2 sts, *ch3, sc into middle of next petal top; rep around creating 10 ch-3 eyelets between petals. This creates a slightly different eyelet size from Motif A.
Round 11 :
Scallop finish: into each petal top work (sl st, ch2, 4 dc, ch2, sl st) to make a broader scallop. There will be 10 scallops around the edge.
Round 12 :
BLO round: 1 sc in each st BLO to form a neat ridge just under the scallops for crisp texture. This may slightly reduce diameter; stretch gently while blocking. (count variable)
Round 13 :
Optional picot or slip-stitch finishing: *sl st in middle of scallop, ch2, sl st back into ch to create tiny points; rep around if desired. Fasten off and weave in ends; block flat.
Round 14 :
Info : Use Motif B in alternating positions for visual texture. Photographed runner alternates motif types throughout the column to create subtle differences in petal height and depth.
Round 15 :
Repeat motif set as needed. Make motifs in your chosen color order so layout is ready for joining.
— Joining Motifs (As-you-go and Sewn Joining Options) :
Round 1 :
Info : Lay out your motifs in the desired staggered column pattern before joining. Photograph shows a single central column staggered with half-offset motifs forming a honeycomb-like running order. Mark the join points with pins.
Round 2 :
As-you-go join method (preferred): On final scallop round of a new motif, when you reach a scallop that touches an already-made motif, work sl st into corresponding scallop picot/edge of existing motif instead of sl st into your own starting point. Continue to work the remainder of the scallop across the new motif. Repeat at each touching scallop to join as you crochet.
Round 3 :
For a sewn join: Block all motifs flat. With right sides up, position two motifs in touching orientation so scallops overlap slightly. With a matching yarn tail and tapestry needle, whip-stitch through the loops of both motif scallops (through the outer loops of each scallop and into the underlying stitch to prevent gaps). Use small, close stitches. Repeat to join all motifs in the layout.
Info :
When joining, try to use the same color yarn as the motifs to keep joins invisible; if you want a decorative seam, use a contrasting color and stitch with even spacing for a dashed-line effect.
Round 4 :
Join sequence for a column: Start in the top motif and sew the second motif beneath it so that two scallops of motif 2 touch two scallops of motif 1. Continue stacking motifs so each new motif contacts two motifs above (except the top and bottom motifs). This creates a stable, interlocked column.
Round 5 :
Joining math: Each motif has 10 scallops; in the column layout each internal motif will share approximately 4-6 scallop joins with neighbors (two above, two beside depending on layout). Plan yarn tails accordingly (approx. 40-60cm per motif if sewing, longer if slip-stitch joining).
Round 6 :
Edge reinforcement after joining: With 3.5mm hook and working in matching color, work 1 sc around the interface of motifs where small gaps appear: sc through both motif edges in the seam area to stabilize join. This is a narrow join row and will not change motif counts but will visually tighten seams.
Info :
If motifs shift during joining, block them again and re-pin. A tightly blocked motif keeps scallops aligned and prevents puckering from seam tension.
Round 7 :
If you prefer a continuous join, after joining all motifs, use a surface slip-stitch round: with hook from the right side and preferred color, insert hook under the top loop of each motif scallop and work sl st around entire runner perimeter connecting adjacent scallops in one continuous round for a clean join.
Round 8 :
Info : For a softer seam that allows runner flexibility, use whip-stitch with a yarn needle passing through the back loops only of each scallop edge. This creates a less visible join and retains scallop mobility.
Round 9 :
After joining column, inspect edges for small holes or looseness; address by adding small sc stitches into the gaps. This is an easy micro-fix and keeps the runner durable under light table traffic.
Round 10 :
Info : If you want the motifs to lie completely flat and flush with no overlap, reduce the tension in the shell rounds during motif construction by using a slightly larger hook for the outer petal rounds only; this spreads the petals. Conversely, a smaller outer hook tightens scallops for a denser edge.
— Outer Border & Edge Unification (worked after all motifs joined) :
Round 1 :
With right side up, attach yarn at one edge scallop seam and ch1. Work 1 sc evenly into each visible stitch around the outer perimeter of the entire joined runner to create a narrow, even edge. This evens out small gaps and gives a uniform face to the runner.
Round 2 :
1 sc in each st around (count will vary depending on number of motifs and joins). Place stitch markers at corners or transition points to maintain shape and keep counts consistent between sides. Move marker at each repeat to keep orientation straight.
Round 3 :
Info : If the runner edge looks too plain, work one more decorative round: into every 2nd sc, work (ch2, 3 dc, ch2, sl st) to create a scalloped outer border that references the motif petals. Space this decorative scallop so you have one scallop for roughly every original motif scallop across the edge.
Round 4 :
Decorative scallop round: Work *(sl st into next sc, ch2, 5 dc in next sc, ch2, sl st in next sc), rep across outer edge places where space permits. This will create a soft continuous scalloped border that unifies the runner visually. Adjust number of dc per scallop to avoid puckering—5 dc is a good balance for worsted cotton.
Round 5 :
1 sc round to stabilize outer scallops: Work 1 sc in each st around, through both loops, to lock decorative scallops in place. Fasten off and weave ends. Block entire runner again to relax perimeter and straighten scallops.
Info :
If your runner drapes unevenly, lightly steam-block the outer scallops and gently stretch when pinning to ensure a flush, uniform outer edge.
Round 6 :
Optional fringe: If you prefer a fringe instead of a tassel at the end, measure and cut doubled yarn strands and knot them into the final row's edge using a larks-head knot, spacing evenly. For this runner we recommend one large tassel instead of multiple fringe pieces.
Round 7 :
Info : Keep the border proportionate; an overly-large border can overwhelm the motifs. If you prefer a minimalist look, a single sc round is sufficient to tidy joins and secure seams.
Round 8 :
Fasten off all loose tails and weave in on the backside. Trim ends close to fabric for a neat finish.
— Tassel & End Finish :
Round 1 :
Info : The photographed runner features a long, wrapped tassel in Dusty Rose. It adds visual weight and anchors the runner end. Make tassel after motif assembly so you can position it centrally on the final bottom motif.
Round 2 :
To make a wrapped tassel: Cut a 12cm wide cardboard (or use a book) and wrap yarn around it 60-80 times depending on desired tassel fullness. For a fuller tassel wrap more times. Keep wraps even and flat.
Round 3 :
Slip a 25-30cm length of yarn under the wrapped loops at one end and tie tightly; this forms the top of the tassel. Slide the wrapped bundle off the cardboard carefully.
Round 4 :
Fold the bundle in half so the tied end creates a loop. Take an 80cm strand of yarn and wrap it around the tassel head several times to create the wrapped neck. Tuck the ends under the wraps and secure with a knot; trim close.
Round 5 :
Cut the bottom loops to release the tassel fringe. Use scissors to neaten and shape the ends. Comb gently with fingers to spread strands evenly. Tassel length in photo looks approx 25-30cm; adjust wrap and cut lengths to preference.
Info :
To attach the tassel: Thread the tied top loop through a central scallop at the runner's end and secure by knotting on the underside. For extra security stitch the tassel top down with a few small whip-stitches through the wrapped neck into the motif base.
Round 6 :
If you want a tassel with a small hanging loop, leave the top loop intact and weave it through the scallop, knotting on the underside. For a wrapped head like the photo, hide the loop under the wrap and stitch in place.
Round 7 :
Trim tassel ends evenly and steam lightly to relax cotton strands. Optionally, add a small drop of craft glue inside the wrap to keep neck wrapping secure (allow to dry before use).
Round 8 :
Info : For a boho look you can add multiple small tassels at the lower edge of the runner spaced evenly; for this pattern use one bold tassel to match the photo styling.
Round 9 :
Fasten off and tidy all ends. Your runner is ready for display—place on a table, dresser or mantle and enjoy the handmade texture it brings.
— Extra Finishing & Variation Rounds (Optional) :
Round 1 :
Color-block border: Add 1-2 rounds of sc in Cream around the outer scallops to create a pale highlight band. Work neat scs in both loops, fasten off and weave in ends.
Round 2 :
Contrast join row: After joining motifs, twist a thin cord of contrasting yarn and chain across join seams to create a decorative ladder look. This uses no additional structural stitches but creates extra visual interest.
Round 3 :
Mini tassel cluster: Make three small 8cm tassels and attach them in a triangular cluster at the runner end for a playful finish instead of one large tassel.
Info :
These optional rounds let you customize color emphasis and scale—experiment on a single motif first to decide what looks best before altering the full runner.
Round 4 :
Maintenance tip: Hand wash cotton runner in cool water, reshape while damp, and lay flat to dry to maintain scallops and tassel shape over time.
This scalloped doily motif table runner brings handmade charm to any surface and is a joy to stitch row after row. The layered petals, alternating colors and the statement tassel give it a warm, vintage-meets-modern personality. It's a beautiful way to practice lacy stitches and finishing techniques while producing a useful home accent. Enjoy the calming rhythm of repeating motifs and the delight of assembling them into a lovely runner! 🧶🌸