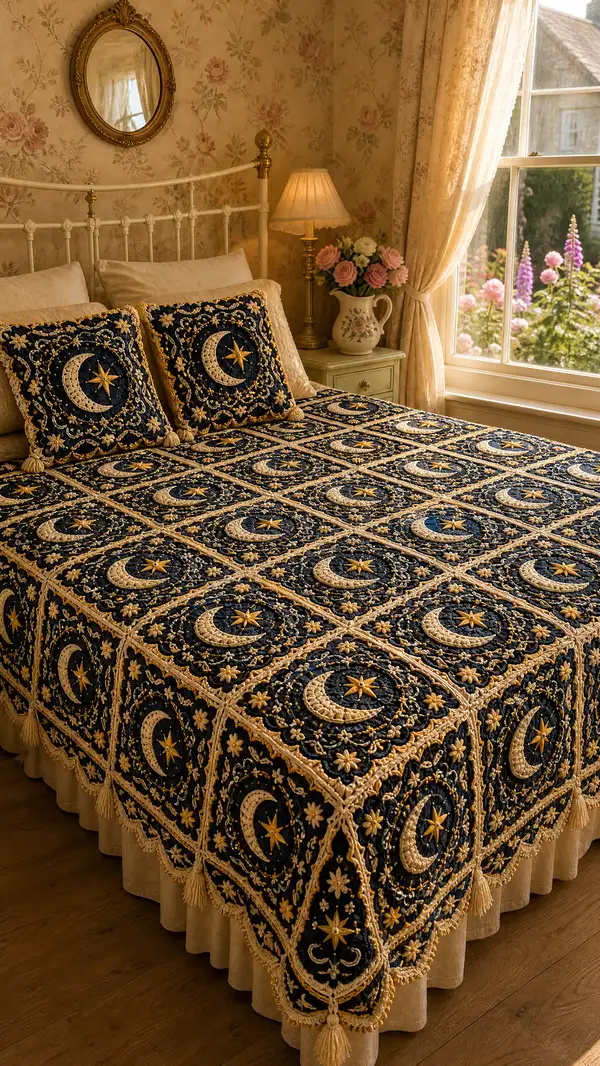
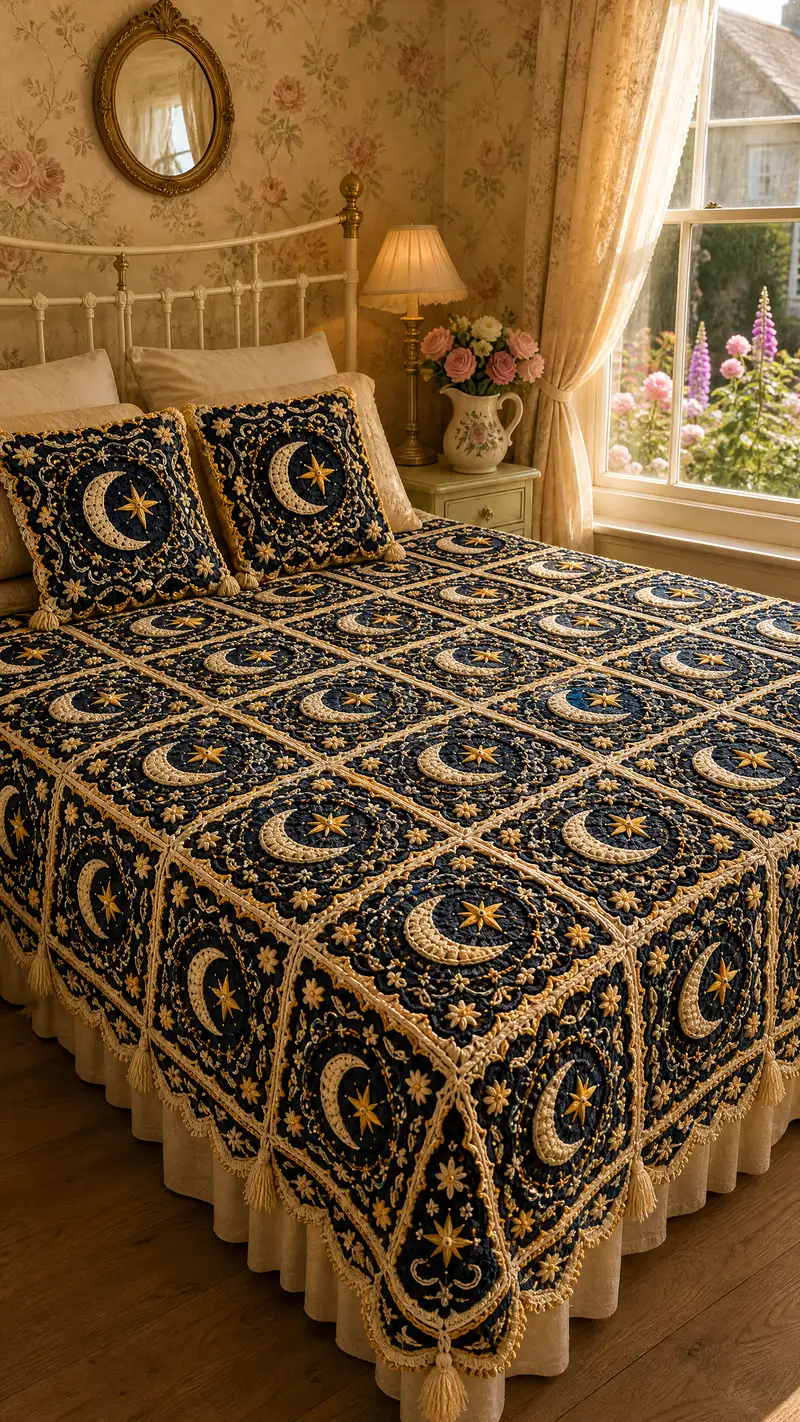
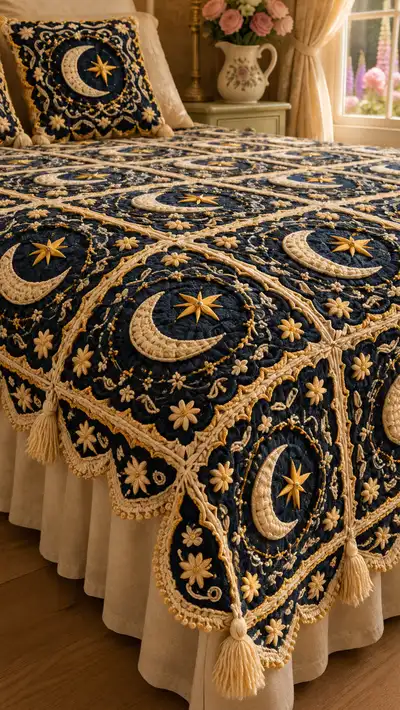
An elegant, vintage-inspired bedspread made from richly textured navy granny squares featuring raised crescent moons, eight-point stars and floral embroidery. Each square is worked in deep navy with cream and gold appliques, joined with a scalloped border and tasseled corners for a luxurious finish. Suitable for a full or queen bed when assembled in the layout shown. The design highlights overlay crochet, bobbles and surface embroidery for a heirloom-quality blanket.
Progress Tracker
0% Complete
— Overview :
Info :
This pattern describes one large decorative square (approx. 12.5"/32cm finished blocked) worked in rounds with deep navy background and applied cream moon and gold star. Repeat the square and join as directed to form the bedspread layout shown (5 squares across x 6 squares down). Adjust the number of squares for different bed sizes. Work squares flat in joined rounds, add appliques, then join-as-you-go or sew squares together. Block squares and finish with the scalloped border and tasseled corners.
— Motif: Midnight Moonstar Square (Make as many squares as needed) :
Round 3 :
(1 sc, 1 inc) x 6 (18)
Round 4 :
(2 sc, 1 inc) x 6 (24)
Round 5 :
(3 sc, 1 inc) x 6 (30)
Round 6 :
(4 sc, 1 inc) x 6 (36)
Info :
Maintain a tight tension for amigurumi-style circles that will later be squared. At the end of Round 6 place a marker at first stitch to track round starts; move marker every round.
Round 7 :
(5 sc, 1 inc) x 6 (42)
Round 8 :
(6 sc, 1 inc) x 6 (48)
Round 9 :
1 sc in each st (48)
Round 10 :
1 sc in each st (48)
Round 11 :
1 sc in next 6 sts, (2 sc, ch 3, 2 sc) in next st *this begins corner 1; repeat across to make 4 corners* Continue round placing corner clusters at approx. 12-st intervals to create 4 corners (52 + 4 ch-3 spaces)
Info :
Round 11 transitions the circular motif toward a square by working corner cluster shells at four equidistant points. Count carefully and place corners evenly. The ch-3 at each corner will be used as the corner chain space in subsequent rounds.
Round 12 :
Work 1 sc evenly between corners. In each ch-3 corner space work (2 sc, ch 3, 2 sc). Continue around to maintain square outline. Approx stitch count: 56 excluding corner chains (edges will vary).
Round 13 :
1 sc in each st and 1 sc in each ch-3 space (work evenly; square shape becomes more defined). Approx (64)
Info :
From Round 13 onward you are establishing a square base. Keep the same number of edge stitches between corners to maintain straight sides. Gently tug edges to square while working.
Round 14 :
1 sc in each st (64)
Round 15 :
Change to BLO for one round to create a defined frame edge: 1 sc in each st BLO (64)
Round 16 :
Switch back to regular sts. Begin textured frame: *sc 4, bobble in next st* repeat across sides and 2 sc in ch-3 corners (total bobbles 12, sc spacing adjusted) Approx (64)
Info :
Bobble (bp) instruction: yarn over, insert hook, pull up loop (3 loops), yarn over and pull through two loops twice to form a raised bobble; finish by securing with sl st into next stitch. Keep bobbles tight and uniform. Practice one bobble before proceeding across entire motif.
Round 17 :
1 sc in each st (64)
Round 18 :
Surface and overlay foundation: Ch 1, sc in each st for one round, but position approx 6 stitches from center to reserve space for moon placement. (64)
Info :
At this stage the center circle measures roughly 6-7 inches across unblocked and provides the foundation for the crescent moon placement. Block lightly if you prefer a flatter center before applying the crescent.
Round 19 :
Begin background texture: *fpdc around next stitch, bp in next stitch, 1 sc in next 3 sts* repeat across all four sides creating a raised floral lattice (64)
Round 20 :
Repeat Round 19 to deepen texture (64)
Round 21 :
Switch to lace chain work: *sc 2, ch 3, sc 2* in next st to add picot-like spacing along inner circle; corners: (sc 2, ch 3, sc 2) into each corner chain 3. (64)
Info :
Place your motif on a flat surface and mark the top center. The crescent moon will be oriented toward the bed headboard in the assembled spread — keep motifs consistent when you make multiples.
Round 22 :
1 sc in each stitch and in each ch-3 corner (64)
Round 23 :
Begin decorative rope-outline for later applique anchor: *ch 1, 1 sc in each st BLO* around entire square to create a slightly recessed channel (64)
Round 24 :
Change to cream/ivory yarn (Info before round): Info : Change to cream yarn. Carry navy inside if you prefer to avoid many ends. 1 sc in each st in cream to create contrast edge around central area (64)
Round 25 :
Work decorative overlay rail: *ch 2, skip 1, sl st in next, ch 2, 1 sc in next* repeat around to create small looped motifs framing the center (64 loops)
Round 26 :
Switch back to navy. 1 sc in each st across to secure loops and create a pronounced navy field (64)
Round 27 :
Work small embroidered daisies foundation: in predesignated spots, mark 8 positions around the inner circle (place markers at equal intervals). In the marked stitch work 6 hdc cluster to create base for embroidered petals. Continue even sc elsewhere (64)
Info :
These hdc clusters will be turned into raised daisies using surface embroidery or short petal stitches later. Use stitch markers to keep spacing seven to eight stitches apart around the center.
Round 28 :
1 sc in each st (64)
Round 29 :
Establish moon placement: Count to the top-center mark and place 12 markers to outline the crescent shape area where the cream crescent applique will sit. Work 1 sc around maintaining navy field (64)
Round 30 :
Change to cream and prepare to sew applique: 1 sc in each st in cream for one round to create a sturdy applique base (64)
Info :
At completion of Round 30 your square is a textured navy canvas with a cream inner frame ideal for applique. It's time to make the crescent moon piece separately and applique it onto the square to achieve the raised sculptural moon seen in the photo.
— Crescent Moon Applique (Make 1 per square) :
Round 1 :
With cream yarn: ch 6, join to make a loop or start with mr and work 6 sc (6)
Round 2 :
Inc in each st around (12)
Round 3 :
(1 sc, inc) x 6 (18)
Round 4 :
Switch to an oval shaping: sc 4, inc along one side, sc across opposite side, inc again only on long outer curve to start crescent shaping. Approx (22)
Round 5 :
Work 1 sc around, but on the inner curve do dec operations to hollow a crescent silhouette: *sc 3, dec* repeat on inner curve; outer curve: *sc 5, inc* repeat to flare (st count approx 24)
Round 6 :
1 sc all around maintaining crescent shaping. Add a 2-row ridge by working 1 sc in flo over previous round to create a textured inner rim (24)
Round 7 :
Work 1 sc across and then BLO round: 1 sc in each st BLO to define the outer sculpted rim (24)
Round 8 :
Edge the crescent: ch 1, *sc 2 in next st, picot (ch 3, sl st in first ch)* repeat along outer edge to create decorative scalloped surface. Fasten off leaving long tail for attaching (24)
Info :
Block the crescent lightly on a flat surface to ensure it holds shape. You may place a small bit of fiberfill behind the thicker parts of the crescent for slight dimension before sewing onto the square.
— Eight-Point Star Applique (Make 1 per square) :
Round 1 :
With gold yarn: mr, ch 1, 8 sc in mr (8)
Round 2 :
Sl st into next st to offset, ch 5 (counts as 1 tr + ch 1), *sk 1 st, tr in next st, ch 1* repeat until 8 points formed, sl st to join (8 points)
Round 3 :
Secure points: in each ch-1 space work (sc, hdc, sc) to thicken points and ensure star lies flat. Fasten off leaving long tail for attaching.
Info :
Sew the star at the crescent center using gold thread and small invisible stitches. Add a tiny glass bead or pearl to the very center for sparkle if desired.
— Small Flower Embellishments (Make many for each square) :
Round 1 :
With cream yarn: mr, ch 1, 6 sc in mr (6)
Round 2 :
*ch 2, sl st in next st* around to create 6 loops. Fasten off (6 loops)
Round 3 :
Using gold yarn, on each loop work a standing petal: in loop make (sl st, ch 3, 3 tr cluster, ch 3, sl st) to create a raised petal; repeat for all 6 loops. Fasten off leaving tails for sewing (6 petals)
Info :
These small flowers are positioned around the inner circle and at corners like in the photo. Sew them by anchoring the center with a tiny bead or French knot in embroidery thread for extra definition.
— Embroidered Vine and Bead Chain (Surface Embroidery) :
Info :
Using stranded yarn or tapestry thread, embroider looping vines around the inner circle and between flowers with chain stitch and detached chain (lazy daisy) stitches, adding tiny seed-bead clusters along the vine for the gold dotted effect shown in the photo.
— Attaching Appliques to Square :
Info :
Position the crescent and star on the premarked area. Place a small pad of fiberfill under the crescent if you want a raised relief. Sew the crescent down with neat whipstitches around the inner edge using matching cream yarn, then secure outer edges with small invisible stitches. Sew star over the crescent center with gold thread. Attach small flowers symmetrically around the inner field and along edges as shown.
— Square Outer Accent Rounds & Corner Flourish :
Round 31 :
After appliques are attached, 1 sc in each st around in cream to define border (64)
Round 32 :
*sc 2, ch 2, skip 1* across side; in corner work (sc 2, ch 3, sc 2) to form scalloped indentations. Approx stitch count remains consistent (64)
Info :
These ch-2 loops will later be embellished with tiny gold bobbles and picots to mimic the photograph's ornate latticework.
Round 33 :
Work small gold bobble accents into every second ch-2 loop: at each designated loop, make a tiny 3-tr bobble (secured with sl st). Continue sc around between accents. (64)
Round 34 :
1 sc around in cream. Finish the square with one more decorative scallop: *dc 3 in next st, sl st in next* repeat across to create heavy scalloped edge. Fasten off leaving tail for blocking and weaving. (64)
Info :
Block each square to a consistent size with pins and steam/blocking cloth. Trim excess tails and weave in ends. Prepare at least 30 squares for a 5 x 6 layout as shown (adjust numbers for size).
— Join-As-You-Go Method (or Sew Together) :
Info :
You can join squares by whipstitching after blocking, but join-as-you-go (JAYG) gives a cleaner continuous border. The method here: attach new square to finished neighbor by working through loop of current square and corresponding loop of neighbor at edge intersection. Use cream yarn for visible joined seams as shown.
Round 35 :
Lay two squares right sides up, align edges. With cream yarn and 3.5mm hook, work slip-stitches through edge ch-2 loops of both squares: *insert hook through loop of square A and square B, sl st* across joining entire side. Repeat for all adjacent sides to assemble grid. (number of sl st equals number of joining loops per side, ~14 per side)
Info :
When joining corners of four squares, nest a decorative knot: after joining two adjacent sides, bring the corner seam together and create a small 6-sc star knot by working 6 sc through both corner stitches from all four squares to lock corners neatly. This yields the knotted corner look seen in the photo.
— Wide Scalloped Border (Work around entire assembled spread) :
Round 36 :
Once your grid (5 x 6) is joined and blocked, work a round of cream sc around the entire outer edge with corners: (2 sc, ch 3, 2 sc) in each corner to maintain square shape. Use 4.0mm hook. Edge stitch count will vary with size; work evenly to keep border flat.
Round 37 :
Work 1 round of fpdc around to create a raised rope: fpdc in each st and around posts of previous round to emphasize a ridge. Keep stitches tight but even.
Round 38 :
Decorative petal round: *ch 3, skip 1, 5 dc in next (shell), skip 1, ch 3, sl st in next* repeat around creating scalloped shell clusters. At corners, work 7 dc shells to keep corners open. Fasten off. (shell count approx 60-80 depending on spread size)
Info :
If your bedspread size differs, adjust shells spacing to end evenly at a corner. Blocking after each border round will make shells sit neatly.
Round 39 :
Embellish shell arcs with gold bead loops: in each shell's central ch space add chain-3 loops and place a tiny gold bobble or bead sewn in position to mimic the dotted chain in the photo.
Round 40 :
Final lace trim: switch to 3.5mm hook and work a delicate picot lace: *sc in next 2, picot (ch 3 sl st 1), sc in next 4* across each shell for a refined scallop edge. Fasten off and weave in ends carefully.
Info :
Finish by blocking the entire spread on a flat surface if possible or use steam blocking in sections. This smooths joins and sets lace edge. Add tassels to corner points as final flourish.
— Tassels & Corner Details (Make 4 large tassels and many small corner knots) :
Round 41 :
Cut 60 strands of cream yarn each 12"/30cm for large tassel. Fold in half and attach to corner with a lark's head knot through corner loop. Repeat for each bedspread corner. Trim to even length and comb if desired.
Round 42 :
Create smaller tassel accents at each square join intersection by wrapping 12 strands, securing with wrappings of gold yarn and attaching with a few stitches into the corner knot; trim and fluff.
Info :
Tassel weight helps drape the border. If your bedspread will be washed, reinforce tassels with a few back stitches and use a dab of fabric glue at the knot to keep them secure.
— Pillow Covers (Make 2 matching square cushions) :
Round 1 :
Follow the Motif rounds 1-34 for a single large square cushion front. For back panel you can make a simpler navy square without appliques: work rounds 1-30 in navy only and add a zip or envelope overlap. Final finish with the same scalloped trim used on bedspread edge. (square size matches bedspread squares)
Round 2 :
For back panel envelope: make two rectangles each the width of square and height half the square plus 2" overlap. Join along three edges, insert cushion pad, and close. Add tassels at corners to match bedspread.
Info :
For a luxurious finish use a feather insert or high-loft cushion pad. Sew on appliques to the front panel before assembling the back to avoid struggling with pillow construction.
— Finishing Touches & Care :
Info :
Weave in all ends on the wrong side, trim carefully. Use a soft brush to nap and clean the spread. If washing is needed, hand wash in cool water with mild detergent and reshape on flat surface; avoid machine drying to preserve delicate appliques and tassels.
Info :
Optional: add a thin cotton backing panel sewn to the wrong side to protect the delicate appliques when in regular use. This also adds warmth and prevents hooks catching on the bed linen.
This Midnight Moonstar bedspread is a true labor of love — a blend of texture, contrast and celestial charm that becomes more beautiful the more you look at it. Every square presents a little scene: a raised crescent, a radiant star and delicate embroidered blooms. Finishing with scalloped lace and tasseled corners makes it feel like an heirloom ready to treasure. 🧶✨ Take your time, enjoy the rhythmic repeats, and celebrate every completed square — your bed will thank you for it! 🌙