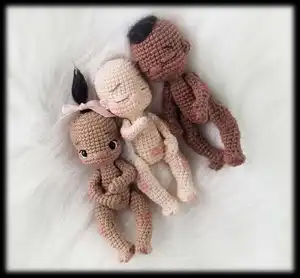
Make adorable mini baby dolls with this detailed crochet pattern that walks you through head, body, legs, face, and finishing techniques. You will get clear step-by-step rounds, photo-tutorial captions, and assembly tips so you can create a cute pocket-sized doll. Perfect for gifting, practicing amigurumi skills, or creating a tiny collection of dolls in different skin tones.
Progress Tracker
0% Complete
— Head / Body :
Rnd 3 :
(1sc, INC) x6 (18)
Rnd 4 :
(1sc, INC, 1sc) x6 (24)
Rnd 5 :
(3sc, INC) x6 (30)
Rnd 6 :
(2sc, INC, 2sc) x6 (Fig. 1) (36)
Round 7-12 :
36sc (6 rounds) (Fig. 2) (36)
Rnd 13 :
8sc, inv DEC, 16sc, inv DEC, 8sc (34)
Rnd 14 :
10sc, (INC) x5, 4sc, (INC) x5, 10sc (44)
Rnd 15 :
2sc, inv DEC, 36sc, inv DEC, 2sc (Fig. 3) (42)
Rnd 16 :
7sc, inv DEC, 24sc, inv DEC, 7sc (40)
Rnd 17 :
(inv DEC, 4sc) x6, inv DEC, 2sc (33)
Rnd 18 :
(inv DEC, 2sc) x7, inv DEC, 3sc (25)
Info :
If using safety eyes (open eyes option), insert now. (Fig. 4) (See next page for tutorial photos.) For closed eyes option, continue with the next round.
Rnd 19 :
(1sc, inv DEC) x8, 1sc (17)
Info :
Stuff head firmly with fiber fill. (Fig. 5)
Info :
Tip: Be sure to fill out the cheeks with fiber fill, stretching the increases.
Rnd 20 :
(inv DEC, 1sc) x5, 2sc (12) (Starting neck)
Rnd 21-22 :
12sc (2 rounds) (12)
Rnd 23 :
(INC) x12 (Fig. 6) (24)
Info :
For open eyes option, you will now make the indents for the eyes. (See next page for tutorial photos.) For closed eyes option, continue to the next round.
Rnd 24-26 :
24sc (3 rounds) (Fig. 7) (24)
Rnd 27 :
2sc, inv DEC, (4sc, inv DEC) x3, 2sc (20)
Rnd 28-29 :
20sc (2 rounds) (20)
Rnd 30 :
2sc, INC, (4sc, INC) x3, 2sc (24)
Info :
Note: The previous increase along with the next 3 increases will form the baby's bottom, and should be centered across the back of the baby.
Rnd 32 :
INC, 1sc, (INC) x2, 21sc (28)
Rnd 33-34 :
28sc (2 rounds) (Fig. 8) (28)
Rnd 35 :
(2sc, inv DEC) x7 (21)
Info :
Stuff the body with fiber fill. (Fig. 9)
Rnd 36 :
(1sc, inv DEC) x7 (14)
Info :
Close hole, leaving a long tail.
Info :
Making Baby's Bottom: Thread tail onto a tapestry needle, *(insert into the closing hole, and bring out through the center of the back around Rnd 29 or 30.) Repeat from * 2 more times so that the yarn is doubled, pull yarn tight to indent and sew in end. (See photos below.)
— Inserting Safety Eyes :
Info :
Find center, between Row 13 and 14 (place center point). Safety eyes will go 4 stitches out from the center for each eye. Use a larger hook to widen the hole and poke safety eye through and fasten the back.
— Making Eye Indents :
Info :
Thread a tapestry needle with a length of skin tone colored yarn. Needle goes in through the neck, and out at the bottom of the eye. Insert needle back in at the top of the eye. Bring needle out at the top of the other eye. Insert needle back in at the bottom of the eye, and out through the neck. Help the yarn go to the outside edge of the eyes. Pull on yarn ends until the yarn slips under the safety eyes. Pull yarn to make indents under the safety eyes. Knot yarn ends and hide inside fiber fill. Tip: If it is difficult to get the needle directly across, you can come up somewhere in between, and go back in the same hole to come out at the top of the other eye.
— Creating the Face - Open Eyes Option :
Info :
Insert a tapestry needle (threaded with white yarn) under chin, bring up at the bottom of the eye.
Info :
Insert needle at the top of the same eye, and bring through the top of the other eye.
Info :
Insert needle into bottom of the same eye and out the original hole under the chin.
Info :
Get a little craft glue on your tapestry needle to secure whites if desired.
Info :
Place some glue on the outer edge of the eye to keep the yarn in place. Finished whites of eyes.
Info :
Placement guide: for black eye line, and brown eyebrow, both are approximately 3 sts in length and 1 st in height. Thin some black yarn to 2 strands and thread a tapestry needle.
Info :
Insert needle into the back of head, and bring through outside of eye (one stitch from side of safety eye). Insert needle into inner top corner of eye, and pull through inner top corner of opposite eye. Insert needle outside the eye (one stitch from the side of the safety eye), and return to original starting hole on back of head. Finished black eye lines.
Info :
Thin some brown yarn to 2 strands and thread a tapestry needle. Bring needle from back of head, and come through at outside corner of the eyebrow. Insert needle into inside corner of eyebrow, and come out at inside corner of opposite eyebrow. Insert needle into outer corner of eyebrow, and return to original starting hole on back of head. Finished eyebrows.
Info :
Insert needle threaded with skin colored yarn under the chin to make the nose which is 4-5 sts in width, centered, and in line with the bottom of the safety eyes.
Info :
Nose consists of 5 overlapping stitches neatly lying. When the face is completed, you will have leftover ends. Knot each set of ends. Thread the ends onto your needle and insert into hole and through fiber fill and out another spot. Trim the excess yarn, and use your needle to poke the short end back into the doll. Finished face, open eyes option.
Info :
Note: Depending on your tension, your stitches may be different than mine. Therefore, I show photos as a guideline for creating your doll's face, but exact size/distances of stitches may need to be adjusted for your particular doll to achieve the look you want!
— Creating the Face - Closed Eyes Option :
Info :
Find the center of the face between the cheeks and between Row 13 and 14. Eyes will be placed 2 sts from the center, and will be 3 sts in width. Thread your needle with skin colored yarn, insert into back of head, coming out at the outside corner of where the closed eye will be made.
Info :
Insert needle to make the eye 3 sts in width, and continue passing over the 3 sts until you have 5 overlapping stitches neatly lying. On the last time, bring needle through to the inside of the second eye (about 4 sts between eyes). Continue in the same way for the second eye.
Info :
On the last time, bring the needle through to one row below the inside corner of the eye. The nose will be 4-5 sts in width and centered between the eyes, 5 overlapping stitches neatly lying. How the face will look at this point.
Info :
Using light brown or brown yarn (for light or medium skin tones) or black yarn (for dark skin tones), thin yarn to 2 strands and thread a tapestry needle. Bring needle from back of head and come through to outside corner of the closed eye. Insert needle into inside corner of the closed eye, bringing needle out just below the eyelid (keeping between the brown yarn and the eyelid), one stitch in from the outer corner.
Info :
Insert needle below brown yarn and one stitch toward the inner corner of the eye (so it will hold the brown yarn in place), and come out at inner corner of the second eye (*don't pull too tightly). Insert needle into outside corner of the closed eye, bringing needle out just below the eyelid (keeping between the brown yarn and the eyelid), one stitch from the inner corner. Insert needle below brown yarn and one stitch toward the outer corner of the eye (so it will hold the brown yarn in place*) (*don't pull too tightly). Bring needle out approximately 2-3 sts above the outside corner of eye, and 1 stitch to the left, to start eyebrow.
Info :
Eyebrows are 3 sts wide and 1 stitch in height, and there are about 5 sts between. After finishing second eyebrow, bring the needle back out the original entry point in the back of the head. Finished face, closed eyes option.
— Belly Button :
Info :
Ch 3, join into circle and leave tail. Pull tight forming a knot. Insert each tail (using a tapestry needle) through body to the back (about 1 stitch apart), (see photos for placement) then pull from the back to indent belly button. Tie ends into knot, sew them in, and hide inside body with a hook or tapestry needle.
— Ears :
Info :
Do not join. Leave tail and position approximately 2-3sc away from corners of eyes. Sew to head in a LYING FLAT POSITION, sewing down the front half of the ear, keeping rounded side less attached (like a real ear.)
— Left Leg :
Info :
(Note: Additional Photo Tutorial for Rnds 1-4 on pgs. 18-20) Start with Ch 5
Rnd 1 :
Starting in 2nd ch from hook, 2sc, INC, 3sc in next ch (across end of row of chains), (now working opposite side) 2sc, INC (Fig. 10) (11)
Rnd 2 :
5sc in next st, 9sc, 1slst (Note: heel will start to form) (Fig. 11) (15)
Rnd 3 :
Note: place a marker in the back loops of each of the next 2 stitches you will be working into (these are stitches from the previous round), to make finding them easier in the next step (Fig. 12), [FLO - (1hdc, 1slst) in next st] x2 (Fig. 13), Bobble stitch (Fig. 14), 1sc* (tacks down the bobble) (Fig. 15), 9sc, inv DEC (Fig. 16) (16)
Info :
*Note: You will need to bend your bobble stitch (squeeze it together to form the big toe), pull your next sc tightly (it will end up behind the bobble) to hold the 'bobble' shape. (Fig. 15)
Rnd 4 :
(Skipping toes and working on the inside of the foot) (1sc in next marked back loop) x2 (Fig. 17), 1sc (working into stitch just past the bobble), 1sc, inv DEC, 7sc (Fig. 18) (12)
Rnd 5 :
(inv DEC) x2, 8sc (Fig. 19) (10)
Rnd 6 :
inv DEC, 8sc (Fig. 20) (9)
Rnd 7 :
4sc, INC, 4sc (Fig. 21) (10)
Rnd 8 :
6sc, INC, 3sc (Fig. 22) (11)
Rnd 9 :
5sc, INC, 5sc (Fig. 23) (12)
Rnd 10 :
4sc, INC, 2sc, inv DEC, 1sc, inv DEC (Fig. 24) (11)
Rnd 11 :
4sc, BLO – (5sc), 2sc (Fig. 25) (11)
Rnd 12 :
(INC) x2, 2sc, 5slst, 2sc (Fig. 26) (13) (Note: the 5slst will end up hidden inside the leg)
Info :
On the next round: Do not worry when you come to a small gap before the marked back loops and after the marked back loops – it is supposed to be that way! Continue with keeping your stitches consistent and tight, and the upper foot will start to form!
Rnd 13 :
6sc, 5sc in front loops from Rnd 11 (from BLO sts) (see Fig. 25, 27), 2sc (back on current row) (Fig. 28, 29) (13)
Rnd 14 :
1sc, (inv DEC) x2, 3sc, inv DEC, 3sc (Fig. 30) (10)
Rnd 15 :
1sc, INC, 5sc, INC, 2sc (12)
Rnd 16 :
7sc, INC, 1sc, INC, 2sc (Fig. 31) (14)
Rnd 17 :
INC, 3sc, INC, 9sc (Fig. 32) (16)
Rnd 18-19 :
16sc (2 rounds) (Fig. 33) (16)
Info :
Stuff leg lightly with fiber fill (keeping its shape and not over stretching). (Fig. 34)
Rnd 20 :
(2sc, inv DEC) x4 (12)
Rnd 21 :
(1sc, inv DEC) x4 (Fig. 35) (8)
Info :
Close hole (whip stitch through front loops). Leave a long tail and set aside.
— Additional Photo Tutorial for Rounds 1-4: Left Foot :
Info :
Photo tutorial shows chain 5, Rnd 1 starting in 2nd ch from hook, and shaping across chain row, Rnd 2 forming top of foot, Rnd 3 marking back loops for toes and making bobble stitch as shown. Follow photos for clarity when using larger yarn for tutorial demonstration.
— Right Leg :
Info :
(Note: Additional Photo Tutorial for Rnds 1-4 on pgs. 24-26) Start with Ch 5
Rnd 1 :
Starting in 2nd ch from hook, 2sc, INC, 3sc in next ch (across end of row of chains), (now working opposite side) 1sc, INC, 5sc in next ch (original starting chain) (Fig. 37) (15)
This darling Mini Baby Doll pattern is perfect for making a tiny handmade friend to keep or give as a special gift. The clear step-by-step rounds and photo tutorials help guide you through tricky details like the face and tiny toes. Make each one in a new skin tone and hairstyle to create a whole nursery of mini dolls! 🧶😊🍼