🧢 Beautiful ✨ Detailed πŸ’ Adorable

Mini Crossbody Bag Pattern

Mini Crossbody Bag Pattern
4.6β˜… Rating
5-7 Hours Time Needed
2.8K Made This
βœ‚οΈ

Intermediate Level

Ideal for those with basic crochet experience, featuring slightly more advanced stitches and techniques to expand your skills.

⏱️

Weekend Treat

Takes 5-7 hours, making it an enjoyable project to finish over a couple of days.

✨

Stylish Touch

An elegant detail to elevate any look, combining traditional techniques with contemporary design sensibilities.

About This Mini Crossbody Bag Pattern

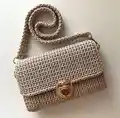
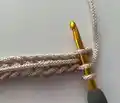
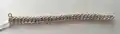
This pattern creates a compact, elegant mini crossbody bag crocheted in 2mm macrame cord using back-loop single crochet for a neat texture. The project includes instructions for the main panel, side pieces, assembly, and a crocheted handle option. You will also find clear photos and sizing details to guide finishing and hardware placement.

Mini Crossbody Bag Pattern crochet pattern - detailed view of completed project

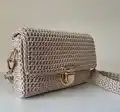
Perfect for an evening out or everyday use, the bag features a flap closure and hardware attachments for a professional look. The pattern includes measurements, optional handle methods, and step-by-step assembly instructions.

Why You'll Love This Mini Crossbody Bag Pattern

I absolutely love this pattern because it turns simple materials into a refined, wearable accessory that you can proudly carry. I enjoy how the back-loop stitch creates a tidy textured fabric that looks more complex than it is. The design is highly adaptable β€” you can make a crocheted handle or use ready-made straps and hardware. It is satisfying to see the bag take shape quickly, and the clear photo steps make assembly relaxing and straightforward. I always get excited when a project is both functional and beautiful, and this pattern delivers on both.

Mini Crossbody Bag Pattern step 1 - construction progress Mini Crossbody Bag Pattern step 2 - assembly progress Mini Crossbody Bag Pattern step 3 - details and accessories Mini Crossbody Bag Pattern step 4 - final assembly and finishing

Switch Things Up

I love how many ways you can customize this bag by changing cord color or hardware to suit your style.

You can make a larger or smaller bag simply by adding or subtracting foundation chains and adjusting the number of rows; always check gauge first.

Try using metallic or multicolored macrame cord for a bold look, or pastel shades for a softer, feminine finish.

Swap the flap lock for a magnetic snap if you prefer an invisible closure or use a button and loop for a handcrafted vibe.

Make a slim strap for crossbody wear or a short handle for a clutch look by adjusting handle length and hardware choice.

I often line my bags with cotton fabric to protect the interior and add pockets; sew the lining before attaching the lock for a neat finish.

Embellish the flap edge with a contrasting surface slip stitch or single crochet border for a polished outline.

Add tassels, pom-poms, or embroidered initials to make the bag a personalized gift.

If you want a firmer base, insert a thin piece of plastic canvas into the bottom before finishing for extra stability and shape retention.

Consider using heavier hardware (brass or gunmetal) to change the bag's overall aesthetic β€” hardware finish can dramatically alter the final look.

Common Mistakes & How to Fix Them

βœ— Not counting foundation chains accurately will change the bag width; recount your foundation chain before starting and adjust to reach the desired width. βœ— Working into the wrong loops can distort the textured pattern; always insert the hook into the back loop of the current row and the back loop of the previous row as instructed. βœ— Cutting the working yarn too early during assembly can leave you without enough length to join pieces; follow the joining steps carefully and only cut when the pattern specifically directs you to. βœ— Skipping the steaming/blocking step will make it harder to shape the bag; straighten and steam the fabric to achieve clear rectangular form and accurate measurements before assembly.

Mini Crossbody Bag Pattern

Make a stylish mini crossbody bag using 2mm macrame cord and a simple back-loop single crochet texture. This pattern gives clear step-by-step instructions with photos and an assembly guide so you can create a compact, everyday bag. Perfect for gifting or making a personalized accessory, the design uses basic stitches and hardware for a polished finish.

Intermediate 5-7 Hours

Materials Needed for Mini Crossbody Bag Pattern

β€” Main Fabric

  • 01
    Sensy 2 mm macrame cord (100% polypropylene), approx 230 m / 251 yards per 200 g (7 oz) skein β€” approx 251 yards total used (Latte color shown)
  • 02
    Substitute yarn: macrame cord 2 mm (similar thickness and structure) β€” adjust quantity to match sample gauge
  • 03
    Note: the pattern is designed for 2 mm cord to achieve the sample measurements and texture

β€” Tools Required

  • 01
    Crochet hook size 3.50 mm (E/4)
  • 02
    Measuring tape
  • 03
    Scissors
  • 04
    Stitch markers
  • 05
    Tapestry needle for weaving ends and sewing hardware
  • 06
    Bag accessories: 16 mm (5/8") inner metal D-rings (2), 25 mm (1") inner metal swivel clasps (2), 46 mm x 44 mm bag lock (1 set)
  • 07
    2.5 cm / 1-inch wide carabiner for handle attachment (optional)
  • 08
    Steam iron or steamer (for shaping/steaming pieces)

Progress Tracker

0% Complete

β€” Materials & Gauge :

Info :

Original yarn: Sensy 2 mm (100% polypropylene macrame cord). Gauge: 17 sc* 13 rows = 4" (10cm). Always use a crochet hook size that will result in the correct gauge after blocking.

β€” Main Part :

Info :

Leave a long tail of yarn approximately 25 cm / 10 inches and make a chain of foundation chain stitches. Note: You can make more or fewer stitches depending on the desired width of the bag. I made 31 chains [Fig 1].

Round 1 :

Row 1: 30 sc, 1 ch, turn [Fig 2].

Info :

Next, lay the long tail of yarn on top, and will crochet it into the second row. Work single crochet stitches, inserting the hook into the back loop of the current row and the loop of the foundation chain [Fig 3-6].

Round 2 :

Row 2: 30 sc, 1 ch, turn [fig 7].

Info :

Straighten the beginning of the crocheted fabric and use the long tail to adjust so that the first rows are not overstretched.

Info :

MAIN PATTERN: Work single crochet stitches, inserting the hook into the back loop of the current row and the back loop of the previous row [Fig 8-10]. Detailed instructions for crocheting this pattern are shown in the video.

Round 3 :

Row 3: 30 sc, 1 ch, turn [Fig 11].

Round 4-Repeat :

Repeat Row 3 until the desired length is reached, 35-36 cm / 13.8 - 14 inches. I ended up with 90 rows [Fig 12]. Straighten the fabric, steam it, and shape it into a clear rectangular form. Measure the length and width.

Info :

Mark the bottom and sides of the bag with stitch markers. Note: You can fold the fabric along these markers to estimate the size of the finished bag.

β€” Size :

Info :

When using similar materials, the bag will be width = 18.5 cm / 7.3"; height = 11 cm / 4.5"; depth = 4 cm / 1.5"; handle length = 70 cm / 27.5".

β€” Bag Sides :

Info :

Make 2 side pieces.

Round 1 :

Make a chain of 5 foundation chain stitches. Row 1: 4 sc, 1 ch, turn.

Round 2 :

Row 2: 4 sc, 1 ch, turn. Continue with the main pattern.

Round 3-25 :

Rows 3-25: 4 sc, 1 ch, turn.

Round 26 :

Row 26: 4 sl-sts [Fig 13].

Info :

Cut the working yarn. Straighten and steam the side piece.

β€” Assembly :

Attach side pieces :

Attach the side pieces to the main part using sl-sts. Start with the left side piece. Place the side piece onto the main part and connect the corner parts [Fig 14].

Join technique :

Insert the hook into the back loop of the main part and the front loop of the side piece (3 loops on the hook) and pull the working yarn through all 3 loops [Fig 15]. In this way, work slip stitches along the three sides of the bag side piece [Fig 16-17].

Info :

A video of the joining process can be found here.

Continue joining :

Do not cut the working yarn! Continue to crochet slip stitches along the main part to the corner and then to the middle of the closing flap. Cut the yarn [Fig 18-19].

Attach other side :

Attach the right bag side in the same way [Fig 20-21].

Finishing joins :

Weave in the ends of the working yarn into the fabric. Mark the center of the flap [Fig 22].

Attach clasp :

Attach the clasp to the flap. First, attach the lock to the upper flap [Fig 23], and then the corresponding part of the lock to the main part of the bag [Fig 24-25].

Sew D-rings :

Sew D-rings to the bag side for attaching the handle [Fig 26].

β€” Handle :

Info :

You can use a ready-made handle or crochet one. For easy attachment of the handle to the bag, a 2.5 cm / 1-inch wide carabiner is used [Fig 26].

Info :

Leave a long tail of yarn approximately 15 cm / 6 inches. Make a chain of 4 foundation chain stitches.

Round 1 :

Row 1: 3 sc, 1 ch, turn. Continue with the main pattern of the bag.

Round 2 :

Row 2: 3 sc, 1 ch, turn.

Round 3 :

Row 3: 3 sc, 1 ch, turn.

Round 4-Repeat :

Crochet rows until the desired length of the handle is reached. I made a medium-length handle, 67 cm / 26 inches long. I ended up with 146 rows.

Attach handle :

Attach the handle to the carabiners [Fig 27]. Weave in the yarn ends.

Finish :

Attach the handle, and the bag is ready! [Fig final images]

Assembly Instructions

  • Attach the side pieces to the main part using slip stitches: place the left side piece onto the main part, align corners, insert the hook through the back loop of the main part and the front loop of the side piece (3 loops on hook) and pull through; slip stitch along three sides to join securely.
  • Continue slip stitching along the main part to the corner and then to the middle of the closing flap before cutting the working yarn, ensuring the flap closes centered over the bag front.
  • Attach the second side piece in the same way and weave in all ends into the fabric, trimming any excess yarn for a neat finish.
  • Attach the bag lock by first fastening the locking plate to the upper flap, then attaching the corresponding lock piece to the main front of the bag aligned with the center of the flap.
  • Sew D-rings to each bag side at the marked positions for attaching the handle or swivel clasps, ensuring they are sewn through multiple strands for strength.
  • Attach the handle (crocheted or ready-made) to the carabiners or swivel clasps and weave in all yarn ends; test hardware alignment and closure before final use.

Important Notes

  • πŸ’‘Use stitch markers to mark bottom and sides before folding and joining to ensure accurate placement and symmetry.
  • πŸ’‘Straighten and steam the crocheted fabric to shape into a clear rectangle before assembly; steaming improves fit and appearance.
  • πŸ’‘Do not cut the working yarn during joining until the pattern instructs, so you have enough length to complete slip-stitch joins.
  • πŸ’‘Weave in ends securely and trim excess to avoid bulky spots when attaching hardware or lining.
  • πŸ’‘Check hardware placement (lock and D-rings) against the folded bag before sewing to ensure perfect alignment.

This mini crossbody bag pattern helps you create a chic everyday accessory with a professional finish. It uses simple stitches and 2mm macrame cord to achieve a tidy textured fabric you will love to make and carry. Try different cord colors and hardware finishes to personalize your bag and make it uniquely yours. πŸ§Άβœ¨πŸ‘œ

You ask,

we answer.

FAQs

What size will the finished piece be?

The finished bag measures approximately 18.5 cm (7.3") wide, 11 cm (4.5") high, and 4 cm (1.5") deep when using the recommended 2mm macrame cord and 3.5 mm hook.

Can I use different yarn weights for this pattern?

Yes, you can use different cord thicknesses, but the final size and texture will change; if using a different yarn weight, adjust your hook size and check gauge before proceeding.

Do I need prior crochet experience for this pattern?

This pattern is rated intermediate, so basic knowledge of single crochet, working in back loops, and joining pieces with slip stitches is recommended for best results.

How long does this project typically take to complete?

Most crocheters complete this project in 5-7 hours depending on experience and whether you crochet the handle or use ready-made hardware and straps.