🧢 Beautiful ✨ Detailed πŸ’ Adorable

Mini Hulk Amigurumi Pattern

Mini Hulk Amigurumi Pattern
4.8β˜… Rating
2-3 Hours Time Needed
1.5K Made This
βœ‚οΈ

Beginner Friendly Level

Perfect for those just starting their crochet journey, with clear instructions and simple techniques

⏱️

Bite-Sized Project

Finishes in 2-4 hoursβ€”perfect for an afternoon of creative relaxation.

🧸

Cute Companion

An adorable friend to cherish, handcrafted with love to bring comfort and joy for years to come.

About This Mini Hulk Amigurumi Pattern

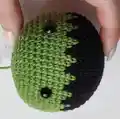
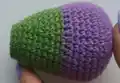
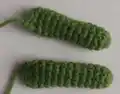
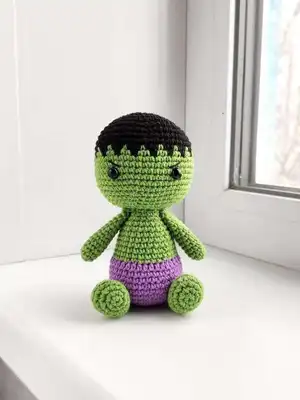
This pattern creates a small, cuddly 13 cm amigurumi with a green head and body, purple shorts, and a black hair detail. The design uses continuous spiral crochet, simple increases and decreases, and a few color changes for the hairline. You will make all parts separately then sew them together for a neat finish.

Mini Hulk Amigurumi Pattern crochet pattern - detailed view of completed project

Easy-to-follow rounds and clear assembly steps make this an approachable project for crocheters with basic skills. The finished doll is great for gifts, decor, or practicing color changes.

Why You'll Love This Mini Hulk Amigurumi Pattern

I absolutely love this pattern because it captures a playful personality with very few pieces and simple techniques. I enjoy how quickly it comes together β€” you can complete a whole little character in an afternoon. The alternating color rounds for the hairline create a charming, unique detail I always get compliments on. I also love that the pattern uses basic stitches, so I can share it with newer crocheters who want a satisfying result.

Mini Hulk Amigurumi Pattern step 1 - construction progress Mini Hulk Amigurumi Pattern step 2 - assembly progress Mini Hulk Amigurumi Pattern step 3 - details and accessories Mini Hulk Amigurumi Pattern step 4 - final assembly and finishing

Switch Things Up

I love customizing small amigurumi by swapping yarn colors to make new characters; try pastel greens and lilacs for a softer version.

I often change yarn weight and hook size to make different sizes β€” thicker yarn and a larger hook gives you a chunky plush, while thinner yarn makes a tiny keychain version.

I like to experiment with eye size too; smaller safety eyes or embroidered eyes change the expression dramatically.

I sometimes embroider a mouth or blush with yarn or fabric paint to add personality and a handmade feel.

You can add wire inside the arms or legs if you want posable limbs; use thin floral or craft wire wrapped in tape for safety.

I recommend swapping the purple shorts color for any accent color to match a theme or recipient preference.

If you want a wearable pin, sew a brooch back to the body and reduce stuffing to make a flatter version that attaches to bags or jackets.

I often add tiny crocheted accessories like a scarf, bow, or tiny hat to create a set of themed characters.

Try combining different yarn textures β€” a fluffy yarn for the hair area can give a different look while keeping the body smooth.

I also enjoy making a family of sizes by scaling the hook and yarn so you can create a whole group of matching amigurumi characters.

Common Mistakes & How to Fix Them

βœ— Skipping the stitch marker when working in continuous spiral can cause you to lose track of the start of rounds; place and move a marker at the beginning of each round to keep counts accurate. βœ— Changing colors without securing the yarn tail can create loose ends or gaps; carry the yarn neatly or weave in ends immediately and make a secure color join on the last pull-through. βœ— Overs or under stuffing the head and body will distort shaping and facial placement; stuff gradually and firmly but not overly tight, checking the shape as you go. βœ— Sewing limbs without aligning stitches can make them lopsided; pin parts in place and align three stitches side-by-side where instructed before sewing to ensure symmetrical placement.

Mini Hulk Amigurumi Pattern

Make a cute 13 cm mini Hulk-style amigurumi with clear, friendly instructions you can follow step by step. This pattern uses basic stitches and color changes to create the iconic green body, purple shorts and black hair detail. Perfect for a quick handmade gift or a small collectible to display. You will enjoy simple assembly and charming finishing touches like embroidered eyebrows.

Beginner Friendly 2-3 Hours

Materials Needed for Mini Hulk Amigurumi Pattern

β€” Main Fabric

  • 01
    YarnArt Jeans yarn - green (for head, body and limbs), amount sufficient for a 13 cm amigurumi (amount not specified in pattern)
  • 02
    YarnArt Jeans yarn - purple (for shorts), amount sufficient for a small amigurumi (amount not specified)
  • 03
    YarnArt Jeans yarn - black (for hair), amount sufficient for color detail (amount not specified)

β€” Tools Required

  • 01
    Crochet hook Clover Soft Touch 2.00 mm
  • 02
    8 mm black safety eyes (2 pieces)
  • 03
    Toys filler (polyester stuffing)
  • 04
    Black thin thread for embroidering eyebrows
  • 05
    Scissors
  • 06
    Tapestry needle
  • 07
    Pins for assembly
  • 08
    Stitch marker

Progress Tracker

0% Complete

β€” Skill Level & Intro :

Info :

Skill level -easy. Pattern does not contain crochet tutorials! You should have basic crochet skills. Approx.13cm (about 5.1 inches) tall using the materials stated in the pattern. You may use any size yarn for this amigurumi, just make sure to use the hook size suggestion on the yarn label. Use safety eyes that are a suitable size for the yarn you are using.

β€” Materials :

Info :

The hook suitable under your yarn. I have Clover Soft Touch 2.00 mm. Yarn: green, purple and black colors. I used Β«YarnArtJeansΒ» yarn. 8 mm black safety eyes. Toys filler. Black thin thread (eyebrows). Toys filler. Scissors. Tapestry needle. Pins. Stitch marker.

β€” Terms used :

Infos :

MR -magic ring. sc-single crochet. ch-chain stitch. slst-slip stitch. blo-through back loops only. inc-increase (stitch 2 times into the next stitch). dec -invisible decrease (crochet 2 sc together using invisible method). hdc -half double crochet. (...)xn -repeat instructions in brackets n times. R -round.

β€” Color Change Note :

Info :

Change colors in crochet. Loop your new yarn color over your hook. Crochet your new yarn color back through the two loops on your hook.

β€” Notes :

Infos :

-Crochet continuously in a spiral, unless otherwise specified. -In order to not lose track of the number of worked stitches in each round, use a stitch marker to mark the beginning of each round -a thin thread of contrasting color. -Crochet tightly enough so the filler is not visible through the holes between loops. -Tightly and gradually fill all the details of the toy in the process of crocheting. -Size of the finished toy can vary depending on the materials used, the density of crocheting and filling, etc.

β€” Body + head :

Round 1 :

6 scMR (6)

Round 2 :

6 inc (12)

Round 3 :

(1 sc, inc)x6 (18)

Round 4 :

(2 sc, inc)x6 (24)

Round 5 :

(3 sc, inc)x6 (30)

Round 6 :

(4 sc, inc)x6 (36)

Round 7 :

(5 sc, inc)x6 (42)

Round 8-10 :

42 sc (3 rounds) (42)

Round 11 :

(5 sc, dec)x6 (36)

Round 12 :

36 sc (36)

Round 13 :

36 hdc (36)

Info :

Continue on with green.

Round 14 :

(4 sc, dec)x6 (30)

Round 15 :

30 sc (30)

Round 16 :

(13 sc, dec)x2 (28)

Round 17 :

28 sc (28)

Round 18 :

(12 sc, dec)x2 (26)

Round 19 :

26 sc (26)

Round 20 :

(11 sc, dec)x2 (24)

Round 21 :

24 sc (24)

Round 22 :

(2 sc, dec)x6 (18)

Round 23 :

18 sc (18) Cut the yarn.

Info :

Stuff the body firmly. Stuff body and head firmly, stuffing as you go.

β€” Arm x2 :

Info :

Crochet with green.

Round 1 :

6 sc MR (6)

Round 2 :

(2 sc, inc)x2 (8)

Round 3-8 :

8 sc (8)

Info :

Stuff only half of the arms.

Round 9-13 :

8 sc (8)

Info :

Do not stuff of the arms. This way the arm doesn't stick out too much after sewing it to the body. Press the opening with your fingers, aligning 3 stitches side by side. Break the yarn and leave a long tail to sew arms to body.

β€” Head :

Info :

Crochet with black yarn.

Round 1 :

6 sc MR (6)

Round 2 :

6 inc (12)

Round 3 :

(1 sc, inc)x6 (18)

Round 4 :

(2 sc, inc)x6 (24)

Round 5 :

(3 sc, inc)x6 (30)

Round 6 :

(4 sc, inc)x6 (36)

Round 7 :

(5 sc, inc)x6 (42)

Round 8 :

(6 sc, inc)x6 (48)

Round 9 :

(7 sc, inc)x6 (54)

Round 10-11 :

54 sc (2 rounds) (54)

Info :

In the next 12 and 13 rounds we will alternate green and black colors.

Round 12 :

(green 1 sc, black 2 sc)x18 (54)

Round 13 :

(green 2 sc, black 1 sc)x18 (54)

Info :

Continue on with green.

Round 14-19 :

54 sc (6 rounds) (54)

Round 20 :

(7 sc, dec)x6 (48)

Round 21 :

(6 sc, dec)x6 (42)

Info :

Place safety eyes between rounds 16 and 17, 11 st apart.

Round 22 :

(5 sc, dec)x6 (36)

Round 23 :

(4 sc, dec)x6 (30)

Round 24 :

(3 sc, dec)x6 (24)

Info :

Start to stuff the head.

Round 25 :

(2 sc, dec)x6 (18)

Round 26 :

Only through back loops, (1 sc, dec)x6 (12)

Round 27 :

6 dec. Leave the thread for sewing.

β€” Leg x2 :

Info :

Start working with green yarn.

Round 1 :

6 sc MR (6)

Round 2 :

6 inc (12)

Round 3 :

inc, 3 sc, 3 inc, 3 sc, 2 inc (18)

Round 4 :

7 sc, 3 inc, 8 sc (21)

Round 5 :

Only through back loops, 21 sc (21)

Round 6 :

7 sc, 3 dec, 8 sc (18)

Round 7 :

4 sc, 4 dec, 6 sc (14)

Round 8 :

2 sc, 4 dec, 4 sc (10)

Round 9 :

(3 sc, dec)x2 (8)

Info :

Stuff only half of the legs.

Round 10-15 :

8 sc (6 rounds) (8)

Round 16 :

Only 5 sc. Do not stuff of the legs. Press the opening with your fingers, aligning 3 stitches side by side. Break the yarn and leave a long tail.

β€” Finishing :

Infos :

Sew the head to the body. Sew the legs to the body. Sew the arms to the body symmetrically. Embroider eyebrows.

Assembly Instructions

  • Place safety eyes between rounds 16 and 17 on the head, spaced 11 stitches apart, then secure the backs before stuffing the head fully.
  • Attach the head to the top of the body using the long tail left at R27, sewing through the remaining stitches to secure it firmly.
  • Sew the legs to the bottom of the body evenly spaced so the doll sits stably, aligning the openings and stitching securely through several rounds.
  • Position arms on either side of the body, aligning 3 stitches side by side at the openings, press the openings together and sew the arms symmetrically.
  • Embroider eyebrows with black thin thread as shown in photos, using small backstitches above the eyes for expression.

Important Notes

  • πŸ’‘Crochet continuously in a spiral unless the pattern specifies otherwise to avoid visible seams.
  • πŸ’‘Use a stitch marker to mark the beginning of each round so you do not lose track of rounds during shaping and color changes.
  • πŸ’‘Stuff gradually and firmly while crocheting to preserve the toy shape; overstuffing can stretch stitches and under stuffing causes limp parts.
  • πŸ’‘When changing colors, bring the new color through the two loops on the hook to create a clean join and reduce loose ends.

This tiny amigurumi pattern is perfect for a quick handmade gift or to practice shaping and color changes. It combines simple rounds with a charming hairline detail and tiny embroidered features. Make one for your collection or give it to someone who loves handmade toys. 🧢🧡

You ask,

we answer.

FAQs

What size will the finished piece be?

The finished amigurumi measures approximately 13 cm (about 5.1 inches) tall when using the recommended yarn and a 2.00 mm hook.

Can I use different yarn weights for this pattern?

Yes, you can use different yarn weights, but the final size will change; choose an appropriate hook for your yarn and expect differences in proportions.

Do I need prior crochet experience for this pattern?

This pattern is labeled easy and beginner friendly, so basic knowledge of single crochet, increases, and decreases is recommended for best results.

Where do I place the safety eyes?

Place safety eyes between rounds 16 and 17 on the head, spaced 11 stitches apart as specified in the head instructions.