About This Mini Seal Amigurumi Pattern
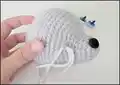
This pattern teaches you how to crochet a cute mini seal from the front of the head to the back, complete with sewn fins and embroidered details. It includes full round-by-round instructions, eye placement guidance, and finishing tips. Photos and an extra video link are provided to help with tricky assembly steps.

Worked in continuous spiral rounds using worsted weight yarn and a 3.25 mm hook, the finished seal measures about 6 inches tall. The pattern includes instructions for making two tail fins and two sewn-on fins, plus embroidery for eyebrows and optional sleepy eyes.
Why You'll Love This Mini Seal Amigurumi Pattern
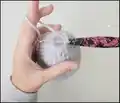
I absolutely love this pattern because it brings a sweet, realistic seal to life with simple shaping and small finishing details that add so much personality. I enjoy the way the eye placement and slight embroidery transform the face into a charming expression. The construction is clever — crocheting from the front of the head to the back makes assembly more seamless and reduces visible seams. I also love that the pattern includes clear photos and an extra video link to guide you through the eye-sinking process, which can be tricky for many makers.
Switch Things Up
I love how easily this seal pattern can be customized by changing yarn colors; try a variegated or pastel yarn for a totally different vibe.
If you want a larger or smaller seal, change your yarn weight and hook size — bulky yarn creates a chunkier cuddle buddy while fingering weight yarn makes a tiny, delicate version.
I often swap the safety eyes for embroidered eyes for a softer, child-safe finish or use smaller eye sizes for a cuter expression.
For extra texture, use boucle or chenille yarn to create a fluffy, plush-looking seal; be mindful that fuzzy yarn can hide stitch definition.
Try embroidering different eyebrow shapes or mouth expressions to change the seal's personality from sleepy to surprised.
I sometimes add a tiny crocheted scarf or bow as an accessory to make the seal gift-ready and seasonal.
You can add a keyring to make a mini version into a keychain or backpack charm by reducing rounds or using thinner yarn.
Experiment with stuffing: lighter stuffing makes the seal squishier and floppy, while firmer stuffing gives a more sculpted look.
I also like to surface crochet small lines on the fins for decorative stripes instead of embroidery for a bolder look.
For a waterproof decoration, consider using washable acrylic yarn and securely weave in ends before gifting to children or households with pets.
Common Mistakes & How to Fix Them
✗ Skipping stitch markers when working in continuous spiral can lead to lost beginning rounds; use a marker at the start of each round to keep track.
✗ Overstuffing the head and body will distort the shape and make sewing parts difficult; stuff gradually and firmly but not too tight to maintain smooth shaping.
✗ Placing safety eyes without counting holes precisely causes uneven eye placement; count 10 holes between eyes and confirm positions before inserting.
✗ Forgetting to remove stuffing before placing eye washers can prevent proper seating; remove most stuffing, attach washers, then re-stuff to secure eyes.