🧢 Beautiful ✨ Detailed πŸ’ Adorable

Minimals Deer Amigurumi Pattern

Minimals Deer Amigurumi Pattern
4.7β˜… Rating
5-7 Hours Time Needed
2.8K Made This
βœ‚οΈ

Intermediate Level

Ideal for those with basic crochet experience, featuring slightly more advanced stitches and techniques to expand your skills.

⏱️

Weekend Treat

Takes 5-7 hours, making it an enjoyable project to finish over a couple of days.

🧸

Cute Companion

An adorable friend to cherish, handcrafted with love to bring comfort and joy for years to come.

About This Minimals Deer Amigurumi Pattern

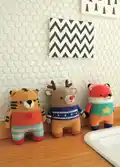
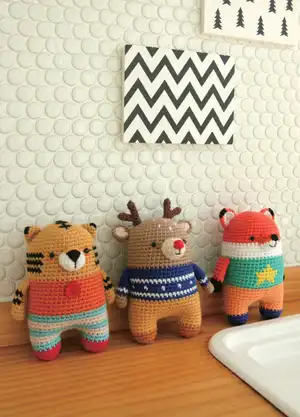
This pattern creates a 15cm (5.9in) Minimals Deer amigurumi with head, body, legs, arms, horns, ears and a separate snout. It features simple color changes to make the striped sweater and clear stitch counts for shaping. Youll find symbol charts and step-by-step rounds to guide your work from magic ring to finishing. Ideal for making a small gift or a cute shelf companion.

Minimals Deer Amigurumi Pattern crochet pattern - detailed view of completed project

Includes clear materials and abbreviations plus multiple photos for assembly reference. The pattern uses worsted weight yarn and a 3mm hook for the shown size.

Why You'll Love This Minimals Deer Amigurumi Pattern

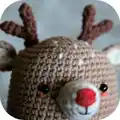
I absolutely love this pattern because it turns simple stitches into a lovable character with personality. I enjoy the little colorwork sweater which adds charm without complicated technique. I appreciate how the pattern breaks the make into clear sections so you can craft head, body, legs, arms and accessories separately. I especially love the tiny snout and horns β€” they give the deer so much character and are fun to sew in place.

Minimals Deer Amigurumi Pattern step 1 - construction progress Minimals Deer Amigurumi Pattern step 2 - assembly progress Minimals Deer Amigurumi Pattern step 3 - details and accessories Minimals Deer Amigurumi Pattern step 4 - final assembly and finishing

Switch Things Up

I love altering colors to create different personalities for this deer; try pastel hues for a softer look or bright primaries for playful charm.

I sometimes swap yarn weight and adjust hook size to make mini keychain versions or larger cuddly dolls.

I often embroider different facial expressions to make each deer unique, moving the eyes or adjusting the mouth for smiles or sleepy looks.

Adding felt accessories like tiny scarves, hats or a crocheted bow makes fun seasonal variants.

I suggest testing color placement on a small swatch when changing the sweater colors to ensure stripe spacing matches the charts.

For a posable version, I add thin wire to the arm inserts before sewing them closed so limbs can be posed for display.

I sometimes replace safety eyes with embroidered eyes for baby-safe toys and to create a softer aesthetic.

If you want a plush version, try using a slightly thicker stuffing and a softer bulky yarn; this gives a cuddlier feel.

I like to stitch small decorative spots on the head using contrasting yarn to mimic natural deer markings.

Try making a family set with different color combinations and add tiny accessories to make each deer distinct and gift-ready.

Common Mistakes & How to Fix Them

βœ— Not changing yarn color where indicated leads to incorrect sweater stripes; follow the symbol charts and change colors exactly where shown to keep pattern symmetry. βœ— Forgetting to use stitch markers when dividing legs causes misplacement; place markers to identify the center space and leg boundaries before splitting rounds. βœ— Overstuffing the head or legs makes shaping bulky and uneven; stuff gradually, check shape often, and avoid packing fiberfill too tightly. βœ— Skipping stitch counts during increases and decreases results in uneven shaping; count stitches after each round and mark rounds where shaping occurs to stay accurate.

Minimals Deer Amigurumi Pattern

Make a charming Minimals Deer amigurumi with this complete pattern. Youll create a cuddly little deer with colorwork sweater stripes, cute horns, ears, and a tiny snout. The pattern includes detailed rounds, symbol charts, and step-by-step assembly tips so you can follow along with confidence. Perfect as a handmade gift or a sweet addition to your toy collection.

Intermediate 5-7 Hours

Materials Needed for Minimals Deer Amigurumi Pattern

β€” Main Fabric

  • 01
    Worsted weight yarn (approximate small amounts of each color): Brown yarn for main body (primary), Dark brown yarn for horns and accents, Light beige yarn for snout and inner ears, Blue yarn for sweater stripes, Red yarn for nose detail, White yarn for snout and stripe details, Dark orange yarn for foot accents, Yellow yarn for pants/body lower part
  • 02
    Eyes: 5mm Black plastic eyes x2
  • 03
    Note: Pattern photo size is 15cm (5.9 inches) when using fingering weight yarn on a 3mm hook; the pattern instructions are written for worsted weight yarn as listed.

β€” Tools Required

  • 01
    Crochet hook 5/0 (3mm)
  • 02
    Yarn needle for sewing and weaving ends
  • 03
    Scissors
  • 04
    Stitch markers (to divide legs and mark rounds)
  • 05
    Fiberfill stuffing (polyester stuffing)
  • 06
    5mm black plastic safety eyes x2
  • 07
    Glue (to glue eyes on face, if desired)
  • 08
    Optional: wooden pins for feet to straighten doll

Progress Tracker

0% Complete

β€” Head / Body / Legs :

Round 1 :

scx6 in the yarn loop, tighten the loop [6 sts]

Round 2 :

(2-sc inc) x 6 [12]

Round 3 :

(scx1, 2-sc inc) x 6 [18]

Round 4 :

(scx2, 2-sc inc) x 6 [24]

Round 5 :

(scx3, 2-sc inc) x 6 [30]

Round 6 :

(scx4, 2-sc inc) x 6 [36]

Round 7 :

(scx5, 2-sc inc) x 6 [42]

Round 8 :

(scx6, 2-sc inc) x 6 [48]

Round 9~36 :

sc in all 48 st [48]

Infos :

Do not forget to change the color as shown in the illustration to the right. Check the symbol patterns and change yarn colors according to the charts. To divide the legs: identify the center space between the legs by the 6 stitches; each leg identifies the other by 18 stitches. Use stitch markers to help.

Info :

Sc at the 31th st of the Rnd 36. This sc is the first st of the first leg (left leg). Continue working on the first leg (left leg).

Round 37~40 :

sc in all 18 st [18]

Round 41 :

(scx1, sc2tog) x 6 [12]

Round 42 :

(sc2tog) x 6 [6]

Info :

Fasten off, leaving a long tail. Stuff the leg. Using a yarn needle, weave the yarn tail through the front loop of each remaining stitch and pull tight to close.

Info :

Second leg (Right leg): Rejoin the Yellow yarn to 7th back unworked stitch of Rnd 36. This sc is the first stitch for the second leg (right leg). Continue working the second leg (right leg) the same way as the first leg (left leg), from Rnd 37~42. Using a yarn needle, sew the 6 sts between the legs.

β€” Arm :

Round 1 :

Use the Brown yarn to make MAGIC RING. scx5 in the yarn loop, tighten the loop [5 sts]

Round 2 :

(2-sc inc) x 5 [10]

Round 3~11 :

sc in all 10 st [10]

Info :

Fasten off, leaving a long tail for sewing. Flatten the ARM, do not stuff.

β€” Long Horn :

Round 1 :

Use the Dark brown yarn to make MAGIC RING. scx4 in the yarn loop, tighten the loop [4 sts]

Round 2~5 :

sc in all 4 st [4]

Round 6 :

2-sc inc, scx3 [5]

Round 7 :

2-sc inc, scx4 [6]

Info :

Fasten off, leaving a long tail for sewing. Do not stuff.

β€” Short Horn :

Round 1 :

Use the Dark brown yarn to make MAGIC RING. scx4 in the yarn loop, tighten the loop [4 sts]

Round 2~4 :

sc in all 4 st [4]

Info :

Fasten off, leaving a long tail for sewing. Do not stuff. Sew the Short horn to the Long horn.

β€” Snout :

Round 1 :

Use the Light beige yarn to make 3 chains. scx1 in second ch from hook, scx3 in the bottom chain, working up the other side-scx1, scx1 in the next chain, slst [6 sts]

Round 2 :

ch 1, (2-sc inc) x 6, slst [12]

Round 3 :

ch 1, sc in all 12 st, slst [12]

Round 4 :

ch 1, scx4, 2-sc inc, scx6, 2-sc inc, slst [14]

Round 5 :

ch 1, sc in all 14 st, slst [14]

Info :

Fasten off, leaving a long tail for sewing. Fill with some stuffing. Make a nose and mouth on the snout after sewing in place.

Info :

Eyes Location: place eyes between Rnd 13 and 14 on the head.

β€” Ear :

Round 1 :

Use the Light beige yarn to make MAGIC RING. scx6 in the yarn loop, tighten the loop [6 sts]

Round 2 :

(2-sc inc) x 6 [12]

Info :

Fasten off, and make another Light beige ear; make two Brown ears the same way.

Round 3 :

Edging: Locate light beige colored ear part on the brown ear, and then SC together with brown yarn. [12]

Info :

Fasten off, leaving a long tail for sewing. Attach ears to the head between Rnd 14 and 15 as shown in illustrations.

Assembly Instructions

  • Attach the snout centered on the face between rounds 13 and 14 and sew securely with the long tail, then embroider the nose and mouth.
  • Position safety eyes between Rnd 13 and 14, spacing them approximately 8 stitches apart; secure and glue if desired.
  • Sew the ears to the head between Rnd 14 and 15, matching the light beige inner ear to the brown ear edge and sewing through both layers.
  • Sew arms to the sides of the body between Rnd 20 and 21, angling slightly forward and securing firmly with a yarn needle.
  • Sew horns to the top of the head in the positions shown; attach short horn pieces onto long horn pieces before sewing, then secure horns to the crown area.

Important Notes

  • πŸ’‘Use stitch markers to mark the stitch boundaries between legs before dividing to avoid miscounting stitches.
  • πŸ’‘Follow the symbol pattern for color changes exactly to keep the sweater stripes aligned and symmetrical.
  • πŸ’‘Stuff parts gradually and check shape frequently; overstuffing can distort the amigurumi shape.
  • πŸ’‘Weave in ends as you go and leave long tails for sewing separate parts together for easier assembly.

This Minimals Deer is a delightful little companion ready to brighten any shelf or gift box. Handcraft each tiny detail β€” from the striped sweater to the cute snout β€” and enjoy the process. Happy crocheting and share your handmade joy with someone special! 🧢🧸

You ask,

we answer.

FAQs

What size will the finished piece be?

The finished amigurumi measures approximately 15 cm (5.9 inches) when using the recommended yarn and hook combination shown in the pattern.

Can I use different yarn weights for this pattern?

Yes, you can use different yarn weights but it will change the final size; adjust your hook size accordingly and test gauge with a small swatch.

Do I need prior crochet experience for this pattern?

This pattern is rated intermediate, so basic crochet knowledge such as magic ring, increases, decreases and sewing pieces together is recommended.

How long does this project typically take to complete?

Most crocheters complete this project in 5-7 hours, though time may vary based on experience level and working pace.