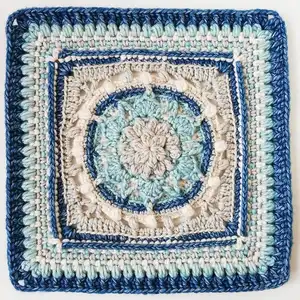
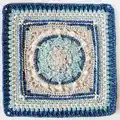
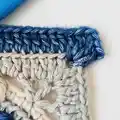
Create a textured mandala-style crochet square with layered stitches, puff clusters and front-post detailing. This pattern guides you through each round with clear photos and stitch explanations so you can achieve a professional finish. Youll build a beautiful 12" x 12" decorative square perfect for cushions, throws or wall art. Enjoy combining four stonewashed colors for a serene, handmade accent.
Progress Tracker
0% Complete
— Pattern :
Infos :
Color A - Crystal Quartz. Color B - Amazonite. Color C - Moon Stone. Color D - Blue Apatite.
Round 1 :
(color A) In a magic ring ch3 and a 2dc-CL (count as a 3dc-CL). (Ch2, 3dc-CL) 5 times. Ch2. Sl st to the first 3dc-CL. DO NOT CUT YARN. [6 3dc-CL, 6 ch2-sp]
Round 2 :
(color A) Sl st to the ch2-sp. Ch3 and a 2dc-CL (count as a 3dc-CL). Ch2. 3dc-CL in same ch2-sp. Ch2. Skip next st. [(3dc-CL, ch2, 3dc-CL) in next ch2-sp, ch2] 5 times. Sl st to first 3dc-CL. Cut yarn and sew in ends. [12 3dc-CL, 12 ch2-sp]
Round 3 :
(color B) Standing FPsc around first 3dc-CL from previous rnd worked in a ch2-sp from rnd 1. *2 sc in next ch2-sp. FPsc around next st. FPtr worked around 3dc-CL from rnd 1 immediately below. This FPtr is worked behind the ch2-sp from previous rnd. FPsc around next 3dc-CL.** Repeat from * to ** 5 more times, omitting last FPsc. Sl st to first FPsc. DO NOT CUT YARN. [12 FPsc, 6 FPtr, 12 sc]
Round 4 :
(color B) Ch1 (does not count as a st). Sc in same st. *Ch3. Skip next 2 sts. Sc in next st. (3 dc, picot, 3 dc) in next st. It is the FPtr from previous rnd. Sc in next st.** Repeat from * to ** 5 more times, omitting last sc. Sl st to first sc. Cut yarn and sew in ends. [12 sc, 36 dc, 6 picots, 6 ch3-sp]
Round 5 :
(color C) Standing sc in any 1st skipped st, of a group of 2 sc worked in rnd 3. Sc in next skipped st. These 2 sc are worked in front of the ch3-sp. Ch5. Sc in next 2 skipped sts from previous rnd.** Repeat from * to ** 5 more times, omitting last 2 sc. Sl st to the first sc. Push the (3dc, picot, 3 dc) from previous rnd to the front of the ch5-sp. DO NOT CUT YARN. [12 sc, 6 ch5-sp]
Round 6 :
(color C) Ch3 (counts as a 1st dc). Dc in same st. 2 dc in next st. *6 dc in next ch5-sp. 2 dc in each of the next 2 sts.** Repeat from * to ** 5 more times, omitting last 4 dc. Sl st to the top of beg ch3. Cut yarn and sew in ends. [60 dc]
Round 7 :
(color B) Standing sc in 1st dc of the 1st 2 dc group. Sc in next st. *FPtr2tog working one leg around the sc after the picot from rnd 4 and the other leg around the sc before next picot from rnd 4. Do not skip the st behind. Sc in next 10 sts.** Repeat from * to ** 5 more times, omitting last 2 sc. Sl st to the first sc. Cut yarn and sew in ends. [6 FPtr2tog, 60 sc]
Round 8 :
(color D) Work entire rnd in BLO. BLO Standing sc in the st immediately before the FPtr2tog from previous rnd. *FPsc around next st. It is the FPtr2tog from rnd 7. BLO Sc in next 10 sts.** Repeat from * to ** 5 more times, omitting last BLO sc. Sl st to first BLO standing sc. Cut yarn and sew in ends. [6 FPsc, 60 BLO sc]
Round 9 :
(color A) Work entire rnd in BLO. BLO Standing sc in any FPsc from previous rnd. BLO sc in next 5 sts. *Dc in the picot from rnd 5. Do not catch any other st nor skip any st. BLO sc in next 11 sts.** Repeat from * to ** 5 more times, omitting last 6 BLO sc. Sl st to BLO standing sc. Cut yarn and sew in ends. [6 dc, 66 BLO sc]
Round 10 :
(color C) Work entire rnd in BLO except for the Puff-sts. Standing Puff-st in any dc from previous rnd. Puff-st is worked in both loops. *BLO sc in next 5 sts. Puff-st in next st.** Repeat from * to ** 11 more times, omitting last Puff-st. Sl st to first Puff-st. Cut yarn and sew in ends. [12 Puff-st, 60 BLO sc]
Round 11 :
(color A) Standing dc in the 3rd sc after a Puff-st from previous rnd, worked in a dc from rnd 9. (Ch2, dc, ch2, dc) in same st. This is the first corner. *Ch2. Skip next 2 sts. FPhdc around next st. It is the Puff-st. Ch2. Skip next 2 sts. Puff-st in next st. Ch2. Skip next 2 sts. FPsc around next st. It is the Puff-st. Ch2. Skip next 2 sts. Puff-st in next st. Ch2. Skip next 2 sts. FPhdc around next st. It is the Puff-st. Ch2. Skip next 2 sts. (Dc, ch2, dc, ch2, dc) in next st.** Repeat from * to ** 3 more times, omitting last corner sts. Sl st to first dc. DO NOT CUT YARN. [8 Puff-sts, 4 FPsc, 8 FPhdc, 24 ch2-sp, 4 x (Dc, ch2, dc, ch2, dc) corner sts]
Round 12 :
(color A) Ch3 (counts as a first dc). 2 dc in next ch2-sp. (2 dc, ch2, 2 dc) in next st. New corner. * 2 dc in next ch2-sp. Dc in next st. 2 dc in next ch2-sp. Hdc in next st. 2 hdc in next ch2-sp. FPhdc around next st. It is the Puff-st. 2 hdc in next ch2-sp. Hdc in next st. 2 hdc in next ch2-sp. FPhdc around next st. It is the Puff-st. 2 hdc in next ch2-sp. Hdc in next st. 2 dc in next ch2-sp. Dc in next st. 2 dc in next ch2-sp. (2 dc, ch2, 2 dc) in next st.** Repeat from * to ** 3 more times, omitting last 3dc and corner sts. Sl st to the top of the beg ch3. Cut yarn and sew in ends. [44 hdc, 56 dc, 8 FPhdc, 4 x ch2 corner sp]
Round 13 :
(color D) Work entire rnd in BLO. Standing dc in any ch2 corner sp. (Dc, ch2, 2 dc) in same ch2 corner sp. *BLODc in next 9 sts. BLOHdc in next 9 sts. BLODc in next 9 sts. (2 dc, ch2, 2 dc) in next ch2 corner sp.** Repeat from * to ** 3 more times, omitting last corner sts. Sl st to first dc. Cut yarn and sew in ends. [36 BLOhdc, 80 BLOdc, 8 dc, 4 x ch2 corner sp]
Round 14 :
(color C) Standing hdc in any ch2 corner sp. (Ch2, hdc) in same ch2 corner sp. *BPhdc in next 31 sts. (Hdc, ch2, hdc) in next ch2 corner sp.** Repeat from * to ** 3 more times, omitting last corner sts. Sl st to first hdc. Cut yarn and sew in ends. [8 hdc, 124 BPhdc, 4 x ch2 corner sp]
Round 15 :
(color B) Standing sc in any ch2 corner sp. (Ch2, sc) in same ch2 corner sp. *(Ch1, skip next st, sc in next st) 16 times. Ch1. Skip last st. (Sc, ch2, sc) in same ch2 corner sp.** Repeat from * to ** 3 more times, omitting last corner sts. Sl st to first sc. Cut yarn and sew in ends. [72 sc, 68 ch1-sp, 4 x ch2 corner sp]
Round 16 :
(color A) Standing sc in any ch2 corner sp. (Ch2, sc) in same ch2 corner sp. *(Ch1, skip next st, sc in next ch1-sp) 17 times. Ch1. Skip last st. (Sc, ch2, sc) in same ch2 corner sp.** Repeat from * to ** 3 more times, omitting last corner sts. Sl st to first sc. Cut yarn and sew in ends. [76 sc, 72 ch1-sp, 4 x ch2 corner sp]
Round 17 :
(color C) Standing sc in any ch2 corner sp. (Ch2, sc) in same ch2 corner sp. *(Ch1, skip next st, sc in next ch1-sp) 18 times. Ch1. Skip last st. (Sc, ch2, sc) in same ch2 corner sp.** Repeat from * to ** 3 more times, omitting last corner sts. Sl st to first sc. Cut yarn and sew in ends. [80 sc, 76 ch1-sp, 4 x ch2 corner sp]
Round 18 :
(color B) Standing 2dc-CL in any ch2 corner sp. (Ch3, 2dc-CL) in same ch2 corner sp. *Ch1. Skip next st. (Puff-st in next ch1-sp, ch1, skip next st) 19 times. (2dc-CL, ch3, 2dc-CL) in next ch2 corner sp.** Repeat from * to ** 3 more times, omitting last corner sts. Sl st to first 2dc-CL. Cut yarn and sew in ends. [76 Puff-st, 8 2dc-CL, 80 ch1-sp, 4 x ch3 corner sp]
Round 19 :
(color D) Standing 2dc-CL in any ch3 corner sp. (Ch3, 2dc-CL) in same ch3 corner sp. *FPdc around next st. It is the 2dc-CL from previous rnd. Skip next ch1-sp. FPdc around next st. It is the first Puff-st from previous rnd. (Hdc in next ch1-sp. FPdc around next st) 19 times. (2dc-CL, ch3, 2dc-CL) in next ch3 corner sp.** Repeat from * to ** 3 more times, omitting last corner sts. Sl st to first 2dc-CL. Cut yarn and sew in ends. [76 hdc, 8 2dc-CL, 84 FPdc, 4 x ch3 corner sp]
This beautiful Miosotis square combines clusters, puff stitches and front-post detail for a richly textured look. Its layered design makes it a perfect focal point for cushions, blankets, or framed wall art. Make a set in coordinated colors for a show-stopping handmade home collection. 🧶✨🖼️