🧢 Beautiful ✨ Detailed πŸ’ Adorable

Mushroom Hand Warmers Pattern

Mushroom Hand Warmers Pattern
4.3β˜… Rating
2-3 Hours Time Needed
1.7K Made This
βœ‚οΈ

Intermediate Level

Ideal for those with basic crochet experience, featuring slightly more advanced stitches and techniques to expand your skills.

⏱️

Bite-Sized Project

Finishes in 2-4 hoursβ€”perfect for an afternoon of creative relaxation.

🏑

Cozy Accent

A warm touch for your space that transforms ordinary corners into inviting nooks filled with handmade charm.

About This Mushroom Hand Warmers Pattern

This pattern creates a pair of fingerless hand warmers with a mushroom chart on the back of the hand. It features a ribbed cuff worked flat, then joined to work in rounds with a detailed color chart for the mushroom. The pattern uses DK/8 ply yarn and a 3.5 mm hook for a snug, wearable fit.

Mushroom Hand Warmers Pattern crochet pattern - detailed view of completed project

Youll find step-by-step rows, charted colorwork for left and right hands, and finishing instructions for embroidered details. Suitable for making matching pairs or customizing colors for a unique look.

Why You'll Love This Mushroom Hand Warmers Pattern

I absolutely love this pattern because it combines simple construction with a playful colorwork motif that really stands out. I enjoy the satisfying rhythm of the ribbing followed by the quick rounds that shape the hand warmer. The mushroom chart lets me add a little personality to everyday accessories, and I love gifting these because theyre quick to make yet feel special. Im always excited to try different color combinations and see how the same pattern changes mood with new yarns.

Mushroom Hand Warmers Pattern step 1 - construction progress Mushroom Hand Warmers Pattern step 2 - assembly progress Mushroom Hand Warmers Pattern step 3 - details and accessories Mushroom Hand Warmers Pattern step 4 - final assembly and finishing

Switch Things Up

I love changing the mushroom colors to match seasons β€” bright reds for poppy vibes or soft pastels for a springtime look.

You can make a mini version by using fingering weight yarn and a smaller hook for keychains or tiny gifts.

Want chunkier warmers? Use a bulky yarn and a larger hook to get a thicker, cozier version that works up fast.

I sometimes add a thumb gusset by adjusting the number of chains at Row 14 to make a roomier thumb opening for comfort.

I like to embroider extra details on the mushroom using a contrasting thread to make the motif pop even more.

Try adding a small pom-pom or crochet leaf applique near the cuff for a whimsical accent that personalizes the pair.

If youre making a set for gifting, change the main color and keep the mushroom color consistent to make a coordinated collection.

I often block the finished warmers lightly to even out stitches and help the colorwork sit flat and neat.

For a washable, everyday pair, choose a machine-washable acrylic or superwash wool to keep them easy-care.

I also like to add a simple lining with felt for extra warmth and wind protection while keeping the fingerless design intact.

Common Mistakes & How to Fix Them

βœ— Skipping the stitch count when joining the ribbing to work in rounds can lead to uneven joins; count your stitches carefully before slip stitching Row 1 to the last row to ensure a neat seam. βœ— Carrying the contrast yarn across many stitches will create lumps and visible floats; follow the note in the pattern and only carry the mushroom yarn when needed, dropping it and picking it up again as required. βœ— Not counting increases on Rows 8-11 will produce the wrong stitch totals and distort the shape; record stitch counts after each increase row to stay accurate. βœ— Forgetting to make the chain 8 thumb opening at Row 14 will close the thumb gap; follow the distinct Right/Left Row 14 instructions to create the thumb opening correctly.

Mushroom Hand Warmers Pattern

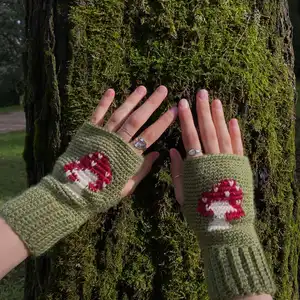
This cozy pattern teaches you how to crochet a pair of fingerless hand warmers with a charming mushroom motif. Youll work a ribbed cuff, join it into rounds, and follow a color chart for the mushroom detail. The instructions are clear and photo-supported so you can create a warm, stylish pair for yourself or as a handmade gift. Perfect for crafters who enjoy small wearable projects with personality.

Intermediate 2-3 Hours

Materials Needed for Mushroom Hand Warmers Pattern

β€” Main Fabric

  • 01
    70 g DK / 8 ply / worsted weight yarn (main color) - example: Karisma by Drops
  • 02
    Small amounts of 2 contrast colors for the mushroom detail (cap color and stem color)
  • 03
    Yarn recommendations listed: Easy Care Merino by Mayflower; Zeeman Royal Breigaren; Marvel 8ply acrylic; Adlibris Socki Garn; Blue Sky Fibers Woolstok Yarn; Stylecraft DK

β€” Tools Required

  • 01
    3.5 mm crochet hook
  • 02
    A needle and thick thread for embroidered details (last touches)
  • 03
    Yarn for colorwork (2 contrasting colors for the mushroom)

Progress Tracker

0% Complete

β€” Charts :

Info :

Two 12x12 color charts are provided: LEFT HAND CHART and RIGHT HAND CHART. Follow the left chart for the left glove and the right chart for the right glove when working the mushroom colorwork.
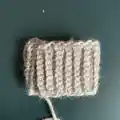
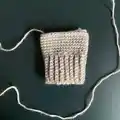
β€” Step 1. Ribbing :

Row 1 :

make a row of 11 sc, and turn your work

Row 2-33 :

chain 1, blo sc until last st remain, turn (11 st)

Info :

Connect Row 1 with the last one using ss, and turn it inside out

β€” Step 2. The Body :

Row 1 :

ch 1, make a row of 33 sc on top of the ribbing, ss in the ch of 1

Row 2-7 :

ch 1, 33 sc, ss

Row 8 :

ch 1, 9 sc, increase, follow the chart for left or right hand (12 sc), inc, 9 sc, ss (33+2 st increase)

Info :

Note! Do not carry the yarn for the mushroom all over the project, use it and leave it if you donΒ΄t need it anymore, then take it again on the next row

Row 9 :

ch 1, 10 sc, inc, chart (12 sc), inc, 10 sc, ss (35 st+2 st inc)

Row 10 :

ch 1, 11 sc, inc, chart (12 sc), inc, 11 sc, ss (37 st+2 st inc)

Row 11 :

ch 1, 12 sc, inc, chart (12 sc), inc, 12 sc, ss (39 st+2 st inc)

Row 12-13 :

follow the chart, no increases (41 st), ss

Info :

*for bigger sizes continue increasing on row 12-13 (Row 12:43 st, Row 13: 45 st)

Row 14 :

is different for each glove.

Right :

after changing colours on that row make 3 sc, chain 8 and skip 8 st, slip stitch it with the ninth stitch

Left :

at the beginning of this row ch 1, make 4 sc, chain 8, skip 8 st, slip stitch it with the ninth stitch

Row 15 :

ch 1, make a row of sc following the chart (put in the chain you made 8 sc), ss

Row 16-18 :

ch 1, 41 sc, ss

Info :

*for bigger sizes the number of stitches at this point would be 45

Row 19-21 :

are also different.

Right. Row 19 :

ch 1, 27 sc, decrease, 8, decrease, continue with the row of sc, ss (39 st)

Info :

*43 for bigger sizes

Row 20 :

ch 1, 27 sc, decrease, 6 st, decrease, continue with the row of sc, ss (37 st)

Info :

*41 for bigger sizes

Row 21 :

ch 1, 27 sc, decrease, 4 st, decrease, continue with the row of sc, ss (35 st)

Info :

*39 for bigger sizes

Left. Row 19 :

ch 1, 3 sc, decrease, 8, decrease, continue with the row of sc, ss (39 st)

Info :

*43 for bigger sizes

Row 20 :

ch 1, 3 sc, decrease, 6 st, decrease, continue with the row of sc, ss (37 st)

Info :

*41 for bigger sizes

Row 21 :

ch 1, 3 sc, decrease, 4 st, decrease, continue with the row of sc, ss (35 st)

Info :

*39 for bigger sizes

Row 22-25 :

ch 1, 35 sc, ss

Info :

*39 for bigger sizes

Row 25 :

Fasten off

β€” Last touches :

Info :

Take a needle and the thick thread, put it through the back to the front side of the cup of the mushroom and then through the front side to the back, trying to repeat the shape of the letter V.

Info :

Weave in ends securely and trim any excess thread. Your gloves are ready!

Assembly Instructions

  • Connect Row 1 of the ribbing to the last row with a slip stitch and turn the tube inside out to create a neat cuff seam.
  • When you reach Row 14 follow the Right or Left instruction to create the thumb opening: make the chain-8 gap and slip stitch to the ninth stitch to form the thumb hole.
  • Follow the LEFT and RIGHT color charts carefully when working Rows 8-15 so the mushroom motif sits centered on the back of each hand.
  • After finishing Row 25 fasten off, weave in all yarn ends neatly on the inside of the glove to hide them and secure color changes.
  • Use a needle and thick thread to embroider the small V-shaped details on the mushroom cup as described in Last Touches for added definition.

Important Notes

  • πŸ’‘This pattern uses US terminology; ensure your stitch abbreviations match if you normally use another system.
  • πŸ’‘Do not carry the mushroom color yarn across the entire project; pick it up only where needed and drop it when not in use to avoid bulky floats.
  • πŸ’‘Connect the ribbing rows with a slip stitch and turn the work inside out for a clean finish at the cuff.
  • πŸ’‘For larger sizes follow the starred notes to continue increases on Rows 12-13 and adjust stitch counts as indicated.

These Mushroom Hand Warmers are a cozy, handmade accessory that adds whimsical charm to chilly days. Theyre quick to make, customizable with your favorite colors, and perfect for gifting or everyday wear. Try different mushroom colors or yarn weights to create variations youll love. πŸ„πŸ§Ά

You ask,

we answer.

FAQs

What size will the finished piece be?

Finished size depends on your gauge and yarn. Using the recommended gauge (20 sts x 22 rows = 10x10 cm) and 3.5 mm hook, the warmer fits an average adult hand; adjust yarn or hook for different sizes.

Can I use different yarn weights for this pattern?

Yes, you can use different yarn weights but this will change the final size and stitch counts; swatch to check gauge and adjust hook size accordingly.

Do I need prior crochet experience for this pattern?

This pattern is rated intermediate because it includes working flat ribbing, joining to work in rounds, increases/decreases, and color chart work; familiarity with single crochet, increases/decreases and basic color changes is recommended.

How long does this project typically take to complete?

Most crocheters finish a pair in about 2-3 hours, though time may vary with experience, colorwork, and whether you make size adjustments.

How do I create the thumb opening?

Follow Row 14 for the Right or Left glove: create a chain-8 gap and slip stitch into the ninth stitch as directed, then work Row 15 placing sc into the chain to form the thumb opening.