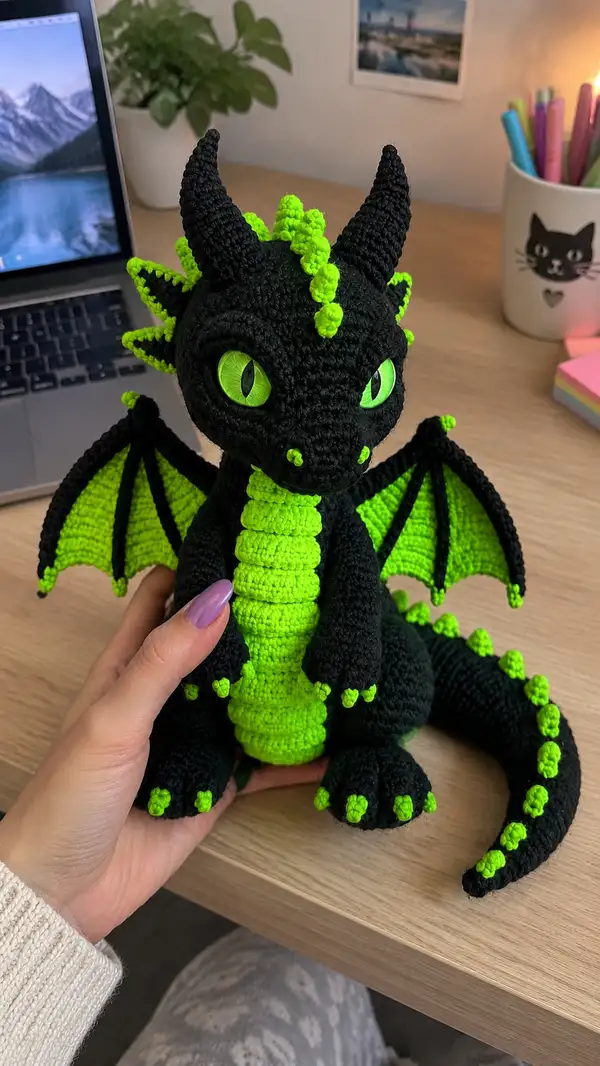
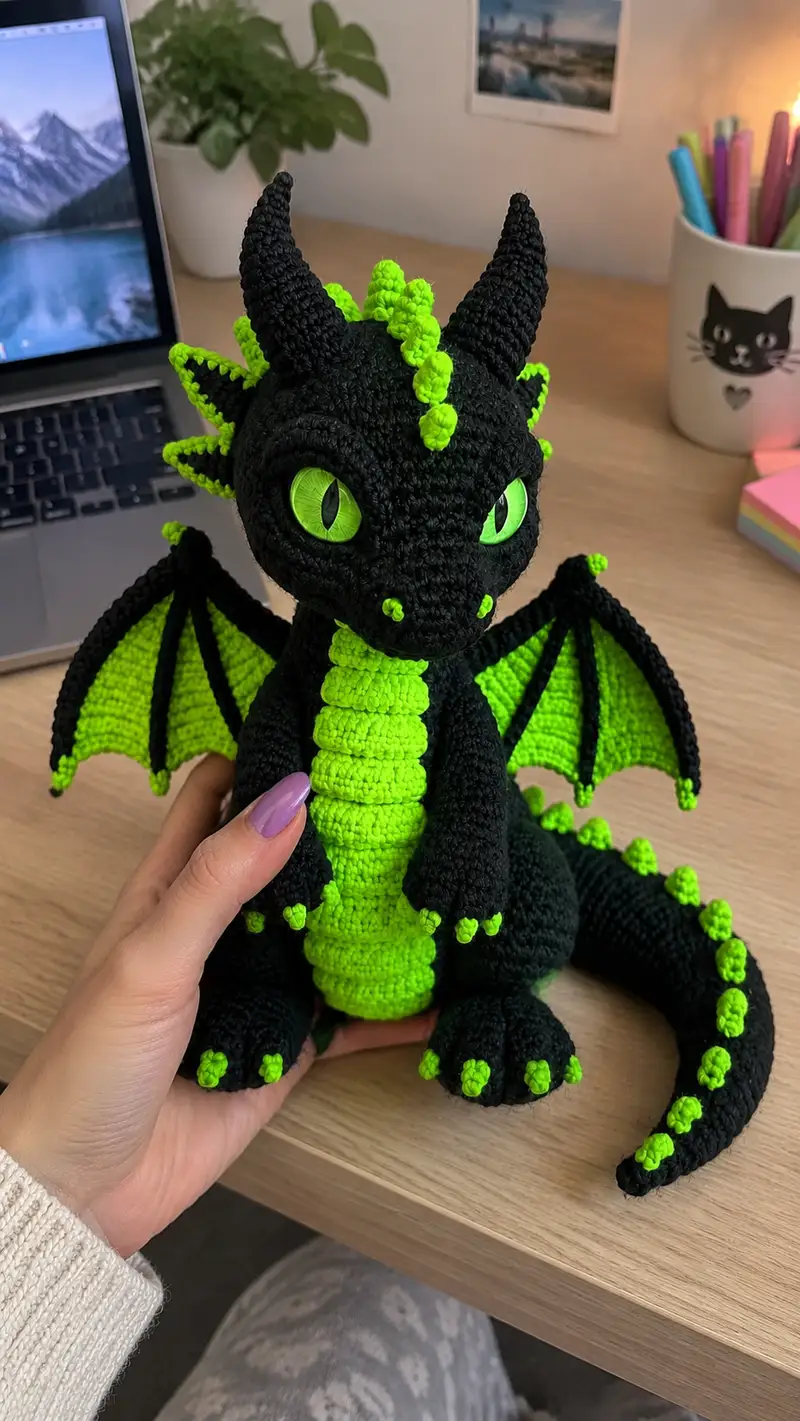
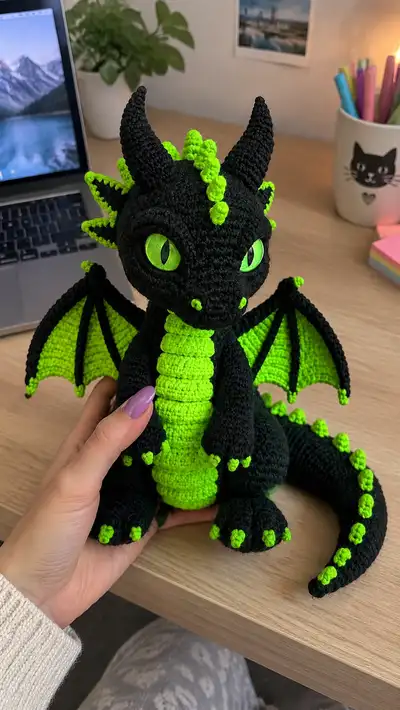
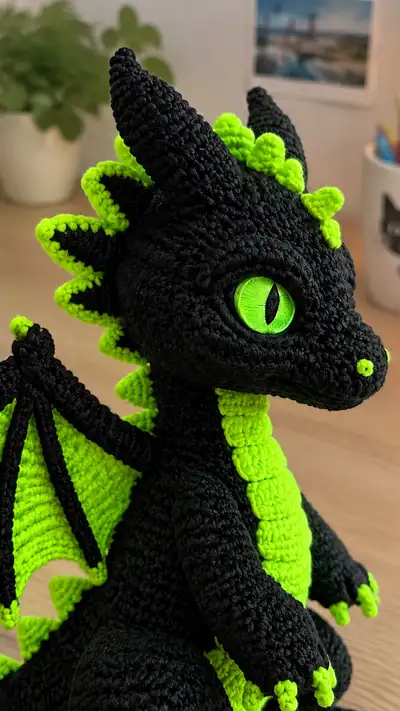
Create a striking black-and-neon-green dragon with this detailed amigurumi pattern. The design features a sculpted head with large slit eyes, pronounced horns, a row of neon scales down the back and tail, articulated wings with neon membranes, and matching neon belly plates and claws. Clear round-by-round instructions and helpful assembly tips make this pattern approachable for intermediate crocheters who love character detail.
Progress Tracker
0% Complete
— Head :
Round 1 :
6 sc in magic ring (6)
Round 3 :
(1 sc, inc) x 6 (18)
Round 4 :
(2 sc, inc) x 6 (24)
Round 5 :
(3 sc, inc) x 6 (30)
Round 6 :
(4 sc, inc) x 6 (36)
Round 7 :
(5 sc, inc) x 6 (42)
Round 8 :
(6 sc, inc) x 6 (48)
Round 9 :
(7 sc, inc) x 6 (54)
Info :
Switch to main black color if starting head from neon was attempted. This round forms the maximum head circumference. Use a stitch marker at start of each round; place it on the first sc of each round to track rounds accurately.
Round 10-15 :
1 sc in each st (54)
Info :
Place safety eyes between rounds 13 and 14. Space them 14-16 stitches apart (center-to-center), measuring visually so they fall just above the muzzle bulge. If using embroidered eyes, mark placement with pins and embroider after stuffing the head slightly.
Round 16 :
(7 sc, dec) x 6 (48)
Round 17 :
1 sc in each st (48)
Round 18 :
(6 sc, dec) x 6 (42)
Round 19 :
(5 sc, dec) x 6 (36)
Info :
Begin stuffing head firmly now. Use small amounts of fiberfill and tamp into the face and around the eyes to create a smooth, rounded brow and cheek. Stuff progressively as you work the decreases to avoid lumps.
Round 20 :
1 sc in each st (36)
Round 21 :
(4 sc, dec) x 6 (30)
Round 22 :
(3 sc, dec) x 6 (24)
Round 23 :
(2 sc, dec) x 6 (18)
Round 24 :
(1 sc, dec) x 6 (12)
Info :
We will start forming the muzzle and snout as a protruding shape. At this point switch to working smaller shaping in front half of head to lengthen the snout slightly: you will work 6-8 additional rounds focused on the front half only, using short rows as below.
Round 25 :
Work in continuous rounds but place a removable marker at the center-front stitch (this is your reference). From this stitch, sc 8 into the next 8 stitches (these will be the front muzzle), then sc around the remainder (4 sc) to complete the 12-st round (12)
Round 26 :
Working only over the front 8 muzzle stitches: sc in each of the 8 st, turn work as if making a short row, then continue around full round to maintain shape (12). Note: this technique sculpts the snout length; keep tension slightly looser on muzzle rows for a smooth curve.
Round 27 :
Repeat muzzle shaping: sc 8 along muzzle stitches to strengthen the snout, then sc remaining 4 around (12)
Info :
Create nostril markers now: with neon yarn, embroider two tiny french knots or crochet 2 x 3-sc rings and sew to placement on the muzzle, approximately 3-4 stitches apart and one round down from the eye line. This pattern will include crocheted little nostril bumps later.
Round 28 :
(1 sc, inc) x 6 around head base where neck will connect (18)
Round 29 :
1 sc in each st (18)
Round 30 :
(3 sc, inc) x 4 + 2 sc (22) - sculpting neck base slightly wider for a smooth join to body
Round 31 :
1 sc in each st (22)
Round 32 :
(3 sc, dec) x 4 + 2 sc (18)
Round 33 :
1 sc in each st (18)
Round 34 :
1 sc in each st (18) - final smoothing round before fastening off
Round 35 :
Fasten off leaving a long tail for sewing. Finish stuffing head and shape brow and snout. Weave tail through remaining 18 sts and close opening. Secure and hide tail well inside head.
Info :
Horns and spikes will be sewn onto the head after assembly. Leave placement pins ready: two horns sit symmetrically 10-12 stitches back from the brow center; smaller spikes run down center line and sides.
— Horn (make 2) :
Round 1 :
6 sc in magic ring (6)
Round 2 :
Inc in each st (12)
Round 3 :
(1 sc, inc) x 6 (18)
Round 4 :
(2 sc, inc) x 6 (24)
Round 5-8 :
1 sc in each st (24)
Info :
These rounds create the base of the horn. Horns taper upward; hold horn flat so base sits flush against head when pinned.
Round 9 :
(3 sc, dec) x 6 (18)
Round 10 :
(2 sc, dec) x 6 (12)
Round 11 :
(1 sc, dec) x 6 (6)
Round 12 :
6 dec (3) - slip stitch to close, stuff lightly near base only, fasten off leaving long tail for sewing
Info :
Horns are worked with black yarn. Make two identical horns. Stuff lightly—the horn should be firm at the base and taper soft toward the tip so it curves naturally when sewn to head.
— Head Spikes / Frill (make 12 small spikes) :
Round 1 :
5 sc in magic ring (5)
Round 2 :
Inc in each st (10)
Round 3 :
1 sc in each st (10)
Round 4 :
(1 sc, dec) x 3 + 4 sc (7)
Round 5 :
1 sc in each st (7)
Round 6 :
Fasten off leaving tail for sewing. Make 12 and sew along center line of head and down neck. Use neon green to edge or make the whole spike neon for contrast as in the photo.
Info :
To achieve the neon edging seen in the photo, either make the spikes in neon yarn or crochet the outermost round with neon and single crochet them onto the head in a staggered row to create the frill effect.
— Eyes (make 2) :
Info :
Use 20mm-22mm safety eyes in neon green or make embroidered eyes by wrapping neon thread around a crochet ring to create a glossy effect. For safety eyes: position between rounds 13-14, 14-16 sts apart. Secure backs before stuffing further.
Alternate (Embroidered Eyes) :
Create a small flat disk by ch 2, 6 sc in 2nd ch, sl st to join, then wrap neon thread around the disk multiple times to create a fill. Sew discs into eye sockets and embroider slitted pupil with black thread.
— Nostrils and Small Facial Details :
Round 1 :
Make two tiny 3-sc rings each: mr, 3 sc, sl st; fasten off leaving a tail. Sew into place as nostrils about one round below eye line centered on muzzle.
Info :
Use neon yarn for nostrils if you want the bright popping detail shown. Attach firmly and weave tails inside head for security.
— Body :
Round 1 :
6 sc in magic ring (6)
Round 2 :
Inc in each st (12)
Round 3 :
(1 sc, inc) x 6 (18)
Round 4 :
(2 sc, inc) x 6 (24)
Round 5 :
(3 sc, inc) x 6 (30)
Round 6 :
(4 sc, inc) x 6 (36)
Round 7 :
(5 sc, inc) x 6 (42)
Round 8 :
(6 sc, inc) x 6 (48)
Round 9 :
(7 sc, inc) x 6 (54)
Round 10 :
(8 sc, inc) x 6 (60)
Round 11-14 :
1 sc in each st (60)
Info :
These rounds create the widest part of the body. Work even to create a round, plump torso. Place a stitch marker to note the front center for later belly attachment and limb positioning.
Round 15 :
(8 sc, dec) x 6 (54)
Round 16 :
1 sc in each st (54)
Round 17 :
(7 sc, dec) x 6 (48)
Round 18 :
(6 sc, dec) x 6 (42)
Info :
Start lightly stuffing the body from the bottom upwards. Stuff firmly at the bottom to create a stable base but keep the upper torso softer to allow for a nice neck join and head mobility.
Round 19 :
1 sc in each st (42)
Round 20 :
(5 sc, dec) x 6 (36)
Round 21 :
1 sc in each st (36)
Round 22 :
(4 sc, dec) x 6 (30)
Round 23 :
(3 sc, dec) x 6 (24)
Round 24 :
1 sc in each st (24)
Round 25 :
(2 sc, dec) x 6 (18)
Round 26 :
(1 sc, dec) x 6 (12)
Round 27 :
6 dec (6) - leave opening large for neck insertion; do not fasten off yet
Info :
Do NOT close this opening fully. You will use it to insert and sew the head’s neck base into the body. If you prefer, leave a longer tail and use ladder stitch to attach head neatly after aligning seams.
Round 28 :
Optional: For a flatter seated base, after round 26: flatten bottom and sc around base in FLO for 2 rounds to create a small rim (24)
Round 29 :
Fasten off leaving long tail for sewing. If you closed the opening, reopen to attach head; otherwise set body aside for final assembly.
— Belly Plates (worked as a long strip then sewn) :
Info :
Make a belly strip of scalloped plates using neon yarn. These will be sewn down the front center of the body from chest to belly.
Row 1 :
Ch 30, 1 sc in 2nd ch from hook and in each ch across (29)
Row 2 :
Ch 1, turn, 1 sc in each st (29)
Row 3 :
Ch 1, turn, make shell across: *skip 2, (5 dc in next st), skip 2, sc in next* rep across to create scallops (approx 9 scallops)
Row 4-12 :
Repeat Row 2 and Row 3 alternating to make a layered row of plates about 9-11 rows high. Fasten off leaving long tail. Sew strip to body center aligning top scallop to chest seam. Overlap shells slightly and stitch through base only to keep scallops raised.
Info :
Alternatively you can crochet belly plates directly onto the body using hdc shells worked into one front column; the strip method gives more control and uniform scallops like the photo.
— Arm (make 2) :
Round 1 :
6 sc in magic ring (6)
Round 2 :
Inc in each st (12)
Round 3 :
(1 sc, inc) x 6 (18)
Round 4 :
(2 sc, inc) x 6 (24)
Round 5-8 :
1 sc in each st (24)
Info :
These rounds create the hand/paw. Stuff the hand portion firmly through round 6 to give a defined paw shape. Leave arm tube unstuffed until attached, stuffing lightly to allow sewing flat to the body.
Round 9 :
(2 sc, dec) x 6 (18)
Round 10-12 :
1 sc in each st (18)
Round 13 :
(1 sc, dec) x 6 (12)
Round 14-16 :
1 sc in each st (12)
Round 17 :
(1 sc, inc) x 4 + 4 sc (16) - shape shoulder slightly for smooth join
Round 18 :
1 sc in each st (16) - fasten off leaving long tail for sewing
Info :
Before sewing arms in place, sew small neon claws (pattern below) to the hand tips. Attach arms at body rounds 18-22 on either side, pin and check placement to create relaxed forward-facing arms.
— Claw (make 10 small claws: 3 per paw, 1 per toe) :
Round 1 :
3 sc in magic ring (3)
Round 2 :
Inc in each st (6)
Round 3 :
1 sc in each st (6) - fasten off leaving tail for sewing
Info :
Sew claws to ends of paws and toes. Use neon yarn so claws pop against black as pictured. Make 3 claws per front paw and 4 claws per back foot if you prefer a detailed foot.
— Leg (make 2) :
Round 1 :
6 sc in magic ring (6)
Round 2 :
Inc in each st (12)
Round 3 :
(1 sc, inc) x 6 (18)
Round 4 :
(2 sc, inc) x 6 (24)
Round 5 :
(3 sc, inc) x 6 (30)
Round 6-9 :
1 sc in each st (30) - foot base rounds
Info :
Stuff the foot firmly to create a flat, stable base for the dragon to sit. Create a slight flattening by compressing stuffing and working an extra inner round if necessary.
Round 10 :
(3 sc, dec) x 6 (24)
Round 11-15 :
1 sc in each st (24) - lower leg portion
Round 16 :
(2 sc, inc) x 6 (30) - begin thigh increase for a rounded top
Round 17-20 :
1 sc in each st (30)
Round 21 :
(3 sc, dec) x 6 (24)
Round 22 :
Fasten off leaving long tail for sewing to body. Stuff leg moderately; the foot should be firm and leg softer.
Info :
Attach legs to bottom of body at rounds 2-6 from the base, spacing them evenly to create a balanced sitting posture. Sew through several stitches and back through body to anchor well.
— Tail :
Round 1 :
6 sc in magic ring (6)
Round 2 :
Inc in each st (12)
Round 3 :
(1 sc, inc) x 6 (18)
Round 4 :
(2 sc, inc) x 6 (24)
Round 5 :
1 sc in each st (24)
Round 6 :
(2 sc, dec) x 6 (18)
Round 7-12 :
1 sc in each st (18)
Info :
The tail tapers slowly. Insert optional flexible wire along center before stuffing to pose tail. If using wire, wrap the wire in a small tube of yarn first or place it inside a length of duct tape to prevent poking through stitches.
Round 13 :
(1 sc, dec) x 6 (12)
Round 14-18 :
1 sc in each st (12)
Round 19 :
(1 sc, dec) x 4 + 4 sc (8)
Round 20 :
1 sc in each st (8)
Round 21 :
(1 sc, dec) x 2 (6)
Round 22 :
1 sc in each st (6)
Round 23 :
Make a tip: ch 3, sl st into base to create a small point; fasten off leaving long tail for sewing (6)
Round 24 :
Sew neon spike motifs along the top of the tail spaced every 5-6 stitches. Use the spike pattern above (6-round spike) and make 8-12 spikes depending on tail length. Fasten off and weave tails securely.
Round 25 :
Use black yarn to finish tail base if needed. Attach tail to back of body at the lower back opening. Sew through several rounds and anchor thread to body to secure a strong join.
— Wing (make 2; each wing has membrane + finger ribs) :
Info :
Wings are made flat as a semi-circle membrane in neon, edged and ribbed in black. You can add wire inside the top edge for stability or crochet narrow tubes for ribs and stitch them on top of the membrane.
Round 1 :
With neon yarn ch 15, starting in 2nd ch from hook, 1 sc in each ch across (14)
Round 2 :
Ch1, turn, 2 sc in first st, 1 sc in next 11 sts, 2 sc in last st (16)
Round 3 :
Ch1, turn, (1 sc, inc) across to widen base to approx 28 sts (approx 28)
Round 4-8 :
Work even in neon sc to create membrane height. Each round increase evenly at ends to form a curved fan shape until membrane measures roughly 12-14 rows tall.
Round 9 :
Switch to black yarn. Work 1 sc around the outer edge to create a black border, slip st into each stitch to maintain a neat edge.
Round 10 :
Create ribs: ch to top of wing center and make 3-5 narrow tubes for ribs by chaining desired length of rib, then sl st back along chain to base to form a thick rib. Make 4 ribs spaced evenly across wing. Fasten off and weave in ends.
Round 11 :
Edge detail: With neon, sc small picot or scallops along bottom edge to create the small neon points visible in the photo, approximately every 6-8 stitches. Fasten off and block wings slightly flat for assembly.
Round 12-20 :
Repeat trim and rib building as necessary to strengthen wing shape. Use optional wire inserted into the top edge (within crochet tube) for poseable wings. Sew wings onto the back at body rounds 10-14, centering them slightly back of the shoulders.
Info :
Pin wings in place and adjust rib shapes before sewing. Sew only through top layers to preserve membrane look and avoid lumpy seams on the outside.
— Wing Fingers (optional decorative ribs) :
Round 1 :
Ch 20, 1 sc in 2nd ch from hook and in each ch back (19). Fasten off leaving tail.
Info :
Sew these thin rib strips onto membrane using black thread for contrast. Create 4-5 per wing and secure ends inside wing seam.
— Spikes along back and tail (make 10-14) :
Round 1 :
6 sc in magic ring (6)
Round 2 :
Inc in each st (12)
Round 3 :
1 sc in each st (12)
Round 4 :
(1 sc, dec) x 4 + 4 sc (8)
Round 5 :
1 sc in each st (8) - fasten off leaving tail for sewing
Round 6 :
Sew spikes along center back from top of head down tail. Space them 4-6 stitches apart; use neon yarn for full spike or black base with neon edging.
Info :
For the pronounced neon ridge on the photos, work each spike entirely in neon yarn and stitch firmly through the head/back rounds to make them stand up.
— Finishing Touches and Embroidery :
Info :
Embroider slit pupils with black embroidery thread. Use satin stitch vertically to create the almond slit look. Add extra small embroidered brow lines above eyes to emphasize expression.
Round 1 :
Sew head to body by inserting neck opening into body opening. Use whip stitch or ladder stitch and work evenly around to avoid gaps. Pull tight and weave tail through internal rounds to hide.
Round 2 :
Sew arms to sides of body at approximately body rounds 18-22 from the front center. Sew legs to base at body bottom. Sew wings to back across the seam, anchoring ribs inside the body seam for extra strength.
Info :
Weave in all yarn tails into thick parts of the toy, and secure with a couple of back-and-forth stitches before trimming. Add a small dab of fabric glue to safety eyes inside the head for extra security if gifting to children older than 3; do not use safety eyes for very young children.
— Optional: Wiring for Poseable Limbs :
Info :
If you want a poseable tail or wings, pre-insert a flexible wire along the length and anchor it into the body by stitching fabric around the wire inside. Ensure wire ends are wrapped or blunted to avoid poking through stitches.
Final :
Check symmetry, ensure all pieces are secure, trim stray fibers and lightly steam-block stuffed parts to smooth stitches if needed. Your neon-spined dragon is complete!
This neon-spined dragon is a dramatic statement piece and a rewarding crochet build. The bold contrast of neon bright against deep black makes each detail pop — from the glassy slit eyes to the layered belly plates and raised spikes. The combination of shaping, subtle colorwork and sculptural elements makes assembly satisfying and the finished toy strikingly characterful. 🐲🧶 Keep it for display or gift it to someone who appreciates bold handmade charm. Happy stitching and don't forget to sign your work with a tiny tag! ✨