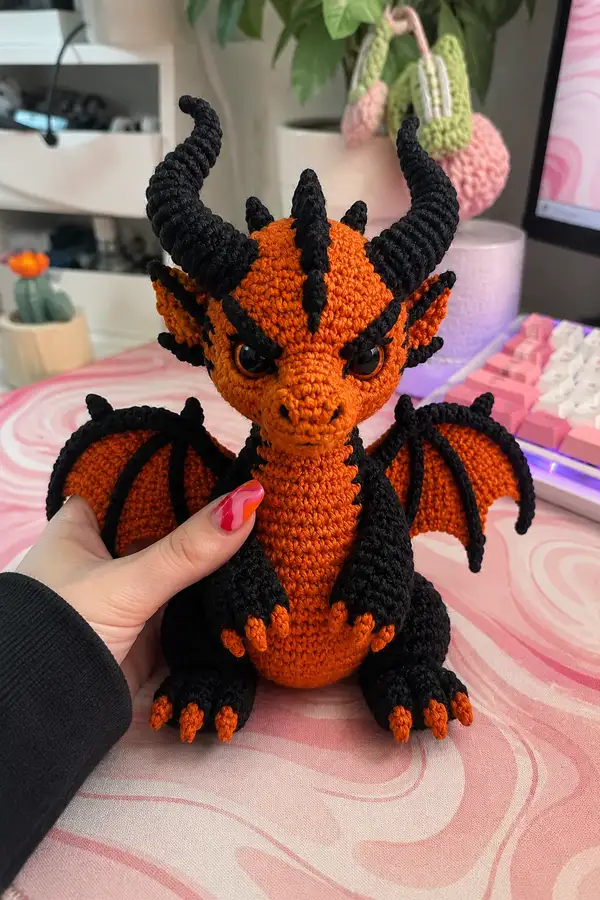
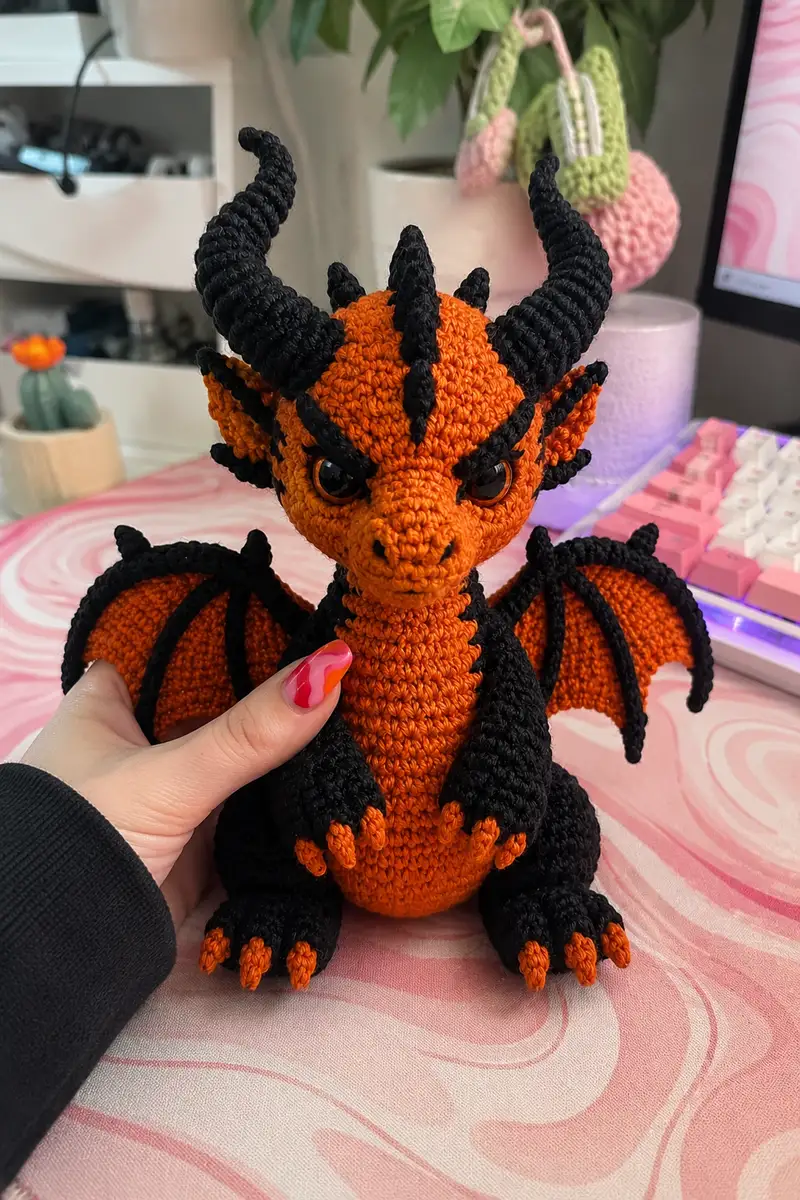
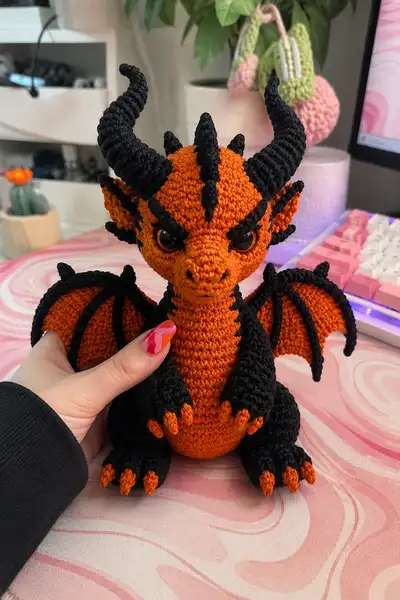
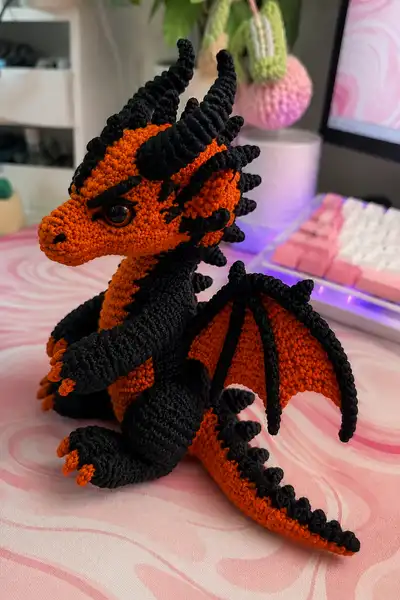
Create a striking orange-and-black demon dragon with dramatic curved horns, expressive amber eyes, detailed wings, and textured back spikes. This amigurumi features a rounded head, sculpted snout, clawed feet and hands, and a long tail with ridged plates. Perfect as a spooky desk companion or a bold handmade gift, the pattern includes step-by-step shaping and assembly guidance to bring this little dragon to life.
Progress Tracker
0% Complete
— Head :
Round 1 :
6 sc in magic ring (6)
Round 3 :
(1 sc, inc) x 6 (18)
Round 4 :
(2 sc, inc) x 6 (24)
Round 5 :
(3 sc, inc) x 6 (30)
Info :
Work these rounds in orange. Use a stitch marker and move it each round; this head begins as a classic sphere. Keep tension slightly firm so stuffing won’t peek through.
Round 6 :
(4 sc, inc) x 6 (36)
Round 7 :
(5 sc, inc) x 6 (42)
Round 8 :
(6 sc, inc) x 6 (48)
Round 9-12 :
1 sc in each st (48)
Info :
Place safety eyes between rounds 11 and 12, 12-14 stitches apart center-to-center depending on expression; on this dragon they sit roughly 12 stitches apart. Weave a small disc of felt behind each eye for a darker look if desired.
Round 13 :
(6 sc, inc) x 6 (54)
Round 14 :
1 sc in each st (54)
Round 15 :
(7 sc, inc) x 6 (60)
Info :
Use rounds 13-15 to create the forehead bulge. On round 15 you may want to add 1-2 rows of surface slip stitch to mark brow ridge later. Begin shaping snout after round 15.
Round 16 :
1 sc in each st (60)
Round 17 :
(8 sc, dec) x 6 (54)
Round 18 :
(7 sc, dec) x 6 (48)
Info :
Begin stuffing head lightly to keep face shape. Stuff more firmly between rounds 17-20 as you shape the snout — firm enough to keep detail but not so firm it distorts stitches.
Round 19 :
(6 sc, dec) x 6 (42)
Round 20 :
(5 sc, dec) x 6 (36)
Round 21 :
(4 sc, dec) x 6 (30)
Round 22 :
(3 sc, dec) x 6 (24)
Info :
Now start the snout sculpting: do not close the head entirely. Instead, work a short tube for the snout before final decreases. This will form the nose and upper lip.
Round 23 :
(2 sc, dec) x 6 (18)
Round 24 :
(1 sc, dec) x 6 (12)
Info :
Fasten off leaving a long tail for sewing to the neck. Do NOT stuff this final small tip - we'll attach the snout tube next. Continue by making the snout tube separately and sewing it into the face opening for sculpted nostrils.
Snout tube — Make 1 :
Ch 6, join into a ring with sl st, Round 1: 6 sc in ring (6). Round 2: 6 inc (12). Rounds 3-6: 1 sc in each st (12). Round 7: (2 sc, dec) x 3 (9). Round 8: 1 sc in each st (9). Stuff lightly and position on the face opening then sew around opening, pulling slightly so snout integrates into head. Embroider nostrils with black yarn (two small horizontal bars) on the front of the snout.
Info :
When snout is sewn in, adjust stuffing so cheeks are even. Use a yarn needle to shape the muzzle by pulling small tucks and securing through the head if you want a more pronounced jawline.
— Head details & crest (spikes & brows) :
Spike (Make 7) :
Round 1: 6 sc in magic ring (6). Round 2: (1 sc, inc) x 3 (9). Round 3: 1 sc in each st (9). Round 4: (2 sc, dec) x 3 (6). Fasten off leaving tail for sewing. Sew spike along centerline starting at top of head behind brow — space them evenly.
Info :
Sew three central spikes along the top center and two smaller side spikes near the ears. Place one small spike behind the horns base for a layered look.
Brow ridges (Make 2) :
Round 1: ch 5, sc in 2nd ch from hook and across (4). Round 2-6: 1 sc in each (4). Fasten off leaving tail to stitch above eyes forming pointed eyebrow slant. Add small surface slip stitches in black across the brow edge to create the thick black eyebrow on each side.
Info :
Use black yarn for the brows; attach firmly so they sit just above the safety eyes and give that fierce look.
— Ears (Make 2) :
Round 1 :
6 sc in magic ring (6)
Round 2 :
(1 sc, inc) x 3 (9)
Round 3 :
(2 sc, inc) x 3 (12)
Round 4 :
1 sc in each st (12)
Round 5 :
(2 sc, dec) x 3 (9)
Round 6 :
1 sc in each st (9)
Round 7 :
(1 sc, dec) x 3 (6)
Round 8 :
Fasten off, leave long tail for sewing. Fold slightly at base and sew the ear to head at rounds 9-11, angling them so tips point slightly outwards.
Info :
Sew ears behind eye level, aligning with outer eye edges. Add black edging to the ear rim using slip stitch around outer edge for contrast.
— Horns (Make 2 large curled horns) :
Note :
Horns are worked in black with a smaller hook (2.75mm) for tightness. Optionally insert floral wire for poseable curl — insert wire before finishing completely and crochet around it for a covered look.
Horn Round 1 :
6 sc in magic ring (6)
Horn Round 3 :
(1 sc, inc) x 6 (18)
Horn Round 4 :
(2 sc, inc) x 6 (24)
Horn Round 5-8 :
1 sc in each st (24)
Info :
To create the spiral curl, after Round 8 begin alternating rounds of short decreases and immediate even rounds. Insert wire now if using: push wire up into the horn, then crochet a couple rounds around it to secure. Curl the horn as you go to check shaping.
Horn Round 9 :
(3 sc, dec) x 6 (18)
Horn Round 10 :
1 sc in each st (18)
Horn Round 11 :
(2 sc, dec) x 6 (12)
Horn Round 12 :
1 sc in each st (12)
Horn Round 13 :
(1 sc, dec) x 6 (6)
Horn Round 14 :
Fasten off leaving long tail for sewing. Fill horn lightly; enough to hold shape but not so firm it becomes rigid. Shape curl by hand, sewing base securely to head between rounds 9-12 on either side above the brow.
Info :
Horns are slightly tapered; curl them so the tip points inward toward each other. Stitch bases into place multiple times through head stitches to secure dramatic curve.
— Neck (attached to head and body) :
Round 1 :
6 sc in magic ring (6)
Round 3 :
(1 sc, inc) x 6 (18)
Round 4-6 :
1 sc in each st (18)
Info :
Work neck in orange. Keep neck slightly elongated (3 rounds of even stitch) to allow a smooth join between head and body. Stuff lightly to keep it flexible for angling the head.
Round 7 :
(2 sc, dec) x 6 (12)
Round 8 :
1 sc in each st (12)
Info :
Do not fasten off; attach neck to body opening when ready. We will continue shaping body from this point for a seamless join. Leave the loop open to slip in head later for sewing.
— Body :
Round 1 :
6 sc in magic ring (6)
Round 3 :
(1 sc, inc) x 6 (18)
Round 4 :
(2 sc, inc) x 6 (24)
Round 5 :
(3 sc, inc) x 6 (30)
Round 6 :
(4 sc, inc) x 6 (36)
Round 7 :
(5 sc, inc) x 6 (42)
Round 8 :
(6 sc, inc) x 6 (48)
Round 9-12 :
1 sc in each st (48)
Info :
Body is worked in black for the dorsal and sides; change to black at the start of round 9 to create the black body contrast. Carry the orange yarn inside or fasten off and rejoin for crisp edges.
Round 13 :
(6 sc, inc) x 6 (54)
Round 14-16 :
1 sc in each st (54)
Info :
Rounds 13-16 produce a slight belly bulge that will help the dragon sit. Keep rounds even to create a rounded torso. Begin marking placement for legs on rounds 14-15 (legs sew at bottom later).
Round 17 :
(7 sc, dec) x 6 (48)
Round 18 :
(6 sc, dec) x 6 (42)
Round 19 :
(5 sc, dec) x 6 (36)
Round 20 :
(4 sc, dec) x 6 (30)
Info :
Start stuffing the body from the bottom upward around round 16. Stuff fairly firm to allow the figure to sit upright. Make sure to add stuffing around the hip area for stable leg attachment.
Round 21 :
(3 sc, dec) x 6 (24)
Round 22 :
(2 sc, dec) x 6 (18)
Round 23 :
(1 sc, dec) x 6 (12)
Info :
Do NOT fasten off; leave an opening to sew the neck tube in. After attaching neck (and head later), close remaining gap with invisible decrease and weave tail inside to secure.
— Arms (Make 2) :
Round 1 :
6 sc in magic ring (6)
Round 3 :
(1 sc, inc) x 6 (18)
Info :
Work arms in black for the outer forearm and orange for the inner paw tip. Plan color change at round 7 to make fingertip claws in orange.
Round 4 :
(2 sc, inc) x 6 (24)
Round 5-6 :
1 sc in each st (24)
Round 7 :
Change to orange yarn — (3 sc, dec) x 6 (18)
Round 8 :
1 sc in each st (18)
Round 9 :
(2 sc, dec) x 6 (12)
Round 10 :
Work 1 sc in each st (12)
Info :
Stuff the hand area firmly to keep paw shape, but leave the arm tube less stuffed for flexibility. Insert a short piece of wire if you want poseable fingers/arms before stuffing fully.
Round 11 :
Switch to black again, 1 sc in each st (12)
Round 12-16 :
1 sc in each st (12)
Round 17 :
(1 sc, dec) x 4 (8)
Round 18 :
1 sc in each st (8)
Round 19 :
Fasten off leaving tail to sew. Flatten top and prepare to sew arms to body at rounds 18-20, sewing through multiple stitches for stability. Add three small orange claw tips by sewing small chains of 3 sc each at the tips of the hand area.
Info :
Arms should be slightly curved inward for hugging pose. Pin them at body rounds indicated and adjust until symmetrical before sewing permanently.
— Fingers / Claws (Make 6 small claw tips for hands and feet) :
Claw :
Ch 3, sc in 2nd ch and next (2), sl st into adjacent stitch of hand. Fasten off leaving tail; repeat to make three claws per hand and four per foot if desired. Use orange yarn for claws.
Info :
Sew claws so they flare slightly outward for a natural look. Lock with a couple of securing stitches at the base.
— Legs (Make 2) :
Round 1 :
6 sc in magic ring (6)
Round 3 :
(1 sc, inc) x 6 (18)
Round 4 :
(2 sc, inc) x 6 (24)
Round 5 :
(3 sc, inc) x 6 (30)
Round 6-8 :
1 sc in each st (30)
Info :
Work legs in black with orange claw tips and an orange underside. Mark toe placement on round 6 before continuing to shape the ankle.
Round 9 :
(4 sc, inc) x 6 (36)
Round 10-13 :
1 sc in each st (36)
Round 14 :
(4 sc, dec) x 6 (30)
Round 15 :
(3 sc, dec) x 6 (24)
Round 16 :
(2 sc, dec) x 6 (18)
Round 17 :
(1 sc, dec) x 6 (12)
Info :
Stuff the feet firmly, especially at toes and sole to provide a stable base. Leave a long tail to sew legs to bottom of body between rounds 1-4; space legs to allow the dragon to sit upright.
Toe claws (Make 6 per foot) :
Ch 3, sc in 2nd ch and next (2). Fasten off leaving tail. Position three at the front of each foot and sew securely, add one or two at sides if desired for extra grip.
— Tail :
Round 1 :
6 sc in magic ring (6)
Round 3 :
(1 sc, inc) x 6 (18)
Round 4-8 :
1 sc in each st (18)
Info :
Work tail in orange on the underside and black ridge along the top. We will add ridged plates on the tail with small spikes sewn along the dorsal side. The tail tapers later with decreases.
Round 9 :
(2 sc, dec) x 6 (12)
Round 10-12 :
1 sc in each st (12)
Round 13 :
(1 sc, dec) x 4 then 2 sc (8 + 2 = 10) — (do math to maintain gently tapering shape) (10)
Round 14-18 :
1 sc in each st (10)
Round 19 :
(1 sc, dec) x 3 (6)
Round 20 :
Fasten off leaving long tail for sewing. Sew tail to back of body at center rear, aligning last body round and sewing securely. Add small spike plates along tail using Spike instructions below.
— Tail spikes / dorsal plates (Make 8) :
Spike Round 1 :
6 sc in magic ring (6)
Spike Round 2 :
(1 sc, inc) x 3 (9)
Spike Round 3 :
1 sc in each st (9)
Spike Round 4 :
(2 sc, dec) x 3 (6)
Spike Round 5 :
Fasten off and sew along spine and tail at even spaces from head to tail tip. Alternate spike sizes for visual interest.
Info :
Sew spikes so they sit upright; anchor base through several stitches into the body to keep them from flopping.
— Wing membranes (Make 2) :
Round 1 :
Ch 11, join to form a ring with sl st (optional) or work flat row to shape curve. Round 1: sc across chain (10), ch 1, turn and work back on the other side to create a flat oval (20).
Round 2 :
Work 1 sc in each st around the oval (20)
Round 3 :
(3 sc, inc) x 5 (25)
Round 4 :
1 sc in each st (25)
Round 5 :
(4 sc, inc) x 5 (30)
Round 6-8 :
1 sc in each st (30)
Info :
Wing membrane is worked in orange. Keep tension slightly looser than body so the wing has a soft drape. Add black piping later to define bones and edge.
Round 9 :
1 sc BLO across this round to create a crisp edge for piping (30)
Round 10 :
Fasten off leaving long tails for attaching to wing bones and body. Repeat for the second wing.
— Wing bones / structure (Make 4 ribs per wing) :
Wing bone (Make 4 per wing) - Tube :
Round 1: 6 sc in magic ring (6). Round 2-12: 1 sc in each st (6). Fasten off leaving long tail. These tubes sew to the inside of the wing membrane forming ribs. Use black yarn and position 4 ribs per wing, one running along edge and three radiating inward.
Bone Info :
Sew each bone to the membrane with whipstitches along its length; bend bone slightly to form the natural curve of the wing. You can insert thin wire inside the tube for poseability before closing the top end.
Wing edge piping :
With black yarn, sl st around the edge of the wing membrane to create a crisp border. Then sew the bone tubes onto the orange membrane aligning with the border lines; add 2-3 small black spikes on the top edge near the shoulder.
Info :
Attach wings to back of body at the level of the shoulder — sew through several body rounds to secure. Angle the wings slightly back and out with the bottom edge tucked near the hip.
— Back ridge and black belly panel :
Black belly panel :
Ch 6 then sc across to make a narrow oval strip: Row 1: sc in 2nd ch from hook and across (5). Row 2-20: 1 sc in each st (5) to reach the length from chin down to tail base. Sew this strip along the belly center from neck down to the belly bottom. Work in black so a contrasting panel shows.
Info :
Use the belly panel to anchor the neck and head and provide a neat seam where two colors meet. Work a seam of slip stitches in orange along the belly border for a finished look if desired.
— Additional small details & finishing rounds :
Eye surround detail :
With a small scrap of black yarn and tapestry needle, embroider a narrow ring around each eye then add a thick eyebrow using surface slip stitch. This strengthens the look and hides the eye safety washer edge.
Mouth embroidery :
Using black yarn single strand, embroider the mouth line lightly and make two small vertical stitches at the nostril base. Reinforce with a second pass if necessary.
Final assembly :
Sew head to neck and neck to body using long tail from neck remaining; use ladder stitch or whip stitch around the opening. Sew legs to bottom rounds 2-5 of the body spaced evenly. Sew arms to body at rounds 16-18 on either side of belly panel. Attach wings to back at body rounds 10-14 and reinforce with hidden stitches. Sew tail securely at the back base and anchor to bottom for balance.
Info :
Weave in all ends, trim close and place any final shaping stitches. Add blush with fabric pastel if desired to warm cheeks. Optional: use a small dab of fabric glue behind eyes for extra security.
Final tips :
For a sturdier build, sew through several rounds when attaching large pieces (head, wings, legs) and use extra passes of yarn to secure joints. Use pins to hold parts before final sewing to ensure symmetry.
This dramatic orange-and-black demon dragon combines bold color contrast with sculpted shaping to create a memorable handmade friend. Each section — from the curled horns to the articulated wings — is designed to be satisfying to crochet and assembly-friendly. It's a pattern that rewards patience with a striking result you can proudly display or give as a one-of-a-kind gift. 🧶🖤 Have fun stitching, shaping, and customizing your own fierce little guardian!