🧢 Beautiful ✨ Detailed πŸ’ Adorable

Owl Granny Square Pattern

Owl Granny Square Pattern
4.1β˜… Rating
2-3 Hours Time Needed
2.6K Made This
βœ‚οΈ

Intermediate Level

Ideal for those with basic crochet experience, featuring slightly more advanced stitches and techniques to expand your skills.

⏱️

Bite-Sized Project

Finishes in 2-4 hoursβ€”perfect for an afternoon of creative relaxation.

🏑

Cozy Accent

A warm touch for your space that transforms ordinary corners into inviting nooks filled with handmade charm.

About This Owl Granny Square Pattern

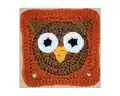
This pattern teaches you how to crochet a delightful owl motif worked into a granny square. It includes complete round-by-round instructions for the square body, plus separate pieces for ears, eyes, and beak. Clear photos and finishing notes make assembly simple and satisfying. Perfect for using small amounts of different colored yarns.

Owl Granny Square Pattern crochet pattern - detailed view of completed project

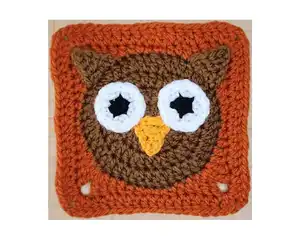
You will learn an invisible stitch finishing method and a clean way to change colors between rounds. The finished square measures approximately 11 cm x 11 cm.

Why You'll Love This Owl Granny Square Pattern

I absolutely love this pattern because it turns simple rounds into a whimsical owl with minimal effort. I enjoy how little yarn is required, making it perfect for using scraps and mixing colors. The invisible stitch and color-change options let me create a tidy, professional-looking finish that I am proud to gift. I also love that you can assemble several squares into blankets or cushions for a cohesive handmade project.

Owl Granny Square Pattern step 1 - construction progress Owl Granny Square Pattern step 2 - assembly progress Owl Granny Square Pattern step 3 - details and accessories Owl Granny Square Pattern step 4 - final assembly and finishing

Switch Things Up

I love changing up the color palette to create different moods β€” try autumn tones or pastels to alter the personality of the owl.

I often make the square larger by using a heavier yarn and a larger hook to turn it into a chunky cushion panel.

I sometimes swap the triple crochet corner for a more open shell to give the square a lacy feel.

I like to embroider eyelashes or eyebrows to give each owl a unique expression before stitching the eyes in place.

I sometimes replace the crocheted beak with a small felt triangle for a different texture and quicker finishing.

I make mini versions for keychains by using thinner yarn and a smaller hook and then attaching a keyring through one corner.

I like to join multiple owl squares into a blanket and alternate background colors to create a repeating pattern across the afghan.

I add a little stuffing behind the head circle before sewing to give the face a slight puff for added dimension.

I occasionally sew on small buttons or beads as eye highlights instead of working the black pupil in yarn for a sparkly touch.

I recommend experimenting with placement of the eyes and beak before sewing β€” a small shift can change the owl's expression dramatically, so try different layouts.

Common Mistakes & How to Fix Them

βœ— Skipping the stitch count at the end of each round can cause errors in shaping; always check the parentheses and recount your stitches at the end of each round to ensure accuracy.
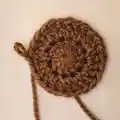
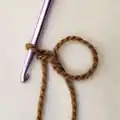
 βœ— Forgetting to tighten the magic ring leaves a loose center and a hole; pull the tail to close the MR firmly and then slip stitch into the first dc to secure it.
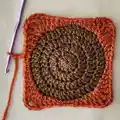
 βœ— Not using the invisible stitch when finishing Round 4 may create a visible join at the color change; use the invisible stitch method or finish neatly and weave in the tail to hide the join. βœ— Placing the ears incorrectly makes the face look unbalanced; position the ears in the corner stitch created by the [2tc+ch2+2tc] in Round 5 to ensure proper symmetry. βœ— Working with inconsistent tension changes the square size unpredictably; maintain even tension and check your gauge by measuring the square (11 cm x 11 cm) as you work.

Owl Granny Square Pattern

Create a charming Owl Granny Square perfect for blankets, pillows, or cozy accents. This pattern walks you through every round with clear step-by-step instructions and helpful photos. You will make the square, ears, eyes, and beak, then assemble them into an adorable owl motif. Ideal for using leftover yarn and making a delightful handmade gift.

Intermediate 2-3 Hours

Materials Needed for Owl Granny Square Pattern

β€” Main Fabric

  • 01
    Lightweight acrylic yarn (DK/light) - Brown (small amount for the circle)
  • 02
    Lightweight acrylic yarn (DK/light) - Dark Orange (small amount for the outer square)
  • 03
    Lightweight acrylic yarn (DK/light) - Light Orange (small amount for the beak)
  • 04
    Lightweight acrylic yarn (DK/light) - White (small amount for eye surrounds)
  • 05
    Lightweight acrylic yarn (DK/light) - Black (small amount for eye centers)
  • 06
    Approximate yardage: small scraps per color sufficient for one 11 cm x 11 cm square (about 10-30g per color depending on yarn)

β€” Tools Required

  • 01
    Crochet hook size 4 mm
  • 02
    Yarn needle
  • 03
    Scissors

Progress Tracker

0% Complete

β€” Notes :

Infos :

- The ( ) at the end of each round/row indicates the total number of stitches that should be completed for that round/row. - When working through the rounds/rows, work through the entire stitch (back loop and front loop); unless stated otherwise. - The ch1 or ch2 at the beginning of each round/row do not count as stitches unless stated otherwise. - You can use any yarn to make this square. For example, if you use a smaller hook and a suitable yarn, the square will be smaller.

β€” Square :

Round 1 :

MR, ch2, 12dc inside MR (12)

Info :

Tighten the MR by pulling on the tail and then sl st in the 1st dc (skip the ch2).

Round 2 :

ch2, *dc inc* all around (24)

Round 3 :

ch2, *dc, dc inc* all around (36)

Round 4 :

ch2, *2dc, dc inc* all around (48)

Info :

Invisible stitch: after you are done with Round 4, cut the yarn, leave a long tail, and pull it all the way through. With your needle, go into the 2nd dc from the back to the front through both loops, and then go through the center of the last dc towards the back. Pull the tail tight enough to create a stitch on top of the 1st dc and then weave in the excess yarn to secure it.

Info :

Color Change: at the end of Round 4, you will need to do a color change. Method 1: change color at the last dc of Round 4. Method 2: finish off with an invisible stitch and then attach the new color.

Info :

Insert your hook into any stitch and attach the new yarn by pulling it through the stitch.

Round 5 :

ch1, *3sc, 2hdc, 2dc, [2tc + ch2 + 2tc] in the same stitch, 2dc, 2hdc* all around (68)

Info :

Sl st in the first sc that you did at the beginning of Round 5.

Round 6 :

ch2, *dc* all around and [2dc + ch2 + 2dc] in the ch2 space (84)

Info :

At the end of the round, finish off and weave in any excess yarn. You can finish off using the invisible stitch method or sl st in the 1st dc and then yarn over and pull it all the way through.

β€” Ears x2 :

Row 1 :

sl knot, ch5, sc in the 2nd ch away from the hook, hdc, dc, tc (4)

Info :

Cut the yarn and finish off. Leave a long tail for stitching.

β€” Beak :

Row 1 :

sl knot, ch5, sc in the 2nd ch away from the hook, hdc, dc, tc (4)

Info :

Using the light orange yarn. Cut the yarn and finish off. Leave a long tail for stitching.

β€” Eyes x2 :

Round 1 :

MR, ch1, 5sc in MR (5)

Info :

Change to white at the last sc and tighten the MR. The eyes are worked in continuous rounds; continue to the next round without slip stitching or connecting the Rounds.

Round 2 :

*inc* all around (10)

Round 3 :

*sc, inc* all around (15)

Info :

Cut the yarn and finish off. Leave a long tail for stitching.

β€” Assembly :

Info :

Place the face components on the square. Use the tails for stitching.

Info :

The ears are placed in the corner stitches of the granny square (the one with the [2tc + ch2 + 2tc] found in Round 5).

Info :

The beak is stitched between the eyes with the tip (the sc) facing downwards.

Assembly Instructions

  • Place the face components on the square and position them to your liking before stitching, using the tails to baste them in place.
  • Attach the ears in the corner stitches of the granny square (the corner created by the [2tc + ch2 + 2tc] in Round 5), sewing through the tails to secure.
  • Sew the eyes onto the square with the white round surrounding the black pupil, spacing them evenly and using the yarn tails to stitch from the back.
  • Stitch the beak between the eyes with the small tip (the sc) pointing downwards so the beak sits naturally on the owl face.

Important Notes

  • πŸ’‘The number in parentheses at the end of each round indicates the expected total stitch count for that round; always verify your count.
  • πŸ’‘When working through rounds, work through the entire stitch (both front and back loops) unless the pattern specifically instructs otherwise.
  • πŸ’‘Chain 1 or chain 2 at the beginning of a round does not count as a stitch unless the pattern states otherwise, so do not include it in your counts.

This little Owl Granny Square makes a perfect cozy accent for blankets, cushions, or small gifts. It uses small amounts of yarn so you can mix and match colors for a playful look. Make a whole set of these squares and stitch them together for a unique handmade blanket. 🧢🏑✨

You ask,

we answer.

FAQs

What size will the finished piece be?

The finished square measures approximately 11 cm x 11 cm when using lightweight acrylic yarn and a 4 mm hook.

Can I use different yarn weights for this pattern?

Yes, you can use different yarn weights, but the final size will change; choose an appropriate hook size for your yarn and adjust expectations for the finished measurement.

Do I need prior crochet experience for this pattern?

This pattern is rated intermediate and uses double crochet, half double, triple crochet, and continuous rounds; basic knowledge of these stitches is recommended for best results.

How long does this project typically take to complete?

Most crocheters finish one owl granny square in about 2-3 hours, depending on experience and how much time you spend on finishing and assembly.