🧶 Beautiful ✨ Detailed 💝 Adorable

Panda Amigurumi Pattern

Panda Amigurumi Pattern
4.3★ Rating
5-7 Hours Time Needed
3.7K Made This
✂️

Intermediate Level

Ideal for those with basic crochet experience, featuring slightly more advanced stitches and techniques to expand your skills.

⏱️

Weekend Treat

Takes 5-7 hours, making it an enjoyable project to finish over a couple of days.

🧸

Cute Companion

An adorable friend to cherish, handcrafted with love to bring comfort and joy for years to come.

About This Panda Amigurumi Pattern

This pattern creates a plush panda amigurumi made with soft plush yarn and smaller cotton threads for facial details. You will crochet separate parts—upper and bottom paws, head-body, ears, tail, nose, eye patches, eyes and blushes—and assemble them into the finished toy. Clear round-by-round instructions and placement tips are included to help you reproduce the shape and expression.

Panda Amigurumi Pattern crochet pattern - detailed view of completed project

The pattern uses plush yarn for the body and semi-cotton yarn for detailed features like eyes and the bow. Helpful notes on marking, tightening the muzzle, and attaching parts ensure accurate assembly and a charming finished look.

Why You'll Love This Panda Amigurumi Pattern

I absolutely love this pattern because it combines plush textures with a very expressive face that always makes people smile. I enjoy the mix of working with soft plush yarn for cuddly body parts and thinner cotton for crisp facial details. The step-by-step rounds and photos let me control shaping precisely, which is so rewarding when the character comes to life. I also appreciate the clever assembly tips — attaching eye patches as separate pieces makes detailed sewing much easier.

Panda Amigurumi Pattern step 1 - construction progress Panda Amigurumi Pattern step 2 - assembly progress Panda Amigurumi Pattern step 3 - details and accessories Panda Amigurumi Pattern step 4 - final assembly and finishing

Switch Things Up

I love how easy it is to customize this panda by changing yarn colors — swap the black patches for gray or brown to create a different species or use pastel tones for a baby-themed toy.

I sometimes make the panda bigger by using bulky yarn and a 5 mm hook for a chunky cuddle buddy, or I use sport weight yarn with a 2.5 mm hook for a tiny keychain version.

I like to add small accessories like a crocheted scarf, a tiny hat, or a pocket for a message — these make the toy unique and gift-ready.

For a more expressive face, try changing eye placement slightly or embroider different mouth shapes; these subtle changes change the personality tremendously.

I often substitute safety eyes for the crocheted eyes on toys for older kids, but for the soft look shown here, I keep the embroidered and crocheted eye details.

If you want a posable version, I’ll sometimes insert thin wire into the arms to bend them; secure the wire ends well and cover with stuffing for safety.

Swap the blush color or make them heart-shaped for a romantic or themed variant — you can crochet small appliques too.

Try using variegated plush yarn for the body to create a marbled or tie-dye effect that looks modern and unique.

I recommend experimenting with different stuffing levels — firmer stuffing gives structure while softer stuffing makes a squishier, more toy-like feel.

Finally, I love adding tiny embroidered freckles or a little pocket on the belly to make each panda a one-of-a-kind keepsake.

Common Mistakes & How to Fix Them

✗ Skipping stitch markers during shaping can lead to misaligned attachment points; place markers at the beginning of rounds and at attachment locations to keep symmetry. ✗ Not stuffing as you go often causes lumps or a misshapen head; stuff gradually during construction and adjust filling while shaping the rounds. ✗ Forgetting to shift the stitch marker when folding the head will misplace increases/decreases; always shift the marker so INCs and DECs align as instructed. ✗ Using an incorrect hook size for the plush yarn will change the final size and drape; use the recommended 3.75 mm (or 3.5-4 mm) for the body and a smaller 2.25 mm for small details and eyes.

Panda Amigurumi Pattern

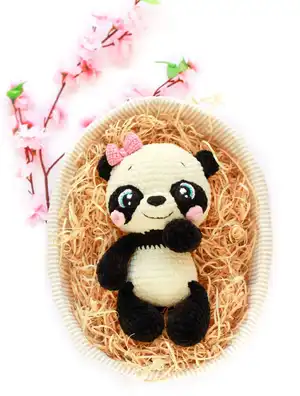
Make a cuddly plush panda amigurumi using soft plush yarn and simple amigurumi techniques. This pattern walks you through each part — paws, head, body, ears, eyes and final assembly — with clear step-by-step rounds and helpful photos. Perfect for gifting or decorating nurseries, you will love the soft texture and sweet expression of this little friend.

Intermediate 5-7 Hours

Materials Needed for Panda Amigurumi Pattern

— Main Fabric

  • 01
    Plush yarn (120 m/100 g / 131 yds/3.5 oz) such as Himalaya Dolphin Baby or YarnArt Dolce — main color: white/ivory (main color consumption is less than a ball)
  • 02
    Black plush yarn for paws, ears, tail and eye patches — less than half a ball
  • 03
    Pink plush yarn for blushes and bow — less than half a ball
  • 04
    Cotton / semi-cotton yarn (~330 m/100 g / 361 yds/3.53 oz) such as YarnArt Jeans or Alize Cotton Gold for eyes, smile, eyebrows and bow: black, white, and a color for glare (blue/green); pink for bow
  • 05
    Thin cotton yarn of plush yarn colors to sew body parts and details

— Tools Required

  • 01
    Crochet hook 3.75 mm (recommended for plush yarn; body parts)
  • 02
    Crochet hook 2.25 mm (for eyes and small details)
  • 03
    Crochet hooks 3.5-4 mm can be used for body depending on yarn and tension
  • 04
    Long needle for tightening (synthetic/tooth thread) and large needle for sewing body details
  • 05
    Thin cotton yarn and synthetic/tooth thread for tightening the muzzle
  • 06
    Stitch markers
  • 07
    Pins with large head for positioning details
  • 08
    Scissors
  • 09
    Yarn needle for sewing and weaving ends
  • 10
    Fiber filling / polyester stuffing
  • 11
    Pins for marking placement
  • 12
    Love (for finishing touches)

Progress Tracker

0% Complete

— Upper paws :

Info :

(2 details). *black plush yarn, 3.75 mm hook. *stuff only bottom part of the paw.

Round 1 :

6 SC in MR (6)

Round 2 :

6 INC (12)

Round 3 :

(SC, INC)*6 (18)

Round 4 :

18 SC (18)

Round 5 :

4 SC, (SC, DEC)*3, 5 SC (15)

Round 6 :

15 SC (15)

Round 7 :

4 SC, 3 DEC, 5 SC (12)

Round 8 - 13 :

6 rounds 12 SC (12)

Round 14 :

work an incomplete round, about 10-11 SC, so that when folding in half, DECs are on one side of the detail

Info :

work a CH, fold in half and crochet the sides together with 6 SC. fix and cut the thread.

— Bottom paws :

Info :

(2 details). *black plush yarn, 3.75 mm hook. *stuff only bottom part of the paw.

Round 1 :

6 SC in MR (6)

Round 2 :

6 INC (12)

Round 3 :

(SC, INC)*6 (18)

Round 4 :

(2 SC, INC)*6 (24)

Round 5 :

24 SC (24)

Round 6 :

6 SC, (2 SC, DEC)*3, 6 SC (21)

Round 7 :

21 SC (21)

Round 8 :

6 SC, (SC, DEC)*3, 6 SC (18)

Round 9 :

18 SC (18)

Round 10 :

6 SC, 3 DEC, 6 SC (15)

Round 11 - 13 :

3 rounds 15 SC (15)

Round 14 :

work an incomplete round, about 12-13 SC, so that when folding in half, DECs are on one side of the detail

Info :

work a CH, fold in half and crochet the sides together with 7 SC. fix and cut the thread.

— Head-Body :

Info :

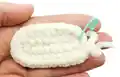
*start with white/ivory plush yarn, 3.75 mm hook. *stuff in process, make sure the head shape is a bit flat, and the muzzle - convex (see photo in process).

Round 0 :

Chain 9; - work in spiral (without a turning CH and SS) as in all amigurumi toys (oval-shape detail);

Round 1 :

(start in the 2nd chain from the hook) 7 SC, 3 SC into the last chain from the hook, on the other side: 6 SC, INC (18)

Round 2 :

INC, 6 SC, 3 INC, 6 SC, 2 INC (24)

Round 3 :

SC, INC, 6 SC, (SC, INC)*3, 6 SC, (SC, INC)*2 (30)

Round 4 :

2 SC, INC, 6 SC, (2 SC, INC)*3, 6 SC, (2 SC, INC)*2 (36)

Round 5 :

3 SC, INC, 6 SC, (3 SC, INC)*3, 6 SC, (3 SC, INC)*2 (42)

Round 6 :

4 SC, INC, 6 SC, (4 SC, INC)*3, 6 SC, (4 SC, INC)*2 (48)

Round 7 - 8 :

2 rounds 48 SC (48)

Round 9 :

5 SC, INC, 6 SC, (5 SC, INC)*3, 6 SC, (5 SC, INC)*2 (54)

Round 10 - 11 :

2 rounds 54 SC (54)

Info :

*fold the detail in half, along the start chain; *shift stitch marker exactly on the side, on the bend (if necessary); *it is important, because INCs in Round 12 should be exactly in the middle of the front part of the detail.

Round 12 :

11 SC, 6 INC, 37 SC (60)

Round 13 - 15 :

3 rounds 60 SC (60)

Info :

*shift stitch marker on the side (if necessary), so that DECs in Round 16 are under INCs in Round 12;

Round 16 :

11 SC, 6 DEC, 37 SC (54)

Round 17 :

5 SC, DEC, 6 SC, (5 SC, DEC)*3, 6 SC, (5 SC, DEC)*2 (48)

Round 18 :

4 SC, DEC, 6 SC, (4 SC, DEC)*3, 6 SC, (4 SC, DEC)*2 (42)

Round 19 :

3 SC, DEC, 6 SC, (3 SC, DEC)*3, 6 SC, (3 SC, DEC)*2 (36)

Round 20 :

2 SC, DEC, 6 SC, (2 SC, DEC)*3, 6 SC, (2 SC, DEC)*2 (30)

Round 21 :

SC, DEC, 6 SC, (SC, DEC)*3, 6 SC, (SC, DEC)*2 (24) - change thread color to black

Info :

*mark the place of attaching upper paws: 6 SC on the sides at a distance of 6 SC in the front and on the back; *make sure, the paws are on the sides of the head; *a paw bend should be closer to the body; *in Round 22, please, be sure to check this area by markers, because the beginning of the round may shifts differently; *the place of attaching the first paw may goes on the previous/next Round (to do this, start attaching the paw earlier/later);

Round 22 :

6 SC with the paw, 6 SC, 6 SC with the paw, 6 SC (24)

Round 23 :

(7 SC, INC)*3 (27)

Round 24 :

27 SC (27)

Round 25 :

(8 SC, INC)*3 (30) - change thread color to white/ivory

Round 26 :

30 SC (30)

Round 27 :

(9 SC, INC)*3 (33)

Round 28 :

33 SC (33)

Round 29 :

(10 SC, INC)*3 (36)

Round 30 :

8 SC, (SC, INC)*6, 16 SC (42)

Round 31 - 32 :

2 rounds 42 SC (42)

Info :

*mark the place of attaching bottom paws: 7 SC on the sides at a distance of 14 SC in the front and on the back; *a paw bend should be closer to the body; *in Round 33, please, be sure to check this area by markers, because the beginning of the round may shifts differently;

Round 33 :

2 SC, 7 SC with the paw, 14 SC, 7 SC with the paw, 12 SC (42)

Round 34 :

(5 SC, DEC)*6 (36)

Round 35 :

(4 SC, DEC)*6 (30)

Round 36 :

(3 SC, DEC)*6 (24)

Round 37 :

(2 SC, DEC)*6 (18)

Round 38 :

(SC, DEC)*6 (12)

Round 39 :

6 DEC (6)

Info :

tighten the hole, fix the thread and hide the end inside.

Info :

do the muzzle tightening with strong synthetic thread: mark 4 points: two at the bottom (on the color change line) and two at the top, between Rounds 11 and 12 between increases in Round 12; insert the needle in the lower point and withdraw it in the upper point; insert the needle in the point from the other side and withdraw it at the bottom near the first point; tighten the thread, tie endings and hide them inside the head.

— Ears :

Info :

(2 details). *black plush yarn, 3.75 mm hook. *don't stuff.

Round 1 :

6 SC in MR (6)

Round 2 :

6 INC (12)

Round 3 :

12 SC (12)

Info :

work a CH, fold in half and crochet the sides together with 6 SC. fix the thread and leave a long ending for sewing.

— Tail :

Info :

*black plush yarn, 3.75 mm hook. *stuff a bit.

Round 1 :

6 SC in MR (6)

Round 2 :

6 INC (12)

Round 3 :

12 SC (12)

Round 4 :

6 DEC (6)

Info :

fix the thread and leave a long ending for sewing.

— Nose :

Info :

*black semi-cotton yarn, 2.25 mm hook.

Round 0 :

Chain 6; - work in spiral (without a turning CH and SS);

Round 1 :

(start in the 2nd chain from the hook) INC, SC, 3 SC in one St, SC, 4 SC into the last chain from the hook, on the other side: 3 SC, INC (14)

Info :

fix the thread and leave a long ending for sewing.

— Blushes :

Info :

(2 details). *pink plush yarn, 3.75 mm hook.

Round 1 :

6 SC in MR (6)

Info :

fix the thread and leave a long ending for sewing.

— Eye patches :

Info :

(2 details). *black plush yarn, 3.75 mm hook.

Round 0 :

Chain 6; - work in spiral (without a turning CH and SS);

Round 1 :

(start in the 2nd chain from the hook) 3 SC, HDC, 5 HDC into the last chain from the hook, on the other side: HDC, 2 SC, INC (14)

Round 2 :

INC, 2 SC, HDC, 5 INC HDC, HDC, 2 SC, 2 INC (22)

Info :

fix the thread. it is better to cut the thread, and then sew the detail with a black thin cotton thread.

— Eyes :

Info :

(2 details). *start with black semi-cotton yarn, 2.25 mm hook.

Round 1 :

6 SC in MR (6)

Round 2 :

6 INC (12)

Round 3 :

(SC, INC)*4, change color to white, back loops only: SC, 3 INC (20)

Round 4 :

back loops only: INC, SC, SS (4)

Info :

fix the thread and leave long ends of black and white yarn for sewing and embroidering the glare (leave more white thread). work (blue) chain stitch under the white SC. withdraw blue thread end on the wrong side, tie a knot and cut ends. embroider the glare with white thread end.

— Final assembly :

Info :

sew the ears between Rounds 5 and 10.

Info :

sew the nose in Round 13 under INCs from Round 12.

Info :

embroider the smile, stretching the thread under the pins and fixing the curve (2 bottom points) with thread.

Info :

place eye patches so that the upper edges are 2 rounds higher than the INCs on the muzzle (see photo). place eyes and blushes on eye patches and fix them with pins.

Info :

take off eye patches together with fixed details and sew them: o sew the eyes with black and white thread endings; o sew the blushes with thin pink cotton thread; then fix the eye patches on the head and sew them with thin black yarn.

Assembly Instructions

  • Attach upper paws to the head during Round 22 by working 6 SC through the paw while crocheting the body, spacing them as marked and ensuring the paw bend faces the body.
  • Sew ears between Rounds 5 and 10, positioning them symmetrically and securing firmly with a whipstitch.
  • Sew the nose in Round 13 under the INCs from Round 12, then embroider the smile by stretching the thread under pins and fixing the curve at two bottom points with thread.
  • Place eye patches so the upper edges are two rounds higher than the muzzle INCs, pin eyes and blushes to patches, sew the details on the patches, then attach each completed patch to the head and sew with thin black yarn.
  • Attach bottom paws at the marked positions in Rounds 31-33 (7 SC spacing and 14 SC distance), close the opening, tighten and hide thread ends.
  • Tighten the muzzle using synthetic thread by marking four points (two bottom at color change line, two between Rounds 11 and 12), pull thread through and hide ends inside the head.

Important Notes

  • 💡Use stitch markers to mark the start of rounds and attachment points so INCs and DECs align correctly during shaping.
  • 💡Stuff gradually and in process to achieve a slightly flattened head shape and a convex muzzle as shown in photos.
  • 💡Check and shift stitch markers before rounds where increases/decreases must align under previous rounds to ensure symmetry.
  • 💡Change thread color where indicated (Round 21 change to black, Round 25 change back to white/ivory) and secure the joins neatly.
  • 💡Cut the thread on eye patches and sew details with thin cotton thread for a neater finish before attaching to the head.

This sweet panda is made with plush yarn for a soft, huggable finish and tiny cotton details for a charming face. It is a delightful makes for baby showers, nursery decor, or a special handmade gift. Have fun stitching and customizing your panda — happy crocheting! 🧶🖤

You ask,

we answer.

FAQs

What size will the finished piece be?

The finished amigurumi measures approximately 25-28 cm (9.8 inches) tall using the recommended plush yarn and the specified hooks.

Can I use different yarn weights for this pattern?

Yes, but the finished size and texture will change; use a larger hook for bulkier yarn and a smaller hook for thinner yarn and adjust stuffing and tension accordingly.

Do I need prior crochet experience for this pattern?

This pattern is rated intermediate and assumes familiarity with amigurumi techniques such as magic ring, single crochet, increases, decreases, working in spiral, and basic sewing.

How long does this project typically take to complete?

Most crocheters complete this project in 5-7 hours depending on experience and how much time is spent on assembly and embroidery details.