🧢 Beautiful ✨ Detailed πŸ’ Adorable

Patchwork Cardigan Pattern

Patchwork Cardigan Pattern
4.9β˜… Rating
12-15 Hours Time Needed
3.9K Made This
βœ‚οΈ

Beginner Friendly Level

Perfect for those just starting their crochet journey, with clear instructions and simple techniques

⏱️

Multi-Day Project

A rewarding 12+ hour journeyβ€”perfect for dedicated crafters who love detailed work.

πŸ‘•

Casual Chic

Relaxed style with a modern twist, perfect for everyday wear while maintaining that handcrafted uniqueness.

About This Patchwork Cardigan Pattern

This pattern creates a warm patchwork cardigan made from vertical colorblock strips that are joined with the mattress stitch. You27ll work small single-crochet panels and assemble them into an oversized, comfortable cardigan. The design includes ribbing for the hem and a finished button band for a clean neckline.

Patchwork Cardigan Pattern crochet pattern - detailed view of completed project

Includes full instructions for front, back, sleeves, ribbing and button band. Clear color change and multi-strand square notes are provided for easy customization.

Why You'll Love This Patchwork Cardigan Pattern

I absolutely love this pattern because it turns simple single crochet squares into a striking, wearable patchwork piece. I enjoy how the vertical strips let you play with color while keeping the crochet techniques straightforward. I love the mattress stitch assembly - it makes seams look neat and professional. I feel proud when a handmade cardigan goes from small panels to a finished garment that feels cozy and unique.

Patchwork Cardigan Pattern step 1 - construction progress Patchwork Cardigan Pattern step 2 - assembly progress Patchwork Cardigan Pattern step 3 - details and accessories Patchwork Cardigan Pattern step 4 - final assembly and finishing

Switch Things Up

I love how easy it is to customize this cardigan27s color palette; try pastel shades for a softer, spring-inspired look or deep jewel tones for a bold statement.

You can make the cardigan larger or smaller by changing yarn weight and hook size: a bulkier yarn with a larger hook yields a chunky version and thinner yarn creates a delicate, lightweight version.

Try switching the stitch for texture: substitute half double crochet for single crochet in squares for a taller stitch and slightly different drape.

I often add embroidered initials or a small motif to one square to personalize the cardigan as a gift.

For a vintage vibe, use variegated yarn for one or two squares to break up solid colors and add visual interest.

Experiment with placement of the multi-strand striped column 26ndash; move it to the outer edge or center for a different focal point.

I sometimes adjust the ribbing height for a longer or shorter hemline depending on the look I want; simply add or omit rows in the BLO ribbing section.

If you want more fitted sleeves, reduce the number of rows or stitches in the sleeve body and test fit before joining to the body.

I recommend swapping to wooden or contrasting buttons to change the cardigan27s personality from modern to rustic in a flash.

For extra warmth, consider lining the body with a lightweight fleece or sewing in a quilted panel between the layers for a cozy winter version.

Make a matching set by using the same colors to crochet a hat or scarf using the same squares and ribbing techniques.

Don27t be afraid to mix yarn fibers; combining a wool blend with acrylic can add loft and texture but always swatch first to ensure gauge and hand feel.

Common Mistakes & How to Fix Them

βœ— Not checking gauge before starting can lead to a cardigan that is too large or too small; make a 42" x 42" swatch (14 sts x 16 rows with 5 mm hook) and adjust hook size accordingly. βœ— Skipping stitch markers for button placement can result in uneven spacing; mark the three buttonhole positions and align markers with button bottoms before making the button band. βœ— Pulling yarn too tight at color changes will distort the square edges; change colors as instructed (drop old yarn before final yarn over and use new color to pull through last two loops) and maintain even tension. βœ— Sewing panels without pinning or matching rows can create lopsided seams; lay pieces flat, match squares and use mattress stitch, pulling gently and evenly as you go. βœ— Overstuffing or stretching ribbing while joining will change the fit at the hem; leave a very long tail, sew ribbing carefully and avoid stretching while attaching to the bottom edge.

Patchwork Cardigan Pattern

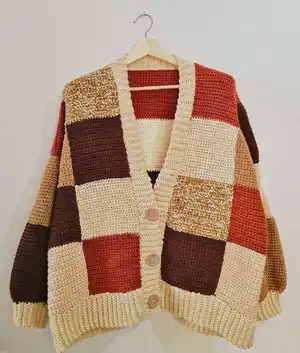
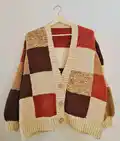
This cozy patchwork cardigan pattern guides you through making colorblock vertical strips and assembling them into an oversized cardigan you will love to wear. You27ll work simple single crochet squares, learn a neat color-change technique and a mattress stitch join. The pattern is designed for medium/aran weight yarn and includes step-by-step assembly, ribbing, and a button band for a polished finish. Perfect for gifting or creating a custom wearable statement piece.

Beginner Friendly 12-15 Hours

Materials Needed for Patchwork Cardigan Pattern

β€” Main Fabric

  • 01
    Lanoso Cazz 100% Acrylic, 100 gr (3.5 oz) = 180 m (197 yds) - 10 ply Medium - Aran (main yarn used)
  • 02
    Kartopu AK-Soft 100% Acrylic, 100 gr (3.5 oz) = 240 m (262 yds) - used for multi-strand squares (use as DK weight with another strand)
  • 03
    Colors and approximate ball counts: XS-S-M: Redwood 2 balls, Beige 2 balls, Brown 2 balls, Ecru 1 ball, Mocha 1 ball, Mocha DK & Ecru DK (multi-strand) 1 each
  • 04
    Colors and approximate ball counts: L-XL: Redwood 2 balls, Beige 2 balls, Brown 2 balls, Ecru 1 ball, Mocha 2 balls, Mocha DK & Ecru DK (multi-strand) 1 each
  • 05
    Colors and approximate ball counts: 2-3XL: Redwood 2 balls, Beige 3 balls, Brown 2.5 balls, Ecru 1 ball, Mocha 2 balls, Mocha DK & Ecru DK (multi-strand) 1 each
  • 06
    Total yarn used: approximately 10 (11, 12.5) balls depending on size (values given in pattern)

β€” Tools Required

  • 01
    Stitch markers
  • 02
    4 mm crochet hook (for the ribbing)
  • 03
    5 mm crochet hook (or any hook that meets the gauge with your tension)
  • 04
    Scissors
  • 05
    Yarn needle for sewing and mattress stitch
  • 06
    Measuring tool (ruler or tape measure)
  • 07
    3 buttons, 3 cm (1.12") or 3.5 cm (1.32") in diameter
  • 08
    Optional: additional yarn for multi-strand squares (Kartopu AK-Soft)

Progress Tracker

0% Complete

β€” Materials :

Info :

My yarn: Lanoso Cazz 100% Acrylic, 100 gr (3.5 oz) = 180m (197yds)- 10 ply Medium - Aran. I used 5 different colors from this medium yarn. You can choose a suitable yarn. The two yarns in the bottom row are: Kartopu Ak- Soft 100% Acrylic , 100 gr (3.5 oz) = 240 m (262 yds). With these two yarns, you will make a multi-strand square. Total you will use is 10 (11, 12.5) balls. These numbers are the total yarn count.

β€” Gauge :

Info :

4 x 4" (10 x 10 cm*) = 14 sts & 16 rows in single crochet stitch with 5 mm crochet hook. *cm measurement is approximate.

β€” Notes on the pattern :

Info :

This cardigan is worked in vertical strips. You start with making the first strip then making the other stripes. Add the strips with the mattress sewing method and thus the front and back panels will be join. Each vertical strip is worked in colour blocks. The cardigan is worked in single crochet.

β€” Abbreviations :

Infos :

ch = chain. sc = single crochet. slst(s) = slip stitch(es). st(s) = stitch(es). loop single crochet. inc = increase. yo = yarn over. rep = repeat.
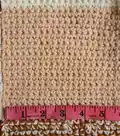
β€” How to Change Colors in Crochet :

Info :

Stop before the final yarn over on the final stitch of row 22. Drop the "B" color of yarn. Put the new yarn "M" color on the hook and use the "M" color to pull through the last two loops on the hook. Turn and ch 1. Continue with a row of sc.

Info :

Multiple-Strands Square: For multi-strand squares, you will follow the same steps as above but when doing this, the weights of the yarns should be 8 ply / DK.

β€” Front Panel :

Round 1 :

Using 5 mm hook. Ch 17 (19, 23)

Round 2 :

ROW 1 (RS): sc in 2nd ch from hook, sc in each ch to end of chain. Turn. 16 (18, 22) sc.

Round 3 :

Rep row 1 until end of row 18 (20, 22). Switch to new color. Repeat this step 4 times. Fasten off.

Info :

And you have one vertical stripes ready. Make this vertical stripes 4 times in total, 2 times for the right front and 2 times for the left front.

β€” Back Panel :

Round 1 :

Using 5 mm hook. Ch 17 (19, 23)

Round 2 :

ROW 1 (RS): sc in 2nd ch from hook, sc in each ch to end of chain. Turn. 16 (18, 22) sc.

Round 3 :

Rep row 1 until end of row 18 (20, 22). Switch to new color. Repeat this step 4 times. Fasten off.

Info :

And you have one vertical stripes ready. Make 5 vertical stripes for the back panel.

β€” Sleeves :

Round 1 :

(Make 2): Using 4 mm hook. Ch 10

Round 2 :

ROW 1: sc in 2nd ch from hook, sc in each ch to end. Turn. (SC X 9)

Round 3 :

ROW 2: ch 1, sc in BLO in each st across. Turn. (BLO SC X 9)

Round 4 :

Rep row 2 until end of row 26 (28, 30)

Round 5 :

Change to 5 mm hook

Round 6 :

ROW 3: Fold your crochet ribbing in half and use slip stitches to join last and first row together. Turn your crochet ribbing inside out.

Round 7 :

ROW 4: Ch 1, SC in the same stitch times (increase) and continue until you have 56 (58, 60) slst into the last st of the round. Turn.

Round 8 :

ROW 5: Ch 1, sc across, slst into the last st of the round. turn.

Round 9 :

Repeat row 5 until you have 27 rows. Fasten off. Switch to the next color from where the slip stitch was. Ch 1, and sc across. Repeat row 5 until you have 23 rows.

Info :

Fasten off leaving a long tail. Go ahead and make the other sleeve in the same way.

β€” Assembly :

Info :

Mattress Stitch: Using yarn needle and long tails, Start by making the first strip, and then invisible sew stitch the previous strip as you progress.

Info :

Lay work with wrong side facing down and edges to be sew side by side. Stitches will be worked through the top loop only of both sides. Insert needle from left to right through the first stitches of both panels at the bottom of your work to begin joining the two panels. Insert needle from right to left into the next stitch of the right panel and continue through the last stitch worked on the left panel.

Info :

Insert needle from left to right into the next stitch of the left panel and continue through the last stitch worked of the right panel. Continue in this manner gently pulling the yarn snug as you go to close the seam. Every few stitches pull the yarn snug to secure and even out the seam.

Info :

Lay the back panel on a flat surface. Next place both front panel on top and with a yarn needle and long tails seam front panels to back panel or slip stitch them together.

Info :

Next lay entire piece out flat with the wrong side still facing up. Grab a sleeve and mark the middle st with a stitch marker. Now attach stitch marker to the shoulder seam. With yarn needle and long tail seam sleeve to main body. Rep on the other side with the other sleeve. Fold over your cardigan and seam along under edge of sleeves and down along the sides. Turn cardigan right side out.

β€” Bottom Ribbing :

Round 1 :

In Beige Yarn with a 4 mm hook, Ch 14

Round 2 :

ROW 1: 1 sc in 2nd ch from hook. 1 sc in each ch to end of chain. Turn. (13 sc).

Round 3 :

ROW 2: Ch 1, sc in BLO in each st across. Turn. (BLO SC X 13 )

Round 4 :

Repeat row 2 until ribbing is long enough to go around the entire bottom edge of cardigan (that includes the bottom edges of the two front panels and the bottom edge of back panel). Fasten off leaving a very long tail. With your yarn needle and long tail sew the ribbed hem to the bottom edge of cardigan.

β€” Button Band :

Round 1 :

Grab 3 stitch markers and place them where you want your three button holes to be. With the Right side facing you, space out the 3 buttons evenly along the opening edge of the neckline. Line up a Stitch Marker with the bottom of each button and place Stitch marker in corresponding st.

Round 2 :

In Beige Yarn with a 4 mm hook, Turn cardigan right side out. Attach yarn to bottom inner corner of the cardigan. Ch 10

Round 3 :

ROW 1: 1 sc in 2nd ch from hook. 1 sc in each ch to end of chain. slst into next 2 sc (on the body of cardigan). Turn. (9 sc).

Round 4 :

ROW 2: skip 2 slsts, 9 sc in BLO, Ch 1, turn, 9 sc in BLO. slst in next 2 sc, turn, skip 2 slsts, 9 sc in BLO, ch 1, turn, 9 sc in BLO, slst in next 2 sc, turn...

Round 5 :

BUTTONHOLE ROW: Ch 1. Working sc in BLO, 1 sc in each of first 3 sts, Ch 3, skip next 3 sts, 1 sc in each of last 3 sts. Slst into next 2 sc (on the body of cardigan). Turn..

Round 6 :

Continue to ROWS 2 until the height of ribbing reaches the next slip marker, then repeat a BUTTONHOLE ROW. Once you27ve crocheted all 3 buttonholes, continue to ROWS 2 until the ribbing measures the length of the entire neckline. Fasten off and weave in all ends.

Round 7 :

Sew buttons on the other side of the neckline opening, taking care to match buttons to button holes.

Info :

*You can use stitch markers to mark the button placement. *If the neckline is ruffling 26ndash; you27ve placed the button too close together and if the neckline is pulling/puckering 26ndash; you27ve placed the buttons too far apart. Your cardigan is now completed!
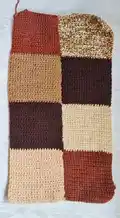
β€” Assembly Diagrams :

Info :

Follow the assembly diagrams for placement of colored squares: Back (5 vertical stripes) and Left Front / Right Front (4 vertical stripes each). Diagrams show 4 rows of squares and indicate multi-strand column as required.

Assembly Instructions

  • Join vertical strips using mattress stitch: lay wrong sides together, align squares and insert needle through top loops of both panels from left to right, then right to left, pulling yarn snug to close seam.
  • Place back panel flat and position both front panels on top; seam front panels to back panel with yarn needle and long tails or slip stitch them together to form the body.
  • Attach sleeves by marking the middle stitch of sleeve with a stitch marker and aligning it to the shoulder seam; sew sleeve to body with yarn needle and long tail, then repeat for the other sleeve.
  • Fold cardigan and seam under edges of sleeves and down the sides to close the side seams; turn cardigan right side out after sewing.
  • Sew the bottom ribbing to the bottom edge: measure ribbing length to fit completely around bottom edges of both front panels and back panel, then sew with long tail and yarn needle.
  • Crochet and attach the button band: with right side facing, attach yarn to bottom inner corner, make the ribbing and buttonholes as directed, then sew corresponding buttons to match holes.

Important Notes

  • πŸ’‘Use stitch markers to keep track of your vertical strips, button placements and sleeve centers for accurate assembly.
  • πŸ’‘Work with consistent tension and check the 10 x 10 cm gauge (14 sts x 16 rows with 5 mm hook) before starting to ensure correct finished size.
  • πŸ’‘Fasten off leaving long tails for mattress stitch joining and ribbing attachment to make finishing easier and neater.
  • πŸ’‘Pin or lay pieces flat and match square rows before sewing to avoid mismatched seams and uneven joins.

This Patchwork Cardigan pattern is designed to be cozy, customizable and fun to make, perfect for colorplay and handmade wardrobes. 🧢 The vertical stripe construction lets you mix colors and textures for a truly unique piece that27s as enjoyable to make as it is to wear. ✨ Make one for yourself or gift a warm, stylish cardigan that shows off your creativity and careful finishing. ❀️

You ask,

we answer.

FAQs

What size will the finished piece be?

The finished cardigan measures approximately: XS-S-M width 22" (57 cm) length 21" (53 cm); L-XL width 25" (64 cm) length 23.5" (59.5 cm); 2-3XL width 31" (78 cm) length 25" (64 cm) when laid flat.

Can I use different yarn weights for this pattern?

Yes, you can use different yarn weights but this will change the finished size and gauge; if you change yarn weight, make a swatch and adjust hook sizes to match the gauge or recalculate the chain counts.

Do I need prior crochet experience for this pattern?

This pattern is beginner-friendly (Beginner / Advanced Beginner) and uses single crochet and simple techniques, but basic experience with changing colors and sewing panels is helpful.

How long does this project typically take to complete?

Most crocheters will take about 12-15 hours to complete this cardigan, depending on experience, size and finishing time for assembly.