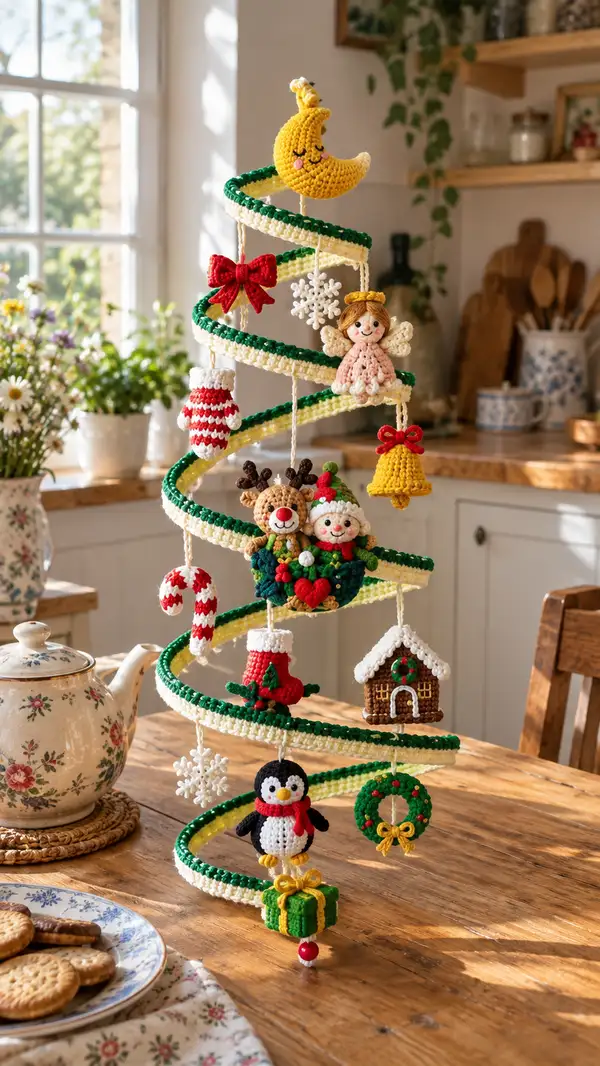
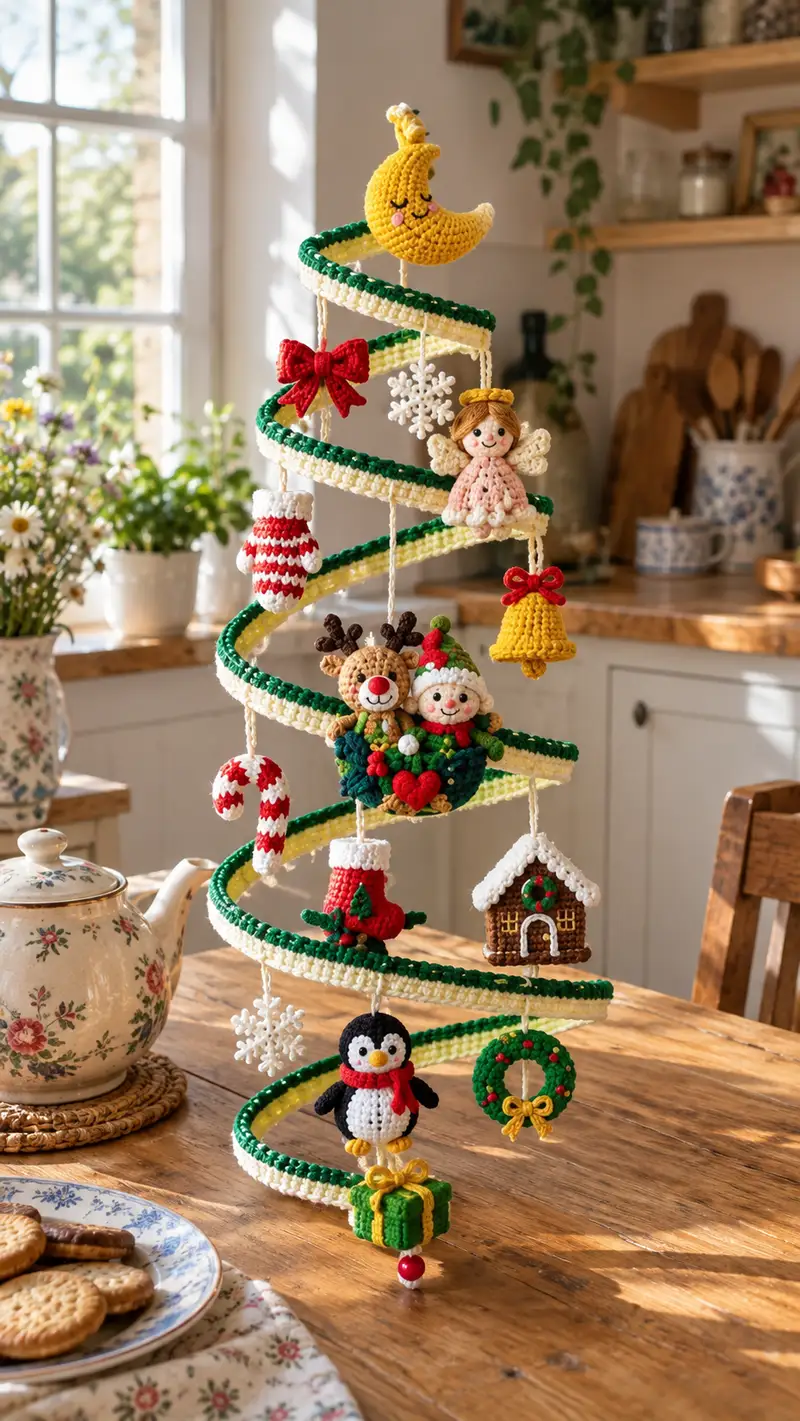
A festive spiral mobile bursting with tiny crochet ornaments — moon, angel, reindeer & elf duo, penguin, wreath, gingerbread house, stocking and more. Created in bright holiday colors with charming embroidered faces and layered textures, this hanging decoration is perfect for tabletops or as a unique tree topper. Each ornament is crocheted individually and suspended from a crocheted spiral tree for a delightful, hand-crafted display.
Progress Tracker
0% Complete
— Spiral Tree Base :
Info :
This spiral is the scaffold for all ornaments. It is worked as a long flat spiral tube (open coil) that is stiff enough to hold shape when wrapped around a metal or cardboard spiral form. Use worsted yarn and 3.25mm hook for dense fabric. Make two identical spiral strips and join them with slip stitch and single crochet edging for the twin-layer look seen in the photo.
Round 1 :
Ch 62, join to first ch with sl st to form a ring being careful not to twist (62)
Round 2 :
Ch1, 1 sc in same st and in each ch around, join with sl st (62)
Round 3 :
Ch1, 1 sc in each st around continuing to work in the round, join (62)
Round 4-6 :
Work 1 sc in each st (62). Maintain even tension so strip remains flat and not bowl-shaped.
Info :
For the inner/outer contrasting stripe: after 6 rounds change to cream or pale yellow and continue as described. Carry yarn inside strip or break and join for clean color changes. This strip will be wrapped into the spiral — make two: one green outer and one cream inner.
Round 7-14 :
Change to contrasting color. 1 sc in each st for 8 rounds (62)
Round 15 :
Switch back to green for edge band. 1 sc in each st (62)
Round 16-20 :
1 sc in each st (62) to give extra thickness to the band and create a raised ridge visible along the edge (62)
Info :
Make second identical strip. To stiffen the spiral, you can weave thin wire along the inner edge before closing, or spray with a light fabric stiffener once assembly is complete. For hanging, leave length of braided cord at top as shown in photo.
Round 21 :
Join two strips using sl st through corresponding edge stitches along entire length to create a double-thickness spiral band; leave gaps where ornaments will pass through for hanging spacing.
Info :
Measure the spiral after joining and coil around a cone or bottle to shape it. Attach with pins and sew a few strategic stitches through turns so it keeps spiral form. This completes the base.
— Braided Hanging Cords (Make 6-10 depending on ornament placement) :
Info :
Each ornament hangs from a twisted cord made of 3 strands of cream yarn plied together. Make cords approx. 12-20 cm long depending on which spiral tier. Make extra cords for adjustments.
Round 1 :
Cut three 60cm lengths of cream yarn. Knot at one end, secure to table and braid tightly, knot the other end. Weave ends into cord to hide.
Info :
Attach cords at specific spiral rounds by sewing through both layers of spiral band with a few secure stitches. Place knots inside band for neat finish.
— Moon Topper (Head Only) :
Round 1 :
mr, 6 sc into ring (6)
Round 3 :
(1 sc, inc) x6 (18)
Round 4 :
(2 sc, inc) x6 (24)
Round 5 :
(3 sc, inc) x6 (30)
Round 6 :
(4 sc, inc) x6 (36)
Round 7-11 :
1 sc in each st (36)
Info :
To shape the crescent, we'll work a long tapered decrease on one side only — this is done by decreasing gradually on alternating rounds and shortening circumference on that side. Place increases on the belly side and decreases along the taper line.
Round 12 :
(5 sc, dec) x6 (30)
Round 13 :
(4 sc, dec) x6 (24)
Round 14 :
(3 sc, dec) x6 (18)
Round 15 :
(2 sc, dec) x6 (12)
Info :
Stuff lightly to maintain soft crescent shape. Continue tapering the tip by working decs only where needed to form the crescent curve. Use a little embroidery to stitch closed cheek and eye lines.
Round 16 :
6 dec (6) - shape tip, FO leaving long tail to sew to spiral top
Info :
Use small embroidered closed eyes and stitched smile. Add a small cream highlight at moon tip with slip stitch or low pile to mimic the photo. Sew moon to top of spiral with strong stitches through band.
— Reindeer Head :
Round 3 :
(1 sc, inc) x6 (18)
Round 4 :
(2 sc, inc) x6 (24)
Round 5 :
(3 sc, inc) x6 (30)
Round 6 :
(4 sc, inc) x6 (36)
Round 7 :
(5 sc, inc) x6 (42)
Round 8 :
(6 sc, inc) x6 (48)
Round 9-12 :
1 sc in each st (48)
Info :
Place 6mm safety eyes between rounds 11-12 leaving about 8-10 sts between eyes depending on desired expression. Embroider small mouth later and add red nose piece made separately.
Round 13 :
(6 sc, dec) x6 (42)
Round 14 :
(5 sc, dec) x6 (36)
Round 15 :
(4 sc, dec) x6 (30)
Info :
Start stuffing head firmly but not overly hard. Use small amounts at a time and push stuffing to front to shape cheeks.
Round 16 :
(3 sc, dec) x6 (24)
Round 17 :
(2 sc, dec) x6 (18)
Round 18 :
(1 sc, dec) x6 (12)
Round 19 :
6 dec (6), FO leaving tail to sew neck to body
Info :
Make a separate small red nose: mr, 6 sc (6), 6 inc (12), 1 sc around 12, FO leaving tail and stuff; sew to front center just below eyes. Embroider smile with dark brown yarn from lower half of mouth area.
— Reindeer Antlers (Make 2) :
Round 3 :
1 sc in each st (12)
Round 4 :
Switch to 2.75mm hook, ch1 and work 6 short branches: *sc in next 2 sts, ch3, sl st back into 2nd ch, FO and return to body stitch; repeat* to create branched antler look. Alternatively work tiny bumps: (sc, inc) x3 (15) then FO and sew in place
Info :
Sew antlers to top of head at rounds 7-8 spaced about 6 stitches apart. Use a few reinforcing stitches through head to anchor antlers firmly.
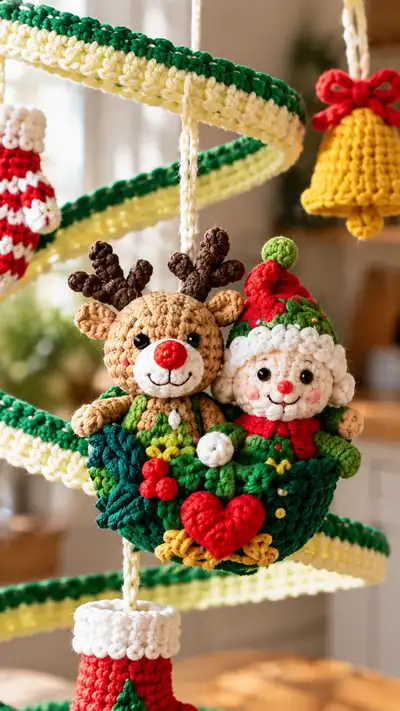
— Reindeer Body / Wreath Basket :
Round 1 :
With dark green, mr, 6 sc (6)
Round 3 :
(1 sc, inc) x6 (18)
Round 4 :
(2 sc, inc) x6 (24)
Round 5 :
(3 sc, inc) x6 (30)
Round 6 :
1 sc in each st (30)
Round 7 :
(3 sc, inc) x6 (36)
Round 8-11 :
1 sc in each st (36)
Info :
We are forming a bowl shape large enough to seat both reindeer and elf heads. Begin shallow increases to flare sides. Add texture by working some rounds in BLO to create a rim that looks braided.
Round 12 :
Change to BLO for next round. 1 sc BLO in each st (36)
Round 13-16 :
Return to regular sc, 1 sc each st, stuffing bottom lightly as you work to make a firm base (36)
Round 17 :
(4 sc, dec) x6 (30)
Round 18 :
(3 sc, dec) x6 (24)
Round 19 :
1 sc in each st (24)
Round 20 :
Work decorative row: *sc, ch2, skip 1* around to create small loops for holly decoration (24 loops)
Info :
Make small red berries (3 x tiny mr 6 sc, FO) and tiny bright leaves crocheted separately (ch4, sc back across, FO) and sew around bowl rim. Embellish front with small red heart motif (worked separately) and stitch to front center.
— Reindeer Arms (Make 2) :
Round 3-4 :
1 sc in each st (12)
Round 5 :
(2 sc, dec) x3 (9)
Round 6-10 :
1 sc in each st (9) - lengthen to create arm approx 8-9 rounds long
Info :
Stuff hand end firmly and leave a long tail to sew; position arms inside bowl hugging the elf and reindeer bodies. Sew with ladder stitch for invisible seam.
— Elf Head :
Round 3 :
(1 sc, inc) x6 (18)
Round 4 :
(2 sc, inc) x6 (24)
Round 5 :
(3 sc, inc) x6 (30)
Round 6-8 :
1 sc in each st (30)
Info :
Place safety eyes between rounds 7-8 spacing about 8 stitches apart. Make tiny rosy cheeks using pink yarn embroidery or blush later. Create curled hair loops separately and sew onto head edge for the hairstyle shown.
Round 9 :
(4 sc, dec) x6 (24)
Round 10 :
(3 sc, dec) x6 (18)
Round 11 :
(2 sc, dec) x6 (12)
Round 12 :
6 dec (6), FO leaving tail to join into wreath-basket
Info :
Elf hat: work separate cone in red and green stripes then add white bobble trim. Hat is stitched to head at crown. Add tiny pompom by crocheting a small ball (mr 6 sc, 6 inc, FO).
— Elf Body (Small, fits in wreath) :
Round 1 :
With light flesh or cream, mr, 6 sc (6)
Round 3 :
(1 sc, inc) x6 (18)
Round 4-7 :
1 sc in each st (18)
Round 8 :
Change to body color (green). 1 sc in each st (18)
Round 9-12 :
1 sc in each st (18)
Round 13 :
(2 sc, dec) x4 (14)
Round 14 :
(1 sc, dec) x4 (10)
Round 15 :
5 dec (5) FO leaving long tail, stuff lightly and sew to inside of wreath-basket
Info :
Sew head to body with invisible stitches. Add tiny scarf by chaining 20, working small rows of sc, then tie around neck and tack ends under body.
— Penguin (Full body) :
Head & Body Combined Round 1 :
mr, 6 sc (6)
Round 3 :
(1 sc, inc) x6 (18)
Round 4 :
(2 sc, inc) x6 (24)
Round 5 :
(3 sc, inc) x6 (30)
Round 6-9 :
Work in black: 1 sc each st (30)
Round 10 :
Change to white for belly shape: 1 sc in next 6 sts, switch back to black, 1 sc in remaining sts to create white oval on front. Carry white up to work belly later.
Round 11-14 :
Continue in black around (30)
Info :
Place eyes on head between rounds 8-9; use 6mm safety eyes. For beak, make a small flat triangle: ch3, sc2 into second ch from hook, FO; sew centered between eyes.
Round 15 :
(4 sc, dec) x5 (25)
Round 16 :
(3 sc, dec) x5 (20)
Round 17 :
(2 sc, dec) x5 (15)
Round 18 :
1 sc in each st (15) - legs attach later here
Round 19 :
(1 sc, dec) x5 (10)
Round 20 :
5 dec (5) FO leaving tail for sewing. Stuff firmly so penguin stands slightly rounded and stable.
Info :
Make two small yellow feet: mr, 6 sc (6), FO. Sew at bottom spaced evenly. Add red scarf by chaining 24 and working small rows of sc, tie around neck and tack at back. Sew penguin onto lower spiral tier using braided cord for suspension.
— Stocking (Small) :
Round 1 :
With red, ch 10, join to work in rnd forming toe circle (10)
Round 2 :
1 sc in each st around (10)
Round 3 :
(1 sc, inc) x5 (15)
Round 4-8 :
1 sc in each st (15)
Round 9 :
Change to white and 1 sc in each st (15)
Round 10 :
Work cuff: BLO 1 sc each st for two rounds to create fluff texture (15)
Round 11 :
FO leaving long tail; fold cuff over and stitch side seam closed leaving opening to hang cord
Info :
Decorate with small green Christmas-tree appliqued motifs: ch4, 3 dc cluster in center, FO and attach to stocking front.
— Gingerbread House :
Base Round 1 :
With brown, mr, 6 sc (6)
Round 3 :
(1 sc, inc) x6 (18)
Round 4-8 :
1 sc in each st (18) - form a flat oval base
Walls Round 9 :
Work back and forth in rows to build wall height: ch1, turn, sc across 18 sts for next 6 rows to reach house height
Info :
Sew roof separately in cream/white, using rows of dc for shingle look. Add wreath and candy details with small appliques and stitch to front. Close bottom seam with whip stitch and stuff lightly to keep shape.
— Bell (Make 1) :
Round 3 :
(1 sc, inc) x6 (18)
Round 4-7 :
1 sc each st (18)
Round 8 :
(3 sc, dec) x4 (14)
Round 9 :
(2 sc, dec) x3 + 2 sc (11)
Round 10 :
FO leaving tail to sew top loop and bottom clapper (small mr 6 sc clapper), sew clapper inside bell. Add small red bow to top as shown.
Info :
Use gold/yellow yarn for bell and red for bow. Reinforce top loop with extra stitching; hang from cord.
— Candy Cane :
Round 1 :
Ch8, join to tube ring, 1 sc in each st around for 6 rounds to create straight cane portion (8)
Round 2-6 :
1 sc in each st (8) alternating red and white every round to create spiral stripes. After 6 rounds curve cane by sewing short seam to bend and continue 3 more rounds to form hook (8)
Info :
Stuff lightly and shape hook by bending and stitching inside to hold curve. Add a small white puff at top if desired.
— Mitten :
Round 3 :
(1 sc, inc) x6 (18)
Round 4-7 :
1 sc in each st (18)
Round 8 :
Change to white and 1 sc around for cuff texture. FO and sew thumb small tube separately (mr 6 sc, 2 rounds) and attach to side.
Info :
Use stripes or add a small heart motif for decoration. Attach a loop for hanging to the seam at the top.
— Small Heart & Berries (Assorted Appliques) :
Heart Round 1 :
Ch6, 2 sc into 2nd ch from hook, hdc next, treble in next, hdc, 2 sc in last ch, sl st across opposite side to form heart, FO
Berry :
mr, 6 sc, FO small red berry; sew in clusters of three onto wreath and basket edges
Info :
These tiny appliques are very forgiving; place them with pins and stitch through spiral for secure attachment. Add a few french knot-style embroidered gold stitches to mimic metallic beads.
— Snowflake (Make 2) :
Round 1 :
Ch6, join to ring. *(ch4, sl st into ring)* repeat 6 times to make 6 arms
Round 2 :
At each arm, sc into first chain and chain 3, sl st into base; repeat to create small branched arms. FO and sew to spiral with cream thread.
Info :
Work in white and use crochet cotton or very fine yarn for delicate snowflakes. Starched lightly to hold shape if needed.
— Present Box :
Box Round 1 :
With green, mr, 6 sc (6)
Round 3 :
(1 sc, inc) x6 (18)
Round 4-6 :
1 sc in each st to build walls (18)
Round 7 :
Switch to yellow for bow; make small flat bow: ch8, sc across, fold and sew into bow shape then attach to top center.
Info :
Stuff lightly and sew into a box shape. Add a bead at bottom of braided cord for weight and decorative finish like in photo. Add a hanging loop to attach to spiral.
— Assembly & Finishing Info :
Info :
Arrange ornaments visually before sewing permanently. Work from top to bottom: secure moon to top coil, attach braided cords to spiral band through both layers using whip stitch. Hang reindeer & elf wreath centrally on a middle tier for focal point. Ensure heavier ornaments like gingerbread are placed on lower tiers and counterbalanced by a small gift weight on the opposite side.
Info :
Weave in all ends and trim close to work. When sewing faces, use surface embroidery for mouth lines and blush with a tiny bit of rosy chalk or washable fabric paint if desired. If using safety eyes, ensure they are locked and secured behind felt if children will handle the mobile.
Info :
Optional Stiffener: mix water with craft glue (50/50), brush lightly on spiral base, shape on cone and allow to dry overnight to retain spiral shape. Test on scrap before applying to finished spiral.
Info :
Final balance: hang mobile temporarily and adjust cord lengths or reposition small ornaments until spiral hangs uniformly without tilting. Sew extra reinforcement stitches through spiral band at attachment points for long-term durability.
This whimsical spiral mobile is a celebration of small handmade moments — each ornament is a tiny world of crocheted joy. From the sleepy crescent moon to the cuddly reindeer and elf duo, the finished piece is full of festive charm and handcrafted personality. I hope stitching these little characters brings you as much delight as arranging them into the spiraled tree will. 🧶🎄✨