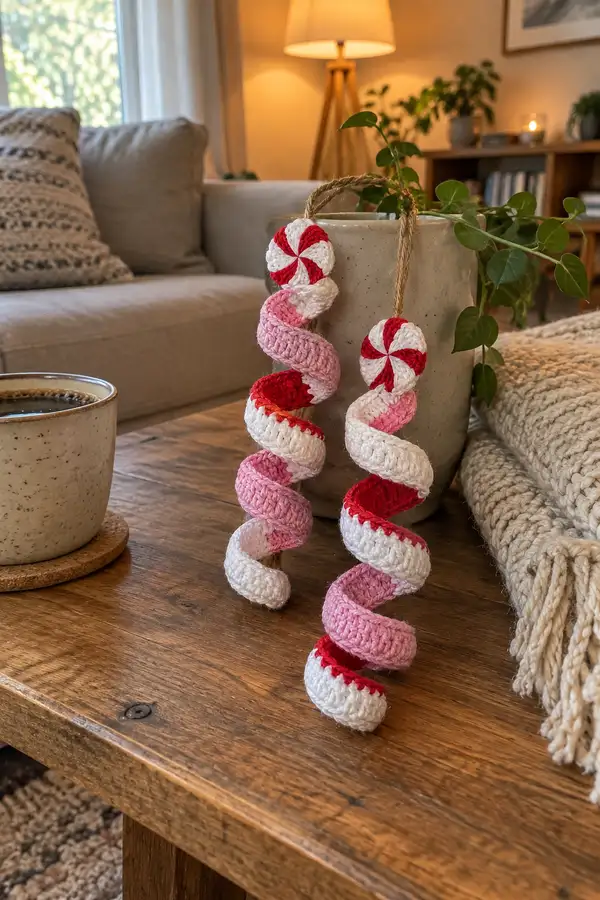
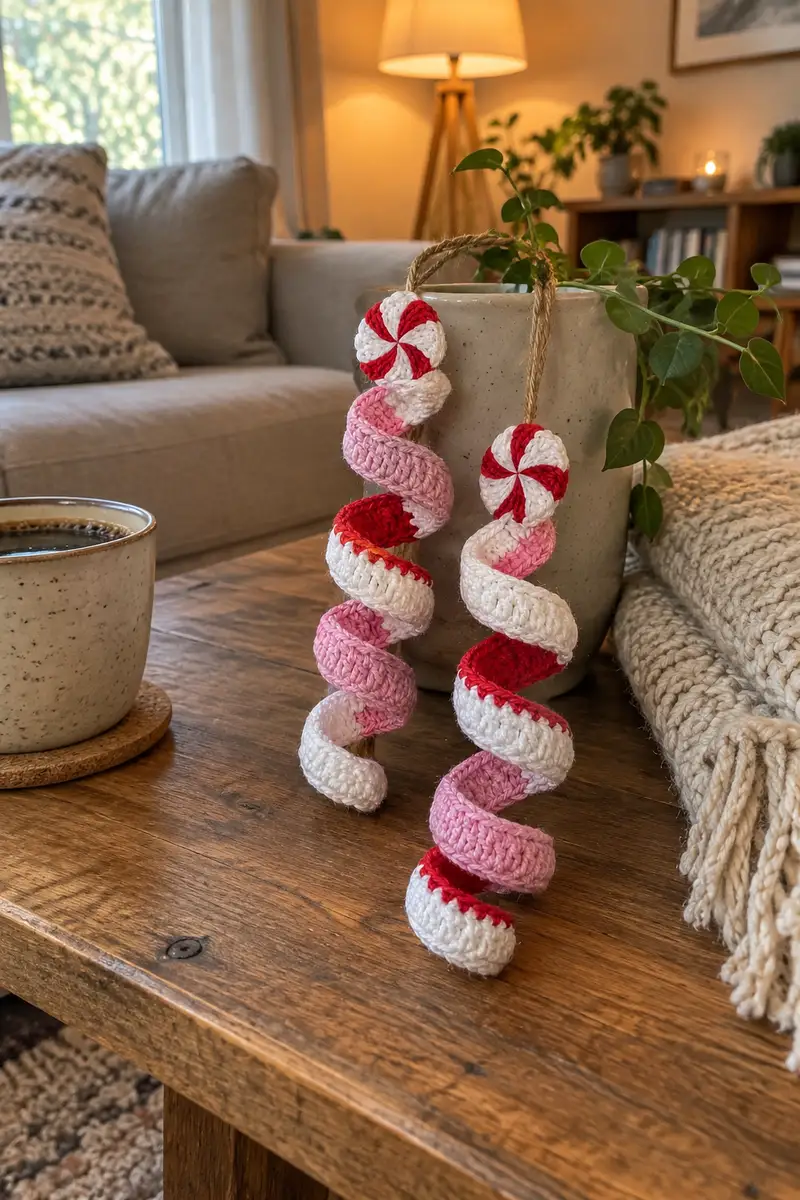
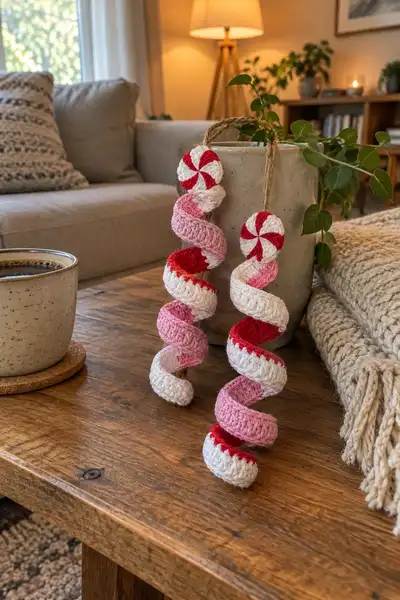
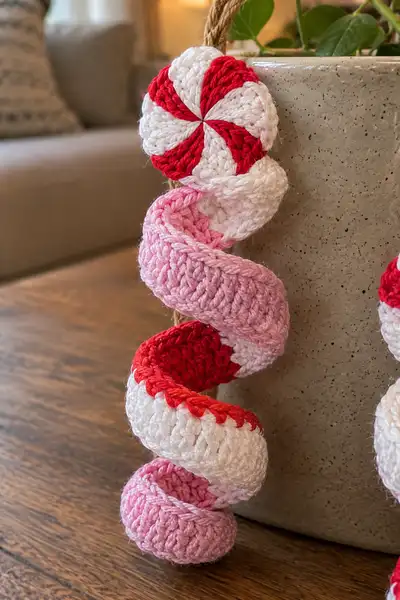
Create a whimsical peppermint swirl spiral garland that brings handmade holiday charm to mantels, trees, and doorways. This pattern recreates the candy-cane inspired spirals and pinwheel discs shown — layered stripes of red, white and soft pink that coil into playful spirals. Designed to be worked in small crocheted tubes and flat pinwheel discs, the finished garland hangs beautifully from a jute cord for a rustic seasonal look.
Progress Tracker
0% Complete
— Materials & Gauge :
Info :
Gauge is not critical for this decorative garland, but for consistent spirals try to achieve approximately 16 sc = 4 inches (10 cm) when working in the tube circumference established in Round 8. Using cotton will give crisp stitches and better stripe definition.
— Peppermint Pinwheel Disc (Make 2 per spiral, top and optional bottom) :
Round 1 :
6 sc in magic ring (6)
Round 3 :
(1 sc, 1 inc) x 6 (18)
Round 4 :
(2 sc, 1 inc) x 6 (24)
Info :
Change color strategically to start creating wedge contrast: for a classic peppermint look you will alternate red and white wedges. We will work flat rounds and then create wedge seams with surface slip-stitching on the right side to exaggerate the pinwheel. Fasten off color if you prefer neat color changes; alternatively carry unused yarn inside the round if you plan to add a backing.
Round 5 :
(3 sc, 1 inc) x 6 (30)
Round 6 :
(4 sc, 1 inc) x 6 (36)
Round 7 :
(5 sc, 1 inc) x 6 (42)
Info :
At this point we have a flat disc large enough to define the petal tips. To make a pinwheel with 8 wedges, plan to create 8 visible wedge seams by using surface slip stitch spokes and changing color at each spoke. Choose the starting point as the very first stitch of Round 1.
Round 8 :
(6 sc, 1 inc) x 6 (48)
Round 9 :
1 sc in each st (48)
Info :
Now we will create 8 wedge spokes. Each wedge comprises 6 stitches (48/8=6). Mark the start of each wedge using 8 evenly spaced stitch markers: every 6th stitch from your chosen start. These markers will guide color changes and surface slip-stitch spokes.
Round 10 :
Surface slip-stitch a contrasting color along the first wedge boundary: sl st down the front of the stitches from Round 9 from center to edge, then fasten off. Move to next wedge marker.
Round 11 :
Working in RS, attach red at wedge marker 1. Dc3 in the first 3 sts of the wedge, sl st into the adjacent stitch to create a raised rib effect; switch to white at next wedge marker. Continue alternating red and white to create 8 visible wedge segments across the top of the disc. (48)
Info :
You may prefer to work explicit wedge clusters to emphasize the swirl: for each wedge work (dc, dc, hdc) or (dc3tog cluster) then switch color and anchor with a sl st. The goal is a pinwheel look where adjacent wedges read as alternating colors when viewed from the top.
Round 12 :
1 sc around the disc in the chosen background color to tidy the edge (48)
Round 13 :
Work 8 sl st radial spokes on the RS spaced at each wedge marker to deepen the swirl illusion; fasten off and weave ends (48)
Info :
Block flat if desired to make the disc sit neatly. If you plan to stuff the disc slightly so it becomes a low dome, add a tiny pinch of stuffing in the center before sewing the back on. Sew a small loop or join to the jute now (see Assembly).
— Spiral Tube (Candy Spiral) — Make one tube per spiral (long section) :
Info :
This is the main structural element. We'll work a round tube in the round to a circumference of 48 stitches then continue even rounds to length. Color changes every 4 rounds will create broad stripes. The tube can be left flexible and coiled naturally, or you can insert thin floral wire along the length for a firm, poseable spiral. For the pictured size work about 88 even rounds after you reach the established circumference — this yields a long spiral approximately 10-12 inches depending on yarn and tension.
Round 1 :
6 sc in magic ring (6)
Round 3 :
(1 sc, 1 inc) x 6 (18)
Round 4 :
(2 sc, 1 inc) x 6 (24)
Round 5 :
(3 sc, 1 inc) x 6 (30)
Round 6 :
(4 sc, 1 inc) x 6 (36)
Round 7 :
(5 sc, 1 inc) x 6 (42)
Round 8 :
(6 sc, 1 inc) x 6 (48)
Info :
We now have a stable circumference of 48 stitches. Mark the first stitch of each round with a stitch marker; we will work in continuous spiral rounds (no joined rounds) to avoid visible joins. If you prefer joined rounds, join with sl st and ch1, but know that carried yarn tails at joins will show as small ridges.
Round 9-12 :
1 sc in each st (48)
Info :
Change to your second stripe color at the start of Round 13. To create crisp stripe lines, change color in the last yarn over of the stitch before the change and carry or fasten off as desired.
Round 13-16 :
1 sc in each st (48) — Color A (stripe)
Round 17-20 :
1 sc in each st (48) — Color B (next stripe)
Round 21-24 :
1 sc in each st (48) — Color C (next stripe)
Info :
Continue alternating colors every 4 rounds to mimic the photographed banding: White for 4 rounds, Red for 4 rounds, Pink for 4 rounds, White for 4 rounds. Repeat this color cycle down the tube length. Carry yarn inside if you prefer neater joins, or fasten off at each color change for crisp, non-carry stripes.
Round 25-88 :
1 sc in each st (48) — Continue color changes every 4 rounds as described above for desired length (use approx. 64 rounds of even 48 to create long coil; adjust if you want shorter or longer spirals)
Info :
If you intend to insert floral wire, do so now: thread a thin, flexible wire down the center of the tube and wrap it with a lengthwise strip of yarn or tape to protect the yarn. Leave 1�0cm of wire poking out at each end to fold back on itself to prevent sharp points. If you prefer a natural coil without wire, skip this step and plan to shape the spiral by hand on completion.
Round 89 :
(6 sc, 1 dec) x 6 (42)
Round 90 :
(5 sc, 1 dec) x 6 (36)
Info :
Begin stuffing lightly through the open end as you decrease. Use small amounts of fiberfill so the tube remains slightly flexible and not rigid. Stuff only to maintain surface; for the pictured spirals a lightly filled tube keeps the candy shape without ever appearing bulbous.
Round 91 :
(4 sc, 1 dec) x 6 (30)
Round 92 :
(3 sc, 1 dec) x 6 (24)
Round 93 :
(2 sc, 1 dec) x 6 (18)
Round 94 :
(1 sc, 1 dec) x 6 (12)
Info :
Close the tube opening using a yarn needle and the tail: weave through the remaining 6 stitches in a gathering motion and pull tight. Fasten off and bury tail inside the tube. Repeat the same decreasing sequence at the start of the tube if you prefer both ends tapered; otherwise leave the start end open to sew into the peppermint disc.
— Small Spiral End Nubs (Optional, Make 2 per spiral for bottom weights) :
Round 1 :
6 sc in magic ring (6)
Round 3 :
(1 sc, 1 inc) x 6 (18)
Round 4 :
1 sc in each st (18)
Round 5 :
(1 sc, 1 dec) x 6 (12)
Round 6 :
6 dec (6) - fasten off, close and hide tail (6)
Info :
These little nubs sit at the bottom of the spiral to give a finished candy end and a tiny weight so the spiral hangs neatly. Stuff slightly before final decreases to hold a plump shape.
— Hanging Loop & Joining Disc (Make 1 per spiral) :
Round 1 :
Ch 20 (or desired length for drop), sl st back along chain to create a sturdy cord; fasten off (20)
Info :
Alternatively, use a length of jute or twine (as in the photograph) and stitch the crocheted cord over it for extra rustic strength. Securely knot or hot glue the jute and hide the join under the peppermint disc.
Round 2 :
Sew one end of the cord securely to the center of a peppermint disc using whip stitch around 8-10 stitches; reinforce with multiple passes (8-10)
Info :
For a neat finish, sandwich the cord between the top peppermint disc and a backing disc or a small circle of felt sewn to the back. This conceals knots and provides a tidy hanging point.
— Assembly & Finishing Edge Detail :
Round 1 :
Optional: Work a tidy picot or single crochet edging around the tube mouth where it meets the peppermint disc: attach yarn and work 1 sc in each st around and a picot every 6 stitches to create a decorative seam (48)
Info :
To make the candy-striped rim visible in the photos, you can work a contrasting slip-stitch color around the edge of the tube where it meets the disc. Work sl st in contrasting color into each stitch around the circumference for one round only for a neat pop of color.
Round 2 :
Sew the top end of the tube to the underside of the top peppermint disc: position the tube end to the center back of the disc, pin into position through both layers and whip stitch through both pieces in and out around the circle until secure (work about 24-36 evenly spaced stitches for a secure join)
Info :
When sewing, match stripe transitions so that the cut edge of the tube sits behind a color wedge on the disc for a finished look. Tie off, weave in ends, and hide tails inside the tube or disc.
Round 3 :
Attach the optional bottom nub by sewing to the tube bottom or allowing it to hang free — either sew into the last closed end or stitch externally for added decoration (6-12)
Info :
If you inserted wire earlier, be sure the wire ends are folded back and covered with a little yarn to prevent poke-through. If you did not use wire, you can shape the coil by wrapping the finished tube around a dowel or rolling it between your hands to coax a spiral. Light misting with water and gentle shaping will help it hold form as it dries.
— Optional Decorations & Variation Rounds :
Round 1 :
Add embroidery lines or small seed-bead accents by stitching on beads or surface crochet lines following the spiral to accent the candy look.
Info :
For a gloss candy look, brush a small amount of fabric stiffener onto the outer face of the spiral and allow to dry; test a sample first to avoid visible shine on your yarn type.
Round 2 :
Make additional spirals in varying lengths to create a garland. Tie each spiral along a length of jute cord at regular intervals (about every 10-14 cm for a balanced look) and secure with a couple of stitches and a dab of glue if desired.
Info :
Mix color patterns: try alternating red/white only for classic candy cane, or add a green stripe for a Christmas variation. You can also alternate wide and narrow stripes by changing the number of rounds per stripe (e.g., 2 rounds for narrow stripes, 4-6 rounds for wider bands).
— Care & Storage :
Info :
Store garlands flat or loosely coiled to avoid permanent kinks. Spot clean gently with mild soap and cool water; avoid heavy soaking. If you used floral wire, remove before laundering and spot clean the yarn only.
This peppermint swirl spiral garland brings playful, handmade cheer to any holiday display. Each candy-like spiral is striped and twirled to catch the eye and invite a smile. Working these pieces is meditative and satisfying — from the magic-ring start to the final coiling, every stitch contributes to a shiny, sweet-looking accent. 🎄🧶 Hang yours proudly, gift to a friend, or mix colors for a customized holiday statement. Happy stitching and enjoy the cozy, candy-striped results! 🎁