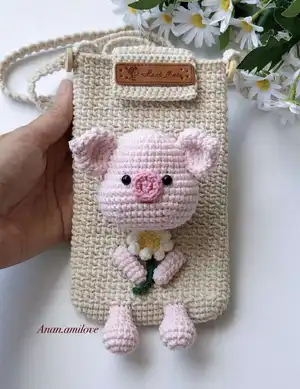
Make a charming pig phone pouch that blends a practical phone case with a cute amigurumi pig attached. You will crochet a textured pouch, a removable lid with a button, a shoulder strap, and a full pig (head, ears, muzzle, arms, legs, and flower). The pattern is detailed with step-by-step rounds, assembly instructions, and helpful tips so you can recreate the design with confidence. Perfect as a sweet handmade gift or a delightful accessory you'll enjoy using.
Progress Tracker
0% Complete
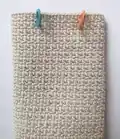
— Bag :
Info :
There are 2 ways to make a single crochet: v-stitch (yarn over single crochet) and x-stitch (yarn under single crochet). There are a lot of video tutorials on youtube, you can watch on it. I use x-stitch (yarn under single crochet).
Info :
Make 24 ch, start in the second ch from hook
Round 1 :
22 sc, 3 sc in the last stitch, continue on the other side of the foundation chain, 21 sc, inc (48)
Round 2 :
inc, 21 sc, 3 inc, 21 sc, 2 inc (54)
Round 3 :
inc, 24 sc, 3 inc, 24 sc, 2 inc (60)
Round 5 :
(1 ch, skip 1 stitch, 1 sc in the next sitch)*30 (60)
Round 6 :
(1 sc in the space of 1 ch, 1 sc in the next stitch)*30 (60)
Info :
From here: the odd rounds (7, 9, 11, 13, 15…) will be made same round 5, the even rounds (8, 10, 12, 14, 16…) will be made same round 6. And stop after finish the 48th round.
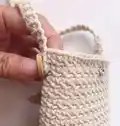
— Lid of pouch :
Info :
Identify the 14 stitches in the middle of the 46th round
Rounds 2-13 :
14 sc. Cut and weave the yarn. Sew the button into the lid of pouch.
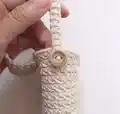
— Shoulder Strap :
Info :
Make 3 ch, start in the second ch from hook: 2 sc, turn
Info :
Crochet repeat 2 sc until the shoulder-strap is about 120 cm. Fasten off and weave the yarn.
Info :
Sew the shoulder - strap and button into the pouch.
— Pig :
Info :
HEAD - Start in pink pastel
Round 1 :
6 sc in the magic ring (6)
Round 3 :
(1 sc, inc)*6 (18)
Round 4 :
(inc, 2 sc)*6 (24)
Round 5 :
(3 sc, inc)*6 (30)
Round 6 :
1 sc, inc, (4 sc, inc)*5, 3 sc (36)
Round 11 :
7 sc, 7 inc, 7 sc, 7 inc, 8 sc (50)
Round 16 :
7 sc, dec, 10 sc, dec, 7 sc, dec, 10 sc, dec, 8 sc (46)
Round 17 :
7 sc, dec, 8 sc, dec, 7 sc, (dec, 8 sc)*2 (42)
Round 18 :
7 sc, (dec, 2 sc)*2, dec, 7 sc, (dec, 2 sc)*2, dec, 8 sc (36)
Round 19 :
(dec, 4 sc)*6 (30)
Round 20 :
(3 sc, dec)*6 (24)
Round 22 :
6 dec, slst. (6)
Info :
Stuff the head. Fasten off and weave the yarn.
Info :
Put in the eyes between rows 11-12, leaving 6 stitches space between them.
Info :
Use fabric glue to pin the head into the pouch.
— Ear (make 2) :
Info :
Start in pink pastel
Round 1 :
4 sc in the magic ring (4)
Round 2 :
(1 sc, inc)*2 (6)
Round 4 :
(1 sc, inc)*6 (18)
Round 5 :
(inc, 2 sc)*6 (24)
Round 8 :
(2 sc, dec)*6 (18)
Round 9 :
(1 sc, dec)*6, slst. (12)
Info :
Fasten the yarn, leaving a long tail for sewing. Don’t stuff the ear, flatten and fold the top of the ear. Put in the ears between rows 5-11.
— Muzzle :
Round 1 :
6 sc in the magic ring (6)
Info :
Fasten off and weave the yarn. Sew the nose with red yarn.
Info :
Sew the mouth between rows 14-15 with red.
— Leg (make 2) :
Info :
Start in pink pastel
Round 1 :
6 sc in the magic ring (6)
Round 3 :
(2 sc, inc)*4 (16)
Round 6 :
(2 sc, dec)*4 (12)
Round 7 :
(dec, 2 sc)*3 (9)
Info :
Slst and fasten the yarn, leaving a long tail for sewing.
Info :
Stuff up to the 5th row of the leg. Sew the legs at row 4.
— Arm (make 2) :
Info :
Start in pink pastel
Round 1 :
7 sc in the magic ring (7)
Info :
Slst and fasten off the yarn, leaving a long tail for sewing.
Info :
Don’t stuff the arm. Sew the arms between rows 13-15.
— Flower :
Round 1 :
6 sc in the magic ring (6)
Round 2 :
(1 sc, inc)*3 (9)
Info :
Change to cream: (make 4 ch, start to crochet on the second chain from the hook: 3 sc, slst into 1 single crochet stitch on round 2)* repeat 9 times. Fasten off and weave the yarn.
— Branch :
Info :
Start in green, make 13 ch, start to crochet on the second chain from the hook: 12 slst.
Info :
Fasten off and weave the yarn.
— Assembling :
Info :
1. Sew the legs at row 4.
Info :
2. Sew the arms into the pouch between rows 13-15.
Info :
3. Use fabric glue to paste the branch into the pouch.
Info :
4. Use fabric glue to paste the flower into the pouch.
Info :
5. Use fabric glue to paste the head into the pouch.
This Pig Phone Pouch pattern combines practical crochet with adorable amigurumi charm. 🐷
Make a personalized phone pouch with a sweet pig, flower, and little legs for a delightful finish. 🧶
Perfect as a special handmade gift or a fun accessory to brighten your day. ✨