🧢 Beautiful ✨ Detailed πŸ’ Adorable

Pillow-panda Amigurumi Pattern

Pillow-panda Amigurumi Pattern
4.1β˜… Rating
5-7 Hours Time Needed
1.8K Made This
βœ‚οΈ

Intermediate Level

Ideal for those with basic crochet experience, featuring slightly more advanced stitches and techniques to expand your skills.

⏱️

Weekend Treat

Takes 5-7 hours, making it an enjoyable project to finish over a couple of days.

🧸

Cute Companion

An adorable friend to cherish, handcrafted with love to bring comfort and joy for years to come.

About This Pillow-panda Amigurumi Pattern

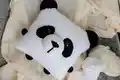
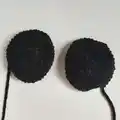
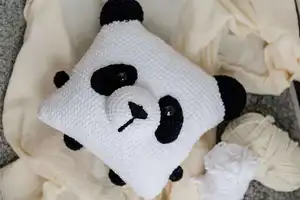
This pattern makes a soft, square panda pillow with a raised snout, embroidered nose, black spots, ears, arms and legs. Youll crochet the pillow base in rounds, then make small black details separately and sew them on for a cute 3D face. The pattern uses plush yarn for a soft, cozy texture that is child-friendly and decorative.

Pillow-panda Amigurumi Pattern crochet pattern - detailed view of completed project

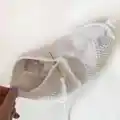
Includes step-by-step rounds for the pillow body and each small detail plus assembly photos for placement. Clear stitch abbreviations and material notes are provided for an easy follow-through.

Why You'll Love This Pillow-panda Amigurumi Pattern

I absolutely love this pattern because it turns simple crochet stitches into a playful, tactile pillow that feels like a stuffed friend. I enjoyed designing the raised nose and spots so the panda has real character and dimension. The use of plush yarn makes the finished pillow extra cozy and child-friendly, which always brings smiles. I also love that you can customize size and color easily by changing yarn weight and hook size.

Pillow-panda Amigurumi Pattern step 1 - construction progress Pillow-panda Amigurumi Pattern step 2 - assembly progress Pillow-panda Amigurumi Pattern step 3 - details and accessories Pillow-panda Amigurumi Pattern step 4 - final assembly and finishing

Switch Things Up

I love to change up the colors when I make this pillow: try soft pastels for a nursery-friendly version or pale greys for a more muted look.

I often make a mini version by using a finer yarn and smaller hook to create keychain-sized panda pillows.

To make a larger, cuddlier pillow I choose a bulkier plush yarn and a bigger hook for a squishier result.

I sometimes replace crocheted eyes with safety eyes, buttons, or embroidered eyes depending on who the pillow is for.

I like to embroider different mouth expressions so each pillow has its own personality β€” experiment with short or long nose embroidery lines.

Try adding tiny crocheted props like a little bow, scarf, or heart to personalize each pillow as a gift.

If you want a firmer pillow, stuff more densely and use a stiffer inner cushion for structure before closing the top.

I sometimes add a removable inner pillow cover so the crochet outer can be washed more easily.

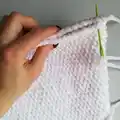
For a textured look, swap some rounds of single crochet for half double crochet or a puff stitch while keeping the same stitch counts.

I recommend testing placement of spots and nose with pins before sewing so you can tweak the expression and symmetry to your liking.

Common Mistakes & How to Fix Them

βœ— Skipping the instruction to fix the beginning of each new circle can cause the round to open up; use a pin or thread to anchor the first stitch of each round. βœ— Not leaving long sewing tails on small parts will make assembly difficult later; always leave and secure a long thread for sewing and hide it inside the piece. βœ— Under-stuffing or over-stuffing the pillow leads to a misshapen result; stuff tightly and evenly and fill the pillow angles well for a crisp square shape. βœ— Placing eyes or spots without checking round placement can look unbalanced; position and pin spots and eyes between the recommended rounds before sewing. βœ— Using a different hook size without adjusting your tension can change final dimensions; check gauge by making a small test square and adjust hook or yarn weight accordingly.

Pillow-panda Amigurumi Pattern

Create a cuddly panda pillow that doubles as charming decor or a soft toy. This pattern guides you through simple rounds, small parts, and assembly so you can crochet a 29x29 cm plush pillow. Youll work with plush yarn, make ears, spots, nose, arms and legs, then sew everything into a lovable panda face. Perfect as a handmade gift for children and adults.

Intermediate 5-7 Hours

Materials Needed for Pillow-panda Amigurumi Pattern

β€” Main Fabric

  • 01
    YarnArt Dolce plush yarn (120 m/100 g) - White: 2 skeins (approximate)
  • 02
    YarnArt Dolce plush yarn (120 m/100 g) - Black: 1 skein (approximate)
  • 03
    Alternative plush yarns suggested: Himalaya Dolphin Baby or other plush yarns of similar weight
  • 04
    Filler: hollowfayber (polyester stuffing) - amount enough to firmly stuff a 29x29 cm pillow

β€” Tools Required

  • 01
    Crochet hook size 3.5-5 mm (the pattern used 3.5 mm)
  • 02
    Black beads or buttons for eyes (22 mm) - 2 pieces
  • 03
    Needle for sewing and embroidery
  • 04
    Filler (hollowfayber) for stuffing the pillow
  • 05
    Pin or thread to fix the beginning of each new circle

Progress Tracker

0% Complete

β€” Pillow :

Info :

Use white plush yarn

Round 1 :

90 ch, connect with the first loop

Round 2 – 37 :

90 sc

Infos :

Leave a long thread and sew the top of the pillow. We fasten the thread and hide inside the pillow. Fill tightly and evenly. Fill the angle of the pillow well. Sew and fasten the thread and hide inside the pillow.

β€” Ear (2 details) :

Info :

Use black plush yarn

Round 1 :

6 sc in magic Ring {6}

Round 2 :

(inc) – repeat 6 times {12}

Round 3 :

(1 sc, inc) – repeat 6 times {18}

Round 4 :

(2 sc, inc) – repeat 6 times {24}

Round 5 :

(3 sc, inc) – repeat 6 times {30}

Round 6 :

(4 sc, inc) – repeat 6 times {36}

Round 7 :

(5 sc, inc) – repeat 6 times {42}

Round 8 :

42 sc

Round 9 :

(19 sc, dec) – repeat 2 times {40}

Info :

Leave a long thread for sewing

β€” Nose :

Info :

Use white plush yarn

Round 1 :

6 sc in magic Ring {6}

Round 2 :

(inc) – repeat 6 times {12}

Round 3 :

(1 sc, inc) – repeat 6 times {18}

Round 4 :

(2 sc, inc) – repeat 6 times {24}

Round 5 :

(3 sc, inc) – repeat 6 times {30}

Round 6 :

(4 sc, inc) – repeat 6 times {36}

Round 7 :

(5 sc, inc) – repeat 6 times {42}

Round 8 – 9 :

42 sc

Info :

Leave a long thread for sewing

β€” Leg (2 details) :

Info :

Use black plush yarn

Round 1 :

6 sc in magic Ring {6}

Round 2 :

(inc) – repeat 6 times {12}

Round 3 :

(1 sc, inc) – repeat 6 times {18}

Round 4 :

18 sc

Info :

Leave a long thread for sewing

β€” Arm (2 details) :

Info :

Use black plush yarn

Round 1 :

6 sc in magic Ring {6}

Round 2 :

(inc) – repeat 6 times {12}

Round 3 :

12 sc

Info :

Leave a long thread for sewing

β€” Spot (2 details) :

Info :

Use black plush yarn

Round 1 :

12 ch

Round 2 :

we begin to work from the second loop from the hook: 10 sc, 3 sc in 1 loop. On the other side of the chain: 10 sc, sl st

Round 3 :

1 ch, we begin to work from the second loop from the hook: inc, 9 sc, inc, 1 sc, inc, 11 sc, sl st

Round 4 :

1 ch, we begin to work from the second loop from the hook: 1 sc, inc, 4 sc, hdc, 5 dc, hdc, 1 sc, sl st

Info :

We fasten the thread and leave a long thread for sewing

β€” Assembly :

Info :

Sew ears: we put ears on the angles of the pillow. Sew and fill. Fasten the thread and hide inside the pillow.

Info :

Sew nose between 13 and 21 rounds. Do not sew up to the end. Fill and leave a small hole. We will embroider the nose.

Info :

Use black plush yarn and needle. Embroider the nose. We start from the center.

Info :

We fasten the thread and hide inside the nose, fill and sew a hole.

Info :

Sew spots and fasten the thread and hide inside the pillow.

Info :

Sew eyes on spots and sew arms and legs. Fasten the thread and hide inside the pillow.

Assembly Instructions

  • Sew ears: place each ear on the four angles of the pillow, sew securely, stuff lightly if needed, then fasten the thread and hide inside the pillow.
  • Sew the nose between rounds 13 and 21 of the pillow; do not close completely, fill the nose, leave a small hole, embroider the nose and then finish closing and hide the thread.
  • Position and sew the black spots onto the face, fasten the thread and hide inside the pillow, then attach black beads or buttons for eyes on the spots.
  • Sew arms and legs to the sides and bottom of the pillow respectively, fasten the thread securely and hide the ends inside the pillow for a neat finish.
  • After all parts are attached, check symmetry by pinning positions before sewing and make small adjustments to placement to ensure a balanced face.

Important Notes

  • πŸ’‘Do not forget to fix the beginning of each new circle with a pin or thread to prevent the round from opening up.
  • πŸ’‘Leave long threads on small parts (ears, nose, spots, arms, legs) for easier sewing and secure finishing.
  • πŸ’‘Stuff the pillow tightly and evenly, paying special attention to the corners to maintain a square shape.
  • πŸ’‘Pin and check placement of facial parts before sewing to ensure symmetry and desired expression.

This adorable panda pillow is a delightful mix of toy and decor, handmade with plush yarn for extra softness. Its raised nose and embroidered details give it a charming personality that kids and adults will love. Perfect as a cozy gift or nursery accentβ€”happy crocheting! 🧢🧡

You ask,

we answer.

FAQs

What size will the finished piece be?

The finished pillow is approximately 29x29 centimeters using YarnArt Dolce and a 3.5 mm hook, though size may vary with yarn and hook.

Can I use a different yarn weight?

Yes, you can use different yarn weights, but the final size and texture will change; choose an appropriate hook and make a test square to adjust.

Do I need prior crochet experience for this pattern?

This pattern is rated intermediate; basic crochet stitches and experience with magic rings and sewing small parts are recommended.

How long does this project typically take to complete?

Most crocheters complete this pillow in about 5-7 hours, depending on experience, yarn choice, and how much time you allow for assembly.