🧢 Beautiful ✨ Detailed πŸ’ Adorable

Pixie the Robot Amigurumi Pattern

Pixie the Robot Amigurumi Pattern
4.9β˜… Rating
5-7 Hours Time Needed
1.5K Made This
βœ‚οΈ

Beginner Friendly Level

Perfect for those just starting their crochet journey, with clear instructions and simple techniques

⏱️

Weekend Treat

Takes 5-7 hours, making it an enjoyable project to finish over a couple of days.

🧸

Cute Companion

An adorable friend to cherish, handcrafted with love to bring comfort and joy for years to come.

About This Pixie the Robot Amigurumi Pattern

Pixie the Robot is a charming amigurumi project that creates a 9 in. (23 cm) tall stuffed robot with a colorful control flap and display screen. The pattern uses simple single crochet rounds, basic increases and decreases, and straightforward color changes. Youll make nine separate pieces and assemble them for a polished, characterful finished toy.

Pixie the Robot Amigurumi Pattern crochet pattern - detailed view of completed project

This pattern emphasizes clear round-by-round instructions and gentle shaping, making it great for crocheters building confidence. Embroidery and small details add personality to the finished robot.

Why You'll Love This Pixie the Robot Amigurumi Pattern

I absolutely love this pattern because it combines easy construction with delightful personalityβ€”Pixie feels playful from the first stitch. I enjoy how the color-blocked body and striped limbs let me experiment with color palettes and tiny details. The embroidery step gives so much expression with minimal effort, and sewing the pieces together always feels rewarding. I love gifting finished robots because theyre handmade, warm, and instantly loved by kids and grown-ups alike.

Pixie the Robot Amigurumi Pattern step 1 - construction progress Pixie the Robot Amigurumi Pattern step 2 - assembly progress Pixie the Robot Amigurumi Pattern step 3 - details and accessories Pixie the Robot Amigurumi Pattern step 4 - final assembly and finishing

Switch Things Up

I love customizing Pixie by changing the color palette; try pastel shades for a softer look or bright contrasting hues for a playful feel.

To make Pixie larger or smaller, change yarn weight and hook sizeβ€”use bulky yarn with a larger hook for a chunky toy or thinner yarn for a mini keychain version.

I often swap safety eyes for embroidered eyes to make the toy safer for babies and to give a different expression.

Add wire inside the arms or legs for simple posability, wrapping the wire in yarn before inserting to protect the stuffing.

Embellish the display screen by crocheting small appliques or stitching tiny shapes with contrasting floss to create custom icons.

Experiment with different stitch textures, like using half double crochet for the control flap to create subtle contrast with the rest of the body.

Personalize Pixie with a tiny crocheted accessory, such as a scarf, hat, or mini backpack, to give the robot extra character.

Use embroidery to add freckles, dials, or a nameplate; I sometimes embroider initials on the back of the robot as a special touch.

Make a set of robots in coordinating colorways to create a family of Pixiesβ€”varying just one or two colors creates a cohesive collection.

If youre gifting, stuff the robot a bit firmer for durability and consider sewing a small loop to the top so it can hang as decor or on a nursery mobile.

Common Mistakes & How to Fix Them

βœ— Skipping a stitch marker when working in continuous rounds will make it hard to track the end of each round; place a marker in the last st made and move it up as you work to avoid losing your place. βœ— Changing colors incorrectly can leave loose carried strands inside the fabric; when changing color, work the last st of the old color to last yarn over then yarn over with the new color and draw through all loops to secure the color change. βœ— Under-stuffing results in a floppy, unsightly shape while over-stuffing stretches the stitches; stuff gradually and check the shape frequently to achieve a firm but flexible body. βœ— Placing safety eyes too late or without measuring can make the face look unbalanced; insert plastic safety eyes between Rnds 10 and 13 about 9 sts apart and double-check symmetry before locking them in. βœ— Pulling yarn too tightly when embroidering can pucker the fabric and distort facial features; use gentle tension and secure embroidery knots on the inside to keep the surface smooth.

Pixie the Robot Amigurumi Pattern

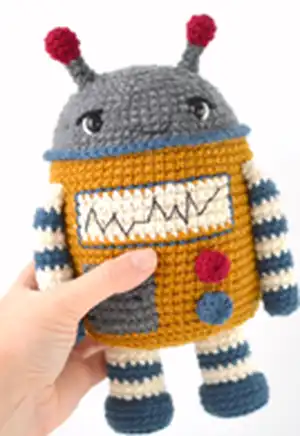
Create Pixie the Robot, an adorable crocheted companion with a cheerful display screen and striped limbs. This easy amigurumi pattern walks you through making the head, body, arms, legs, antennae, and playful knobs step by step. Perfect for gifting or keeping, Pixie mixes simple shaping with fun color changes to give you a satisfying finish. Youll enjoy a cozy, handmade robot that stands out with embroidered details and bright accents.

Beginner Friendly 5-7 Hours

Materials Needed for Pixie the Robot Amigurumi Pattern

β€” Main Fabric

  • 01
    Lion Brand Wool-Ease (Art. #620) #152 Oxford Grey - 1 ball (A)
  • 02
    Lion Brand Wool-Ease (Art. #620) #114 Denim - 1 ball (B)
  • 03
    Lion Brand Wool-Ease (Art. #620) #087 Arrowwood - 1 ball (C)
  • 04
    Lion Brand Wool-Ease (Art. #620) #099 Fisherman - 1 ball (D)
  • 05
    Lion Brand Wool-Ease (Art. #620) #138 Cranberry - 1 ball (E)
  • 06
    Lion Brand Wool-Ease (Art. #620) #153 Black - 1 ball (F)

β€” Tools Required

  • 01
    Crochet hook size F-5 (3.75 mm)
  • 02
    Lion Brand stitch markers
  • 03
    Lion Brand large-eyed blunt needle
  • 04
    Embroidery needle
  • 05
    Black embroidery floss
  • 06
    2 plastic safety eyes, 10 mm diameter
  • 07
    Fiberfill stuffing
  • 08
    Scissors
  • 09
    Pins for assembly (optional)

Progress Tracker

0% Complete

β€” Body :

Info :

Head: With A, make a magic ring.

Round 1 :

Rnd 1 (RS): Work 8 sc in ring; do not join, work in continuous rnds (spiral).

Info :

Gently but firmly, pull tail to tighten center of ring.

Info :

Place a marker in last st made to indicate end of rnd. Move marker up as each rnd is completed.

Round 2 :

Rnd 2: Work 2 sc in each st around – 16 sc.

Round 3 :

Rnd 3: * Sc in next st, 2 sc in next st; rep from * around – 24 sc.

Round 4 :

Rnd 4: * Sc in next 2 sts, 2 sc in next st; rep from * around – 32 sc.

Round 5 :

Rnd 5: * Sc in next 3 sts, 2 sc in next st; rep from * around – 40 sc.

Round 6 :

Rnd 6: * Sc in next 4 sts, 2 sc in next st; rep from * around – 48 sc.

Round 7 :

Rnd 7: Sc in each st around.

Round 8 :

Rnd 8: * Sc in next 5 sts, 2 sc in next st; rep from * around – 56 sc.

Round 9-10 :

Rnds 9 and 10: Sc in each st around.

Round 11 :

Rnd 11: * Sc in next 6 sts, 2 sc in next st; rep from * around – 64 sc.

Round 12-13 :

Rnds 12 and 13: Sc in each st around and change to B in last st of Rnd 13.

Info :

Fasten off A.

Round 14 :

Rnd 14: With B, working in front loops only, sc in each st around; join with sl st in first sc of this rnd.

Info :

Fasten off.

β€” Body (continued) :

Round 15 :

Rnd 15: From RS, join C with sc in back loop of first st of Rnd 13, sc in each st around.

Round 16-18 :

Rnds 16-18: With C, sc in each st around.

β€” Display Screen :

Round 19-22 :

Rnds 19-22: With C, sc in next 24 sts; with D, sc in next 16 sts; with C, sc in next 24 sts – 64 sc.

Info :

Fasten off D.

Round 23-25 :

Rnds 23-25: With C, sc in each st around.

β€” Control Flap :

Round 26-31 :

Rnds 26-31: With C, sc in next 24 sts; with A, sc in next 8 sts; with C, sc in next 32 sts – 64 sc.

Info :

Fasten off A.

Info :

Work remainder of Body with C only.

Round 32-33 :

Rnds 32 and 33: Sc in each st around.

Info :

Insert plastic safety eyes on front of Head between Rnds 10 and 13, about 9 sts apart.

Round 34 :

Rnd 34: Working in back loops only, * sc in next 6 sts, sc2tog; rep from * around – 56 sc.

Info :

Begin stuffing piece and continue stuffing until piece is complete.

Round 35 :

Rnd 35: * Sc in next 5 sts, sc2tog; rep from * around – 48 sc.

Round 36 :

Rnd 36: * Sc in next 4 sts, sc2tog; rep from * around – 40 sc.

Round 37 :

Rnd 37: * Sc in next 3 sts, sc2tog; rep from * around – 32 sc.

Round 38 :

Rnd 38: * Sc in next 2 sts, sc2tog; rep from * around – 24 sc.

Round 39 :

Rnd 39: * Sc in next st, sc2tog; rep from * around – 16 sc.

Round 40 :

Rnd 40: * Sc2tog; rep from * around – 8 sc.

Info :

Fasten off, leaving a long yarn tail. Thread tail through top of sts of last rnd, pull to close opening and knot securely.

β€” KNOBS :

Info :

KNOBS (make 2 – 1 each with B and E). Leaving a long beg tail, make a magic ring.

Round 1 :

Rnd 1: Work 10 sc in ring; do not join, work in continuous rnds (spiral).

Info :

Gently but firmly, pull tail to tighten center of ring.

Round 2 :

Rnd 2: Working in back loops only, sc in next 10 sts; join with sl st in first sc of this rnd.

Info :

Fasten off, leaving a long tail for sewing Knob to Body.

β€” ANTENNAE :

Info :

ANTENNAE (make 2). With E, make a magic ring.

Round 1 :

Rnd 1: Work 6 sc in ring; do not join, work in continuous rnds (spiral).

Info :

Gently but firmly, pull tail to tighten center of ring.

Info :

Place a marker in last st made to indicate end of rnd. Move marker up as each rnd is completed.

Round 3 :

Rnd 3: (Sc in next st, 2 sc in next st) 3 times – 9 sc.

Round 4 :

Rnd 4: Sc in next 9 sts.

Round 5 :

Rnd 5: Sc in next st, (sc2tog) 4 times and change to A in last st – 5 sc.

Info :

Fasten off E.

Round 6-7 :

Rnds 6 and 7: With A, sc in next 5 sts.

Round 8 :

Rnd 8: With A, sc in next st, 2 sc in next st, sc in next st, 2 sc in next st, sc in next st – 7 sc.

Info :

Fasten off, leaving a long tail for sewing Antennae to head.

β€” LEGS :

Info :

LEGS (make 2). With B, make a magic ring.

Round 1 :

Rnd 1: Work 8 sc in ring; do not join, work in continuous rnds (spiral).

Info :

Gently but firmly, pull tail to tighten center of ring.

Info :

Place a marker in last st made to indicate end of rnd. Move marker up as each rnd is completed.

Round 2 :

Rnd 2: Work 2 sc in each st around – 16 sc.

Round 3 :

Rnd 3: * Sc in next st, 2 sc in next st; rep from * around – 24 sc.

Round 4 :

Rnd 4: Working in back loops only, sc in each st around.

Round 5-6 :

Rnds 5 and 6: Sc in each st around.

Info :

Note: When changing yarn color to make stripes, do not fasten off old color until instructed. Carry color not in use along WS of piece.

Round 7 :

Rnd 7: Working in back loops only, * sc in next st, sc2tog; rep from * around and change to D in last st – 16 sc.

Info :

Begin stuffing piece and continue stuffing until piece is complete.

Round 8 :

Rnd 8: With D, working in front loops only, sc in each st around.

Round 9 :

Rnd 9: With D, sc in each st around and change to B in last st.

Round 10-11 :

Rnds 10 and 11: With B, sc in each st around and change to D in last st of Rnd 11.

Info :

Fasten off B.

Round 12-13 :

Rnds 12 and 13: With D, sc in each st around.

Info :

Fasten off, leaving a long tail for sewing Leg to Body.

β€” ARMS :

Info :

ARMS (make 2). With B, make a magic ring.

Round 1 :

Rnd 1: Work 5 sc in ring do not join, work in continuous rnds (spiral).

Info :

Gently but firmly, pull tail to tighten center of ring.

Round 2 :

Rnd 2: Work 2 sc in each st around – 10 sc.

Round 3 :

Rnd 3: Working in back loops only, sc in each st around.

Info :

Note: When changing yarn color to make stripes, do not fasten off old color until instructed. Carry color not in use along WS of piece.

Round 4 :

Rnd 4: Sc in each st around and change to D in last st.

Round 5-6 :

Rnds 5 and 6: With D, sc in each st around and change to B in last st of Rnd 6.

Round 7-8 :

Rnds 7 and 8: With B sc in each st around and change to D in last st of Rnd 8.

Info :

Begin stuffing piece and continue stuffing until piece is complete.

Round 9-16 :

Rnds 9-16: rep Rnds 5-8 twice.

Info :

Fasten off B.

Round 17 :

Rnd 17: With D, sc in each st around.

Round 18 :

Rnd 18: With D, (sc in next 3 sts, sc2tog) twice – 8 sc.

Info :

Fasten off, leaving a long tail for sewing Arm to Body.

β€” Finishing :

Info :

Embroidery: Note: Use straight or back sts to embroider Robot details, using 2 or more strands of floss as desired.

Info :

With D, embroider curves along outer edges of safety eyes for whites of eyes.

Info :

With F, embroider lines along upper edges of safety eyes.

Info :

With black embroidery floss, embroider a V-shaped mouth between Rnds 11 and 14, about 5 sts in length.

Info :

With black embroidery floss, embroider graphs onto display screen (white section).

Info :

With B, embroider a back stitch border around the display screen.

Info :

With A, embroider a back stitch border around the control flap (gray section).

Info :

With F, embroider straight stitch hinges and handle onto control flap.

Info :

Using photograph as a guide and yarn tails still attached to pieces whenever possible, assemble Robot as follows:

Info :

Stuff Knobs with beg yarn tails. With ending yarn tails, sew Knobs to Robot, between Rnds 25 and 29, and between Rnds 30 and 33.

Info :

With D, sew Arms to sides of Body, between Rnds 18 and 20.

Info :

With D, sew Legs to bottom of Body.

Info :

With A, sew Antennae to top of Robot, between Rnds 4 and 7.

Info :

Weave in ends.

β€” Abbreviations :

Infos :

beg = begin(ning). ch = chain. rep = repeat. rnd(s) = round(s). RS = right side. sc = single crochet. sl st = slip stitch. st(s) = stitch(es).

Assembly Instructions

  • Stuff knobs with beginning yarn tails and, using the ending yarn tails, sew each knob to the Body between Rnds 25 and 29, and also between Rnds 30 and 33, matching placement from photograph.
  • With color D, sew Arms to the sides of the Body between Rnds 18 and 20, angling slightly for a natural attachment and securing with tight stitches.
  • With color D, sew Legs to the bottom center of the Body, spacing them evenly so the Robot can sit or stand balanced.
  • With color A, sew Antennae to the top of the Head between Rnds 4 and 7, using long tails to secure them firmly to the fabric.
  • After all pieces are attached, weave in all yarn ends and lightly adjust stuffing to ensure an even shape before closing any final gaps.

Important Notes

  • πŸ’‘Use a stitch marker to indicate the end of each round and move it up as you complete rounds to stay oriented in the spiral construction.
  • πŸ’‘Body, Arms, Legs, Antennae and Knobs are worked in continuous rounds (spiral); do not join first st of rnds to last st and do not turn at the beg of rnds.
  • πŸ’‘When changing yarn color, work the last st of the old color to last yarn over, then yarn over with the new color and draw through all loops to complete the st so the color change is secure.
  • πŸ’‘Exact gauge is not essential for this project, but using a small hook helps keep stitches tight so stuffing does not show through.
  • πŸ’‘If intended for a baby or small child, ensure all pieces and safety eyes have been securely sewn; do not leave a baby or child unattended with the Robot.

This Pixie the Robot pattern makes a lovable, handmade friend thats perfect for gifting or keeping in your cozy craft collection.🧢 The clear round-by-round instructions make shaping easy, and small embroidered details give Pixie a playful personality.πŸ€– Enjoy making Pixie in any color combination you love and share the joy of handmade toys with someone special.✨

You ask,

we answer.

FAQs

What size will the finished piece be?

The finished amigurumi is about 9 in. (23 cm) tall when made with the recommended Wool-Ease yarn and a 3.75 mm (F-5) hook.

Can I use different yarn weights for this pattern?

Yes, you can substitute yarn weights, but this will change the final size; choose an appropriate hook for your yarn and expect a different finished dimension.

Do I need prior crochet experience for this pattern?

This pattern is rated beginner friendly (Easy), so if you are comfortable with single crochet, increases and decreases, and working in the round, you can complete it.

How long does this project typically take to complete?

Most crocheters finish Pixie in 5-7 hours, depending on experience level and how much time you spend on embroidery and assembly.