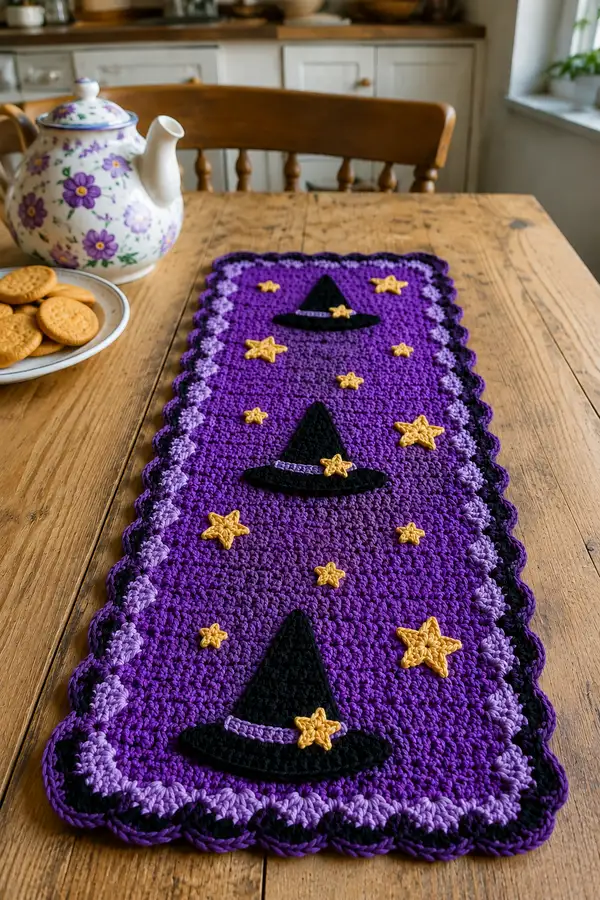
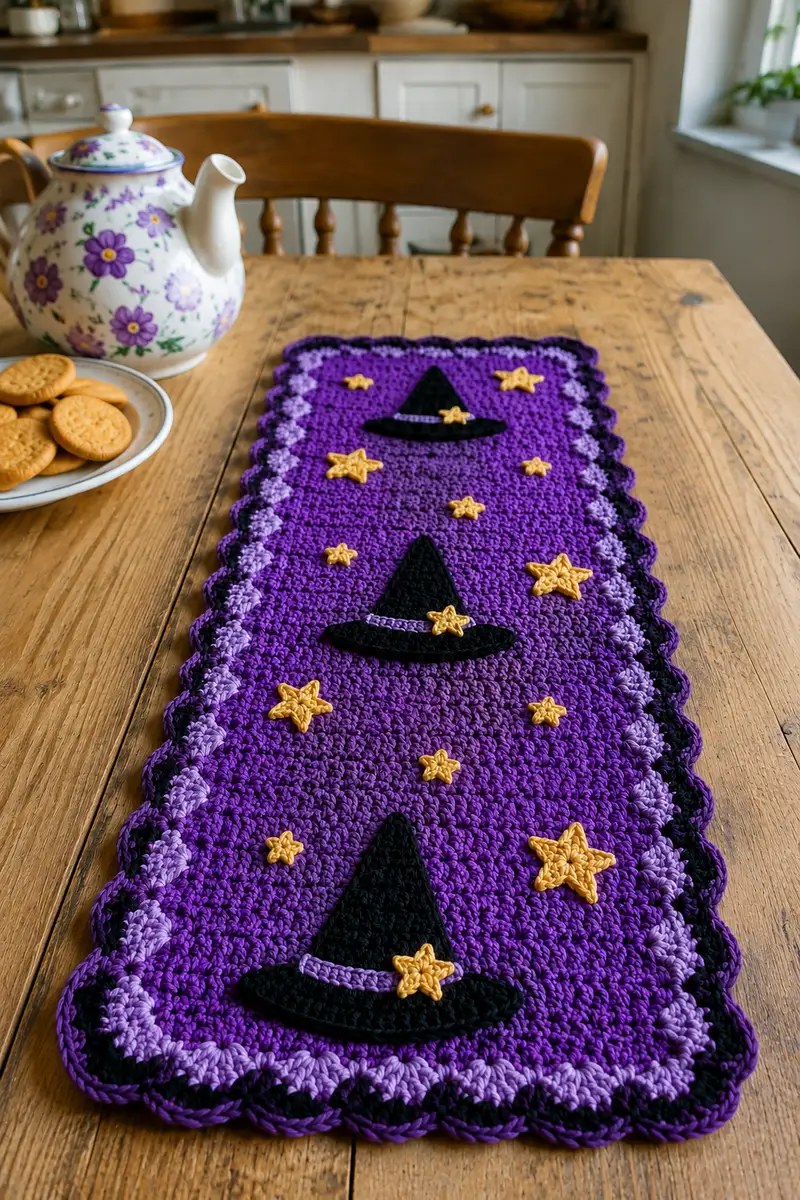
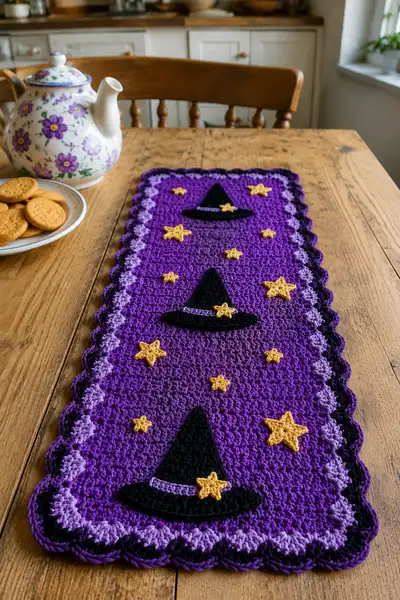
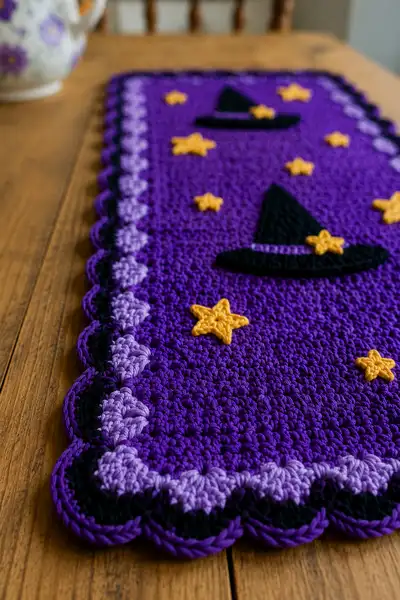
Bright purple table runner decorated with three appliqued witch hats and scattered golden stars. Worked in rows with a textured sc body, two-tone scalloped border, and appliqued motifs sewn on top for a layered look. Uses worsted weight cotton or acrylic yarn in deep purple, light purple, black and gold. A festive Halloween centerpiece that's both decorative and durable for everyday use or seasonal displays.
Progress Tracker
0% Complete
— Notes & Gauge :
Info :
Gauge: 18 sc x 20 rows = 10 cm using 4.0mm hook and worsted #4 yarn. Maintain tight, consistent tension for a dense fabric suitable for table use. Measurements given in this pattern are for the sample runner: approximately 36 cm wide x 95 cm long (14 x 37 inches) including scalloped border. Adjust foundation chain length to change finished length ensuring the central repeat (72 sc) remains intact for balanced border scallops.
— Abbreviated Project Overview :
Info :
You will work a rectangular panel in rows, then add a layered border in joined rounds, and finish by making 3 witch hat appliques plus several stars of two sizes. Appliques are sewn on with careful placement notes provided. The pattern uses mostly single crochet and simple shell stitches for the scallop edge.
— Main Panel (work flat, rows 1-48) :
Round 1 :
Foundation chain 73. Ch2 (counts as first sc), sc in 2nd ch from hook and in each ch across — total 72 sc (72).
Round 2 :
Ch1, turn. 1 sc in each st across (72).
Round 3 :
Repeat Round 2 (72).
Round 4 :
Repeat Round 2 (72).
Info :
Keep edges straight: work the first sc into the very first stitch at the turning chain base and the last sc into the top of the turning ch to maintain rectangular edges. Place a stitch marker in the first stitch of every 10th row to help with alignment when adding motifs later.
Round 5 :
1 sc in each st (72).
Round 6 :
1 sc in each st (72).
Round 7 :
1 sc in each st (72).
Round 8 :
1 sc in each st (72).
Round 9 :
1 sc in each st (72).
Info :
Begin planning applique placement. Measure down from the short edge and mark the row where the center of the first hat will sit. In the sample, centers are placed at rows 8, 24 and 40 (counting from the first sc row). These centers are visually centered along the width at stitch 36-37 (middle of 72 stitches).
Round 10 :
1 sc in each st (72).
Round 11 :
1 sc in each st (72).
Round 12 :
1 sc in each st (72).
Round 13 :
1 sc in each st (72).
Info :
To create a subtle texture like the sample, occasionally work a row in BLO. For the sample runner, work every 6th row in BLO to create a faint ridge. For example, Row 14 will be worked in BLO (see below).
Round 14 :
Ch1, turn. 1 sc in each st BLO (72).
Round 15 :
1 sc in each st (72).
Round 16 :
1 sc in each st (72).
Round 17 :
1 sc in each st (72).
Round 18 :
1 sc in each st (72).
Info :
If your runner will be longer than the sample, continue repeating even sc rows until desired length, keeping motif placement proportional. The sample stops at row 48 to allow room for border scallops; plan for at least 6 rows of margin at each short end before border starts.
Round 19 :
1 sc in each st (72).
Round 20 :
1 sc in each st (72).
Round 21 :
1 sc in each st (72).
Round 22 :
1 sc in each st (72).
Round 23 :
1 sc in each st (72).
Info :
Before you reach the final panel rows, weave in any ends from color changes neatly along the back of the work to avoid bulky spots under the appliques. Use short weaving lengths and a yarn needle to keep the back tidy.
Round 24 :
1 sc in each st (72).
Round 25 :
1 sc in each st (72).
Round 26 :
1 sc in each st (72).
Round 27 :
1 sc in each st (72).
Round 28 :
1 sc in each st (72).
Info :
To keep the panel flat and neat, check the tension at the ends of every few rows. If edges begin to curve, try crocheting the first and last stitch a bit more loosely or use a hook size 0.25mm larger at edges only for a more even border.
Round 29 :
1 sc in each st (72).
Round 30 :
1 sc in each st (72).
Round 31 :
1 sc in each st (72).
Round 32 :
1 sc in each st (72).
Round 33 :
1 sc in each st (72).
Info :
Mark the centers for appliques across the width: stitch 36 and 37 are the exact center of a 72-stitch row. Use a removable stitch marker or a loop of contrasting scrap yarn to mark these stitches at the rows where hat centers will sit (sample rows 8, 24, 40).
Round 34 :
1 sc in each st (72).
Round 35 :
1 sc in each st (72).
Round 36 :
1 sc in each st (72).
Round 37 :
1 sc in each st (72).
Round 38 :
1 sc in each st (72).
Info :
Finish the main panel by flattening and blocking lightly: pin the rectangle to measurement and spray lightly with water or use a steam iron at a safe distance to set stitches before adding border. Blocking will also help the scallop border sit evenly when added.
Round 39 :
1 sc in each st (72).
Round 40 :
1 sc in each st (72).
Round 41 :
1 sc in each st (72).
Round 42 :
1 sc in each st (72).
Round 43 :
1 sc in each st (72).
Round 44 :
1 sc in each st (72).
Info :
Count rows and double-check the three marked center rows — these will help you align appliques accurately later. If your row counts differ due to gauge, measure the distance between centers and place appliques evenly along that distance.
Round 45 :
1 sc in each st (72).
Round 46 :
1 sc in each st (72).
Round 47 :
1 sc in each st (72).
Round 48 :
1 sc in each st (72). Fasten off and weave in ends on the wrong side. The panel is now ready for the border rounds.
— Border (joined rounds around rectangle) :
Info :
We will work 1 round of sc in black around the entire perimeter to create a clean edge, then a lavender cluster round, and finish with a deep purple scallop. Join yarn at any corner. Work evenly with increases in corners to preserve rectangle shape. Placement: starting at a short edge corner, join with sl st.
Round 49 :
With black yarn, join at corner with sl st. Ch1, sc evenly across short edge stitches (work 1 sc into the side of each row), continue along long edge across top, work 1 sc into top of turning chs across, evenly around entire perimeter. In sample this yields approximately 240 sc total around (count will vary slightly; aim for even coverage). Join to first sc with sl st.
Round 50 :
Ch1, sc in each st around, placing 3 sc in each corner st to maintain flat corners. Join with sl st (approx 240 sc).
Info :
Adjust corner increases if you see corners pulling tight or flaring: 2 sc in corner may suffice for a shallower corner; 3 sc is standard for 90-degree corners. Keep counts similar all around so scallops line up evenly.
Round 51 :
Join light purple yarn with sl st to any sc. Ch2 (counts as first hdc), hdc in each st around, placing 3 hdc in each corner st to maintain shape. Join with sl st. This round creates the lavender contrast band under the scallops.
Round 52 :
Ch1, change to black yarn. Sc in each st around for one full round to create a dark outline under scallops. Join with sl st.
Round 53 :
Ch1, change to dark purple (main). Begin scallop round: *(sk next 2 sts, 5 dc in next st, sk next 2 sts, sl st in next st) Repeat around to create compact scallops. Work extra shells in corners to keep scallops continuous. Join with sl st. Count scallops and adjust by adding or skipping a small number of sts in the earlier sc rounds if scallops bunch at corners.
Info :
If your scallops do not sit flat, try using 4 dc shells instead of 5 dc or adjust spacing to (sk 1 st, 4 dc, sk 1 st, sl st) to reduce fullness. Blocking the scallops after completing the border will help shape them beautifully.
Round 54 :
For a layered scallop, work a second scallop round in main purple: sl st into center dc of a previous scallop, ch1, (sc, hdc, 3 dc, hdc, sc) in the center dc of each scallop around to produce rounded, raised scallops. Join with sl st.
Round 55 :
Finish edge by working a neat round of slip stitch in contrasting purple: sl st in each st around, smoothing the scallop edges and providing a crisp finish. Fasten off and weave in ends.
Info :
Final blocking: lightly steam or wet-block the entire runner pinned to measurements to open scallops slightly and neaten the panel. Allow to dry fully before applique placement.
— Witch Hat Applique (Make 3; each hat worked flat) :
Info :
Each witch hat is worked in two parts: the cone (triangular top) and the brim (oval band). Work with black yarn, then add a small gold star and a narrow lavender trim if desired. Use 3.5mm hook for a firmer applique.
Round 56 :
Cone Part: Ch12. Row 1: sc in 2nd ch from hook and across (11 sc). Turn.
Round 57 :
Row 2: Ch1, turn. Sc2tog at first 2 sts to begin taper, sc in next 7 sts, sc2tog last 2 sts — total 9 sc. (11→9)
Round 58 :
Row 3: Ch1, turn. Sc2tog, sc in next 5 sts, sc2tog — total 7 sc. (9→7)
Round 59 :
Row 4: Ch1, turn. Sc2tog, sc in next 3 sts, sc2tog — total 5 sc. (7→5)
Round 60 :
Row 5: Ch1, turn. Sc2tog, sc in next 1 st, sc2tog — total 3 sc. (5→3)
Round 61 :
Row 6: Ch1, turn. Sc2tog across to close triangle top — total 1 sc. Fasten off leaving a long tail to sew cone apex closed and shape cone slightly by pulling tail gently and stitching a few anchoring passes to form a point.
Info :
Instead of working the cone as decreasing rows, you can work a triangular shaped piece by increasing to a center then decreasing, but the decreasing-only method here produces a short, tall cone like the photo. Block lightly for a pointier silhouette.
Round 62 :
Brim Part: With black yarn, ch26. Row 1: sc in 2nd ch from hook and across (25 sc). Turn.
Round 63 :
Row 2: Ch1, turn. 1 sc in each st across (25 sc).
Round 64 :
Row 3: Ch1, turn. BLO: 1 sc in each st BLO across (25 sc). This creates a neat ridge along the brim edge for a defined look.
Round 65 :
Row 4: Ch1, turn. 1 sc in each st across (25 sc). Fasten off leaving long tail for sewing brim to cone.
Round 66 :
Assembly of hat: Pin brim flat and place cone centrally along brim top edge. Using the long tails, whipstitch brim to cone from inside out along base, distributing cone base evenly across brim center 13-14 stitches. Pull slightly to create a gentle curve at brim. Fasten off and weave in.
Round 67 :
Trim and Decoration: With light purple yarn, embroider a narrow band across the base of the cone: use a surface slip stitch or small chain stitched across the seam. Add a tiny star (worked separately) and sew to side of the band.
Info :
Make three hats identical in size. For a slightly larger hat, increase brim chain by increments of 4 and keep cone starting chain in proportion (about half the brim width divided appropriately). Use 3.5mm hook for tighter fabric so hat lies flat against runner.
— Large Star Motif (Make 4) :
Round 68 :
Magic ring, ch1. Round 1: 10 sc into magic ring. Pull tight and join with sl st (10).
Round 69 :
Ch2 (counts as hdc), (hdc, ch2, sl st) into next stitch repeat around to create 5 points: *(hdc in next st, ch2, sl st in same st) x 2 stitches across to shape each point; work evenly to make five petals. Join with sl st to base. This creates a small 5-point petal base. Fasten off leaving long tail for sewing.
Round 70 :
Optional definition: With same gold yarn, surface crochet a small loop around each point by working slip stitches into the outer edge to enhance star points. Weave in end or leave tail to sew star to runner.
Info :
The large star in the sample has depth created by working slightly raised puff clusters on each arm. To make raised arms work (ch2, 3 dc in same st, ch2, sl st) in the designated point stitch for a bolder star.
— Small Star Motif (Make 8-10) :
Round 71 :
Magic ring, ch1. Round 1: (sc, ch2, sc) in same st to form tiny 5 points: (sc, ch2, sc) x 5 around. Slip stitch to join, fasten off leaving a long tail to sew. Each small star measures about 1.2 cm and is perfect for scattered decoration.
Info :
Make as many small stars as desired for your runner. The sample shows 6 small stars and 4 larger stars. Plan placement before sewing: generally one large star near each hat and small stars scattered to create balance.
— Alternate Textured Stars (Optional) :
Round 72 :
To create a puffed star, use the following: Magic ring, (ch1, 5 dc cluster in same st, ch1, sl st) x5 around; pull ring tight, join, and weave tail through clusters to flatten slightly. This gives a small 3D star as an accent.
Info :
Use a smaller hook (3.5mm) for star motifs so they are tidy and sit above the fabric without stretching or sagging.
— Placement Guide & Applique Sewing :
Round 73 :
Info : Positioning: For the sample runner with 48 panel rows, place hat centers at Row 8 (near top third), Row 24 (center), Row 40 (lower third). For width, center each hat across stitches 36-37. Place large stars approximately 6-10 stitches away from hats, and small stars scattered between hats and along margins to create visual balance.
Round 74 :
Info : Pin appliques with straight pins through the wrong side, checking alignment by turning the runner over and making sure motifs are centered and straight. Use at least 3 pins per applique while sewing to prevent slipping.
Round 75 :
Info : Sewing: Use a yarn needle and matching thread to sew appliques with small whip stitches around edges. For hats, sew brim first at the base of the cone then tack cone lightly to the panel at 3 points (left, center, right) to prevent lifting. For stars, stitch through the center and several outer points to secure.
Round 76 :
Info : Secure finishing: After sewing all appliques, weave tails through the back of the runner 4-6 cm, knot if desired, and trim neatly. Lightly block the runner again if applique sewing has distorted edges.
— Finishing Touches & Embellishments :
Round 77 :
Info : Add a tiny embroidered star center or french knot in gold yarn to give more texture to the large stars. Use a tapestry needle and wrap the yarn 3 times for a firm knot then secure on the wrong side.
Round 78 :
Info : Optionally, sew a thin strip of felt behind the largest hats to add firmness if you prefer a flatter, more stable applique. Attach with small neat stitches through felt and crocheted fabric, hiding ends on the wrong side.
Round 79 :
Info : Final inspection: Lay the runner on the table and check that scallops are even and appliques have no loose stitches. Tuck any stray yarn into the wrong side and trim.
Round 80 :
Info : Care instructions: Hand wash gently or machine wash on delicate in a mesh bag and lay flat to dry. Avoid high heat to preserve shape and color. If using acrylic yarn, a low-heat steam block will shape scallops nicely.
— Pattern Variations & Scaling :
Round 81 :
Info : To lengthen the runner, add sets of 16 rows (or multiples that keep motif spacing even). Adjust applique positions proportionally: for each added 16-row section, move outer hats so spacing stays balanced. To make a placemat version, reduce foundation chain to 25 sc across (26 ch) and scale border scallops by halving counts.
Round 82 :
Info : Color swaps: Swap main purple for orange or black for navy for a different mood. Use variegated yarn in the scallop round for a playful edge. Always carry color neatly and weave in any carried yarn at regular intervals on the wrong side to avoid long floats.
Round 83 :
Info : Troubleshooting: If your scallops or border ripple, block flat and try reducing fullness by swapping to 4 dc shells or increasing the base sc round to provide more base stitches for shell anchors.
Round 84 :
Info : Storing: Store flat or rolled loosely to prevent scallops from bending. Avoid folding scallops to prevent creases that are hard to remove later.
Round 85 :
Info : Repeat reminders: Check applique placement before sewing; stitch gently and secure ends by weaving into the wrong side for professional finish.
This purple witch table runner brings instant seasonal charm with its playful hats and glowing stars. Layering simple crochet techniques creates a rich, handcrafted centerpiece that feels both festive and refined. Making each applique and watching the runner come together is incredibly satisfying — the scalloped border is the perfect finishing touch. 🧶✨ Add it to your Halloween decor or gift it to a friend who adores handmade seasonal accents. 🎃