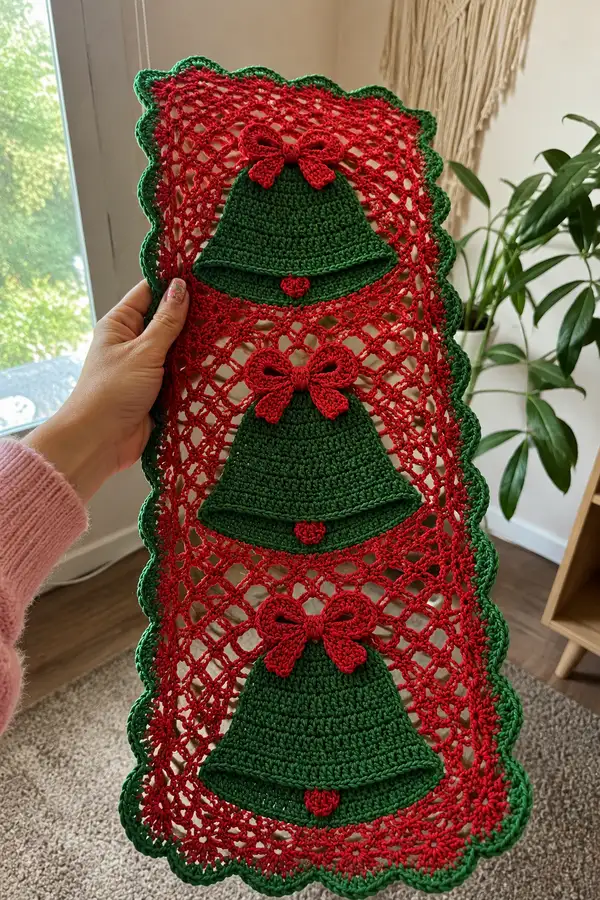
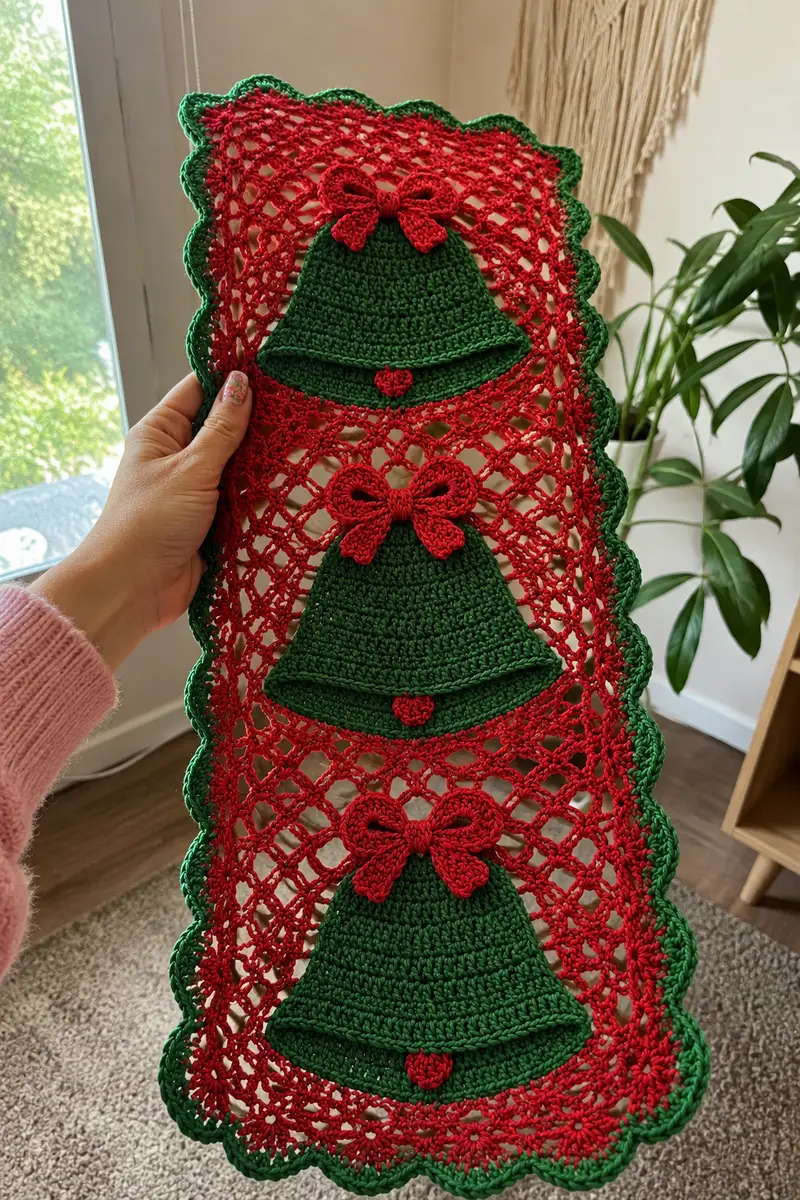
A festive rectangular table runner featuring three appliqued green bells with red bows and tiny clappers set on an open red lace mesh, edged with a scalloped green border. The design uses contrasting green and red cotton yarn for a crisp, seasonal look. Perfect for holiday centerpieces, mantels, or as a gift, this runner showcases layered applique bells and decorative scallops for a classic Christmas aesthetic. This pattern includes full instructions for the lace panel, bell appliques, bows, clappers, and scalloped edging.
Progress Tracker
0% Complete
— Notes :
Info :
This runner is worked in two main parts: the lace red panel and the layered appliques (bells, bows, clappers). Work the main panel first, block it flat, then make the three bell appliques, three bows and three clappers and sew them into position. All appliques are sewn to the right-side after blocking to ensure flat placement. Gauge is not critical for a decorative runner, but use a hook one size smaller than yarn label to keep lace tidy. Finished approximate size: 10'' wide x 30'' long (25 cm x 76 cm) using specified yarn and hook.
— Materials & Gauge :
Info :
Yarn: worsted-weight cotton (4) mercerized gives good stitch definition. Suggested hooks: 3.5mm for lace body, 3.25mm for appliques if you want crisper edges. Gauge: lace open pattern is flexible; for reference after blocking sample 10cm = 3.75" across 8 mesh repeats.
— Lace Panel (work flat, joined rows counted as rounds) :
Round 1 :
Ch 73, sc in 2nd ch from hook and in each ch across (72)
Round 2 :
Ch 3 (counts as dc), turn, skip first st, *dc in next st, ch 1, sk next st* rep across, end with dc in last st (36 dc, 35 ch-1 spaces) (72 total posts counted)
Round 3 :
Ch 1, turn, sc in each dc and sc in each ch-1 space across (72)
Round 4 :
Ch 4 (counts as tr), turn, *tr into next dc, ch 1, sk next sc* across, end with tr in last sc (36 tr, 35 ch-1 spaces)
Round 5 :
Ch 1, turn, sc in each tr and sc in each ch-1 space across (72)
Info :
These first 5 rows establish a sturdy foundation row pattern for the lace. Keep tension even. Use stitch markers at each 12th stitch to help locate bell placements later (bell centers at chains 12, 36 and 60 approx.).
Round 6 :
Ch 4 (counts tr), turn, *tr in next st, ch 2, sk next 2 sts* across, end with tr in last st (36 tr, 24 ch-2 spaces) (72)
Round 7 :
Ch 1, turn, sc in each tr and sc in each ch-2 space (72)
Round 8 :
Ch 5 (counts as tr+ch2), turn, *tr in next st, ch 2, sk next 2 sts* across, end with tr in last st (36 tr)
Round 9 :
Ch 1, turn, sc in each tr and sc in each ch-2 space (72)
Round 10 :
Ch 3, turn, dc in next st, *ch 3, sk 3 sts, dc in next st* across, end with dc in last st. This creates tall open arches across the panel (18 arches across) (72 posts)
Round 11 :
Ch 1, turn, sc in each dc and work 5 sc into each ch-3 arch below (72 + 18*4 = 144) [Work 5 sc across each arch to fill with small star motif]
Info :
At Round 11 you begin working star clusters into the mesh which give the floral-lace look visible in the photographs. Use a stitch marker to identify every third arch to position bells later. Blocking becomes essential after Round 14 to open the mesh evenly.
Round 12 :
Ch 3, turn, *dc in next 2 sts, ch 3, sk next 2 sts, dc in next 2 sts* across, creating diamond arches (72)
Round 13 :
Ch 1, turn, sc in each dc and in each ch-3 (72)
Round 14 :
Ch 2, turn, hdc in next st, *(3 dc, ch 2, 3 dc) in next ch-3 space (shell), sk next 6 sts* rep across to create shell motif band. End with hdc into last st. Count: shells across = 9 shells, with posts 72+
Info :
Work slowly through the shell row so shells are evenly spaced. The panel will be narrow; if you want wider or narrower, adjust the foundation chain by multiples of 4 and repeat the same lace repeats keeping bell center markers at even intervals.
Round 15 :
Ch 1, turn, sc in each st and sc 3 into each shell ch-2 space to anchor shells (total stitches approx 72 + 9*2 = 90 depending on counting shell posts)
Round 16 :
Ch 4, turn, tr in next st, *ch 3, sk 3 sts, tr in next st* across to reestablish openwork arches (approx 36 tr, 18 ch-3 spaces)
Round 17 :
Ch 1, turn, sc across each tr and sc in ch spaces (approx 72)
Round 18 :
Ch 3, turn, dc in next st, *ch 1, sk 1 st, dc in next st* across forming fine mesh (72)
Round 19 :
Ch 1, turn, sc in each dc and sc in each ch-1 (72)
Round 20 :
Ch 5, turn, *shell (3 dc, ch 2, 3 dc) in next ch-1 space, ch 1, sk 1 st* across forming alternating shells down panel (9 shells across) (approx 90 posts)
Info :
Rounds 16-20 are a repeating band that gives the lacy diamonds with small floral clusters. Continue repeating Rounds 16-20 to achieve desired length between bell rows. In this runner we repeat this band four times before placing bells. Each repetition adds approximately 1/2" to the length depending on tension.
Round 21-28 :
Repeat Rounds 16-20, four full repeats (work 8 rounds) to create spacing for the first bell. Maintain stitch counts from those rounds across.
Info :
At the end of Round 28 you should be about 1/3 along the final length. Place temporary stitch markers at the bell center positions: center bell lines at foundation ch positions approximately 12th, 36th and 60th post from the left. These will act as guides for sewing bell appliques.
Round 29 :
Ch 3, turn, dc in next st, *(dc, ch 3, dc) cluster in center of every 2 shells across to mark decorative junctions* end with dc (72)
Round 30 :
Ch 1, turn, sc across, working 7 sc into large ch-3 junctions to form small floral rosettes (approx 72 + extra sc where rosettes made)
Round 31-38 :
Repeat the lace band Rounds 16-20 two more times to reach the next bell placement, keeping counts consistent with previous repeats (maintain 72 base posts per narrow rows, shell rows will have additional post groupings)
Info :
When making repeats, keep the edges straight by counting end posts each row. Put a marker at the beginning of each row to maintain consistent joins. The pattern uses joined rows (ch at start, turn) rather than continuous spirals; always sl st to join when you want a firm base for an applique placement.
Round 39-46 :
Repeat Rounds 16-20 two more times to reach the third bell placement (fourth band total). You should now have the panel long enough to fit three bells with even spacing. Count total rows to ensure symmetry; aim for the same band counts between bell centers.
Round 47 :
Ch 1, turn, sc in each st across (72) - tidy row before shell edging
Round 48 :
Ch 2, turn, hdc across to add a subtle ridge row (72)
Round 49 :
Ch 1, turn, sc across; fasten off red yarn leaving long tail for blocking and facing the right side up (72)
Info :
Block your lace panel: wet block to exact desired dimensions and pin flat. This opens the mesh, evens shell spacing, and makes applique sewing easier. Allow to dry completely before attaching bells and bows.
— Bell Applique (Make 3 identical) :
Info :
Each bell is worked flat in rounds (rows) from the top center outwards to create a trapezoid bell shape with a small lip for the rim and a small clapper circle attached later. Work in green yarn. Use 3.25-3.5mm hook for crisp shaping. Each bell final width is approx 7" at base and height approx 3.5" before blocking; adjust row count to fit your panel spacing.
Round 1 :
Ch 16, sc in 2nd ch from hook and across (15)
Round 2 :
Ch 1, turn, sc inc evenly across to widen the top: (sc, inc) x5 (20)
Round 3 :
Ch 1, turn, sc in each st across (20)
Round 4 :
Ch 1, turn, (2 sc, inc) x5 (25)
Round 5 :
Ch 1, turn, sc across (25)
Round 6 :
Ch 1, turn, (3 sc, inc) x5 (30)
Info :
Rounds 2-6 gradually increase the bell width. Keep increments centered so the bell retains a smooth sloped side. If your bell becomes too wide or narrow compared to the panel, adjust last increase round by adding or removing one extra inc repeat.
Round 7 :
Ch 1, turn, sc across (30)
Round 8 :
Ch 1, turn, (4 sc, inc) x5 (35)
Round 9 :
Ch 1, turn, sc across (35)
Round 10 :
Ch 1, turn, (5 sc, inc) x5 (40)
Round 11 :
Ch 1, turn, sc across (40)
Round 12 :
Ch 2, turn, hdc in next 2 sts, hdc in each across to create a slightly taller mid section (40)
Round 13 :
Ch 1, turn, sc across (40)
Round 14 :
Ch 1, turn, (7 sc, inc) x5 (45)
Round 15 :
Ch 1, turn, sc across (45)
Round 16 :
Ch 1, turn, sc 5, dec, sc 8, dec, sc 8, dec, sc 8, dec, sc to end (41) - begin slight taper to form bell cone
Round 17 :
Ch 1, turn, sc around taper evenly (41)
Round 18 :
Ch 1, turn, sc 4, dec, sc 6, dec, sc 6, dec, sc 6, dec, sc to end (37)
Info :
Rounds 16-18 shape the bell to a soft curve. Keep decreases evenly spaced to avoid flat or pinched corners. The bell is intentionally slightly flat on the top edge so it sits cleanly on the lace panel and allows the bow to sit above it.
Round 19 :
Ch 1, turn, sc across (37)
Round 20 :
Ch 1, turn, sc in BLO across (37) to create a visible ridge near the rim of the bell (this forms a decorative lip)
Round 21 :
Ch 1, turn, sc across (37)
Round 22 :
Ch 2, turn, hdc across in each st (37)
Round 23 :
Ch 1, turn, sc across (37)
Round 24 :
Ch 1, turn, (3 sc, inc) around base evenly to flare the rim slightly (use 9 reps: (3 sc, inc) x9) - if base count not divisible, add small evenly spaced incs so base is approx 46
Round 25 :
Ch 1, turn, sc across base rim (approx 46)
Round 26 :
Ch 1, turn, sc in each st BLO to create a neat rolled rim look (approx 46)
Info :
Weave in a longer tail from the top center so you can use it to sew the bell onto the lace panel. Place the bell temporarily on the blocked panel to ensure the size is right—adjust by adding/removing a few rounds or stitches to match placement.
Round 27 :
Ch 1, turn, sc across, sc2tog at two very slightly spaced points to tidy edge if required (approx 44)
Round 28 :
Ch 1, turn, sl st across and fasten off leaving 12" tail for sewing (approx 44)
Info :
Optional: Block each bell gently by pinning to a curved template to create a shallow dome so it sits nicely on the mesh. Use a damp cloth; do not soak. Allow to dry fully.
— Small Clapper (Make 3) :
Round 1 :
With red yarn, make magic ring, 6 sc in ring (6)
Round 6 :
Fasten off leaving tail for sewing. Slightly stuff with a tiny bit of fiberfill if you want a puffed clapper.
Info :
Sew clapper to the inside center of the bell base about 3 stitches from the rim center. Use the long tail and secure with tight stitches on the back side of the applique.
— Bow Applique (Make 3) :
Round 1 :
With red yarn, ch 8, sc in 2nd ch from hook and across (7)
Round 2 :
Ch 1, turn, (sc, inc) x2, sc, (inc, sc) x1 - work increases centered to form a narrow bow wing (9)
Round 3 :
Ch 1, turn, sc across (9)
Round 4 :
Ch 1, turn, sc across but in the centre st make (3 sc) to puff out center wing slightly (11)
Round 5 :
Ch 1, turn, sc across (11)
Round 6 :
Fasten off leaving a long tail. Make a second identical wing. Fold each wing short ends together and wrap long tail around centre tightly to form a bow shape; knot and hide tail on back. For larger decorative loop pinch the center and sew back to create two loops on each side.
Info :
For a neat bow, block lightly and press center wrap tight. Position the bow at top center of each bell (top edge) and sew tightly with hidden stitches on the inner side of the bell applique so the knot sits on the surface.
— Decorative Center Knot (for bow) :
Round 1 :
With red yarn, ch 5, sl st into first ch to create small ring, sc 6 into ring, tighten (6)
Round 2 :
Sc around, fasten off leaving tail to stitch onto bow center
Info :
Sew this small knot to the front center of the bow for a finished look. Use matching red so the knot appears seamless.
— Scalloped Border (Green) :
Info :
With green yarn, we will work an edging around the entire blocked red panel. Make sure the panel is dry and pinned flat.
Round 1 :
Join green yarn at a corner with sl st, ch 1, sc evenly around the entire panel working 1 sc in each st and 3 sc in each corner (approx 72 sc on short rows and adjustment on long). Count total sc for scallop base; you should have a round total near 288 depending on panel counts.
Round 2 :
Ch 3, *skip 2 sc, (5 dc) in next sc, skip 2 sc, sl st in next sc* repeat across to create scallops. Aim for 12 scallops along the length and 4 at each end evenly spaced. Adjust by adding or removing sl st spaces so scallops fall evenly.
Round 3 :
Ch 1, sl st into center of each 5-dc shell, *ch 1, sl st* across to tidy edges. Fasten off and weave ends.
Info :
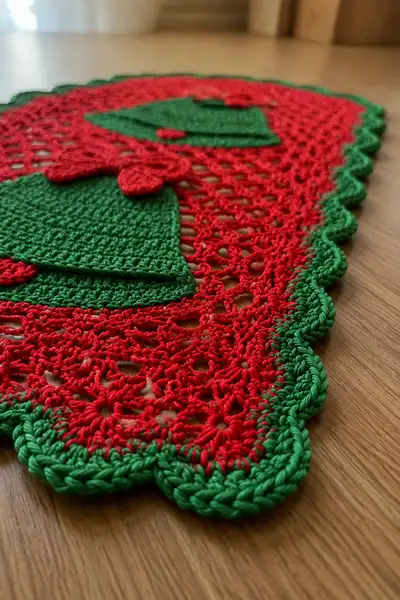
If scallops look too large, use (3 dc) shells instead of 5dc and increase the number of shells accordingly. The photos show deep scallops so 5-dc shells are used here. Stitch shells slightly overlapping the red shell rows to secure border neatly.
— Alternative Tight Edge Option :
Round 4 :
For a pronounced piped edge, return in green and work 1 round of sc in BLO to create a raised ridge along the scallops, then sl st around and fasten off.
Info :
This raised ridge creates the bold green rim seen in the image and helps prevent curling after use.
— Final Finishing Stitches on Bells & Bows :
Info :
Use the long tails left from each applique to attach pieces to the panel. Place bell centered over the targeted mesh window so its top aligns with the decorative junction row (use previously placed markers). Sew with small invisible whip stitches through the back loops of the bell and the top of the mesh—stitch through the mesh junctions to anchor firmly but invisibly.
Round 1 :
Sew bell top with 6-8 evenly spaced stitches across the top edge to secure (use tail from bell crown). Then secure sides with 6 stitches each side through mesh junctions (approx 12-20 stitches total per bell).
Round 2 :
Sew the clapper to the base center of each bell with 4-6 tight stitches through both clapper and bell base, knot securely on the wrong side and hide ends back into applique with tapestry needle.
Round 3 :
Sew the bow above the top center of the bell. Use a combination of stitches through the bow center and a couple on the bow loops to keep it flat yet secure (approx 6-8 stitches). Hide ends on the wrong side.
Info :
Use pins to hold each applique in place while you stitch. Check symmetry by measuring distance from edge and from neighboring bell. If the bell sits too high or low, gently adjust then resew. Keep stitches neat and hidden on the back side of the runner.
— Optional Decorative Surface Stitching :
Round 1 :
Use green or red to add a contrasting running stitch around bell rims or bow loops for enhanced definition. Use 4-6 evenly spaced stitches per arc for subtle detail.
Info :
This is purely decorative but helps the bells read clearly when viewed from a distance on a table display.
— Blocking & Final Care :
Info :
After all attachment is complete, press the runner lightly to even any stitches. If cotton yarn used, hand wash gently and re-block flat to preserve scallop shape. Avoid wringing; reshape and dry flat. Store flat or rolled to prevent creasing of scallops.
Finishing this festive table runner brings such joy! The lacy red mesh paired with crisp green bells and bows creates a timeless holiday accent. Each applique and scalloped edge adds handcrafted charm that will delight guests and become part of your seasonal decor. I hope you enjoy every stitch you make—hang it, gift it, or display with pride! 🎄🧶