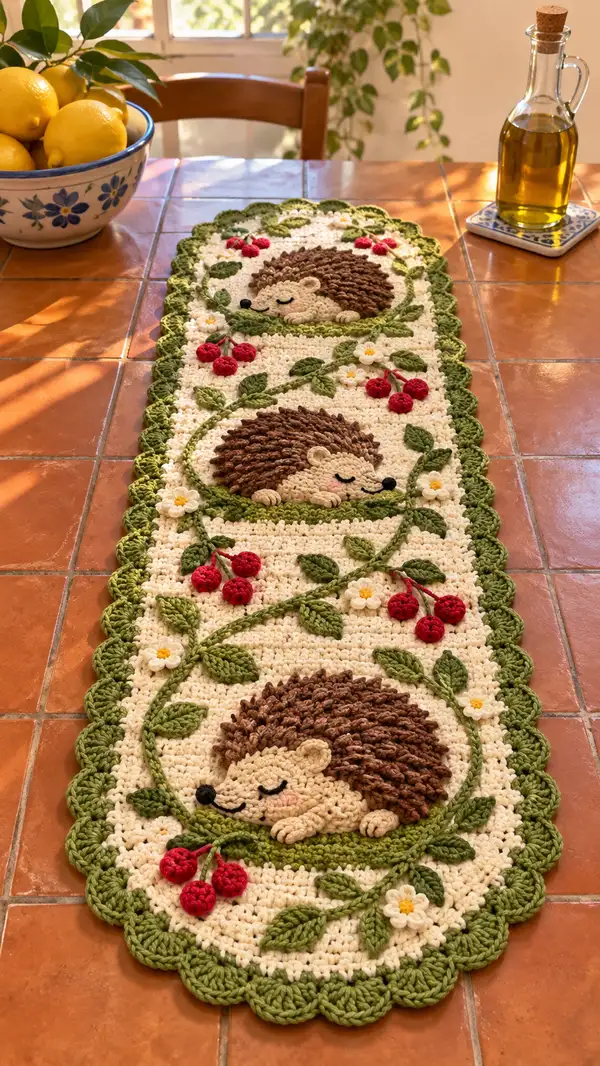
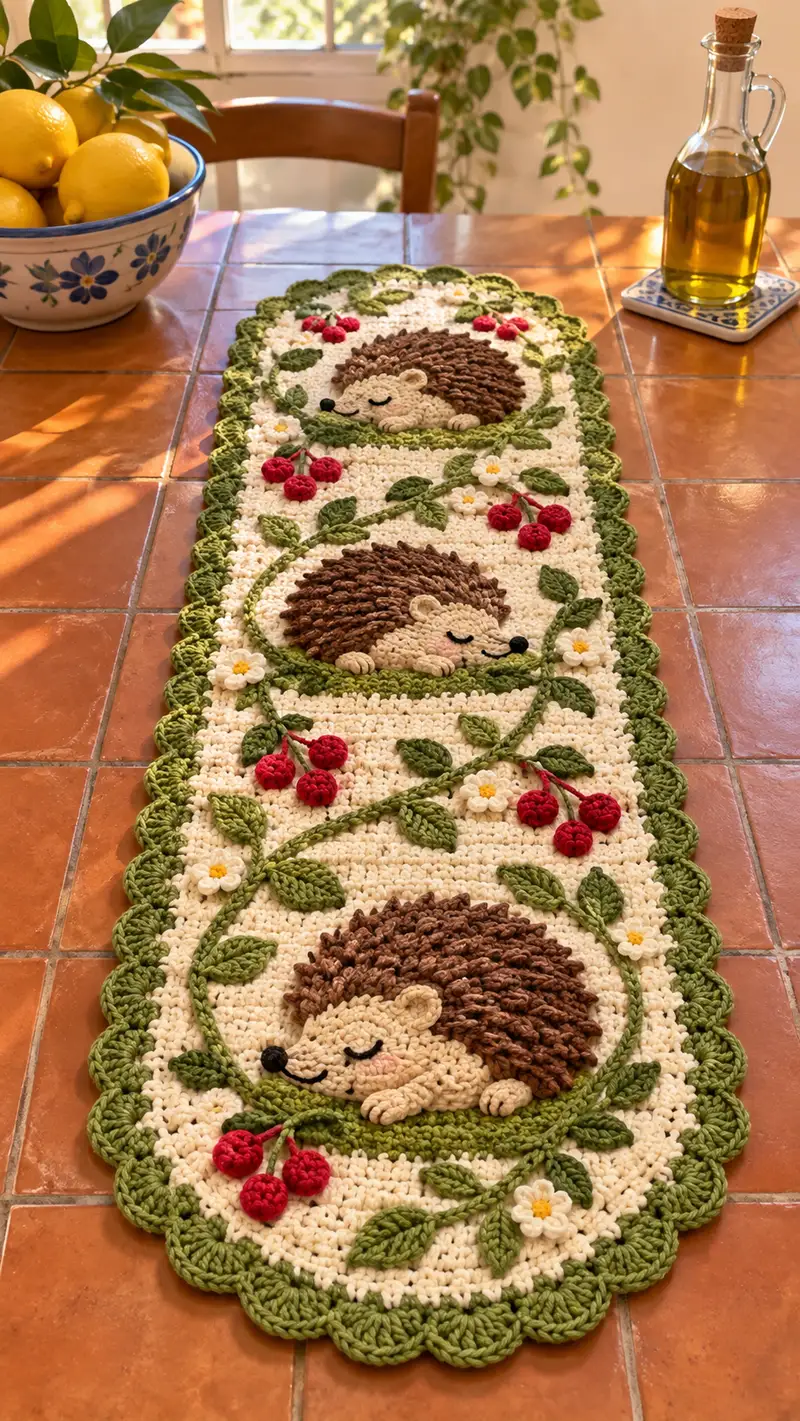
A charming, cottage-style crochet table runner featuring three sleepy hedgehog appliques nestled in leafy wreaths, scattered cherries and tiny daisies. This pattern uses textured quill stitches, raised appliques, and a scalloped border to create a cozy, dimensional centerpiece. Perfect for an afternoon of mindful crochet — it layers surface embroidery, 3D berries and leaves over a structured oval base.
Progress Tracker
0% Complete
— Main Runner Base (Make 1) :
Overview :
This oval runner is constructed by starting from a central foundation chain, working single crochet rows in the round with increases at each short end to form a long oval. The base is worked in a solid creamy off-white and will be joined to appliques and surface motifs later. Use 4.5mm hook and moderate tension to create a dense fabric that supports appliques.
Foundation Chain :
Ch 86. Count carefully. This chain length gives a medium runner width; increase or decrease multiples of 2 to scale the width.
Round 1 :
Working in back bumps of chain: 1 sc in 2nd ch from hook and in next 82 ch, 3 sc in final ch, now work along opposite side of foundation chain: 1 sc in next 82 ch, 2 sc in final ch (178). Join with sl st to first sc.
Round 2 :
Ch 1, 1 sc in same st, 1 sc in next 35 sts, (inc) 3 times at short end evenly spaced as (sc, inc, sc) across 3 sts at each end, 1 sc in next 70 sts along long side, (inc) 3 times at opposite short end, 1 sc in remaining 35 sts (194). Join with sl st to first sc.
Info :
Use stitch markers at the four cardinal points (two short-end corners and two midpoints along long sides) to help with even increases on later rounds. Maintain even tension and place markers every 20-30 stitches.
Round 3 :
Ch 1, 1 sc in each st around (194). Join with sl st to first sc.
Round 4 :
Ch 1, 1 sc in each st around (194). Join. (Even round for height and texture)
Round 5 :
Ch 1, 1 sc in next 30 sts, (inc, 1 sc) x 3 at short end evenly (add 3 inc total), 1 sc in next 100 sts, (inc, 1 sc) x 3 at opposite short end, 1 sc remaining (200). Join.
Round 6-9 :
Ch 1, 1 sc in each st around for 4 rounds (200). Join each round. These rounds build a stable, even background for appliques.
Info :
Lay the base flat and measure to ensure it is sitting flat and not cupping. If it cups, add an extra even round to flatten. If it ruffles, reduce increases on next round a little.
Round 10 :
Ch 1, 1 sc in next 28 sts, (inc, 2 sc) x 3 across short end evenly (adds 3 sts each end), 1 sc in next 110 sts, (inc, 2 sc) x 3 at opposite short end, 1 sc in remaining sts (212). Join.
Round 11-14 :
Ch 1, 1 sc in each st around (212). Join each round. These rounds form the area that will receive wreath placement and appliques. Keep base flat and even.
Info :
Mark the center of the runner lengthwise with pins or stitch markers. You will place three hedgehog wreath centers along this centerline: one near each end and one in the middle. Mark approximate centers at 1/6, 1/2 and 5/6 of the runner length for reference when applying appliques.
Round 15 :
Ch 1, 1 sc in next 40 sts, (dec, 1 sc) twice evenly across short end to introduce subtle shaping for oval ends, 1 sc in next 132 sts, (dec, 1 sc) twice at opposite short end, 1 sc in remaining sts (208). Join.
Round 16-18 :
Ch 1, 1 sc in each st around (208). Join. These rounds stabilize the reduction and add texture to the background.
Round 19 :
Ch 1, 1 sc in next 50 sts, (inc) x 2 evenly at short end, 1 sc in next 96 sts, (inc) x 2 at opposite short end, 1 sc in remaining sts (212). Join.
Round 20-26 :
Ch 1, 1 sc in each st around for 7 rounds (212). These rounds form the main body between hedgehog wreaths. Keep the fabric consistent and even as you prepare to add the wreath circles and vines.
Info :
Before proceeding, block your base lightly to flatten and ensure accurate placement of appliques. Use spray-blocking or steam and pin the runner to desired dimensions. Blocking helps keep scallop borders and surface slip stitch vines even.
Round 27 :
Ch 1, 1 sc in next 26 sts, (inc, 2 sc) x 3 at short end evenly, 1 sc in next 130 sts, (inc, 2 sc) x 3 at opposite short end, 1 sc in remaining sts (224). Join. This adds a touch of width for scallop border later.
Round 28-30 :
Ch 1, 1 sc in each st around (224). Join each round. Work two more even rounds for stability (total rounds at this stage 30).
Info :
Lay the base back on your work surface and mark three circular wreath placement areas: each wreath will be about 30-34 sts in diameter around the hedgehog. Use removable pins to mark their centers along the runner centerline at equal spacing.
— Hedgehog Face Applique (Make 3 identical faces) :
Overview :
Each hedgehog face is worked as a flat, slightly domed applique (face shell) with separate 3D quill sections attached on top. Work the face in light beige/tan using 3.5mm hook for more definition. These rounds form a semi-sphere that will be sewn onto the base inside the wreath circle.
Round 1 :
mr, 6 sc in magic ring (6)
Round 3 :
(1 sc, inc) x 6 (18)
Round 4 :
(2 sc, inc) x 6 (24)
Round 5 :
(3 sc, inc) x 6 (30)
Info :
At this stage the face is a small round disk. We will elongate and shape on subsequent rounds. Place a stitch marker at the first stitch of each round to keep track of the center-front.
Round 6 :
(4 sc, inc) x 6 (36)
Round 7 :
(5 sc, inc) x 6 (42)
Round 8 :
1 sc in each st around (42)
Round 9 :
1 sc in next 6 sts, (inc) x 1, 1 sc in next 12 sts, (inc) x 1, 1 sc in next 18 sts, (inc) x 1, 1 sc in remaining (45) - note: this round adds subtle front shaping
Round 10 :
1 sc in each st around (45)
Info :
Identify the nose placement: count forward from the stitch marker 6 stitches and mark that stitch as the nose point (center-front). We will shape the snout by adding a short oval extension in the next rounds.
Round 11 :
Work front snout extension: At nose point, ch 4, turn and work 1 sc in 2nd ch from hook, 1 hdc, 1 sc. Slip stitch to the next base stitch to anchor. Continue 1 sc around rest of face (approx 49 including ch stitches anchored). Join.
Round 12 :
1 sc in each st around (49). This rounds encases the snout extension and smooths the edge.
Round 13 :
1 sc in next 10 sts, (dec) x 1 near back of face to begin slight oval shaping, 1 sc in next 28 sts (48)
Round 14 :
1 sc in each st around (48)
Info :
Embroidering eyes: For a sleepy look, plan to embroider curved eyes on rounds 12-14 area. Mark approximate eye centers about 6-8 sts on either side of nose and 2-3 rounds above the snout. Use black yarn and backstitch technique later for closed eyes.
Round 15 :
(6 sc, dec) x 6 (42)
Round 16 :
(5 sc, dec) x 6 (36)
Info :
Begin light shaping: this round will slightly flatten the back to prepare for quill attachment. Do not stuff — appliques are flat.
Round 17 :
(4 sc, dec) x 6 (30)
Round 18 :
(3 sc, dec) x 6 (24)
Round 19 :
(2 sc, dec) x 6 (18)
Round 20 :
(1 sc, dec) x 6 (12)
Round 21 :
6 dec (6). Fasten off leaving long tail for whip stitch applique sewing. Weave tail through remaining stitches and close center. Block lightly to flatten and shape snout.
Info :
Make three face appliques identical in size. Place them aside for later quill attachment and sewing to base.
— Hedgehog Quill Section (Make 3 sets to cover each face) :
Overview :
Quills are created as separate textured panels using loop stitch rows (or elongated front-loop bobbles) worked to cover the back half of the face applique. Work quill rows in mid-brown with a 4.5mm hook for a fluffy, chunky texture. Each quill panel will be worked flat and seamed onto the face.
Quill Panel - Foundation :
Ch 28. This chain length makes a quill panel approximately matching face diameter; adjust chain length to fit your face applique.
Row 1 :
Sc in 2nd ch from hook and in each ch across (27)
Row 2 :
Ch 1, turn, sc in each st across (27)
Info :
Loop stitch technique: For looped quills work a loop stitch (yarn over to create a loop of about 1.5cm length, pull up through stitch, then complete sc over loop) or create short elongated front-loop bobbles by working 3 dc cluster into front loop only. Choose the technique that matches the texture you prefer. Keep loops consistent in length.
Row 3 :
Ch 1, turn. Loop stitch in each st across (27 loops). Fasten off and join next row on one short side.
Row 4-13 :
Repeat Row 3 for 10 additional rows (total 11 loop rows). You should have a rectangular panel of loop stitches approximately wide enough to curve across the rounded back. Make 11-14 rows to create fuller quill coverage if desired.
Info :
Trim long loop ends very slightly for a neat appearance or leave loops intact for a softer, furrier quill. If trimming, cut uniformly across the panel. For dense quills use two overlapping panels and stagger rows for a layered look.
Row 14 :
Ch 1, turn, sc in each st across to create a clean edge (27). Fasten off leaving long tail for sewing. Repeat to make 3 quill panels (one per hedgehog).
Assembly Info :
Position the quill panel over the back of the face applique covering approximately 2/3 of the face from the top rear down toward the snout but leaving snout and cheeks exposed. Gather panel gently and sew along curved edge with whip stitch to the face applique. If using two panels layer the second panel centered and sew edges to secure. Use small whip stitches to hide yarn tails and secure loops.
— Hedgehog Ears (Make 6, two per head) :
Round 1 :
mr, 6 sc in magic ring (6)
Round 3 :
(1 sc, inc) x 6 (18)
Round 4 :
1 sc in each st around (18)
Info :
Flatten slightly and finish off leaving long tail for sewing. Position ears slightly above the snout on either side, partially inset into quill panel for a natural tucked-in look.
— Hedgehog Paws (Make 6 small paws, two per head) :
Round 1 :
mr, 6 sc in magic ring (6)
Round 3 :
1 sc in each st around (12)
Round 4 :
(1 sc, dec) x 4 (8)
Round 5 :
1 sc in each st around (8). Fasten off leaving long tail for sewing. These small pads will be sewn partially under the snout to emulate tiny tucked paws.
Info :
Optional: create tiny toe indentations with surface embroidery using a darker yarn to suggest paw definition. Position two paws near front base of the snout and one behind as seen in the photo (tucked under).
— Nose (Make 3) :
Round 1 :
mr, 6 sc in magic ring (6)
Round 3 :
(1 sc, inc) x 6 (18). Fasten off leaving long tail for sewing. Stuff very lightly to create slight 3D nose, sew to nose point and embroider a few satin stitches to shape if desired.
Info :
If you prefer a safer finish for a child-friendly runner, substitute a securely embroidered black nose rather than a sewn-on felted nose piece.
— Surface Vine and Leaves (Make vine in one long length, make leaves as needed) :
Vine Foundation :
Using medium green yarn and 4.5mm hook, attach yarn at the base edge near one end of runner where first wreath will sit. Ch 160 (this length is approximate — make longer if needed to reach across runner and form three lawns). Fasten off leaving long tails for sewing.
Info :
Instead of chaining one continuous vine, you can work shorter lengths (ch 40-60) and join invisibly with sl st on surface; this makes shaping and attaching easier. Plan vine path in pencil with pins first.
Surface Slip Stitch Joining :
Use a yarn needle and the vine chain tail to sew vine to base with small whip stitches along vine at 6-8 stitch intervals. Gentle curves should make slight dips over hedgehog wreaths. Pin vine into place before sewing.
Leaf (Make 18 or as desired) :
Ch 7. Row 1: sc in 2nd ch from hook, hdc in next, dc in next 2, hdc in next, sc in next. Now work back along opposite side of ch: sc, hdc, dc, hdc, sc to form full leaf shape. Slip stitch to join at base. Fasten off leaving tail for sewing. Alternatively, to make fuller leaves work BLO picot edge or add a small raised center rib with surface slip stitch.
Info :
Sew leaves along vine in alternating directions to mimic photo. Use small invisible stitches and slightly curve each leaf for a natural look. Place more leaves around wreath edges to integrate hedgehog faces.
— Daisies (Make 6-8) :
Center :
mr, 6 sc in magic ring (6), sl st to close. Fasten off leaving tail for sewing.
Petals :
With white yarn join to center. (Ch 4, sl st into next stitch of center) x 5 or 6 to form petals around center. Fasten off and sew to runner near vine intersections. Add a small yellow embroidery knot to the flower center if desired.
Info :
Petal count and length can be varied to suit your aesthetic. Slight puff in petal base can be achieved by making 2 dc in the ch loop before sl st to center.
— Cherries (Make 9 small berries for clusters) :
Round 1 :
mr, 6 sc in magic ring (6)
Round 3 :
(1 sc, inc) x 6 (18)
Round 4 :
1 sc in each st around (18). Fasten off leaving long tail for sewing. Make clusters of 2-3 berries by sewing stems (ch 6-10, fasten off) to berry tops and then attaching to vine with sewn stems.
Info :
For a rounder berry, stuff lightly with a small pinch of fiberfill before closing. Use stem yarn tail to sew the berry onto the vine and wrap the extra tail as a twisted stem for a natural look.
— Applique Assembly & Surface Embroidery :
Positioning :
Pin the three face appliques into the marked wreath centers along the runner centerline. Make sure each face is oriented with snout pointing slightly inward toward the vine curls shown in photo. Pin quill panels over the back of each face and adjust until the quills curve naturally into the wreath circle.
Sewing Faces :
Using matching beige thread and a yarn needle, whip stitch each face around its perimeter onto the base, catching a couple of single crochet base stitches as you go to secure. Use small, even stitches and hide tails by weaving into the quill panel behind.
Sewing Quills :
Sew quill panels to the face perimeters with small backstitches; aim to catch the face edge and a couple of loops of the quill panel for security. For extra hold sew the central row of quills to the base around the perimeter with tail thread woven through the base stitches under the quill panel.
Eyes & Mouth Embroidery :
With black yarn and tapestry needle embroider sleepy closed eyes as small curved satin stitches approximately 6-8 sts wide and 2-3 rounds above nose. Embroider a tiny smiling mouth or leave eyes only. Add a blush with soft pink yarn stitched as a few short satin stitches on the cheek if desired.
Nose Attachment :
Sew noses at the nose point. If using 3D nose pieces, sew through the face applique and into the base for stability, then weave tail through underside and trim.
Paws Attachment :
Sew paws under the snout edge as pictured so they peek out and appear tucked under. Use a few securing stitches through both paw and face base to hold firmly.
Leaf, Flower & Berry Placement :
Pin vine onto base along the previously marked path then pin leaves, flowers and clusters. Sew each item with small whip or mattress stitches. For berries sew stems in place first then attach berry bodies to stems to hide join stitches.
Info :
Take frequent breaks and step back to check overall placement symmetry. It is easy to over-cluster the vine; follow photo spacing with gentle allowances around each hedgehog wreath.
— Scalloped Border :
Round 1 (Border Prep) :
Using medium green yarn, join at any base edge stitch. Ch 1, 1 sc in each st around the runner, placing 2 sc in each corner end increase area to maintain shape. Join with sl st (total stitches will equal base stitch count). This creates a neat clean edge for scallops.
Round 2 (Shell Placement) :
Ch 3, *skip 2 sts, 5 dc in next st (shell), skip 2 sts, sl st in next st* repeat from * to * around. Adjust skip counts to make shells sit evenly around oval; you may need to do (skip 1, 5 dc, skip 1, sl st) at narrower curves. Join with sl st to starting ch-3.
Round 3 (Scallop Reinforce) :
In each 5-dc shell from previous round work: sl st into center dc, ch 3, 3 dc into same center dc, ch 3, sl st to close shell. This rounds and firms the scallop edge. Fasten off and weave in ends.
Info :
Work scap all around and adjust where shells bunch by altering the number of skipped stitches slightly. For a tighter scallop work shells every 3 sts; for wider shells increase spacing slightly.
— Final Finishing Touches :
Weaving in Ends :
Weave all yarn tails through multiple stitches on the underside of the runner so no ends are visible. Trim flush after weaving.
Blocking :
Gently block the assembled runner by pinning to desired dimensions and steaming or misting. Shape scallops and wreath circles while damp and allow to dry completely before use.
Info :
Hand wash or gently spot clean this runner; avoid machine washing due to appliques and 3D details. If required, lay flat to dry to preserve shape of quills and scallop edge.
You are about to finish a truly special table runner filled with tiny details and personality! Each hedgehog, leaf and berry adds texture and charm to a cozy centerpiece that will brighten any table. Take your time sewing and blocking — the careful finishing is what turns good crochet into beautiful handmade decor. 🧶✨ Enjoy the slow, satisfying process of seeing all parts come together and imagine the smiles this runner will bring to your home. Happy stitching! 🌿🍒