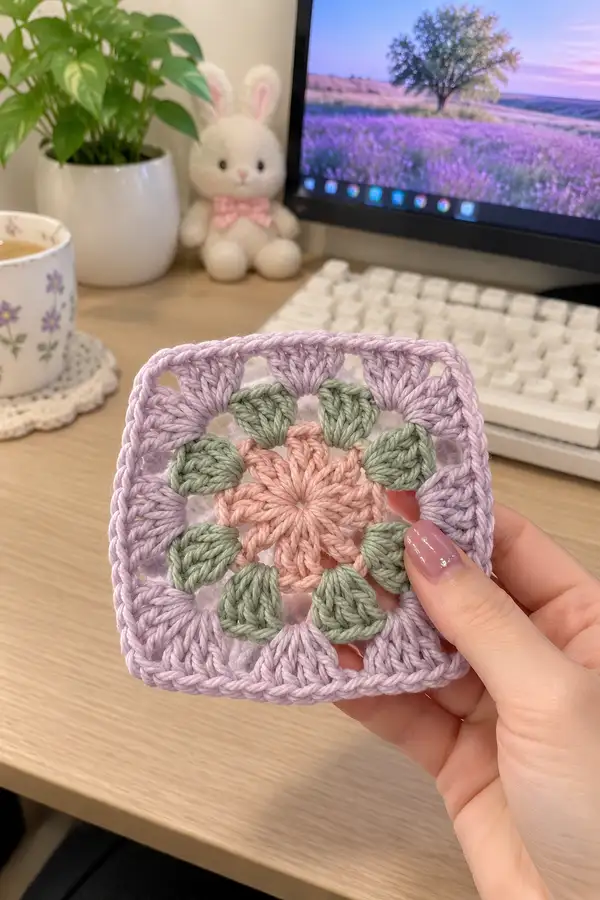
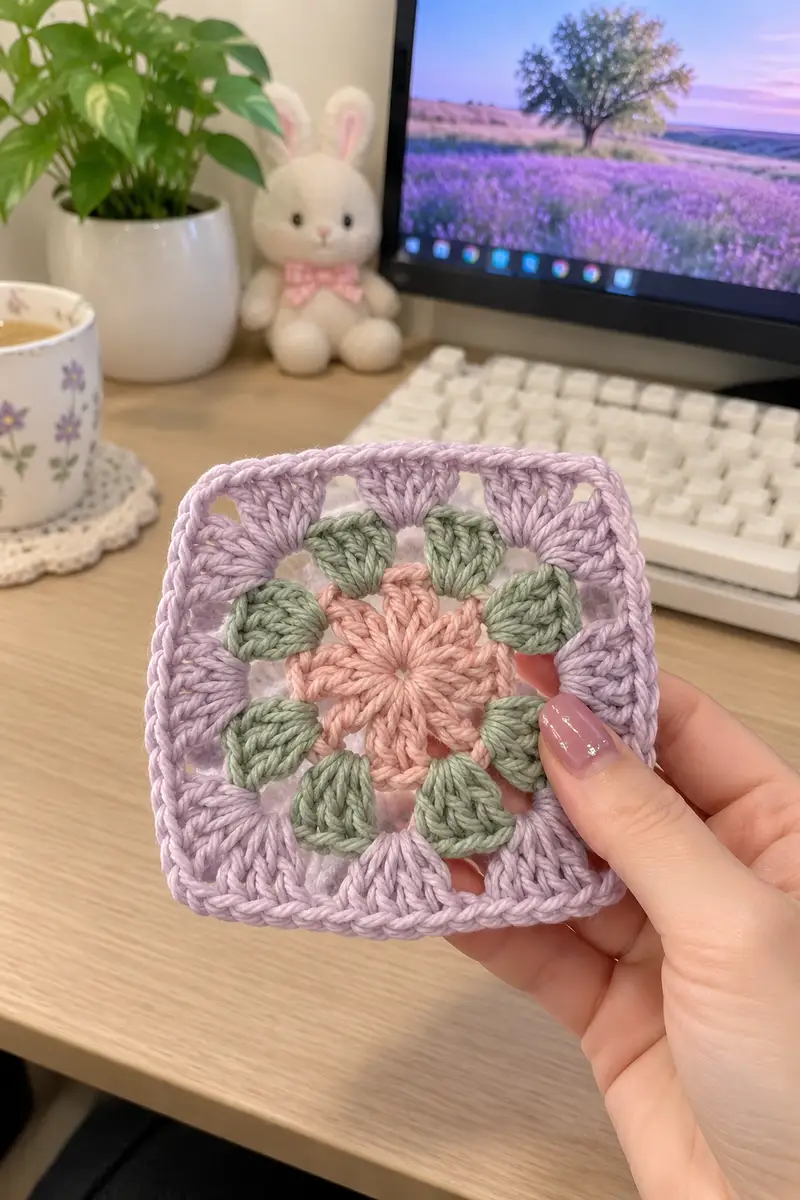
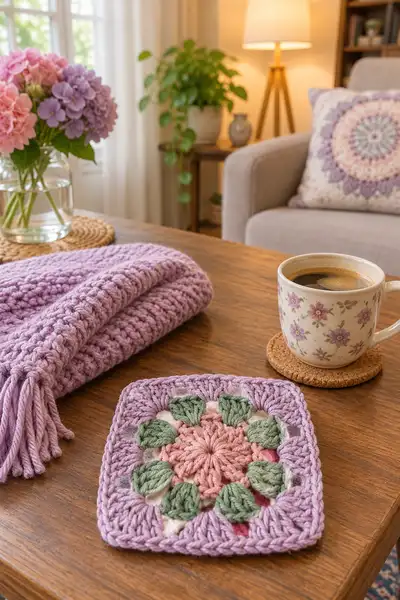
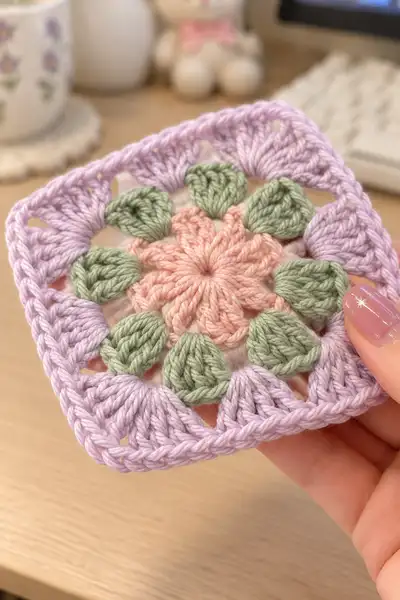
A gentle boho-inspired bedspread built from pretty pastel granny squares—soft lilac borders, dusty pink centers and sage green petal clusters create a romantic, cottagecore look. This pattern teaches a textured puff-and-cluster square, join-as-you-go assembly, and a decorative finishing border perfect for bed or throw size. Ideal for creating a coordinated set with pillows and a fringe edge, the design reads beautifully in muted, blended colors.
Progress Tracker
0% Complete
— Notes & Gauge :
Info :
This pattern is written for worsted weight (#4) yarn and a 4.0 mm hook. Gauge is not critical for motif shape but affects bedspread size—measure one completed square after blocking; it should measure approximately 15 cm (6") across. Adjust hook up or down to achieve that measurement if necessary.
Info :
Puff stitch instructions used here: Yarn over, insert hook, pull up a long loop, yarn over, insert hook, pull up loop (repeat until you have 7 loops on hook), yarn over and pull through all loops, ch1 to close puff. Each puff counts as 1 stitch.
— Motif (Make as many squares as required) :
Round 1 :
With dusty pink, mr, ch1, make 12 puff stitches into the magic ring, sl st to first puff to join (12 puff) (12)
Round 2 :
Ch1, *sc in next puff, ch3; rep from * around (sc12, ch3 spaces x12) (12 sc + 12 ch3 spaces)
Info :
Pull the magic ring tight before joining Round 2 so the center is closed and tidy. Place a stitch marker in the first sc of this round to mark the round start.
Round 3 :
Change to sage green. In each ch3 space work: (ch1, 3 dc cluster, ch1) — this creates 12 leaf clusters. Sl st to join. (12 leaf clusters = 36 dc + chain spaces) (36)
Round 4 :
Ch1, sc in each dc across each cluster (work 3 sc into each 3-dc cluster top) and sc into the sc from Round 2 between clusters — you will make 48 sc total (48)
Info :
This round flattens the cluster row and creates a base for the ring. Work evenly and use the stitch marker to keep track of the first sc.
Round 5 :
Change to cream/soft white. Ch4 (counts as dc+ch1), *skip next sc, dc in next sc, ch1; rep from * around, sl st to 3rd ch of starting ch4 to join. You will have 12 dc separated by ch1 spaces (12 dc + ch1 spaces)
Round 6 :
Ch1, sc in same sp, *ch3, sc in next ch1 sp; rep from * around (12 sc, 12 ch3 spaces) (12)
Info :
Round 6 defines the open ring that will become the interior space for the lilac corner construction. Keep spaces even—these ch3 spaces are where the corner clusters will sit later.
Round 7 :
Change to sage green. In each ch3 space: work 3 puff stitches separated by ch1: (puff, ch1, puff, ch1, puff) in the same space to form fuller leaf petals; sl st to join. This creates 12 grouped-puff sections (12 groups; 36 puff loops) (12)
Round 8 :
Ch1, sc in each puff around and sc between groups—total 48 sc (48)
Info :
At this point the motif has a defined round of petals with a stable ring—if you prefer less texture, you can omit Round 7 and move directly to the first square-forming round.
Round 9 :
Change to lilac. Ch3 (counts as dc), *3 dc in next space to start a corner cluster, ch2, 3 dc in same space (corner made), skip to next petal group and work 3 dc in the mid gap between petal groups; rep to make four corner clusters and side clusters between; sl st to top of starting ch3 to join. Structure will create four corner clusters and side clusters: 4 corners x (3+3=6 dc) = 24 dc for corners plus side clusters (variable) — total approx 48-60 dc depending on spacing (approx 56)
Info :
Round 9 starts to square-off the motif. The corners are made by working (3 dc, ch2, 3 dc) in the four equidistant ch spaces. Place markers at corners if you need to keep count while making many motifs.
Round 10 :
Ch1, sc in each dc and ch2, working (sc, ch2, sc) in each corner ch2 to keep corners open. This round evens out stitches and establishes a regular stitch count around—aim for 56 sc total after working the corner sc pairs. (56)
Info :
If you are making a large bedspread, make a sample of four joined squares to test how the corner spacing aligns before you make your full batch of motifs.
Round 11 :
Ch3, *dc in next 3 sts, (dc, ch2, dc) in corner sc into corner, dc in next 3 sts; rep from * around. This round builds a clean square look with 3-dc side shells and corner shells. Approx total = 56-64 dc depending on exact stitches available (approx 60)
Round 12 :
Ch1, sc in each st around working 3 sc into each corner (18 sc across each corner cluster), resulting in approximately 64 sc total (64)
Info :
After Round 12 the motif should lie flat and read as a clear square. Block your motif lightly with pins to square it if required. Repeat Motif rounds for the required number of squares for your bedspread layout.
— Single Motif Decorative Border (Optional) :
Round 13 :
With lilac, ch2 (counts as hdc), *hdc in next 4 sts, (ch1, skip 1) to create breathable texture; rep around. Aim for approx 64 hdc (64)
Round 14 :
Ch1, sc in each hdc, placing 3 sc in each corner to maintain square shape (approx 68 sc) (68)
Info :
Use BLO on this round if you want a defined ridge where the single-motif border meets the join-as-you-go later. Working BLO will create a slight raised seam that helps the squares sit together evenly.
Round 16 :
Ch3 (counts as dc), 1 dc in each st around, working (2 dc, ch2, 2 dc) in corner sts to form a pronounced corner. Approx total = 72 dc (72)
Info :
Fasten off or leave your yarn attached if you plan to join squares using a join-as-you-go (JAYG) method—see the JAYG section for step-by-step instructions starting at Round 25.
— Join-As-You-Go Method (JAYG) — Join squares while making the last round :
Info :
JAYG saves sewing time and produces a seamless look on the right side. The instructions assume you have completed motifs up to the base single-motif border and are working an attached final round to join to previously blocked motifs.
Round 17 :
With lilac (attached to a completed motif to be joined), ch3, *dc in next 3 sts, (dc, ch2, dc) in corner, dc in next 3 sts; rep until you reach a side that aligns with an already joined square. (Work alignment so corners match) (approx 60-72 dc depending on motif) (approx 68)
Round 18 :
When you reach a side that touches an already-placed square: instead of working the dc into your current motif, sl st into the corresponding st of the already-made motif to join, ch1, continue working dc as pattern prescribes. Repeat this join across each touching side. Continue around the square, joining as many sides as needed. (Number of joins will equal the number of touching edges at the time you work the round)
Info :
Work joins in the top of the dc or in the designated joining space—slip stitching into the opposite motif should be snug but not tight; keep tension even to avoid puckering.
Round 19 :
After joining sides, finish the round by closing with a sl st to the first dc. If you only joined one side, you will have remaining sides to join later as you place more squares; if you joined multiple sides the square should sit flat and locked in place. (st count varies)
Info :
When placing motifs on a bed, start in the center of the arrangement and work outwards. This makes it easier to keep the edges straight and to place the final partial squares at the edges of the bed.
Round 20 :
Continue adding motifs row by row using Round 17-19 to tack the new square into adjacent squares. If corners do not match perfectly, weave in a long tail and ease the corner into place with a few mattress stitches after assembly. (st count varies)
Info :
Tip for large spreads: make motifs in batches of 6-12 and join these sub-panels together later. It reduces handling large, heavy work and helps maintain straight rows while joining.
— Large Blanket Assembly Strategy :
Info :
Decide on your color layout: the sample bedspread in the photos shows a repeating pattern of motifs alternating center colors in a subtle grid. Plan the layout on a floor or design wall before final joining to avoid surprises.
Round 22 :
Make four-motif blocks first: join 2 motifs on one side using JAYG instructions (sl st joins across the side) so you create 2x2 blocks—this establishes consistent corner intersections later. Repeat until you have desired number of blocks (assembly repeats)
Round 23 :
After creating sub-blocks, join sub-blocks side to side and row to row using the same JAYG sl st method—ensure that corner ch2 spaces from the motif align with adjacent corner ch2 spaces to form neat intersections.
Info :
When you join many motifs, the bedspread will naturally gain weight and stretch; maintain light tension and pin rows flat before joining to keep edges square and consistent.
Round 24 :
Continue until the bedspread reaches your desired dimensions. For a full/queen bed, aim for approximately 7 x 8 to 9 x 10 motif layout depending on motif size—measure as you go. (final motif count varies by bed size)
Info :
Keep a notebook with the number of squares per row and per column to track your progress. This helps when making matching pillow covers or final borders to match motif counts.
— Outer Border & Edge Rounds (Make border for entire spread) :
Round 25 :
Once all motifs are joined, work an even round of sc around the whole blanket edge in lilac—work 3 sc in each corner junction (stich count depends on blanket perimeter) (approx perimeter sc variable)
Round 26 :
Ch2 (counts as hdc), hdc in each st around for a soft raised round. Work (hdc, ch1, hdc) in each corner to keep corners square. (st count = perimeter hdc approx)
Info :
Blocking large bedspreads is easiest when you can pin a portion at a time. If you have a large washing line or drying rack, pin the blanket squared and leave to dry fully; the blocking will settle joins and even the border.
Round 28 :
Ch3, *dc in next 5 sts, (2 dc, ch2, 2 dc) in corner; rep around. This creates a substantial outer round to frame the bedspread. (st count variable)
Round 29 :
Ch1, sc in each st around. If you prefer a scalloped edge, skip to Round 31 for shell edging. (st count variable)
Info :
If your bedspread perimeter is heavy and floppy, add an additional supportive round in hdc worked in FLO to add firmness without bulk.
Round 31 :
Optional scallop edge: Switch to a lighter lilac or accent color. *Skip 2 sts, 5 dc in next st (shell), skip 2 sts, sc in next st; rep around, ending with sc in last st. Work 3 sc in corner areas to maintain square shape. (st count variable)
Round 32 :
Final finishing round: Ch1, sc around the entire scallop round, placing 2 sc in the middle dc of each shell to stabilize. Fasten off and weave in ends. (st count variable)
Info :
Optionally add fringe: measure even lengths of yarn, fold and latch-hook into edge spaces every 2-3 shells for a boho fringe that mirrors the simple fringe shown in the photos.
— Matching Pillow Cover (One pillow front) :
Round 33 :
Create one large central motif for a 40x40 cm pillow or join four motifs as a 2x2 square for larger pillows. Follow Motif Rounds 1-12 and optional single motif border Rounds 13-16. (st counts as above)
Round 34 :
For a 2x2 pillow front, join motifs using JAYG method described in Rounds 17-19 so the seams sit flush. Fasten off and weave ends. Make a plain back panel in solid lilac using 12mm chunky crochet or 8 mm hook ribbed pattern for contrast (instructions below). (st count variable)
Round 35 :
Back panel (ribbed): Using lilac and 4.0 mm hook, ch42 (or width equal to front), Row1: sc in 2nd ch from hook and across; Rows 2-18: ch1, sc BLO across to create ridged texture; fasten off. This slip-over/back panel can be sewn on or attached with buttons for removable covers. (st counts depend on pillow size)
Info :
Sew pillow front to back leaving an opening for an insert; use ladder stitch for an invisible seam and stuff with a plump pillow insert or fiberfill for a soft, cozy cushion matching the bedspread.
— Fringe & Tassel Finishing (Optional) :
Round 36 :
Cut 20 cm lengths of lilac yarn; for a bedspread of 8x9 motifs you will need approx 120-200 tassels depending on fringe density. Fold yarn in half, pull loop through edge space and pull tails through loop to secure. Trim evenly. (tassel count variable)
Info :
For a softer fringe, lightly comb tassels with fingers or a soft brush and then trim evenly. Tie two small overhand knots at the binding point of each tassel for extra security if the bedspread will be washed frequently.
— Blocking & Care :
Info :
Gently machine wash on delicate cycle or hand wash in cool water with mild detergent. Reshape and pin to blocking mat while damp; air dry flat. Avoid high heat in the dryer to maintain yarn color and shape.
Round 38 :
Check joins after blocking and re-tighten any loose join stitches. Re-weave ends that may have loosened during blocking.
— Alternate Finishes & Texture Variations :
Info :
If you prefer a denser fabric, work the motif again in a hook one size smaller; conversely use a larger hook for a softer drape. Alternate the lilac border rounds to include a popped rib by working hdc in FLO for one round and then sc in BLO for the next to create ridged texture.
Round 40 :
Edge reinforcement: if blanket will be used heavily, fold final border in half lengthwise and surface-stitch through both layers to create a reinforced hem. This will use extra yarn but gives structure. (no stitch count)
— Troubleshooting & Tips (frequent Info sections) :
Info :
If you are missing a stitch at the corner while joining, undo to the last correct corner and re-align both motifs. Small misalignments can be eased using mattress stitch while finishing.
Info :
To keep the color transitions smooth, cut yarn and weave in ends after finishing each contrasting color round if you dislike carrying yarn. Alternatively, carry the yarn inside the ring if you plan to reuse colors within 2-3 rounds.
Info :
Label bags of motif colors to avoid mix-ups if making many squares—this helps preserve the intended grid layout and color rhythm across the bedspread.
— Full Step-By-Step Example (Complete single motif expanded into many micro-rounds for clarity) :
Round 44 :
Start detailed micro-steps for the puff center: mr, ch1, yarn over twice, insert hook into ring, pull up long loop, yarn over, insert hook into ring, pull up long loop, yarn over, insert hook into ring, pull up long loop (you now have 7 loops on hook), yarn over, pull through all loops, ch1 to close puff. Repeat 12 times. (12 puffs)
Round 45 :
Sl st to join last puff to first puff, ch1, sc into each puff; after each sc chain 3 to create a helper space—this yields sc12 + ch3 spaces x12 (12 sc + 12 ch3)
Info :
Check the center at this point—if gaps are visible between puffs, pull the puffs inward slightly by pulling on the central yarn tail and re-tighten the magic ring for a tidy finish.
Round 47 :
Change color to green. Work in each ch3 sp: ch1, dc, dc, dc (3 dc cluster), ch1 and sl st to next sc to anchor—repeat 12 times. (12 clusters = 36 dc)
Round 48 :
Ch1, sc across each cluster top: work 3 sc over each 3-dc cluster and 1 sc into each sc from the previous round—you will create 48 sc total. (48)
Info :
To make the green leaves more three-dimensional, you can work Round 47 using 3 puff stitches instead of dc clusters—this will increase texture and pop on the finished motif.
Round 50 :
Change to cream. Ch4 (counts as dc+ch1), *skip next sc, dc into next sc, ch1; rep around ending with sl st to third ch of starting ch4—this creates 12 evenly spaced dc points forming the base for corner shells. (12 dc + ch1 spaces)
Round 51 :
Ch1, sc into each dc and chain space, placing (sc, ch2, sc) into each corner ch1 space to mark corners—resulting in 48 sc + 4 corner ch2 spaces (48)
Round 52 :
Change to lilac. Ch3, 3 dc into the next sc, dc into each of the next 3 sc, (3 dc, ch2, 3 dc) in the corner ch2 space, dc in each of the next 3 sc; rep to form four corner shells and side shells. Approx total 64 dc. (64)
Round 53 :
Ch1, sc in each st around placing 3 sc in each corner cluster (64 sc)
Info :
Check square flatness: slight cupping means your tension is too tight—loosen up a half size hook for subsequent motifs to match. Slight ruffling means your tension is too loose—switch to a smaller hook for next motifs.
Round 55 :
Optional border micro-steps: Ch2, hdc in each st around working (hdc, ch1, hdc) in each corner. This gives a subtle texture and neat finish. (approx 68 hdc)
Info :
When making many motifs, keep the working yarn tails long (approx 20 cm) for easier weaving during joining if you prefer to sew squares rather than JAYG.
— Sewn Join Option (Alternative to JAYG) :
Round 57 :
Block all motifs and lay them flat in planned layout. Using a yarn needle and matching yarn, whip stitch through the back loops of adjacent motifs aligning the corners. For a stable join use three small mattress stitches every 1 cm along the seam. (no numerical stitch count)
Info :
Sewn joins create a softer, more pliable seam on the wrong side; JAYG creates a more integrated right-side finish. Choose based on your aesthetic preference.
— Final Large Border (Detailed Micro Rounds) :
Round 59 :
With lilac, work one round of sc around the entire blanket, placing 3 sc in each corner junction. This evens the perimeter before the decorative rounds. (perimeter sc variable)
Round 60 :
Ch2, hdc in each sc around to add body. In corner triple the stitch to preserve square alignment. (perimeter hdc variable)
Round 61 :
Ch3, *dc in next 6 sts, (2 dc, ch2, 2 dc) in corner; rep around. This adds a framed look and builds a base for the shell edge. (perimeter dc variable)
Round 62 :
Ch1, sc around to tidy, then fasten off. (perimeter sc variable)
Round 63 :
Optional shell scallop: Attach accent color and *skip 2 sts, 7 dc in next st, skip 2 sts, sc in next st; rep around. Finish with a slim sc round to secure shells. (perimeter scallops variable)
Info :
Work shells evenly across large edges; you may need to add or skip a few stitches at the start of each side to keep shells aligned—adjust by adding 1-2 sc where needed and keep symmetry in mind.
— Careful Count & Quality Check Rounds :
Info :
Before final finishing, inspect joins, weave in any loose tails, check corners for gaps, and ensure the border lies flat. Re-stitch any loose areas with small, secure stitches.
Round 65 :
Final weave-in: Using a yarn needle, weave each remaining tail back through at least 5 cm of stitches and trim close. This secures endings and prevents unravelling during washing. (no count)
Info :
For longevity, line-dry the spread and avoid prolonged exposure to direct sunlight which can fade pastel colors. Store folded inside breathable cotton when not in use.
— Pattern Variations (Creative Ideas) :
Info :
Make a gradient bedspread by changing the center color every two rows of motifs; or add metallic accent yarn in the final border round for a subtle shimmer. Try thicker yarn on the final border for a chunky trim look.
Info :
Create pillow shams using a single motif centered, surrounded by a 3-round lilac border and quilted backing for a luxe look. This pattern is intentionally modular so you can mix sizes easily.
— Measurements & Motif Count Examples :
Round 69 :
Example counts (approximate): Motif size after blocking ~15 cm. For different bed sizes: Twin 6x8 motifs (48 motifs), Full 7x8 motifs (56 motifs), Queen 8x9 motifs (72 motifs), King 9x10 motifs (90 motifs). Adjust to taste. (counts approximate)
Info :
These are guidelines; measure your motifs and desired drape and calculate precise motif counts before making a huge yarn commitment.
— Final Encouragement & Pattern Summary :
Info :
This pattern is deliberately descriptive and modular—take your time, make sample blocks, and enjoy customizing the colors and finish. The boho charm comes from texture and soft color mixing—trust the process and have fun making your cozy sanctuary.
Completing this Soft Boho Charm bedspread is such a rewarding project—each square is like a tiny handmade tile in a pastel mosaic. You'll love the tactile puff petals, the delicate sage leaves and the cozy lilac border that ties everything together. Make it for a bedroom or a gift to warm someone's home—it's comforting, pretty, and made with care. 🧶✨ Happy stitching and enjoy creating your soft boho sanctuary! 🌿