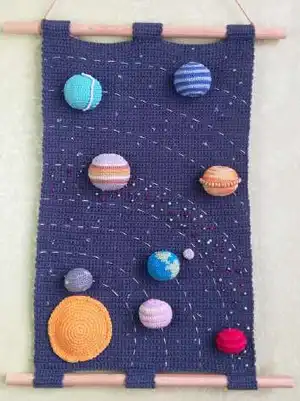
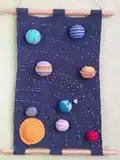
Create a charming solar system wall hanging featuring crocheted planets and a textured background. This pattern guides you step-by-step through crocheting the base panel and each planet, including hemispheres, color changes, and finishing touches. Perfect for gifting or decorating a child’s room, the finished piece is full of handmade character and tactile detail. You will learn easy amigurumi techniques and decorative assembly as you stitch.
Progress Tracker
0% Complete
— The base :
Info :
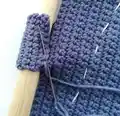
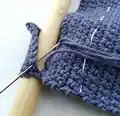
Work in back and forth rows with a 3.0 mm crochet hook. Begin each row with a turning chain.
Round 1 :
Chain 65, start working in the 3rd chain from hook: 1. 63 sc, turn (63)
Round 2-107 :
1 t-ch, 63 sc, turn (63)
Info :
The finished wall hanging using the materials stated in this pattern is 28*42 cm. (The width and size could be different due to the different crochet density.)
Info :
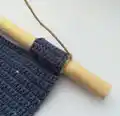
To attach the crocheted piece to your branch/wooden stick, you will need to crochet the loops. We need to make three loops from above, below, in the center, and on the edges.
Round 1 (loops) :
If you use the wooden stick of a similar diameter, then work as follows: 1. 9 sc, turn (9)
Round 2-11 (loops) :
1 t-ch, 9 sc, turn (9)
Info :
Leave a long yarn tail for sewing. If you use the branch of a different diameter, then make the required number of rows. Try on if needed. Do not sew now. Complete assembling the base.
— Earth :
Info :
For each planet, you need to crochet two parts - a circle and a hemisphere. Crochet in continuous spirals without a turning chain. Use a 1.5 mm.
Round 1 :
8 sc into MR (8)
Round 3 :
(1 sc, inc)*8 (24)
Round 4 :
(3 sc, inc)*6 (30)
Round 5 :
(2 sc, inc, 2 sc)*6 (36)
Round 6 :
(5 sc, inc)*6 (42)
Round 7 :
(3 sc, inc, 3 sc)*6 (48)
Info :
Leave a long tail for sewing.
Info :
Work the hemisphere in back and forth rows. Begin each row with a turning chain. See how to change colors on page 5. Carry all yarns on the wrong side. Begin with white color yarn.
Round 1 (hemisphere) :
4 sc into MR, pull the ring and turn (4)
Round 2 (hemisphere) :
1 t-ch, inc*4, turn (8)
Round 3 (hemisphere) :
White color: 1 t-ch, (1 sc, inc)*2 Light blue color: (1 sc, inc)*2, turn (12)
Round 4 (hemisphere) :
1 t-ch, (3 sc, inc)*3, turn (15)
Round 5 (hemisphere) :
1 t-ch, (2 sc, inc, 2 sc)*3, turn (18)
Round 6 (hemisphere) :
Light blue color: 1 t-ch, 5 sc, hold yarn BEHIND the work, Green color: 1 inc, hold the yarn BEHIND the work, Light blue color: (5 sc, inc)*2, turn (21)
Round 7 (hemisphere) :
Light blue color: 1 t-ch, (3 sc, inc, 3 sc)*2, 1 sc, hold yarn IN FRONT OF work, Green color: 1 sc, inc, hold yarn IN FRONT OF work, Light blue color: 4 sc, turn (24)
Round 8 (hemisphere) :
Light blue color: 1 t-ch, 4 sc, hold yarn BEHIND the work, Green color: 4 sc, hold yarn BEHIND the work, Light blue color: 16 sc, turn (24)
Round 9 (hemisphere) :
Light blue color: 1 t-ch, 16 sc, hold yarn IN FRONT OF work, Green color: 4 sc, hold yarn IN FRONT OF work, Light blue color: 4 sc, turn (24)
Round 10 (hemisphere) :
Light blue color: 1 T-CH, 3 sc, hold yarn BEHIND work, Green color: 5 sc, hold yarn BEHIND work, Light blue color: 16 sc, turn (24)
Round 11 (hemisphere) :
Light blue color: 1 T-CH, 15 sc, hold yarn IN FRONT OF work, Green color: 6 sc, hold yarn IN FRONT OF work, Light blue color: 3 sc, turn (24)
Round 12 (hemisphere) :
Light blue color: 1 T-CH, 3 sc, hold yarn BEHIND work, Green color: 8 sc, hold yarn BEHIND work, Light blue color: 13 sc, turn (24)
Round 13 (hemisphere) :
Light blue color: 1 T-CH, 13 sc, hold yarn IN FRONT OF work, Green color: 8 sc, hold yarn IN FRONT OF work, Light blue color: 3 sc, turn (24)
Round 14 (hemisphere) :
Light blue color: 1 T-CH, 4 sc, hold yarn BEHIND work, Green color: 5 sc, hold yarn BEHIND work, Light blue color: 15 sc, turn (24)
Round 15 (hemisphere) :
Light blue color: 1 T-CH, 13 sc, hold yarn IN FRONT OF work, Green color: 2 sc, hold yarn IN FRONT OF work, Light blue color: 2 sc, hold yarn IN FRONT OF work, Green color: 3 sc, hold yarn IN FRONT OF work, Light blue color: 4 sc, turn (24)
Round 16 (hemisphere) :
Light blue color: 1 T-CH, 6 sc, dec, 2 sc, hold yarn BEHIND work, Green color: 3 sc, hold yarn BEHIND work, Light blue color: 1 sc, dec, 6 sc, dec, turn (21)
Round 17 (hemisphere) :
Light blue color: 1 T-CH, 3 sc, dec, 3 sc, hold yarn IN FRONT OF work, Green color: 5 sc, hold yarn IN FRONT OF work, Light blue color: 1 sc, dec, 2 sc, dec, 1 sc, turn (18)
Round 18 (hemisphere) :
Light blue color: 1 T-CH, 4 sc, hold yarn BEHIND work, Green color: 1 sc, dec, 4 sc, dec, 1 sc, hold yarn BEHIND work, Light blue color: 2 sc, dec, turn (15)
Round 19 (hemisphere) :
Green color: 1 T-CH, sc, hold yarn IN FRONT OF work, Light blue color: 1 sc, hold yarn IN FRONT OF work, Green color: dec, 2 sc, dec, 3 sc, hold yarn IN FRONT OF work, Light blue color: dec, 2 sc, turn (12)
Round 20 (hemisphere) :
Light blue color: 1 T-CH, 2 sc, hold yarn BEHIND work, Green color: dec, (1 sc, dec)*2, dec, turn (8)
Round 21 (hemisphere) :
1 t-ch, dec*4 (4)
Round 22 (hemisphere) :
sc 4 cluster (pull loops). Break yarn, and secure the tail.
Info :
Put some stuffing material in the hemisphere. Sew the parts to each other. Glue / sew Velcro (I glued the soft half, and I will glue the sharp half to the base).
— Mercury :
Info :
The smallest and closest planet to the Sun. Use gray yarn, crochet hook 1.5 mm.
Round 1 :
8 sc into a MR (8)
Round 3 :
(1 sc, inc)*8 (24)
Round 4 :
(3 sc, inc)*6 (30)
Round 5 :
(2 sc, inc, 2 sc)*6 (36)
Info :
Cut yarn. Leave a long tail for sewing.
Round 1 (hemisphere) :
4 sc into a MR, turn (4)
Round 2 (hemisphere) :
1 t-ch, inc*4, turn (8)
Round 3 (hemisphere) :
1 t-ch, (1 sc, inc)*4, turn (12)
Round 4 (hemisphere) :
1 t-ch, (3 sc, inc)*3, turn (15)
Round 5 (hemisphere) :
1 t-ch, (2 sc, inc, 2 sc)*3, turn (18)
Round 6-11 (hemisphere) :
6 rows: 1 t-ch, 18 sc, turn (18)
Round 12 (hemisphere) :
1 t-ch, (4 sc, dec)*3, turn (15)
Round 13 (hemisphere) :
1 t-ch, (1 sc, dec, 2 sc)*3, turn (12)
Round 14 (hemisphere) :
1 t-ch, (dec, 1 sc)*4, turn (8)
Round 15 (hemisphere) :
1 t-ch, dec*4, turn (4)
Round 16 (hemisphere) :
sc 4 cluster (pull the loops). Cut off the yarn and secure it.
Info :
Sew the Velcro to the circle. Stuff with fiberfill. Sew the parts together. Embroider the stars with white thread.
— Venus :
Round 1 :
8 sc into a MR (8)
Round 3 :
(1 sc, inc)*8 (24)
Round 4 :
(3 sc, inc)*6 (30)
Round 5 :
(2 sc, inc, 2 sc)*6 (36)
Round 6 :
(5 sc, inc)*6 (42)
Round 7 :
(3 sc, inc, 3 sc)*6 (48)
Info :
Cut yarn. Leave a long tail for sewing.
Round 1 (hemisphere) :
4 sc into a MR, turn (4)
Round 2 (hemisphere) :
1 t-ch, inc*4, turn (8)
Round 3 (hemisphere) :
1 t-ch, (1 sc, inc)*4, turn (12)
Round 4 (hemisphere) :
1 t-ch, (3 sc, inc)*3, turn (15)
Round 5 (hemisphere) :
1 t-ch, (2 sc, inc, 2 sc)*3, turn (18)
Round 6 (hemisphere) :
1 t-ch, (5 sc, inc)*3, turn (21)
Round 7 (hemisphere) :
1 t-ch, (3 sc, inc, 3 sc)*3, turn (24)
Round 8-15 (hemisphere) :
8 rows: 1 t-ch, 24 sc, turn (24)
Round 16 (hemisphere) :
1 t-ch, (6 sc, dec)*3, turn (21)
Round 17 (hemisphere) :
1 t-ch, (2 sc, dec, 3 sc)*3, turn (18)
Round 18 (hemisphere) :
1 t-ch, (4 sc, dec)*3, turn (15)
Round 19 (hemisphere) :
1 t-ch, (1 sc, dec, 2 sc)*3, turn (12)
Round 20 (hemisphere) :
1 t-ch, (dec, 1 sc)*4, turn (8)
Round 21 (hemisphere) :
1 t-ch, dec*4, turn (4)
Round 22 (hemisphere) :
sc 4 cluster (pull the loops). Cut off the yarn and secure. Sew the velcro to the circle. Stuff with fiberfill. Sew the parts together.
— Mars :
Info :
The "red" planet contains a lot of iron. Circle. Work in continuous spirals:
Round 1 :
8 sc into a MR (8)
Round 3 :
(1 sc, inc)*8 (24)
Round 4 :
(3 sc, inc)*6 (30)
Round 5 :
(2 sc, inc, 2 sc)*6 (36)
Round 6 :
(5 sc, inc)*6 (42)
Info :
Cut yarn. Leave a long tail for sewing.
Round 1 (hemisphere) :
4 sc into a MR, turn (4)
Round 2 (hemisphere) :
1 t-ch, inc*4, turn (8)
Round 3 (hemisphere) :
1 t-ch, (1 sc, inc)*4, turn (12)
Round 4 (hemisphere) :
1 t-ch, (3 sc, inc)*3, turn (15)
Round 5 (hemisphere) :
1 t-ch, (2 sc, inc, 2 sc)*3, turn (18)
Round 6 (hemisphere) :
1 t-ch, (5 sc, inc)*3, turn (21)
Round 7-13 (hemisphere) :
7 rows: 1 t-ch, 21 sc, turn (21)
Round 14 (hemisphere) :
1 t-ch, (2 sc, dec, 3 sc)*3, turn (18)
Round 15 (hemisphere) :
1 t-ch, (4 sc, dec)*3, turn (15)
Round 16 (hemisphere) :
1 t-ch, (1 sc, dec, 2 sc)*3, turn (12)
Round 17 (hemisphere) :
1 t-ch, (dec, 1 sc)*4, turn (8)
Round 18 (hemisphere) :
1 t-ch, dec*4, turn (4)
Round 19 (hemisphere) :
sc 4 cluster (pull the loops). Cut off the yarn and secure it. Sew the velcro to the circle. Stuff with fiberfill. Sew the parts together.
— Jupiter :
Info :
Jupiter is the largest planet in the solar system. Circle. Work in continuous spirals:
Round 1 :
8 sc into a MR (8)
Round 3 :
(1 sc, inc)*8 (24)
Round 4 :
(3 sc, inc)*6 (30)
Round 5 :
(2 sc, inc, 2 sc)*6 (36)
Round 6 :
(5 sc, inc)*6 (42)
Round 7 :
(3 sc, inc, 3 sc)*6 (48)
Round 8 :
(7 sc, inc)*6 (54)
Round 9 :
(4 sc, inc, 4 sc)*6 (60)
Info :
Cut yarn. Leave a long tail for sewing.
Info :
For crocheting a hemisphere, I used gray, brown, white and yellow yarn. Work in back and forth rows.
Round 1 (hemisphere) :
4 sc into a MR, turn (4)
Round 2 (hemisphere) :
1 t-ch, inc*4, turn (8)
Round 3 (hemisphere) :
1 t-ch, (1 sc, inc)*4, turn (12)
Round 4 (hemisphere) :
1 t-ch, (3 sc, inc)*3, turn (15)
Round 5 (hemisphere) :
1 t-ch, (2 sc, inc, 2 sc)*3, turn (18)
Round 6 (hemisphere) :
1 t-ch, (5 sc, inc)*3, turn (21)
Round 7 (hemisphere) :
1 t-ch, (3 sc, inc, 3 sc)*3, turn (24)
Round 8 (hemisphere) :
1 t-ch, (7 sc, inc)*3, turn (27)
Round 9 (hemisphere) :
White color: 1 t-ch, (4 sc, inc, 4 sc)*3, turn (30)
Round 10-11 (hemisphere) :
Brown color: 1 t-ch, 30 sc, turn (30)
Round 12-14 (hemisphere) :
Yellow color: 1 t-ch, 30 sc, turn (30)
Round 15 (hemisphere) :
Gray color: 1 t-ch, 30 sc, turn (30)
Round 16 (hemisphere) :
White color: 1 t-ch, 30 sc, turn (30)
Round 17 (hemisphere) :
Yellow color: 1 t-ch, 30 sc, turn (30)
Round 18-19 (hemisphere) :
Brown color: 1 t-ch, 30 sc, turn (30)
Round 20 (hemisphere) :
Brown color: 1 t-ch, (4 sc, dec, 4 sc)*3, turn (27)
Round 21 (hemisphere) :
Gray color: 1 t-ch, (7 sc, dec)*3, turn (24)
Round 22 (hemisphere) :
1 t-ch, (6 sc, dec)*3, turn (21)
Round 23 (hemisphere) :
1 t-ch, (2 sc, dec, 3 sc)*3, turn (18)
Round 24 (hemisphere) :
1 t-ch, (4 sc, dec)*3, turn (15)
Round 25 (hemisphere) :
1 t-ch, (1 sc, dec, 2 sc)*3, turn (12)
Round 26 (hemisphere) :
1 t-ch, (dec, 1 sc)*4, turn (8)
Round 27 (hemisphere) :
1 t-ch, dec*4, turn (4)
Round 28 (hemisphere) :
sc 4 cluster (pull the loops). Cut off the yarn and secure. Sew the velcro to the circle. Stuff with fiberfill. Sew the parts together.
— Neptune, Uranus, Saturn :
Info :
Neptune is the farthest from the Sun. Uranus is shrouded in icy clouds. Saturn is known for its rings. I crocheted these three giant planets according to one description. Also for the rings of Uranus and Saturn you will need beads.
Round 1 :
8 sc into a MR (8)
Round 3 :
(1 sc, inc)*8 (24)
Round 4 :
(3 sc, inc)*6 (30)
Round 5 :
(2 sc, inc, 2 sc)*6 (36)
Round 6 :
(5 sc, inc)*6 (42)
Round 7 :
(3 sc, inc, 3 sc)*6 (48)
Round 8 :
(7 sc, inc)*6 (54)
Info :
Cut yarn. Leave a long tail for sewing.
Info :
Work the hemisphere in back and forth rows.
Round 1 (hemisphere) :
4 sc into a MR, turn (4)
Round 2 (hemisphere) :
1 t-ch, inc*4, turn (8)
Round 3 (hemisphere) :
1 t-ch, (1 sc, inc)*4, turn (12)
Round 4 (hemisphere) :
1 t-ch, (3 sc, inc)*3, turn (15)
Round 5 (hemisphere) :
1 t-ch, (2 sc, inc, 2 sc)*3, turn (18)
Round 6 (hemisphere) :
1 t-ch, (5 sc, inc)*3, turn (21)
Round 7 (hemisphere) :
1 t-ch, (3 sc, inc, 3 sc)*3, turn (24)
Round 8 (hemisphere) :
1 t-ch, (7 sc, inc)*3, turn (27)
Round 9-17 (hemisphere) :
1 t-ch, 27 sc, turn (27)
Round 18 (hemisphere) :
1 t-ch, (7 sc, dec)*3, turn (24)
Round 19 (hemisphere) :
1 t-ch, (6 sc, dec)*3, turn (21)
Round 20 (hemisphere) :
1 t-ch, (2 sc, dec, 3 sc)*3, turn (18)
Round 21 (hemisphere) :
1 t-ch, (4 sc, dec)*3, turn (15)
Round 22 (hemisphere) :
1 t-ch, (1 sc, dec, 2 sc)*3, turn (12)
Round 23 (hemisphere) :
1 t-ch, (dec, 1 sc)*4, turn (8)
Round 24 (hemisphere) :
1 t-ch, dec*4, turn (4)
Round 25 (hemisphere) :
sc 4 cluster (pull the loops). Cut off the yarn and secure. Sew the velcro to the circle. Stuff with fiberfill. Sew the parts together.
Info :
Put the bead onto the mono-thread using the beading needle (I used light shades beads). Sew the ring to Uranus vertically. For Saturn, I used the beads of a suitable shade and sewed them horizontally.
— Moon :
Info :
The Moon is the only natural satellite of the earth. Use gray yarn and 1.5 mm crochet hook.
Round 1 :
8 sc into a MR (8)
Info :
Cut yarn. Leave a long tail for sewing.
This Solar System wall hanging makes a whimsical, educational decor piece that brightens any room and sparks imagination. The set of crocheted planets is tactile, colorful, and detachable for play or display. Finished with beaded rings and Velcro-fastened planets, it is both decorative and interactive. 🌟🪐🧶