🧢 Beautiful ✨ Detailed πŸ’ Adorable

Spiderman Amigurumi Pattern

Spiderman Amigurumi Pattern
4.2β˜… Rating
5-7 Hours Time Needed
1.3K Made This
βœ‚οΈ

Intermediate Level

Ideal for those with basic crochet experience, featuring slightly more advanced stitches and techniques to expand your skills.

⏱️

Weekend Treat

Takes 5-7 hours, making it an enjoyable project to finish over a couple of days.

🧸

Cute Companion

An adorable friend to cherish, handcrafted with love to bring comfort and joy for years to come.

About This Spiderman Amigurumi Pattern

This pattern creates a soft, chunky Spiderman amigurumi approximately 10 inches tall, written for the Peter Parker colorway with notes to adapt to the Miles Morales version. It uses Premier Parfait Chunky yarn and simple single crochet shaping to build the head, body, arms and legs. The pattern includes step-by-step rounds, color-change guidance, and finishing instructions for eyes and the chest spider detail. Clear assembly directions make sewing the pieces together straightforward for a polished finish.

Spiderman Amigurumi Pattern crochet pattern - detailed view of completed project

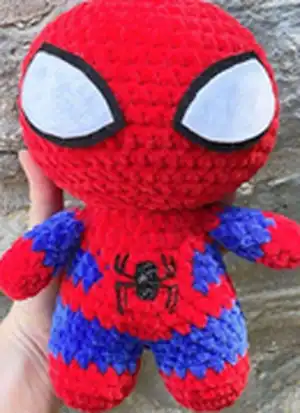
You will work in continuous rounds with simple increases and decreases to shape each piece. The pattern also explains how to make felt eyes and use puffy paint or felt for the spider emblem.

Why You'll Love This Spiderman Amigurumi Pattern

I absolutely love this pattern because it transforms soft, chunky yarn into a huggable, characterful plush that crochets up quickly. I enjoy how the color-change rounds add playful stripes and give the finished piece a bold superhero look. The pattern is satisfying to assemble β€” sewing the head, body, and limbs together gives a real sense of accomplishment. I also love that it includes simple options to adapt between the Peter Parker and Miles Morales versions so you can make two very different characters from the same instructions.

Spiderman Amigurumi Pattern step 1 - construction progress Spiderman Amigurumi Pattern step 2 - assembly progress Spiderman Amigurumi Pattern step 3 - details and accessories Spiderman Amigurumi Pattern step 4 - final assembly and finishing

Switch Things Up

I love experimenting with different yarn colors to make your own unique hero β€” try pastels for a softer look or neon shades for a bold, modern twist.

If you want a bigger or smaller plush, change your yarn weight and hook size; bulky yarn with a larger hook creates a chunkier toy, while lighter yarn makes a smaller collectible.

I often swap the felt eye shapes for embroidered eyes to give a different handcrafted feel; you can embroider outlines or add small stitched highlights for personality.

Try adding wire in the arms if you want posability β€” I sometimes insert thin craft wire for adjustable posing, making sure to wrap and secure it safely inside the stuffing.

For the spider emblem, use contrasting yarn and embroider it instead of puffy paint for a textured, durable finish that will hold up to play.

I sometimes make little removable accessories like tiny masks, capes, or scarves to give the plush extra character and play value.

Mix and match yarn textures β€” a fuzzy yarn for the body with smooth yarn for the details gives a fun contrast and highlights features like the eyes and spider logo.

Swap the eye colors and outer felt to create themed variants β€” for example, try gold eyes and a white outline for a superhero mashup or fan tribute.

I also recommend experimenting with facial placement β€” moving the eyes slightly up or down changes the expression from cute to mischievous, so position them and check before gluing.

Finally, I like to personalize each plush with a small sewn-in tag or embroidered initial on the bottom so it becomes a truly special handmade gift.

Common Mistakes & How to Fix Them

βœ— Skipping the long tail on the body before sewing can make attachment difficult; leave and preserve the long tail to sew the head on securely. βœ— Not stuffing as you go causes lumps or flat spots in shaping; begin stuffing early and continue to stuff well as you work for smooth curves. βœ— Forgetting to change colors exactly where directed produces uneven stripes; follow the color-change rounds closely and carry or fasten off yarn as instructed. βœ— Overstuffing the head or limbs makes seams bulge and distorts shaping; stuff firmly but in small increments to maintain the intended silhouette. βœ— Not fastening off or leaving a long tail on the first leg can complicate assembly; fasten off on the first leg only and continue on the second leg as instructed to join the body seamlessly.

Spiderman Amigurumi Pattern

Create a charming Spiderman plush with this detailed crochet pattern designed for a soft, chunky finish. You'll make a 10-inch amigurumi with clear instructions for head, arms, legs, body, and facial details. The pattern includes color-change notes for both the Peter Parker and Miles Morales versions. Perfect for gifting or keeping as a cuddly collectible, this pattern walks you through assembly and finishing touches.

Intermediate 5-7 Hours

Materials Needed for Spiderman Amigurumi Pattern

β€” Main Fabric

  • 01
    Premier Parfait Chunky yarn (brand as listed) - Peter Parker: Red (Poppy) & Blue (Classic Blue)
  • 02
    Premier Parfait Chunky yarn (brand as listed) - Miles Morales: Black & Red (Poppy)
  • 03
    Felt for eyes - Peter Parker: Black & White; Miles Morales: Red & White
  • 04
    Puffy paint for spider - Peter Parker: Black, Miles Morales: Red

β€” Tools Required

  • 01
    Crochet hook size 4.5 mm
  • 02
    Stuffing (polyester fiberfill)
  • 03
    Yarn needle
  • 04
    Scissors
  • 05
    Stitch marker
  • 06
    Felt for eyes
  • 07
    Puffy paint for spider (or felt and glue if preferred)

Progress Tracker

0% Complete

β€” Head :

Info :

Using red.

Round 1 :

8 sc in MR (8)

Round 2 :

inc x 8 (16)

Round 3 :

*sc,inc* x8 (24)

Round 4 :

*3sc, inc* x6 (30)

Round 5 :

*2sc, inc, 2sc* x6 (36)

Round 6 :

*5sc, inc* x6 (42)

Round 7 :

*3sc, inc, 3sc* x6 (48)

Round 8-14 :

sc around (48), 7 total rounds.

Round 15 :

*3sc, dec, 3sc* x6 (42)

Round 16 :

*5sc, dec* x6 (36)

Round 17 :

*2sc, dec, 2sc* x6 (30)

Info :

Begin stuffing, and continue to stuff well as you work.

Round 18 :

*3sc, dec* x6 (24)

Round 19 :

*sc, dec* x8 (16)

Round 20 :

dec x6 (6)

Info :

Fasten off and sew closed.

Info :

Use black to make the head if making miles morales.

β€” Arms (make 2) :

Info :

Starting with red.

Round 1 :

8 sc in a MR (8)

Round 2-4 :

sc around (8), 3 total rounds.

Info :

Change to blue.

Round 5-8 :

sc around (8), 4 total rounds.

Info :

Change to red.

Round 9 :

sc around (8)

Info :

Fasten off and leave a long tail for sewing. Stuff very lightly.

Info :

For miles morales: Rnd 1-2. with red, Rnd 3-9. with black.

β€” Legs (make 2) :

Info :

Starting with red.

Round 1 :

8 sc in a MR (8)

Round 2 :

inc x8 (16)

Round 3-5 :

sc around (16), 3 total rounds.

Info :

Change to blue.

Round 6-7 :

sc around (16), 2 total rounds.

Info :

Fasten off here on the first leg only. On the second leg, continue to rnd 8.

Info :

For miles morales: Rnd 1. with red, Rnd 2-7. with black.

β€” Body :

Info :

Continuing from the second leg.

Round 8 :

Ch 1. Make 16 sc around the first leg, 1 sc in the ch, 16 sc around second leg, and 1 sc into the other side of the ch (34)

Round 9 :

*sc 7, dec, 6 sc, dec* x2 (30)

Info :

Change to red.

Round 10 :

sc around (30)

Info :

Stuff the legs well.

Round 11 :

*dec, 13 sc* x2 (28)

Info :

Rounds 12-14 involve multiple color changes. Change colors between red and blue as indicated by the red and blue text.

Round 12 :

5 sc, 6 sc, 7 sc, 6 sc, 4 sc (28)

Round 13 :

3 sc, dec, 6 sc, *sc,dec* x2, sc, 6sc, 2sc, dec (24)

Round 14 :

5 sc, 5 sc, 6 sc, 5 sc, 3 sc (24)

Info :

The rest of the body is made with red.

Round 15-17 :

sc around (24), 3 total rounds.

Info :

Fasten off and leave a long tail for sewing.

Info :

Stuff the body well, especially the top of the body/neck.

Info :

For miles morales: All of the body is made with black.

β€” Assembly :

Info :

Using the long tail from the body, sew it to the head.

Info :

Sew the arms between rnd 16-17, on either side of the body.

β€” Eyes :

Info :

I do not have a cricut, so i cut out my eyes by hand. Here is how i do it.

Info :

1. Using a picture of my spiderman plush, or any other you like, enlarge the image on a tablet/laptop so that it is the same size as your plush.

Info :

2. Trace the inner white part of the eye and cut it out in felt.

Info :

3. Glue this to the outer eye felt color (black or red felt depending on the version).

Info :

4. Leaving a small border, cut around the white part.

Info :

Glue the eyes around rnd 6-10.

β€” Spider :

Info :

I use puffy paint and a yarn needle to be as precise as possible when making the spider.

Info :

Alternatively, you could use a cricut for this.

Assembly Instructions

  • Using the long tail from the body, sew it to the head securely with a yarn needle, matching the neck opening to the body top.
  • Sew the arms between rounds 16-17 on either side of the body, angling slightly outward for a natural pose and reinforcing with several stitches.
  • Glue or sew the felt eyes around rounds 6-10 of the head after sizing and trimming the felt pieces to fit the head proportionally.
  • Create the spider emblem on the chest using puffy paint for precision or cut felt and sew/glue it in place; use black puffy paint for Peter Parker and red for Miles Morales.
  • Fasten off and leave long tails where instructed (legs and body) to make sewing pieces together easier and more secure.

Important Notes

  • πŸ’‘Begin stuffing the head early and continue stuffing as you work to maintain smooth shaping and avoid gaps at the seams.
  • πŸ’‘Leave long tails when instructed (first leg, body) to make joining and sewing parts together much easier and neater.
  • πŸ’‘Follow the color-change rounds carefully for the Peter Parker version; rounds 12-14 require multiple color changes to create the stripe pattern.
  • πŸ’‘For the Miles Morales version, substitute black yarn for the head and the entire body as noted to achieve the correct colorway.

This adorable Spiderman amigurumi is designed to become a treasured handmade companion with bold, colorful stripes and a cuddly chunky texture. Whether you make the classic Peter Parker colors or switch to the Miles Morales look, each version is full of character and charm. Finished at about 10 inches tall, this plush is perfect for gifting or display. πŸ§ΆπŸ•·οΈ

You ask,

we answer.

FAQs

What size will the finished piece be?

The finished spiderman plush is about 10 inches tall when using the recommended Premier Parfait Chunky yarn and a 4.5 mm hook.

Can I use different yarn weights for this pattern?

Yes, you can use different yarn weights but this will change the finished size; choose an appropriate hook and expect a smaller or larger plush depending on yarn thickness.

Do I need a Cricut to make the eyes?

No, the designer cuts the eyes by hand using an enlarged picture as a template; a Cricut is optional and can speed up the process but is not required.

How long does this project typically take to complete?

Most crocheters finish this project in 5-7 hours, though time may vary depending on experience, color changes, and finishing details like the spider emblem.