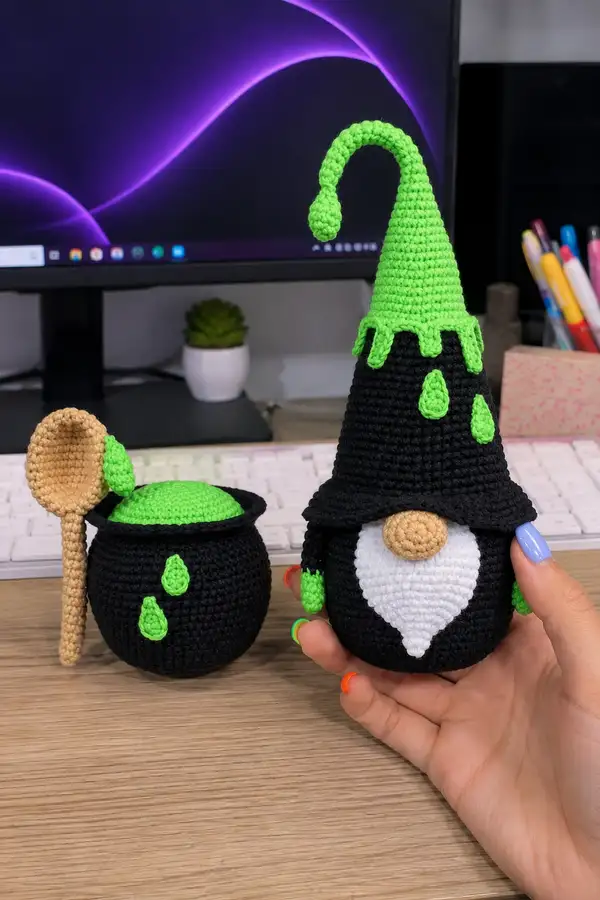
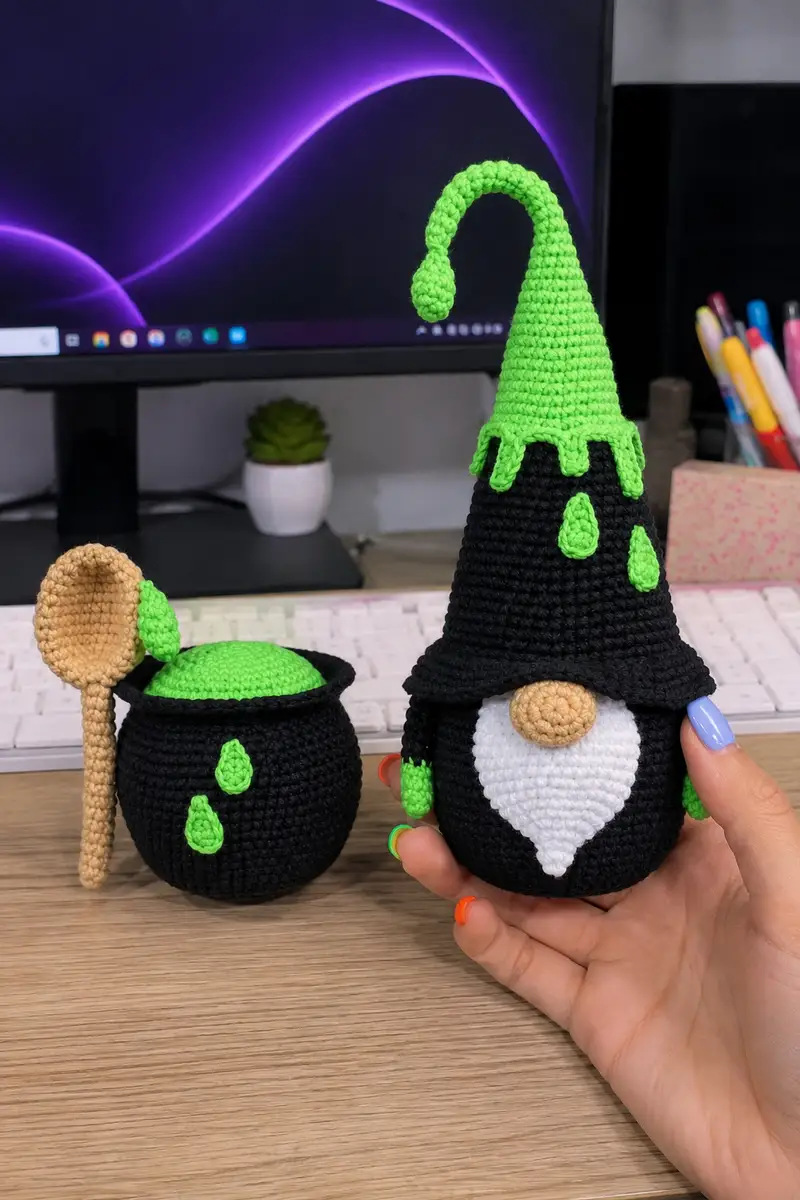
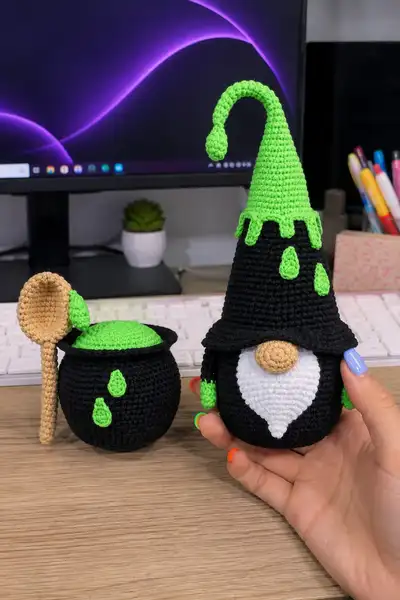
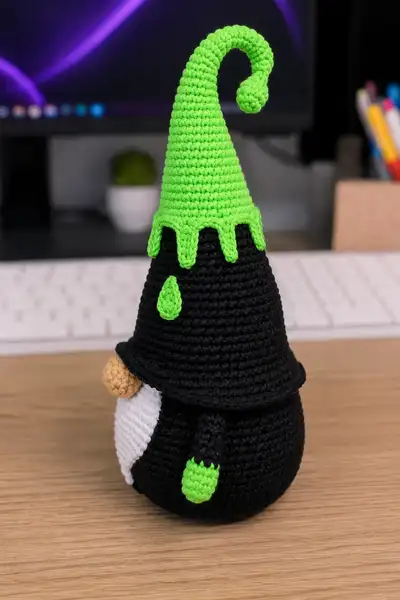
Create a spooky yet adorable Halloween gnome with a tall dripping neon-green hat, a plush black body, a curly hat tip and a bubbling cauldron companion. This pattern includes the gnome, detachable hat with slime drips, beard and nose, tiny green hands, plus a matching cauldron and wooden spoon. Clear round-by-round instructions and assembly notes help you recreate every detail you see in the photo.
Progress Tracker
0% Complete
— Head :
Round 1 :
6 sc in magic ring (6)
Round 3 :
(1 sc, 1 inc) x 6 (18)
Round 4 :
(2 sc, 1 inc) x 6 (24)
Round 5 :
(3 sc, 1 inc) x 6 (30)
Round 6 :
(4 sc, 1 inc) x 6 (36)
Round 7 :
(5 sc, 1 inc) x 6 (42)
Info :
The head for this gnome is worked as the top portion of the torso in this pattern; we build a small rounded head you will later attach the nose to. Keep tension even so the hat will sit nicely on top. Place a stitch marker in the first stitch of each round.
Round 8 :
1 sc in each st (42)
Round 9-12 :
1 sc in each st (42) (work 4 rounds even to build head height)
Info :
At the end of Round 12 the head should be clearly domed. If you want the beard to cover more or less of the face, adjust the number of even rounds here by +/-1. We will attach the beard later between rounds 14-18.
Round 13 :
(5 sc, 1 dec) x 6 (36)
Round 14 :
(4 sc, 1 dec) x 6 (30)
Info :
Begin stuffing head lightly but firmly to create a round face. Stuff enough so the nose will sit proud but avoid overstuffing which prevents the hat from sitting low.
Round 15 :
(3 sc, 1 dec) x 6 (24)
Round 16 :
(2 sc, 1 dec) x 6 (18)
Round 17 :
(1 sc, 1 dec) x 6 (12)
Info :
Fasten off leaving a long tail for sewing if you will close this head opening into the body later. For this gnome the head sits integrated into the body shape; finish stuffing through Round 15-17.
— Body :
Round 1 :
6 sc in magic ring (6)
Round 3 :
(1 sc, 1 inc) x 6 (18)
Round 4 :
(2 sc, 1 inc) x 6 (24)
Round 5 :
(3 sc, 1 inc) x 6 (30)
Round 6 :
(4 sc, 1 inc) x 6 (36)
Round 7 :
(5 sc, 1 inc) x 6 (42)
Info :
We are increasing more to create a nice rounded belly base. If you prefer a wider body, repeat the increase pattern one additional time to reach 48 sts total before working even rounds.
Round 8-12 :
1 sc in each st (42) (work 5 rounds even to establish body height)
Round 13 :
(6 sc, 1 dec) x 6 (36)
Round 14-16 :
1 sc in each st (36)
Info :
At the end of Round 16, the body should be tall enough to accept the hat brim. If you'd like a squat gnome, work fewer even rounds; for a taller gnome add rounds in multiples of the circumference.
Round 17 :
(5 sc, 1 dec) x 6 (30)
Round 18 :
(4 sc, 1 dec) x 6 (24)
Round 19 :
(3 sc, 1 dec) x 6 (18)
Info :
Begin stuffing the body moderately at this point. The bottom should be rounded and firm enough to allow the gnome to sit upright without wobbling. Keep stuffing as you decrease.
Round 20 :
(2 sc, 1 dec) x 6 (12)
Info :
Close bottom with mattress stitch or slip stitch closure using the yarn tail, weave end through several stitches to secure. Alternatively, stop at Round 20 and sew the head inside for an integrated finish.
— Beard (Applique) :
Round 1 :
With white yarn: 6 sc in magic ring (6)
Round 3 :
(1 sc, 1 inc) x 6 (18)
Round 4 :
(2 sc, 1 inc) x 6 (24)
Round 5 :
(3 sc, 1 inc) x 6 (30)
Round 6 :
1 sc in each st (30)
Info :
We will now shape the bottom of the beard into a scalloped point to match the photo. Work in rows across the round foundation to create the pointed shape, or continue in the round and stitch shaped decreases as shown.
Round 7 :
(4 sc, 1 dec) x 5, 1 sc (25)
Round 8 :
(3 sc, 1 dec) x 5 (20)
Round 9 :
1 sc in each st (20)
Round 10 :
(2 sc, 1 dec) x 5 (15)
Round 11 :
(1 sc, 1 dec) x 5 (10)
Round 12 :
1 sc in each st (10)
Info :
To create the scalloped edging seen in the photo where the beard has a textured edge, work a round of picot or slip stitches along the outer edge: *sc2tog, ch2, sl st into first ch to make a tiny scallop* around the face edge, or work BLO ridges for texture.
Round 13 :
Work a decorative edging: *sc in next 2 sts, ch2, sl st in base of ch2* around to give a scalloped effect that will sit under the hat brim
Round 14 :
Fasten off leaving long tail for sewing. Position beard centered on front of body between approximately Rounds 10-18 of the body — pin in place and baste stitch before final sewing.
— Nose :
Round 1 :
6 sc in magic ring (6)
Round 3 :
(1 sc, 1 inc) x 6 (18)
Round 4 :
1 sc in each st (18)
Round 5 :
(2 sc, 1 dec) x 6 (12)
Round 6 :
1 sc in each st (12)
Info :
Stuff nose firmly so it sits round and proud. Fasten off leaving a long tail and sew nose to the brim edge so it peeks out from under the hat as pictured. On the finished gnome the nose is centered horizontally above the beard top.
— Arms (Make 2) :
Round 1 :
With black yarn: 6 sc in magic ring (6)
Round 3 :
1 sc in each st (12)
Round 4 :
1 sc in each st (12)
Info :
These rounds create a short black arm tube. In the photo arms are fairly short and attached at the upper body. After four rounds change to neon green for the hand color.
Round 5 :
Change to neon green. 1 sc in each st (12)
Round 6 :
(1 sc, 1 inc) x 4, 1 sc x 0 (16)
Round 7 :
1 sc in each st (16)
Round 8 :
(2 sc, 1 dec) x 4 (12)
Round 9 :
1 sc in each st (12)
Round 10 :
(1 sc, 1 dec) x 4 (8)
Round 11 :
1 sc in each st (8)
Info :
Stuff hands lightly; stuff tips first then fill the arm tube minimally so arms are soft and can be positioned. Fasten off leaving long tail for sewing. Repeat for second arm.
— Hat Brim (worked in black, then hat in neon green) :
Round 1 :
With black yarn: 6 sc in magic ring (6)
Round 3 :
(1 sc, 1 inc) x 6 (18)
Round 4 :
(2 sc, 1 inc) x 6 (24)
Round 5 :
(3 sc, 1 inc) x 6 (30)
Round 6 :
1 sc in each st (30)
Round 7 :
Working in BLO: 1 sc in each st BLO (30)
Info :
Working the brim in BLO creates a slight flare so the hat will sit and cover the eye area. The brim attaches to the body around approximately Rounds 12-16 of the body; pin it to measure exact placement before sewing.
Round 8 :
Switch to regular stitch: 1 sc in each st (30)
Round 9 :
To create a rolled brim edge, work: *sc in next 3 sts, inc* around (36)
Round 10 :
1 sc in each st (36)
Info :
Fasten off leaving long tail for sewing. Pin brim over the top of the head/body where the head rounds were established so the nose will peek out. On the sample the brim flares slightly and hangs down over the face—adjust number of rounds to achieve desired coverage.
— Hat (Tall Curled Cone in Neon Green) :
Round 1 :
With neon green yarn: 6 sc in magic ring (6)
Round 3 :
(1 sc, 1 inc) x 6 (18)
Round 4 :
(2 sc, 1 inc) x 6 (24)
Round 5 :
(3 sc, 1 inc) x 6 (30)
Round 6 :
1 sc in each st (30)
Info :
The hat begins with a typical cone base. The brim will be sewn to the hat's lower edge so measure your brim circumference and, if necessary, adjust hat increases so the lower round matches brim stitches closely (commonly 30-36 sts depending on your gauge).
Round 7 :
(4 sc, 1 inc) x 6 (36)
Round 8-14 :
1 sc in each st (36) (7 rounds even to build height)
Info :
These even rounds form the lower section of the hat where the neon-green slime drips sit over the black body. Mark the location for drips now: place 5 drip anchors spaced evenly around the hat lower rounds (for the sample 5 drips: left, front-left, front, front-right, right).
Round 15 :
(5 sc, 1 dec) x 6 (30)
Round 16-24 :
1 sc in each st (30) (9 rounds straight - these rounds make the tapered upper cone)
Round 17 Info :
For a subtle tapering and a natural curl at the tip, later we will do a series of decreases and then short rounds to form the curved tip. If you want a taller hat, add more even rounds between 16-24.
Round 25 :
(4 sc, 1 dec) x 5, 1 sc (25)
Round 26 :
(3 sc, 1 dec) x 5 (20)
Info :
Begin stuffing the hat base lightly if you want it to hold shape; however the sample hat is hollow and removable — do not overstuff if you want it to sit freely over the brim.
Round 27 :
(2 sc, 1 dec) x 5 (15)
Round 28-34 :
1 sc in each st (15) (7 even rounds to start forming the curl)
Round 35 :
(1 sc, 1 dec) x 5 (10)
Round 36 :
1 sc in each st (10)
Round 37 :
(1 sc, 1 dec) x 3, 1 sc x 4 (7)
Round 38 :
1 sc in each st (7)
Round 39 :
(1 sc, 1 inc) x 3, 1 sc (10)
Round 40 :
1 sc in each st (10)
Round 41 :
(1 sc, 1 inc) x 5 (15)
Info :
These small increases create the little bulb at the tip of the hat and help form the curl you see. If you want a wired curl, insert thin floral wire down the hat center before this stage and bend tip into shape.
Round 42-50 :
1 sc in each st (15) (9 rounds to lengthen the curled tip — adjust to preference)
Round 51 :
(2 sc, 1 inc) x 5 (20)
Round 52-56 :
1 sc in each st (20)
Round 57 :
(1 sc, 1 inc) x 10 (30)
Round 58-64 :
1 sc in each st (30)
Info :
Rounds 57-64 are worked to give the hat the long stretched cone silhouette before it narrows again for the tip. The sample shows a long hat that narrows then curls; if your hat becomes too wide or too short, adjust these counts by +/- 2 rounds.
Round 65 :
(2 sc, 1 dec) x 10 (20)
Round 66 :
(1 sc, 1 dec) x 10 (10)
Round 67 :
1 sc in each st (10)
Round 68 :
Work a small 6-8 stitch bobble for the tip: (6 sc in magic ring), stuff lightly, close and sew to the curled end.
Info :
Fasten off leaving a long tail to sew the hat along the brim. The hat in the photo sits loosely over the black brim and is removable; pin and adjust placement before sewing. If you want the green slime drip effect over the black brim, add drip appliques now (instructions follow).
— Hat Drip Appliques (Make 5 varied sizes) :
Drip A (Large) Round 1 :
5 sc in magic ring (5)
Round 3 :
(1 sc, 1 inc) x 5 (15)
Round 4 :
1 sc in 3 sts, 1 sc in next 4 sts working into edge to make a teardrop point, fasten off leaving tail for sewing (15)
Info :
Sew each drip to the lower rows of the hat so they hang over the black brim. Pin them first to get spacing even; for the sample place one in front center, two on each side and two slightly toward the back for balance.
Drip B (Medium) Round 1 :
6 sc in magic ring (6)
Round 3 :
Work a teardrop shape by decreasing on one side and increasing on the other to form a point: (3 sc, 1 dec, 1 sc) then shape edge and fasten off (12)
Drip C (Small) Round 1 :
6 sc in magic ring (6)
Round 3 :
Fasten off leaving tail and flatten slightly to form a teardrop point (12)
Info :
Make 3-5 drips in varying sizes. You will also use identical small teardrops for the cauldron sides. Weave in tails after sewing to the hat and cauldron to hide ends inside the hat or cauldron lining.
— Cauldron :
Round 1 :
With black yarn: 6 sc in magic ring (6)
Round 3 :
(1 sc, 1 inc) x 6 (18)
Round 4 :
(2 sc, 1 inc) x 6 (24)
Round 5 :
(3 sc, 1 inc) x 6 (30)
Round 6 :
(4 sc, 1 inc) x 6 (36)
Round 7-9 :
1 sc in each st (36) (3 rounds straight to build the bowl)
Round 10 :
(5 sc, 1 dec) x 6 (30)
Round 11-12 :
1 sc in each st (30)
Round 13 :
To create the outward rim: *sc in next 2, inc in next* around (40)
Round 14 :
1 sc in each st (40)
Info :
Sew the cauldron rim flat by working a few rounds in BLO to create a thick lip that looks like the sample’s rim. The rim should be wide enough to balance the spoon when leaned against it.
Round 15 :
Switch to neon green for slime filling: 1 sc in each st (40)
Round 16 :
(4 sc, 1 inc) x 8 (48)
Round 17 :
1 sc in each st (48)
Round 18 :
(3 sc, 1 dec) x 12 (36)
Round 19 :
1 sc in each st (36)
Round 20 :
Fasten off leaving long tail to sew lid in place. Fill slime inside slightly if you want a puffy lid — the sample shows a domed neon-green foam inside the cauldron, made by working a small dome and sewing into the top.
Cauldron Lid Round 1 :
With neon green yarn: 6 sc in magic ring (6)
Round 3 :
(1 sc, 1 inc) x 6 (18)
Round 4 :
1 sc in each st (18)
Round 5 :
Fasten off leaving tail and lightly stuff; sew lid into cauldron opening so the neon green flush sits slightly above the rim. Add a few small drip appliques to the side of the cauldron as on the sample.
— Spoon :
Round 1 :
With tan yarn: 6 sc in magic ring for spoon bowl (6)
Round 3 :
1 sc in each st (12)
Round 4 :
To create shallow bowl, dec 4 evenly across to leave 8 sts and flatten: (1 sc, 1 dec) x 4 (8)
Round 5 :
Fasten off leaving long tail and attach to spoon handle. Handle: ch 18 with tan yarn, join to bowl and sc back along chain to thicken handle (work 2 rows of sc along chain for width).
Info :
Whipstitch the spoon to the rim of the cauldron or lean it against the bowl as in the picture. Optionally add a darker brown slip stitch along the handle as a shading detail.
— Small Slime Droplets (Make 5-7) :
Round 1 :
6 sc in magic ring (6)
Round 3 :
1 sc in 6 sts, then shape to a point on one side by working 3 sc into one stitch and decreasing on opposite side to form a teardrop; fasten off leaving tail (12)
Info :
Sew droplets to body and cauldron in the positions visible: two drips on the cauldron side and two-three drips on the hat/body. Pin before sewing to check visual balance.
— Assembly & Final Finishing :
Info :
Before sewing pieces together, block the hat and brim gently (steam or shape with hands) to keep the brim curve. Use a yarn needle and matching yarn to sew pieces together with small, neat stitches. We provide recommended positions below.
Final Steps :
Sew beard centered on front of body spanning approximately Rounds 10-16; sew nose centered above beard top and below brim. Sew arms to sides of body roughly at the same height as the top of the beard. Position hat brim over head and secure at 6-8 points around to remain removable. Sew hat drips and small droplets to hat and body. Attach cauldron beside gnome or display separately.
Info :
Weave in all ends on the inside of the pieces, trimming close. Add optional blush to cheeks with very light dabs of fabric-safe chalk or paint if desired.
This playful Halloween gnome set brings a touch of spooky charm to any shelf or mantle. I love how the tall curled hat and neon slime details give it a cheeky personality, and the matching cauldron makes a perfect tiny scene. It’s a fun weekend make that will delight Halloween lovers and crafters alike. 🧙♀️🧶