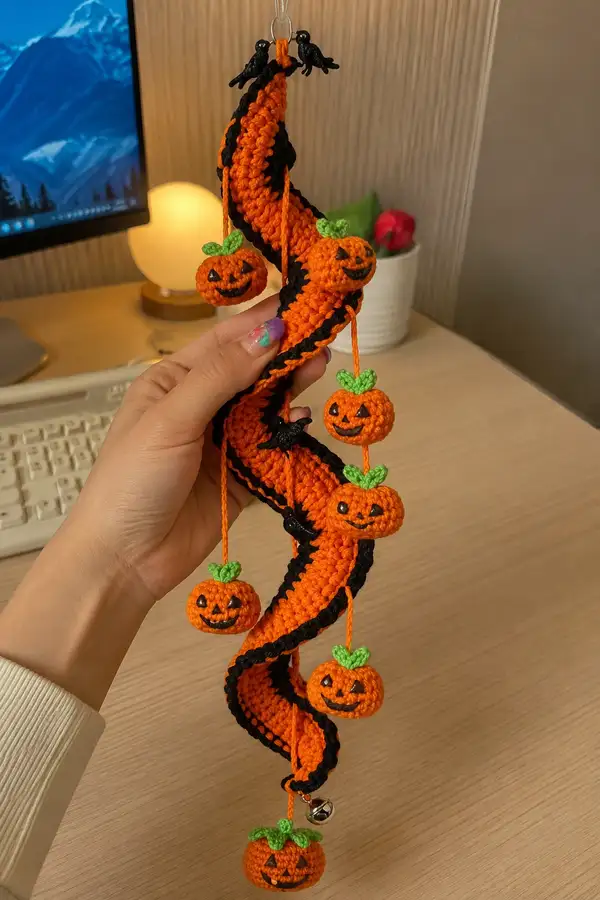
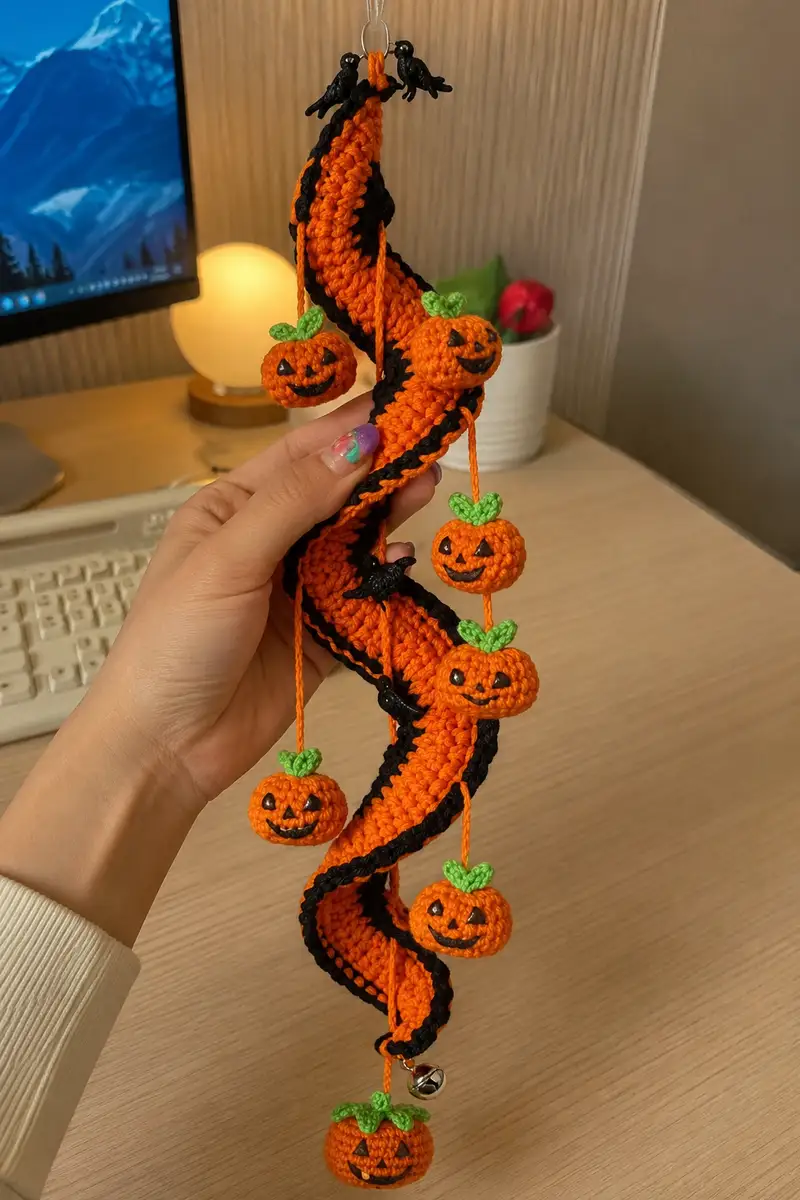
A playful Halloween spiral garland featuring a twisted orange-and-black crochet tube studded with tiny jack-o-lantern amigurumi and little bats. This pattern creates a flexible hanging decoration with cheerful embroidered pumpkin faces, bright green leaves, and optional jingle bell at the base. Perfect for doorways, wall hooks, or seasonal displays — lightweight, portable, and a wonderful little stitch-and-stuff project.
Progress Tracker
0% Complete
— Materials & Gauge :
Info :
Gauge is not critical for length projects but for pumpkins aim for 10 sc x 10 rows = 4 cm (worked tightly). Use a smaller hook for pumpkins to prevent stuffing showing through. All pieces are worked in continuous rounds unless noted. Use stitch marker to mark first stitch of each round.
— Pumpkin (Head) — Make 6 :
Round 1 :
6 sc in magic ring (6)
Round 3 :
(1 sc, inc) x 6 (18)
Round 4 :
(2 sc, inc) x 6 (24)
Round 5 :
(3 sc, inc) x 6 (30)
Round 6 :
(4 sc, inc) x 6 (36)
Round 7-10 :
1 sc in each st (36)
Info :
These rounds create the pumpkin width. If you want a slightly larger pumpkin, work rounds 7-10 up to round 12 before beginning the squashed shape. Place a stitch marker at start of Round 11 to mark where the attachment cord will join later.
Round 11 :
(4 sc, 1 dec) x 6 (30)
Round 12 :
(3 sc, 1 dec) x 6 (24)
Round 13 :
(2 sc, 1 dec) x 6 (18)
Info :
Start stuffing now using small amounts; pinch in and add extra fiber until pumpkin feels firm but slightly squishy for a plump look. Stuff evenly to avoid lumps where the leaf will be sewn.
Round 14 :
(1 sc, 1 dec) x 6 (12)
Info :
Fasten off leaving a long tail (about 20 cm) for sewing to the hanging cord. Do not close completely; leave a small opening for shaping the pumpkin ridges with a length of yarn if desired.
Round 16 :
Using tapestry needle and a long tail, run the tail through the center of the pumpkin approx at the 6 'north-south' points to create slight vertical ridges if desired. Pull gently and knot to create classic pumpkin segments. If you prefer round pumpkins without stitched segments, skip this step.
Round 17 :
Change to green yarn for leaf. Attach yarn at top center with sl st and ch1 to prepare leaf (or leave tail for later sewing) (attach)
Round 18 :
Ch3, sc in 2nd ch from hook, hdc in next, dc in next, sl st to pumpkin top. Repeat to make second leaf and fasten off leaving a tail for sewing (this row makes two small leaves)
Info :
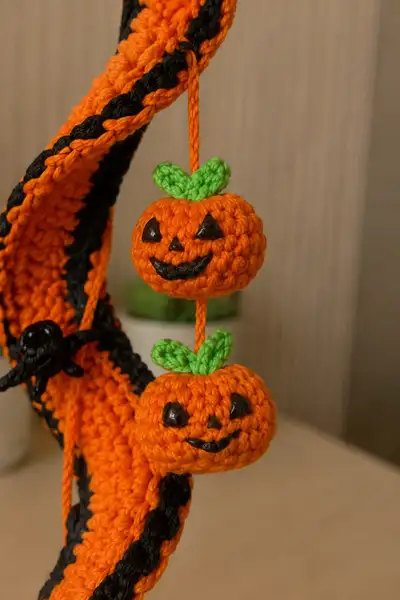
Make two small leaves on top by repeating the leaf motif: ch3, 1 sc in 2nd ch from hook, 1 hdc in next ch, 1 dc in next ch, sl st to base. Position leaves slightly staggered for a natural look. Alternatively, crocheted oval leaves of 4-6 sts can be used.
Round 19 :
Sew green leaves down securely using tail and small whip stitches; hide ends inside pumpkin by weaving down into stuffing
Round 20 :
Facial details: Use black embroidery floss or fabric paint to create two triangular eyes and a smiling mouth. For embroidery, use satin stitch for eyes and backstitch for mouth. Allow paint to dry fully if used.
Round 21 :
Attach orange cord: Thread a 20-28 cm length of orange yarn through top of pumpkin (through center) leaving a 3-4 cm tail above leaf for knotting. Secure with multiple overhand knots inside so pumpkin hangs firmly on cord. Trim or hide tail.
Round 22 :
Repeat the same process for each pumpkin. Make 6 pumpkins in total, spacing size roughly identical. If you wish to vary size, reduce or add rounds 7-10 accordingly.
Info :
Each small pumpkin uses very tight tension to keep stuffing inside. If you see holes, drop to a 2.25-2.75 mm hook for pumpkins. Embroider faces before final tight closing for best control.
— Garland Spiral Tube (Body) :
Info :
The spiral is worked as a long closed tube that will be folded and twisted into an S-shaped spiral. Work in continuous rounds to desired length. The tube has a bright orange body and a black spiraled edge worked in FLO to create a framed look. Start with orange. This section will be worked with a 3.5 mm hook.
Round 1 :
6 sc in magic ring (6)
Round 3 :
(1 sc, inc) x 6 (18)
Round 4 :
(2 sc, inc) x 6 (24)
Round 5 :
(3 sc, inc) x 6 (30)
Round 6 :
(4 sc, inc) x 6 (36)
Info :
You now have a small circular tube. To create a wide flat spiral strip, you will work rounds without increasing until you have a tube circumference that equals the desired width. The example spiral width is approx 3.5-4 cm, which corresponds to 36 sc circumference in worsted yarn with 3.5 mm hook.
Round 7-10 :
1 sc in each st (36)
Info :
We will now create a flat-spiral effect by alternating a few rounds of hdc in BLO along one side to bias the tube so it will curl; this helps the strip sit flat when twisted. Use FLO/BLO changes as described below.
Round 11 :
1 sc in each st (36)
Round 12 :
1 sc in each st BLO (36)
Round 13 :
1 sc in each st (36)
Round 14 :
1 sc in each st BLO (36)
Info :
Rounds 12 and 14 in BLO create subtle ridges and bias to encourage the tube to twist and lie open. If you prefer a completely smooth tube, skip BLO rounds and work all rounds standard.
Round 15-24 :
1 sc in each st (36)
Info :
At this point the tube length is moderate. To make a long spiral (the sample photo is about 35-40 cm of crocheted tube before twisting), continue working even rounds until you reach desired length. Each additional even round of 36 stitches adds approximately 0.3-0.4 cm to tube length depending on tension; plan for 80-90 even rounds total to create a long decorative spiral.
Round 25-64 :
1 sc in each st (36) (continue working until you reach length ~36-40 cm when stretched)
Info :
If you prefer a shorter garland, stop earlier. The photographed spiral has a dramatic S-shape achieved by making a long tube and then folding it into an S and securing the folds with sewn tucks and a few black bat embellishments.
Round 65 :
Begin edging: Change to black yarn at end of previous round; join with sl st to any st (36)
Round 66 :
Ch1, 1 sc in same st and continue 1 sc evenly around (36)
Round 67 :
To create a raised black braid effect, work 1 sc in each st BLO around (36)
Round 68 :
Switch back to orange: join with sl st and continue 1 sc in each st (36)
Info :
The black edge can be worked as a single round of sc or as a 2-row braid by working sc in BLO and then a second sc row to thicken. The photo shows a slightly raised black braid on the edge; use the BLO technique to recreate this look.
Round 69 :
Work 1 sc in each st (36) and fasten off leaving long tail at top to attach to ring
Info :
To shape the S-spiral, fold the long tube into your desired S shape. Pin the folds in place and use an orange tail to sew through inner tube sections, creating small tucks that encourage the spiral to hold its shape. If you want a permanently stiff S, insert a thin craft wire along the tube length before tucking (be sure ends are wrapped so they do not poke out).
— Small Bat Embellishment — Make 3 :
Round 1 :
6 sc in magic ring (6)
Round 3 :
1 sc in each st (12)
Round 4 :
Work 4 sc, ch4, turn and sc back along chain to create wing; continue to next 4 sc, repeat wing, finish with 4 sc (this is a simple bat silhouette)
Round 5 :
Fasten off leaving tail. Flatten and stitch base to create a small body; embroider eyes with small French knots of black yarn or paint them.
Info :
Alternatively create bats by making a tiny ball for body and crocheting two wings (as triangular motifs) then sewing wings into body. The photograph shows flat stylized bats sewn onto the spiral edge.
— Small Leaf (Top) — Make 12 :
Round 1 :
With green yarn, ch4, 1 sc in 2nd ch from hook, 1 hdc in next ch, 1 dc in last ch, sl st to base to form a small leaf (approx 3-4 sts)
Round 2 :
Make second leaf adjacent using the same method; leave long tails for sewing
Info :
Two small leaves per pumpkin look best, slightly offset. Make 6 pumpkins x 2 leaves = 12 leaves. Weave tails into the pumpkin top to secure.
— Hanging Cord & Bell :
Round 1 :
Cut lengths of orange yarn for each pumpkin: sample uses lengths from 6 cm (top-most) to 28 cm (bottom-most) depending on spacing desired. Knot one end through the pumpkin top opening and the other end will be attached to the spiral tube.
Info :
A simple twisted cord (ch 2, turn, sc in each ch) or a 4-ply twisted yarn cord looks neat. For an even cord, chain required length and run a slip-stitch seam down the chain, or tightly braid three lengths of yarn.
Round 2 :
Attach bottom-most pumpkin cord to the end of the spiral using a secure overhand knot and sew extra with small stitches. Add jingle bell under the last pumpkin by threading onto cord before finishing and knotting just above.
Info :
Trim cord ends neatly and weave in any tails. Test each pumpkin by pulling gently on its cord once sewn to ensure security.
— Assembly & Positioning :
Info :
Before final sewing, pin the spiral into an S shape and pin each pumpkin cord at intended positions. The sample shows pumpkins arranged roughly evenly down one side, with three on the outer curve and three on inner curve; adjust to pleasing spacing.
Round 1 :
Starting from the top: Attach cord of pumpkin #1 at approx 3 cm from the top ring; secure with about 8 whip stitches through the spiral tube fabric so cord does not slide.
Round 2 :
Attach pumpkin #2 about 6-8 cm further down, then #3, #4, #5 and #6; stagger left-right for a natural falling look and sew small bats onto spiral at tuck points to hide sewing knots and to add decoration.
Info :
Place tiny seaming stitches through the inside of the tube and around the cord so the knotted top of the pumpkin is not visible. Use matching orange thread to blend stitches.
Round 3 :
Sew black bats to the spiral at three visually pleasing spots. Use two or three small stitches to anchor firmly. Add a small dab of fabric glue if desired for extra security for the bats or bell.
Info :
If you want a loop at the top, use the long tail left at the top of the spiral to form a hanging loop around a metal ring. Secure with a few mattress stitches and weave ends in.
— Finishing Touches :
Round 1 :
Use black fabric paint to deepen the pumpkin faces if embroidered thread appears faint; a small drop applied with a toothpick makes sharp triangular eyes and a smiling mouth. Let dry fully before handling.
Round 2 :
Weave in all tails into the spiral tube and pumpkins. Trim close to work. If any seams feel loose, reinforce with additional small stitches from the inside of the tube outward to keep a neat surface.
Info :
For long-term durability, seal painted faces with a matte acrylic varnish spray used lightly or with small dabs of fabric medium to prevent rubbing off. Keep away from high moisture or heavy handling.
This charming pumpkin spiral garland turns simple stitches into a playful Halloween accent you will love to display! Each tiny pumpkin adds personality and a handmade charm that brightens any doorway or hook. The step-by-step approach ensures a neat finish and durable hanging garland you can reuse for seasons to come. 🧶✨ Enjoy making and gifting — small details like the leaf tops and painted faces make every piece special. 🎃🔔