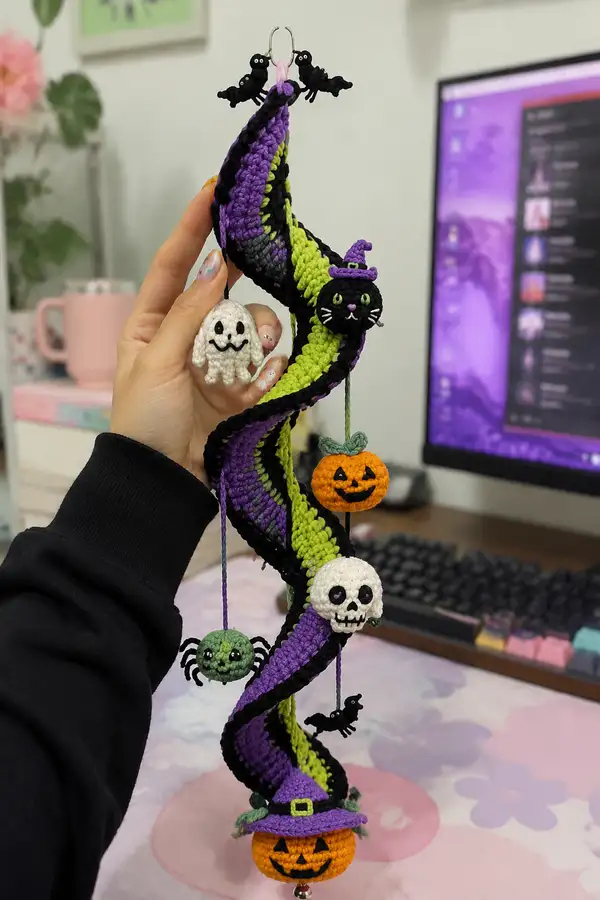
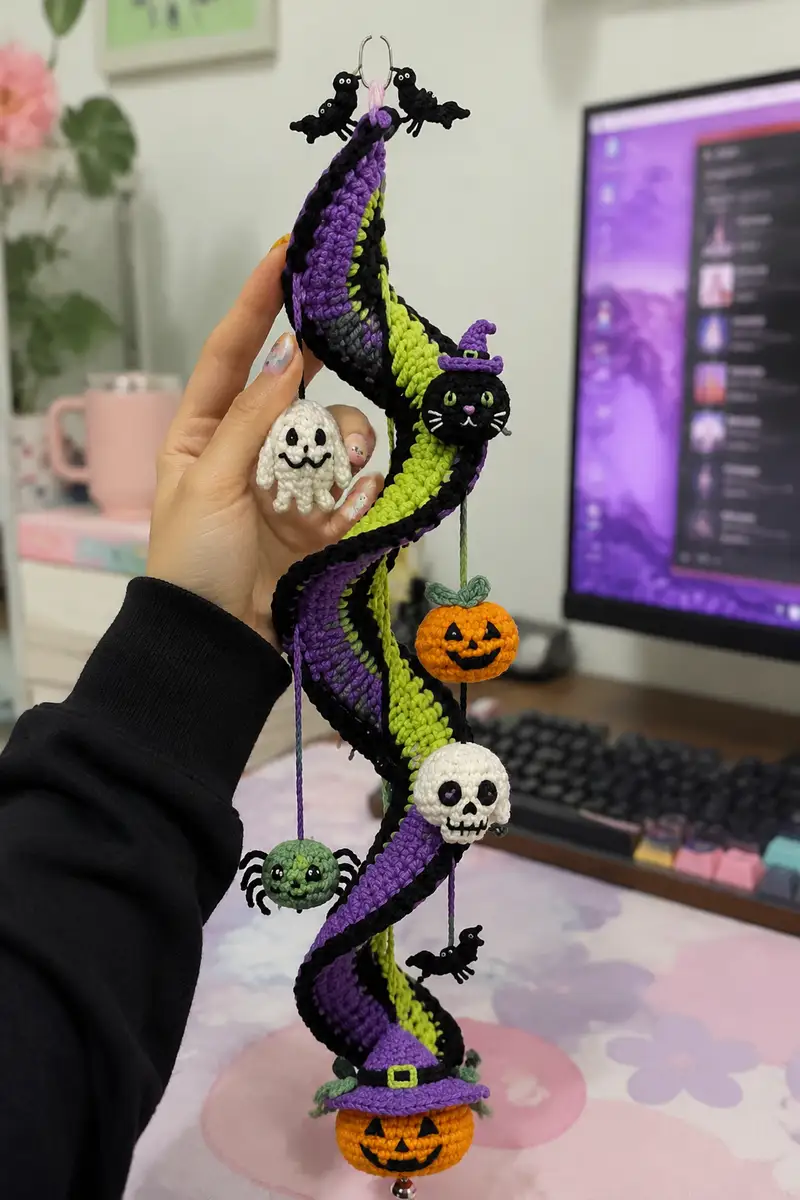
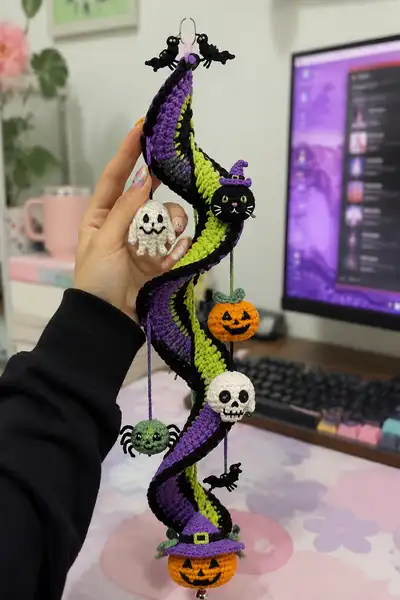
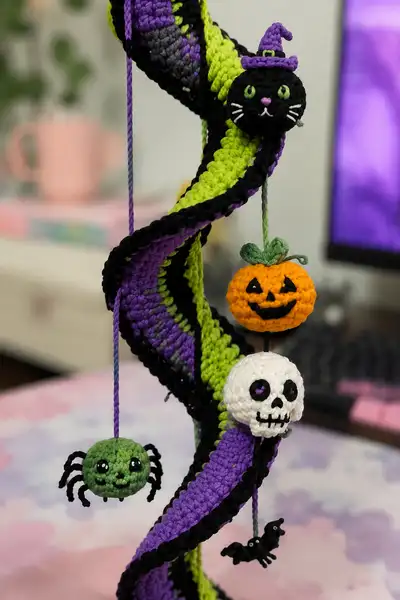
Create a whimsical spiraling Halloween mobile with a twisted tri-color spiral and a collection of tiny spooky pals — pumpkins, skull, spider, ghost, bats and a little witch cat. This pattern uses vivid lime, purple and black accents, layered texture and small amigurumi ornaments to form a playful hanging decoration. Detailed round-by-round instructions and assembly tips guide you from the first magic ring through final seaming and hanging hardware.
Progress Tracker
0% Complete
— Spiral Stem (Main Body) :
Round 1 :
6 sc in magic ring (6)
Round 3 :
(1 sc, 1 inc) x 6 (18)
Round 4 :
(2 sc, 1 inc) x 6 (24)
Round 5 :
(3 sc, 1 inc) x 6 (30)
Round 6 :
(4 sc, 1 inc) x 6 (36)
Round 7 :
(5 sc, 1 inc) x 6 (42)
Round 8 :
(6 sc, 1 inc) x 6 (48)
Info :
This long tube will form the twisted spiral. Work tightly, and change to your main black for the edge after round 8 to create a dark border. Use a stitch marker at the beginning of each round and keep rounds continuous (do not join) to maintain the spiral look.
Round 9-12 :
1 sc in each st (48)
Info :
Change to neon lime yarn at the first stitch of round 13. Carry unused yarn along the inside if you prefer not to weave in many ends. The neon stripe will be the bright central band; plan color changes so lime sits roughly centered when you twist the tube later.
Round 13-16 :
1 sc in each st using neon lime (48)
Round 17-20 :
1 sc in each st using black (48)
Info :
Alternate 4 rounds of lime and 4 rounds of purple with 4 rounds black border to create the three-color stripe rhythm: example sequence = black edge (4 rounds), purple (4 rounds), black edge (4 rounds), lime (4 rounds) and repeat for length. Adjust the number of rounds per color for narrower or wider stripes.
Round 21-28 :
Work 8 rounds in purple and black as planned: 1 sc in each st (48)
Round 29-36 :
Work 8 rounds in neon lime and black as planned: 1 sc in each st (48)
Info :
Continue alternating color blocks every 8 rounds (or 4 rounds each color for a tighter band). For this pattern we will work a long tube of 120 even rounds total (after round 8) before tapering the end to keep the spiral long and dramatic. Count your color blocks so both ends balance visually.
Round 37-44 :
1 sc in each st (48)
Round 45-52 :
1 sc in each st (48)
Round 53-60 :
1 sc in each st (48)
Round 61-68 :
1 sc in each st (48)
Info :
Keep the tube unstuffed or only very lightly stuffed if you prefer the spiral to be more flexible. If you stuff slightly, use just a scattering of fiberfill to give the tube body; too much will make twisting and sewing into a spiral difficult.
Round 69-76 :
1 sc in each st (48)
Round 77-84 :
1 sc in each st (48)
Round 85-92 :
1 sc in each st (48)
Round 93-100 :
1 sc in each st (48)
Info :
At this stage judge your desired finished length. For a hanging mobile about 30-35cm long, we recommend working a total of 120 even rounds (rounds 9-128). If you want a longer mobile, add sets of 8-16 rounds in your color rotation.
Round 101-108 :
1 sc in each st (48)
Round 109-116 :
1 sc in each st (48)
Round 117-124 :
1 sc in each st (48)
Info :
Begin planning where the hanging ornaments will attach — mark the rounds where each cord will be sewn later. For the pictured mobile, ornaments are spaced roughly every 12-16 rounds along the tube. Place stitch markers on the inside of the tube to mark attachment points for pumpkin, skull, spider and ghost.
Round 125 :
(6 sc, 1 dec) x 6 (42)
Round 126 :
(5 sc, 1 dec) x 6 (36)
Round 127 :
(4 sc, 1 dec) x 6 (30)
Round 128 :
(3 sc, 1 dec) x 6 (24)
Info :
If you want the spiral ends to flare slightly (for the decorative top and bottom), stop decreasing a round earlier and leave a small opening to stitch onto the top metal ring and bottom pumpkin anchor. For a smooth taper, continue with the decreases shown.
Round 129 :
(2 sc, 1 dec) x 6 (18)
Round 130 :
(1 sc, 1 dec) x 6 (12)
Info :
Fasten off leaving a long tail for sewing to the top ring or to the bottom anchor. Press the tube gently with your hands to shape into an elegant S-shaped spiral, then fold and pin into position. We will secure the spiral after finishing ornaments to keep everything centered.
— Base Anchor Pumpkin with Witch Hat (Make 1) :
Round 1 :
6 sc in magic ring (6)
Round 3 :
(1 sc, 1 inc) x 6 (18)
Round 4 :
(2 sc, 1 inc) x 6 (24)
Round 5 :
(3 sc, 1 inc) x 6 (30)
Round 6 :
(4 sc, 1 inc) x 6 (36)
Round 7 :
(5 sc, 1 inc) x 6 (42)
Round 8-12 :
1 sc in each st (42)
Info :
Switch to orange yarn at round 8 for the pumpkin body. Keep your tension a little tighter than the spiral to create a firmer little ball. Place small amount of stuffing beginning at round 10 and fill gently by round 12.
Round 13 :
(5 sc, 1 dec) x 6 (36)
Round 14 :
(4 sc, 1 dec) x 6 (30)
Round 15 :
(3 sc, 1 dec) x 6 (24)
Info :
Finish stuffing firmly but not overstuffed. The base pumpkin will support the weight of the mobile, so it should be slightly firmer than hanging ornaments. Leave a long tail for sewing to the spiral base.
Round 16 :
(2 sc, 1 dec) x 6 (18)
Round 17 :
(1 sc, 1 dec) x 6 (12)
Info :
Sew closed and weave in tail. Embroider or sew on jack-o-lantern features using black felt or black yarn: triangular eyes, nose and a jagged mouth. For the witch hat: work a separate small hat (pattern below) and sew to the top of the pumpkin. Add a small loop of cord through the pumpkin to anchor the bottom of the spiral if desired.
Witch Hat Brim :
Using purple: ch 24, join with sl st to form ring, ch 1, 1 sc in each ch around (24). Work 2 more rounds 1 sc in each st (24).
Witch Hat Cone Round 1 :
6 sc in magic ring (6)
Witch Hat Cone Round 2 :
6 inc (12)
Witch Hat Cone Round 3 :
(1 sc, 1 inc) x 6 (18)
Witch Hat Cone Round 4-6 :
1 sc in each st (18)
Witch Hat Cone Round 7 :
(1 sc, 1 dec) x 6 (12)
Witch Hat Cone Round 8 :
6 dec (6). Fasten off leaving tail to sew cone to brim. Add tiny green buckle (small chain stitch of green then stitch across with black) if desired.
Info :
Sew the brim to the pumpkin top, then position cone in center and sew. If you want a floppy cone tip like the photo, stuff the cone very lightly and bend the top to one side while sewing. Add hat band and buckle in contrasting green for a finished look.
— Hanging Jack-o-Lantern (Middle Ornament) :
Round 1 :
6 sc in magic ring (6)
Round 3 :
(1 sc, 1 inc) x 6 (18)
Round 4 :
(2 sc, 1 inc) x 6 (24)
Round 5-7 :
1 sc in each st (24)
Info :
Stuff gently starting round 6. Keep it small and light to hang easily. Attach a short loop of green for a stem at the top by sewing a small 6-st chain loop and securing inside before final closure.
Round 8 :
(2 sc, 1 dec) x 6 (18)
Round 9 :
(1 sc, 1 dec) x 6 (12)
Round 10 :
6 dec (6). Fasten off leaving long tail. Embroider jack-o-lantern face using black yarn or felt triangles for eyes and a jagged mouth. Attach a 6-8cm length of embroidery floss or yarn as hanging cord and secure inside the top before closing completely.
Info :
For a more three-dimensional pumpkin ridge effect, stitch vertical surface lines with contrasting yarn from top to bottom after stuffing: pull a length of yarn through the pumpkin at equal intervals and secure inside.
— Skull (Hanging Ornament) :
Round 1 :
6 sc in magic ring (6)
Round 3 :
(1 sc, 1 inc) x 6 (18)
Round 4 :
(2 sc, 1 inc) x 6 (24)
Round 5-7 :
1 sc in each st (24)
Info :
Switch to white yarn at round 2 and keep even rounds until round 7. Begin stuffing at round 6 to create a firm but small skull. Use small amounts of stuffing so the skull remains light for hanging.
Round 8 :
(2 sc, 1 dec) x 6 (18)
Round 9 :
(1 sc, 1 dec) x 6 (12)
Info :
Embroider skull eyes and nose with black yarn or attach tiny felt circles for eyes, then stitch a small mouth with vertical bars for teeth. Attach a short loop of yarn at top for hanging. Fasten off and weave tail inside.
— Spider (Hanging Ornament) :
Round 1 :
6 sc in magic ring (6)
Round 3 :
(1 sc, 1 inc) x 6 (18)
Round 4-6 :
1 sc in each st (18)
Info :
Use green yarn for the spider body and black for legs. Begin stuffing at round 5. For a flat-bottom look leave minimal stuffing so the spider sits nicely when hung.
Round 7 :
(1 sc, 1 dec) x 6 (12)
Round 8 :
6 dec (6). Fasten off leaving long tail for sewing. Create eight legs by making 8 ch each and then sl st back along the chain to make short curled legs, or make legs using 6 sc in a small chain then sew around body. Add tiny safety eyes or embroider eyes and small smile. Attach hanging cord to top before final closure.
— Ghost (Hanging Ornament) :
Round 1 :
6 sc in magic ring (6)
Round 3 :
(1 sc, 1 inc) x 6 (18)
Round 4 :
(2 sc, 1 inc) x 6 (24)
Round 5-6 :
1 sc in each st (24)
Info :
Switch to white yarn and stuff lightly to keep the ghost airy. After closing the top, create a scalloped skirt by working single crochet clusters and slip stitches: ch1, *3 dc in next st, sl st in next*, repeat around to create little arms and ruffled bottom similar to the photo.
Round 7 :
(2 sc, 1 dec) x 6 (18)
Round 8 :
(1 sc, 1 dec) x 6 (12)
Round 9 :
6 dec (6). Fasten off and create scalloped bottom: attach yarn at bottom, *ch1, 3 hdc in next st, sl st in following stitch*, rep around. Add embroidered face with black yarn and small white highlights for eyes.
— Cat Head with Tiny Witch Hat (Make 1) :
Round 1 :
6 sc in magic ring (6)
Round 3 :
(1 sc, 1 inc) x 6 (18)
Round 4 :
(2 sc, 1 inc) x 6 (24)
Round 5 :
(3 sc, 1 inc) x 6 (30)
Round 6 :
(4 sc, 1 inc) x 6 (36)
Round 7 :
(5 sc, 1 inc) x 6 (42)
Round 8-12 :
1 sc in each st (42)
Info :
Use black yarn for the cat head. Insert 8mm safety eyes between rounds 9-10 approximately 8-10 sts apart for the expression seen. Place eyes slightly higher than center for a cute look. Start stuffing firmly after eyes are in place.
Round 13 :
(5 sc, 1 dec) x 6 (36)
Round 14 :
(4 sc, 1 dec) x 6 (30)
Round 15 :
(3 sc, 1 dec) x 6 (24)
Round 16 :
(2 sc, 1 dec) x 6 (18)
Round 17 :
(1 sc, 1 dec) x 6 (12)
Info :
Fasten off leaving a long tail for sewing. Embroider nose and whiskers with pink and white yarn respectively: small heart-shaped nose and six whiskers (3 each side) using a yarn needle. Add tiny green felt or embroidered pupils to eyes for the cat look in the photo.
Cat Hat Brim :
Work same as witch hat brim used for base pumpkin but in smaller circumference: ch 16, join, 1 sc in each ch around (16), 2 rounds total.
Cat Hat Cone :
6 sc in magic ring, 6 inc (12), (1 sc, 1 inc) x 6 (18), 2 rounds even, then decrease rounds to shape cone and attach to brim. Fasten off and sew to top of cat head. Add small green buckle detail if desired.
— Small Bats (Make 3-4) :
Bat Body Round 1 :
6 sc in magic ring (6)
Bat Body Round 2 :
6 inc (12)
Bat Body Round 3-4 :
1 sc in each st (12)
Bat Wings :
Attach black yarn at one side of the body, ch 6, sl st in 2nd ch from hook, sc, hdc, dc, sl st back to body. Repeat mirror on the other side to make both wings. Fasten off leaving tail for sewing. Add two tiny white French knots for eyes with embroidery thread or tiny beads.
Info :
These tiny bats are lightweight and look cute dangling near the spiral edges. Attach with a very short cord so they appear to flutter close to the spiral.
— Assembly & Finishing :
Info :
Block out all pieces roughly into position before sewing. Attach top ring to the very top of the spiral tube by using the long tail left at the spiral top: stitch securely around the metal ring using the tail, then weave tail into the tube interior. Check balance by suspending the ring and adjusting ornament placement.
Step 1 :
Sew the base witch pumpkin to the bottom opening of the spiral (or sew a small loop of cord through bottom of spiral and anchor to top of pumpkin) so the pumpkin acts as the anchor. Use at least 6-8 secure mattress/wrapped stitches through both pieces to prevent sagging.
Step 2 :
Use thin cords (embroidery floss or thin yarn) 6-10cm long for hanging ornaments. Sew one end of each cord securely inside the top of each ornament (pumpkin, skull, spider, ghost) before closing the body. Knot and weave the knot into the stuffing so it will not slip. Bring the other end of the cord through a selected stitch inside the spiral and tie a triple-knot on the inside; bury the knot by pulling it into the tube if possible or stitch through the interior for a neat finish.
Step 3 :
Position the cat head on the spiral as in the photo (roughly at the top curve). Pin in place, then sew a few neat stitches through the head base and spiral tube interior to keep it stable. Add a small dab of craft glue inside for extra security if the mobile will be handled often.
Step 4 :
Sew bats to short loops and attach beneath some hanging ornaments or tuck them into the spiral edges. Ensure the overall weight is balanced so the mobile hangs straight and gently rotates without tilting heavily to one side.
Info :
Weave in all yarn ends using a yarn needle, trimming close. If any hanging cords show after assembly, tuck and glue the inside knots to keep the outside neat. Optionally add a small charm or metal bell inside the anchor pumpkin to give a soft jingle when moved.
Step 5 :
Final check: hang the mobile and rotate it to inspect ornament spacing and balance. Move any cord attachments by removing a few stitches and retying as necessary. When satisfied, reinforce key seams with a second pass of sewing for longevity.
Info :
Machine wash is not recommended; spot clean with damp cloth. For gift-giving, package with care to protect the tiny hats and embroidered details.
This spooky spiral mobile is a delightful seasonal project that brings out your crochet creativity and attention to detail. Stitch by stitch you form a twisting carnival of Halloween charm — tiny pumpkins, a cheeky skull, a smiley spider, a drifting ghost and a witchy cat perched among the coils. Each ornament is small but full of character, and the color contrasts make the whole piece pop. 🎃🧶 Hang it in a doorway, over a desk, or give it as a handmade gift and enjoy the smiles it brings. Happy crocheting! ✨