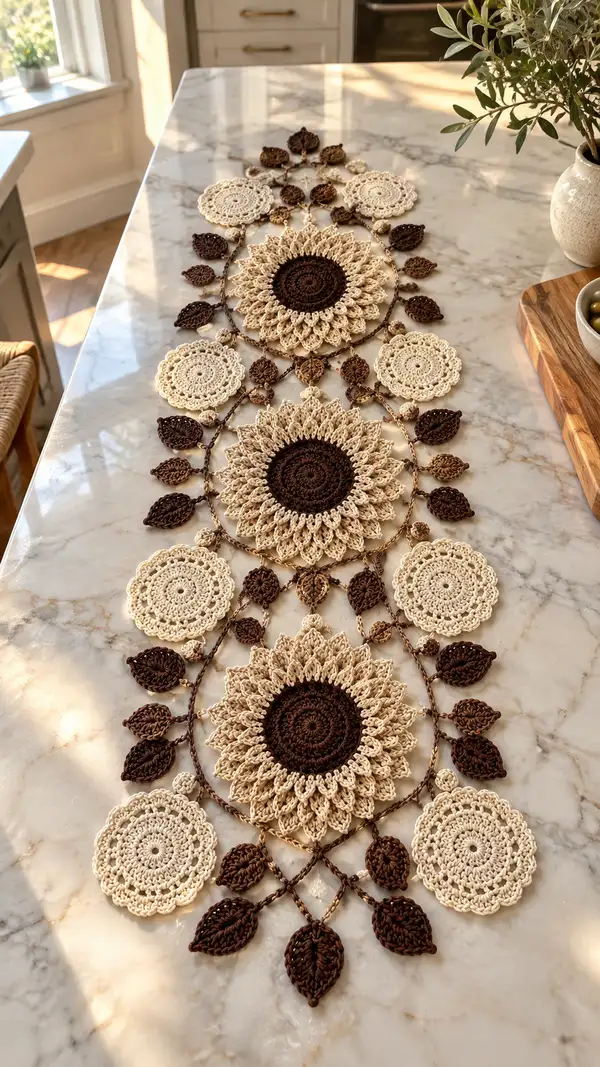
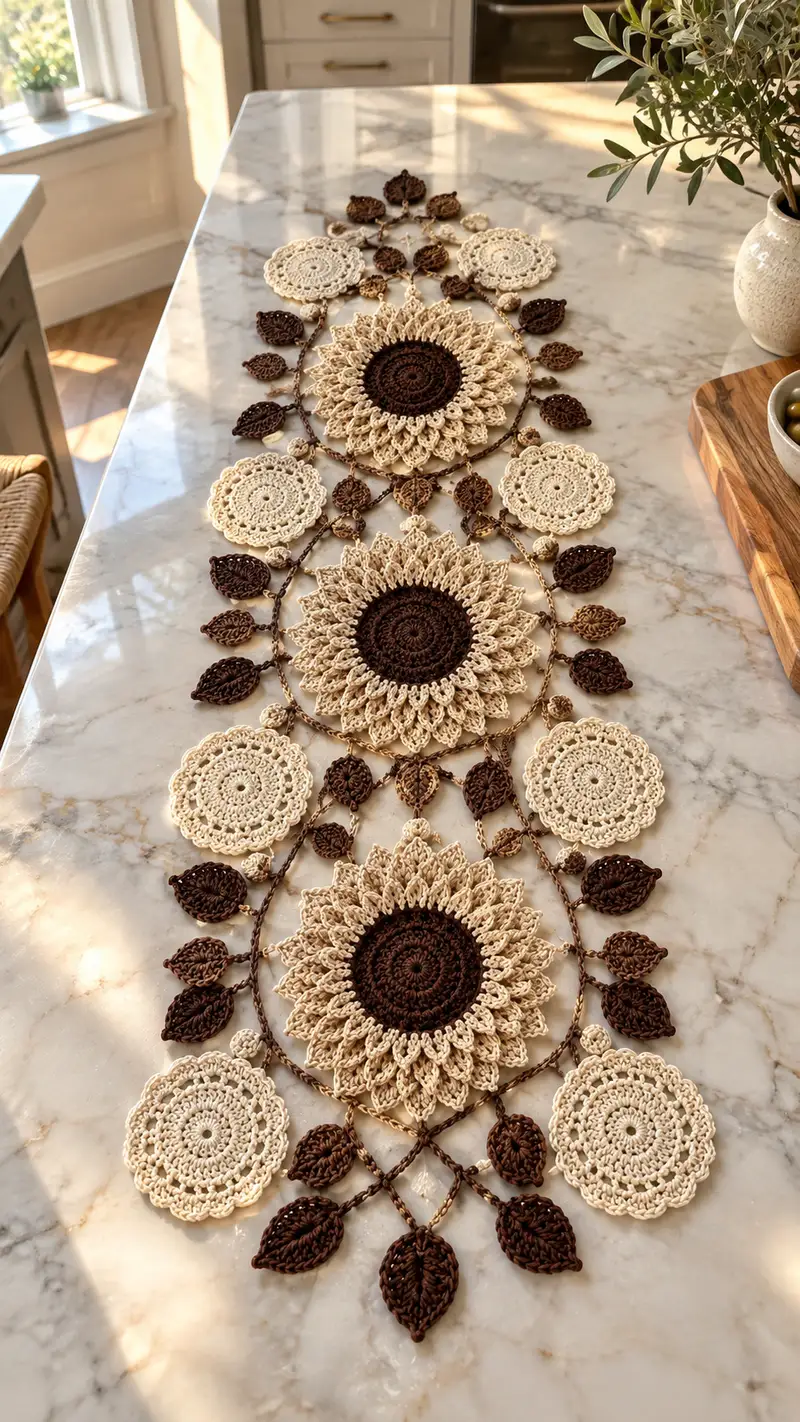
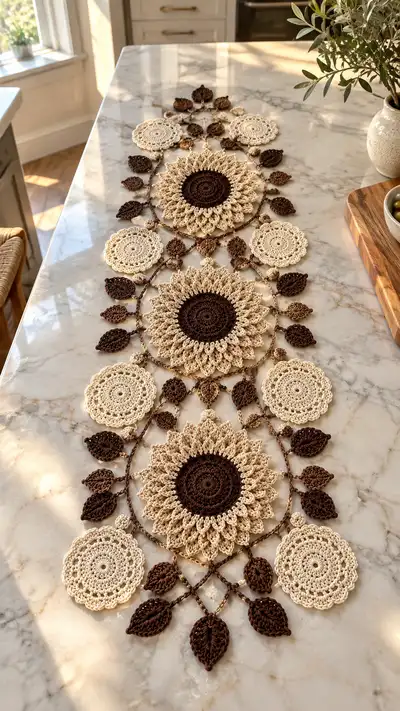
Create a stunning sunflower lace table runner with layered floral medallions, delicate round doilies, and sculpted leaves. This elegant runner uses two warm neutrals—deep chocolate and soft cream—worked in thin cotton for crisp stitch definition. The design features three large sunflower medallions joined by lattice chains and cascading leaves to create a long, heirloom-quality centerpiece.
Progress Tracker
0% Complete
— Notes & Gauge :
Info :
Gauge is flexible for a lace runner; aim for crisp stitches using fine cotton. Using a slightly smaller hook than yarn label produces tighter detail and prevents see-through stuffing (not applicable) for motifs. Block motifs to exact dimensions before assembly: each large sunflower medallion should measure approximately 7.5-8 inches across, each small round doily about 3.25-3.5 inches, and leaves about 1.25-1.5 inches long. Lay motifs flat for joining to maintain symmetry.
— Abbreviations & Conventions Used in This Pattern :
Info :
All rounds are worked in continuous rounds unless noted. Use a stitch marker to mark round starts where helpful. When the pattern says 'in same st' this means work into the same stitch as previous stitch. Puff stitch instructions are spelled out when used. Change colors at the last yarn over of the last stitch to pick up new color cleanly. Join-as-you-go notes appear in Info sections where connectors are added.
— Large Sunflower Medallion (Make 3) :
Overview :
This motif is worked in two colors: Color B for the center (deep chocolate) and Color A for the petals (cream). The medallion is constructed as a flat circle with layered petal rounds worked into chain loops then finished with an outer lacy scallop and anchored to a continuous oval connector. The round numbering below is explicit and mathematically accurate for each growth step.
Round 3 :
(1 sc, 1 inc) x 6 (18)
Round 4 :
(2 sc, 1 inc) x 6 (24)
Round 5 :
(3 sc, 1 inc) x 6 (30)
Round 6 :
(4 sc, 1 inc) x 6 (36)
Round 7 :
(5 sc, 1 inc) x 6 (42)
Round 8 :
(6 sc, 1 inc) x 6 (48)
Round 9 :
(7 sc, 1 inc) x 6 (54)
Round 10 :
(8 sc, 1 inc) x 6 (60)
Round 11 :
(9 sc, 1 inc) x 6 (66)
Round 12 :
(10 sc, 1 inc) x 6 (72)
Round 13-18 :
1 sc in each st (72)
Info :
Place a stitch marker at the first stitch of Round 13 and keep it in place to mark the upright of the petal foundation. Work rounds 13-18 evenly to create a stable base for petals. If you prefer a slightly larger center, work one or two extra rounds even before continuing.
Round 19 :
*Sc in next 2 sts, ch 3, skip 1* repeat across to end (72) — This creates 24 ch-3 loops (72 sts/3 = 24 loops)
Round 20 :
Into each ch-3 loop: [2 dc, tr, 2 dc] in same ch-3 loop, sl st to next sc — repeat 24 times (work does not change base stitch count)
Info :
These tall petal clusters form the first layer of petals. Make sure clusters sit upright — you can slightly stretch the cluster before the final sl st to shape. Do not fasten off color B yet if you plan to carry; fasten off and change to Color A now if working petals in Contrast.
Round 21 :
Change to Color A. Ch 1, sc in same st, *ch 5, sc between next two petal clusters* repeat around forming 24 ch-5 loops (72 base points)
Round 22 :
Into each ch-5 loop: (dc, dc, puff, dc, dc) — puff made as [yo, insert, yo pull up] x3 then pull through all loops and ch 1 to close. Sl st to next sc. (24 puff petals total)
Round 23 :
Ch 3 (counts as dc), *skip 1, (3 dc, ch 2, 3 dc) in top of petal (creates shell), skip 1, dc in next sc* repeat around — this creates a scalloped outer edge; number of shells = 24
Round 24 :
Ch 1, sc in first st, *ch 3, sl st in ch-2 space of shell, ch 3, sc in top of shell* repeat around to create picot connectors (stitch count stays proportional)
Info :
Ensure petals are blocked to fan out. This is the primary layered petal structure. If you desire deeper texture, add an additional round of puff petals (repeat Round 22 technique inside a longer loop) before scallops.
Round 25 :
Edging round: *sc in next 2 sts, ch 4, sc in next shell top* around to create airy lacy edge. This keeps the diameter approximately consistent; count remains visually checked — expect ~96 chain loops distributed across motif depending on shaping.
Round 26 :
Finish round: Use a small scallop round: *(sc, hdc, 3 dc, hdc, sc) in next ch-4 loop* repeat around for finished edge. Fasten off and weave in ends. Block heavily to open petals and flatten center.
Info :
The finished large medallion should be flat when blocked. Use pins to open the petals and stretch the scallop evenly. Repeat to make 3 identical medallions. If your diameter differs, adjust by adding or subtracting one even round (Round 13-18) to match other motifs during joining.
— Small Lacy Round Doily (Make 4) :
Round 3 :
(1 sc, 1 inc) x 6 (18)
Round 4 :
(2 sc, 1 inc) x 6 (24)
Round 5 :
Ch 1, sc in same st, *ch 5, sc in 4th st* repeat around to create 6 ch-5 loops anchored every 4 stitches (24 base points)
Round 6 :
Into each ch-5 loop: sc, hdc, (2 dc, ch 2, 2 dc), hdc, sc. Sl st to join. This creates 6 large scallops.
Round 7 :
Ch 1, sc around in each st and in shell peaks, creating neat fabric for next round. (count approx 48-54 depending on shell peaks)
Round 8 :
Ch 3, *skip 1, (3 dc, ch 2, 3 dc) in shell top, skip 1, dc in next st* repeat to form outer scalloped motif — approx 6 scallops
Round 9 :
Ch 1, sc evenly around, then make small picot edging: *(sc, ch 3, sl st in 3rd ch) at each outer scallop point* repeat; fasten off and weave ends.
Info :
These small doilies act as filler motifs between the large medallions. Block each doily flat to 3.25-3.5 inches diameter and set aside for joins. Optionally work in Color A for all doilies for contrast as shown in the image.
— Leaf Motif (Make 18-24 Leaves) :
Round 1 :
ch 9. In 2nd ch from hook: sc, hdc, 2 dc, 3 tr, 2 dc, hdc, sc at end of chain (creates one side). Now turn to work back along chain opposite side:
Round 2 :
Sl st to next chain base, sc in next, hdc in next, 2 dc in next, 3 tr in center stitch (worked in same top of center), 2 dc in next, hdc in next, sc in last. Fasten off leaving long tail for sewing. (Leaf length about 1.25-1.5 inches)
Info :
To add texture, work Round 2 in BLO so the outer ridge stands out. Make leaves in both Color A and Color B to create contrast along the lattice. Block each leaf lightly to shape the curve.
Alternative Leaf (Textured) :
Ch 7, working along chains: sc, hdc, 2 dc, (puff, ch1) across center, 2 dc, hdc, sc, sl st. Fasten off. These textured leaves provide dimensional contrast when mixed with smooth leaves.
— Connecting Chains & Lattice (Make Several Sections) :
Info :
The runner uses braided chain connectors between motifs to create diamond lattice. Chains are worked in Color B for structure. Sections are created by chaining long lengths and anchoring with small connecting picot knots or tiny round beads (small 6 mm crochet balls made with 6 sc in mr, 2 rounds) at join points. This section explains the standard connector repeat for one diamond segment (use multiples to span between motifs).
Connector Segment :
Ch 50 (or chain to desired spacing), sc in 3rd ch from hook to form small loop base, ch 12, sc around outer point of motif to anchor (join-as-you-go) or sl st onto previously blocked motif point. Repeat ch 50 and anchor at each alternating motif anchor point. Use consistent chain counts between anchors to keep diamonds regular.
Info :
When making connectors, keep chains relaxed—not pulled taut—so the runner sits softly on the table. If you want a tighter lattice, shorten chains by 6–10 chains per segment. All chains should be secured with a tiny sc or picot to anchor points on motifs so the runner holds its shape.
— Tiny Bead / Ball Accent (Make 6-8) :
Round 3 :
1 sc in each st (12)
Round 4 :
Dec x6 (6) - Fasten off leaving long tail. Optional – stuff lightly and close tightly for a small bead. Sew these to connector intersections for visual weight as in the reference photo.
Info :
These tiny balls replicate the knotted accents between petals and leaves. Sew them in place with matched colour for subtle, elegant detail.
— Assembly Preparation & Blocking :
Info :
Block every motif flat. Use pins to open petals and scallops. For large medallions, pin the outer scallop to a round template so all three are identical. Lightly steam or wet-block cotton motifs; allow to dry completely. Lay out the runner on a flat surface (a large blocking mat or towel on a table) with medallions spaced evenly as in the photo: large medallion, small doilies positioned on the sides, diamond lattice connectors and leaves filling the gaps. Pin positions carefully before joining.
Info :
Decide which outer scallop points will anchor connector chains — mark them with pins. The typical layout uses 8–12 anchor points around each large medallion for connectors and leaves; adjust to taste. Ensure symmetry by counting anchor points from the top of each medallion.
— Join-as-you-go Connector Technique (Detailed) :
Info :
Start with a connector chain in Color B. Ch desired length between anchor points (example: ch 18 for moderate spacing). At the end of your chain, instead of fastening off, sl st into the marked anchor picot on the adjacent motif. Continue chaining and anchoring the opposite motif. To make diamond intersections, work small 3–4 ch loops and secure them to the midpoints with a sc or tiny bead. This method prevents bulky sewn seams and keeps joins flat.
Step :
Attach Color B to the underside of a medallion at a chosen anchor point using sl st, ch 18 (or chosen length), sl st into next motif anchor, ch 18 back, sl st into the first medallion anchor forming a loose diamond. Repeat along runner. Use tiny accent balls at the lower point of each diamond and a leaf motif at the top outer points to echo the photo composition.
Info :
For clean joins, insert hook into the back loop of the motif anchor stitch to hide the sl st. Weave tails through the nearest chains and trim. If you prefer sewn joins, use a whip stitch with matching yarn, sewing through the back loops of both motifs to make the seam nearly invisible.
— Alternate Attachment: Sewn Method :
Info :
Pin motifs in place, then use a tapestry needle and matching yarn to sew through the back loops with small mattress or ladder stitches. This technique gives a slightly more stable join for heavier use but can be more visible. Use invisible ladder stitch when sewing petals to avoid pulling the motif edges inward.
— Final Edge & Finishing Touches :
Info :
After all motifs are joined, go around the outer perimeter of the runner with a tidy finishing round in Color B (or matching color of your choice): ch 1, sc evenly around outer scallops, working 3 sc in each outer scallop peak to maintain shape. At leaf clusters, work sc around each leaf base to anchor them and hide raw joins. Add picot edging (ch 3, sl st in 3rd ch) at uniform intervals to echo delicate picots within motifs.
Info :
Weave ends securely: thread all loose tails onto a tapestry needle, weave through 8–12 stitches in the wrong side of the runner and trim close. Give one final light blocking if seams pulled out of shape during sewing.
— Optional Weighted Tips (For Flat Lay) :
Info :
To prevent curling at table edges, add tiny glass seed beads or a dab of fabric glue with a matching bead at the underside tip of the outermost leaves. Sew beads securely using strong thread. Beads should be small and matte to remain unobtrusive.
— Stitch-by-Stitch Troubleshooting & Tips :
Info :
If petals cup up after joining, re-block them wet and pin with slightly more tension outward. If chain connectors droop, shorten chain length incrementally until the lattice sits properly. When colors bleed during blocking, wash motifs separately in cold water with a color catcher sheet.
— Full Project Wrap-up :
Info :
Once assembled and dried, launder gently by hand if needed and re-block. Store flat or rolled (not folded) to preserve scalloped edges. This design photographs beautifully on light and dark table surfaces—the high contrast between deep chocolate centers and cream petals creates a classic, timeless aesthetic.
Completing this sunflower lace table runner is such a delight — every petal and picot builds into a detailed heirloom centerpiece. The layered petals, textured leaves, and airy connectors combine into a runner that brings warmth and handmade charm to your table. Take your time with blocking and joining; the result is worth the careful work. 🌻🧶 Celebrate your creativity and show off your finished runner with pride — it’s perfect for gifts or for elevating your own dining space. ✨