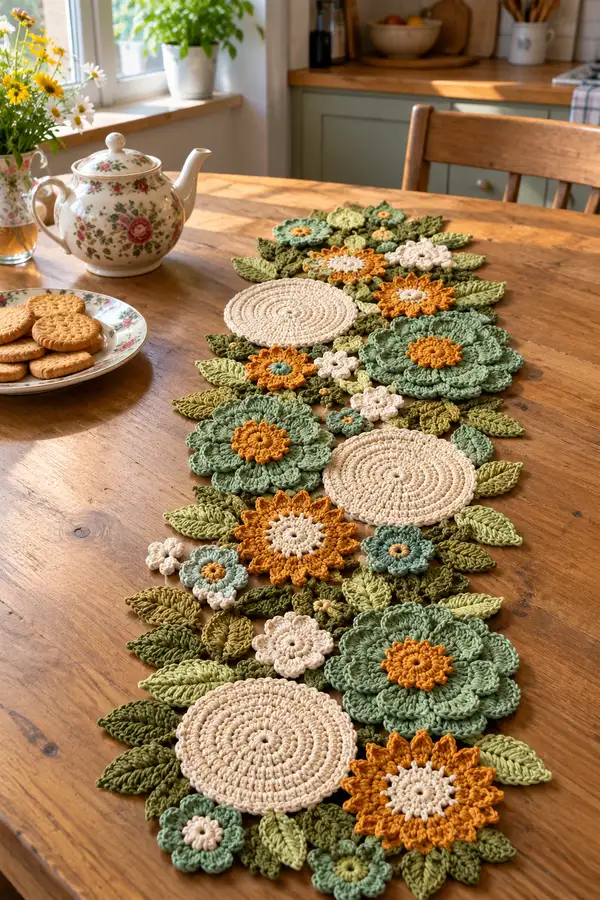
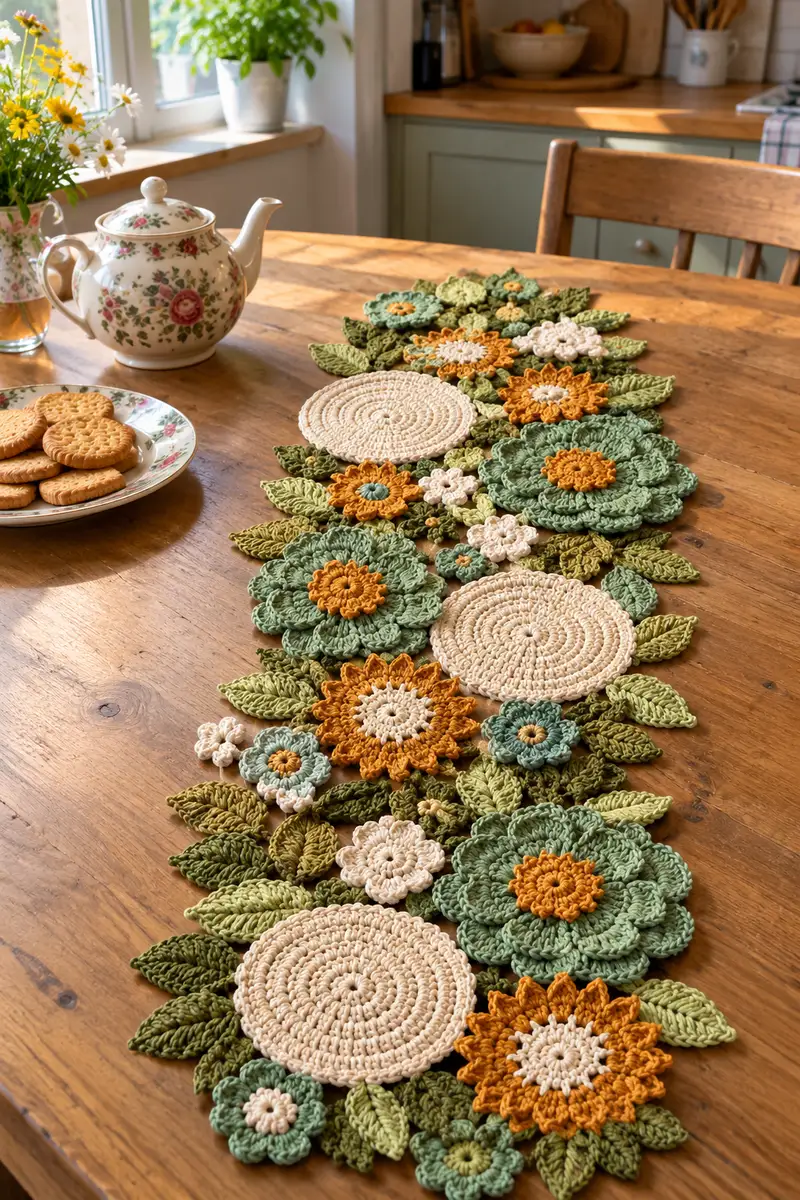
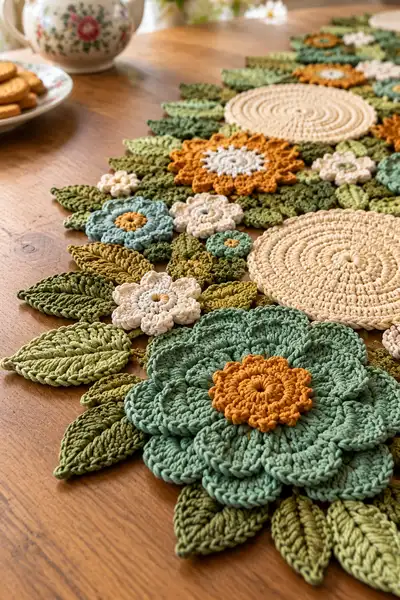
Create a botanical table runner inspired by a sunlit garden: layered crochet flowers, textured leaves and round mats in warm golds, creams and fresh greens. This pattern uses modular motifs you join into an elegant runner that lies flat and feels substantial. Clear, step-by-step instructions guide you through each motif — circles, layered blooms, small filler flowers and sculpted leaves — plus tips for joining and finishing.
Progress Tracker
0% Complete
— Large Round Mat (Make 3) :
Round 1 :
6 sc in magic ring (6)
Round 3 :
(1 sc, 1 inc) x 6 (18)
Round 4 :
(2 sc, 1 inc) x 6 (24)
Round 5 :
(3 sc, 1 inc) x 6 (30)
Round 6 :
(4 sc, 1 inc) x 6 (36)
Round 7 :
(5 sc, 1 inc) x 6 (42)
Round 8 :
(6 sc, 1 inc) x 6 (48)
Round 9 :
(7 sc, 1 inc) x 6 (54)
Info :
Change to cream or natural color before Round 10 if you want the mat to be all one shade. Work tightly during increases to avoid rippling. Place a stitch marker at the start of each round.
Round 10 :
(8 sc, 1 inc) x 6 (60)
Round 11 :
1 sc in each st (60)
Round 12 :
1 sc in each st BLO (60)
Round 13 :
1 sc in each st (60)
Round 14 :
1 hdc in each st (60)
Round 15 :
1 dc in each st (60)
Info :
These alternating height rounds (sc/hdc/dc) add a subtle ridge that looks like rings on the mat; maintain even tension for a flat result. If your mat cups, do a decrease round: (8 sc, dec) x 6 then continue even.
Round 16 :
1 sc in each st (60)
Round 17 :
1 sc in each st (60)
Round 18 :
Fasten off and weave in ends. Block flat to 9-10" diameter (size will vary with yarn and tension)
Info :
If you prefer a slightly larger mat add one more increase round before the even rounds: (9 sc, inc) x 6 (66) then continue even. Blocking is essential to make the mat lie perfectly flat.
— Large Layered Flower (Make 4) :
Round 1 :
6 sc in magic ring (6)
Round 3 :
(1 sc, inc) x 6 (18)
Round 4 :
1 sc in each st (18)
Info :
Change to center accent color (mustard) for the small central round. Tighten the center by pulling the tail to close the hole slightly before continuing.
Round 5 :
*(ch2, 3 dc) in next st, sl st in next st* repeat around (9 petals anchor points) (18)
Round 6 :
Switch to petal color (sage). Work in each ch-2/sp: sl st into ch-2 sp, (sc, hdc, 3 dc, hdc, sc) in same space to form full petal. Repeat around (9 petals) (18)
Round 7 :
1 sc around base of each petal to join (18)
Round 8 :
*(ch3, skip to space between petals, sl st) repeat to form decorative picot ring* (18)
Info :
For extra fullness work Round 8 using puff stitches: in each front loop at petal base make a 3-or-4 incomplete double crochet puff to give a gathered effect, then sl st to secure.
Round 9 :
Second petal layer: Into the gap between petals work: (sl st, ch2, 5 dc cluster, ch2, sl st) to create taller pointed petals (9 petals) (18)
Round 10 :
1 sc around entire flower base (18)
Round 11 :
Edge round: (sc, ch2, sc) around to create picot-like edging and give definition (18)
Round 12 :
Fasten off, weave ends. Block petals gently with pins to shape each petal outward. Flower should measure approximately 5-6" across after blocking.
Info :
Use a slightly smaller hook for the petal rounds if you want tighter texture. You can add a third petal layer by repeating Round 9 in a slightly larger dc cluster to increase diameter.
— Medium Layer Flower (Make 6) :
Round 1 :
6 sc in magic ring (6)
Round 3 :
(1 sc, inc) x 6 (18)
Round 4 :
Change to accent color for center. 1 sc in each st (18)
Round 5 :
In next round create small petals: *(ch3, sl st in same st) x 2 to form petal loops* around (18)
Round 6 :
Switch to petal color. In each ch-3 loop work (sc, hdc, 3 dc, hdc, sc) to create 18 small petals (18)
Round 7 :
Join with 1 sc around; sl st to finish (18)
Round 8 :
Fasten off, weave ends. Block each medium flower to about 3" diameter. Arrange as filler blossoms around the larger motifs.
Info :
Change yarn weight to cotton-light or use 3.5mm hook for smaller, tighter flowers if you want more contrast. Make some centers in mustard and some in cream for variety.
— Tiny Filler Flower (Make 6-10) :
Round 1 :
5 sc in magic ring (5)
Round 2 :
(1 sc, inc) x 5 (10)
Round 3 :
*ch2, 2 dc together in next st, sl st* around to make 5 petite petals (10)
Round 4 :
Fasten off, leaving long tail for sewing into layout. These small flowers are used for filling negative space and softening edges.
Info :
Work these with a 3.5mm hook for tighter look. Stitch counts here keep centers dense so they sit proud between leaves.
— Sculpted Leaf (Make 30-36) :
Round 1 :
Ch 14 (counts as foundation for leaf length)
Round 2 :
Sc in 2nd ch from hook, hdc in next, 2 dc in next, tr in next 4 chs (or tr, tr, tr, tr), 2 dc in next, hdc in next, sc in last. Turn to work down opposite side of foundation chain: sc in base of last stitch, hdc, 2 dc, tr x4, 2 dc, hdc, sc back into first ch (total approx 24 sts across leaf shape)
Info :
This creates a symmetrical leaf built on a chain spine. Adjust ch length for longer or shorter leaves. Use olive green for darker veins and lighter sage for top leaves.
Round 3 :
Work picot edge: *(sc, ch2, sl st) along the edge at regular intervals (approx 6-8 picots per leaf) to give leaf definition
Round 4 :
Fasten off and weave in ends. Block leaves slightly curved by pinning one side lower than the other to create lifelike shape.
Info :
For deeper texture, after Round 2 work a central vein using a ladder stitch with yarn needle and contrasting darker green by stitching through the center and pulling slightly to sink the vein.
— Leaf (Alternate Raised Texture) :
Round 2 :
Sc in 2nd ch from hook, (hdc, dc, tr) in next 3 ch, tr2tog over next 2 ch to create point, then continue symmetrically on opposite side: tr x3, dc, hdc, sc. (approx 20 sts)
Round 3 :
Using fpdc on the outside edge only around entire leaf to give raised ribbing (20 fpdc)
Round 4 :
Fasten off and steam-block for shaping. Make leaves in several greens to mix tones in layout.
Info :
Front post double crochet creates a pronounced rib similar to a leaf vein. Keep posts consistent and tall by using same yarn tension.
— Joining & Layout Notes :
Info :
Arrange all motifs flat on a blocking board or table following the visual flow: large round mats spaced evenly, large layered flowers clustered around and overlapping mats, medium flowers and tiny flowers filling gaps, and leaves radiating outward. Aim for a natural, cascading composition with leaves overlapping petals slightly to create depth.
Round 1 :
When you begin joining, hold two motifs overlapping slightly and use whip stitch along the overlapping edge with matching yarn, taking care to pass through both loops for a secure join. Continue adding motifs one at a time.
Info :
Use long tails (approx 12-18" each) when fastening off motifs for joining — this saves time. Pin motifs before sewing to maintain the intended spacing and prevent accidental flips.
Round 2 :
For decorative join details use surface slip stitch to create a continuous thin vine between motifs: with right side up, insert hook through edge of motif A, pull up loop, then into motif B and work sl st along connection points to create a neat decorative seam.
Info :
If you prefer an invisible join, use mattress stitch with a tapestry needle, sewing through the backs of the stitches on both motifs so the seam sits underneath and is not visible from the top.
— Final Edge & Stabilizing Round :
Round 1 :
Once the runner is assembled to desired length, work a single crochet round along the outermost edge of the whole runner. Work evenly spaced sc in all exposed stitches; when you reach gaps, work 3 sc in the gap to bridge it smoothly.
Round 2 :
Edge decorative round: *(sc, ch3, sc) in every 6th stitch* or where it visually balances to create little scallops along the edge. Keep counts consistent visually rather than strictly numerical since runner perimeter is irregular.
Info :
Blocking the entire runner on a board with pins after joining helps the edge sit evenly. Wet block or steam block according to yarn instructions and allow to dry fully for the crispest finish.
Round 3 :
Optional: Work a row of slip stitches using contrasting color along the seam lines to accentuate the layout. Fasten off and weave in all ends thoroughly.
Info :
If you want a firmer runner, sandwich a thin strip of interfacing or batting between two layers (create duplicate top and backing layers and baste them together) — this is an advanced variation.
— Assembly Tips & Final Touches :
Info :
Sow motifs with invisible mattress stitch for strongest hold if runner will be used frequently; for decorative, occasional-use runners, whip stitch is quick and pretty. Tie off securely and weave tails at least 4" into adjacent motifs before trimming.
Info :
For a natural look, stagger leaf directions and mix dark and light leaves so they read as natural foliage rather than repeated blocks. Use small filler flowers to hide visible joins and to reinforce the runner structure.
Info :
Check final dimensions before finishing: standard length in photo spans about 36-40" but you may extend by adding more motif clusters. The runner in the image is approximately 36-42 inches long depending on mat spacing.
Info :
Keep a small ball of matching yarn for future repairs; hand wash gently and lay flat to dry to maintain shape and color longevity.
Bringing this runner to life is such a rewarding project — every petal and leaf adds character and texture to your table! The finished piece is a beautiful centerpiece that feels handcrafted and welcoming. Enjoy blocking, arranging and sewing the motifs together — it's where the design truly blooms. Share your finished runner and savor the compliments! 🧶🌼