🧢 Beautiful ✨ Detailed πŸ’ Adorable

The Finley Blanket Pattern

The Finley Blanket Pattern
4.3β˜… Rating
12-15 Hours Time Needed
1.8K Made This
βœ‚οΈ

Intermediate Level

Ideal for those with basic crochet experience, featuring slightly more advanced stitches and techniques to expand your skills.

⏱️

Multi-Day Project

A rewarding 12+ hour journeyβ€”perfect for dedicated crafters who love detailed work.

πŸ€—

Soft Hug

Gentle, plush, and full of warmth, creating a sense of comfort and coziness wherever they find a home.

About This The Finley Blanket Pattern

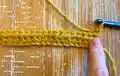
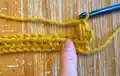
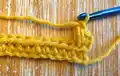
This pattern creates The Finley Blanket, a textured throw worked lengthwise to form vertical stripes using the bean stitch and half double crochets. The design is modern and cozy, giving the blanket a lovely weight and beautiful stitch definition. You can easily adjust length and width to suit your needs.

The Finley Blanket Pattern crochet pattern - detailed view of completed project

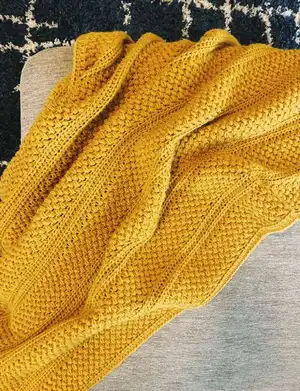
Worked in worsted-weight yarn with a J/6.0 mm hook, this throw finishes at approximately 45" x 53". The pattern includes instructions for the main body and an easy four-sided border.

Why You'll Love This The Finley Blanket Pattern

I absolutely love this pattern because it pairs a unique textured bean stitch with classic hdcs to create a modern, cozy fabric that feels luxurious. I enjoy how the lengthwise construction produces vertical stripes that flatter sofas and beds. The stitch pattern is repetitive enough to be relaxing but interesting enough to keep me engaged. I also love that it uses popular, easy-to-find yarn (Lion Brand Pound of Love), so it is accessible for many crocheters. Finally, the blanket is very customizable, which makes it a joy to gift or keep.

The Finley Blanket Pattern step 1 - construction progress The Finley Blanket Pattern step 2 - assembly progress The Finley Blanket Pattern step 3 - details and accessories The Finley Blanket Pattern step 4 - final assembly and finishing

Switch Things Up

I love how easy it is to customize this blanket by changing colors; try alternating two colors every 8 rows for bold vertical stripes.

I sometimes make a smaller lapghan version by reducing the foundation chain and working fewer repeats of the row sequence.

Want a chunkier look? I switch to a bulkier yarn and a larger hook and love the faster drape it gives.

I often add fringe or tassels to the short ends for a boho touchβ€”just attach them before weaving in ends for a secure finish.

To make matching pillows, I work the pattern on a smaller chain and stuff them or cover ready-made cushions for a coordinated set.

For a more subtle texture, use a heathered or tonal yarn that highlights the bean stitch without too much color contrast.

I sometimes work a narrower border of slip stitches or single crochet for a sleeker edge instead of hdcs, depending on the look I want.

If you prefer stripes, alternate a contrasting color for the row-sets that are repeated to create vertical panels of different colors.

I recommend blocking lightly after finishing to even out the rows and help the border sit flat, especially if you changed yarn or tension.

Don’t be afraid to experiment with embroidery or sewn-on appliques to personalize the throwβ€”simple motifs added to a corner make lovely gifts.

Common Mistakes & How to Fix Them

βœ— Not counting the foundation chain correctly; recount your chains and remember the pattern calls for Ch 171 to result in 169 stitches after working into the back bump. βœ— Treating the ch 2 at the end of rows like a stitch; note that ch 2 does not count as a stitch in this pattern so do not include it in your stitch count when working the row. βœ— Skipping the chain-1 spaces when placing bean stitches; work bean stitch into the ch-1 spaces as instructed to maintain the textured stripe pattern and correct stitch count. βœ— Pulling your tension too tight on bean stitches; keep an even, slightly loose tension so the bean clusters sit nicely and the fabric remains supple and not puckered. βœ— Forgetting to work the last stitches exactly as written at ends; follow the directions for the last bean or hdc on the end of each row to keep edge geometry consistent. βœ— Fastening off before completing the border; do not fasten off after the main body β€” continue with the same yarn for the border as instructed for neat edges.

The Finley Blanket Pattern

Wrap yourself in a modern, textured throw that works up lengthwise to create striking vertical stripes. This pattern uses the bean stitch paired with half double crochets to give a cozy, weighty drape. Youll love how quickly it grows and how beautiful the finished Maize color looks on a sofa or bed. Make it your own by changing length, width, or colors for a personalized handmade gift.

Intermediate 12-15 Hours

Materials Needed for The Finley Blanket Pattern

β€” Main Fabric

  • 01
    Weight 4 (Worsted) yarn β€” approx. 3,060 yds total
  • 02
    Lion Brand Pound of Love β€” Maize β€” 3 skeins (pattern uses approximately 2 1/2 skeins; only half of the third skein is used)
  • 03
    Color: Maize (golden yellow shade)

β€” Tools Required

  • 01
    Crochet hook J/ 6.0 mm
  • 02
    Scissors
  • 03
    Tapestry needle

Progress Tracker

0% Complete

β€” The Finley Blanket :

Infos :

Finished size measures 45" wide x 53" long. This blanket is worked lengthwise. To change the length, chain any odd number. To change the width, simply add more rows. ch 2 does not count as stitch. 2hdc means 2 hdcs in same stitch. Video tutorial for the bean stitch HERE. This pattern uses 2 1/2 skeins of Lion Brand's Pound of Love yarn, so you will have some yarn leftover (save it for a scrapghan or granny squares!).

Foundation row :

Ch 171, hdc in 3rd back bump from hook, hdc across to end, ch 2, turn (169 sts)

Row 1 :

work bean st into 1st hdc, *sk next hdc, bean st into next hdc*, rep from * to * across row to last st, ch 1, turn (remember you ch 1 to secure the bean st, so technically you are chaining 2 at the end of the row) (169 sts - bean and ch 1 spaces count as stitch)

Row 2 :

sk first bean st, work bean st into ch-1 sp *sk bean st, work bean st into ch-1 sp*, rep from * to * across row working last bean st in last ch-1 sp on the end, ch 1, turn (169 sts - bean and ch 1-space count as stitches)

Rows 3 - 8 :

rep row 2

Row 9 :

hdc in 1st bean st, hdc in ch-1 sp *hdc in bean st, hdc in ch-1 sp*, rep from * to * across to last bean st, do not hdc in last bean st, hdc in last ch-1 sp, ch 2, turn (169 sts)

Row 10 :

hdc in each st across to end of row, ch 2, turn (169 sts)

Rows 11 & 12 :

repeat row 10

Rows 13 - 20 :

rep rows 1 - 8

Rows 21 - 24 :

rep rows 9 - 12

Rows 25 - 32 :

rep rows 1 - 8

Rows 33 - 36 :

rep rows 9 - 12

Rows 37 - 44 :

rep rows 1 - 8

Rows 45 - 48 :

rep rows 9 - 12

Rows 49 - 56 :

rep rows 1 - 8

Rows 57 - 60 :

rep rows 9 - 12

Rows 61 - 68 :

rep rows 1 - 8

Rows 69 - 72 :

rep rows 9 - 12

Rows 73 - 80 :

rep rows 1 - 8

Rows 81 - 84 :

rep rows 9 - 12

Rows 85 - 92 :

rep rows 1 - 8

Rows 93 - 96 :

rep rows 9 - 12

Rows 97 - 104 :

rep rows 1 - 8

Rows 105 - 108 :

rep rows 9 - 12

Rows 109 - 116 :

rep rows 1 - 8

Row 117 :

rep row 9; do not ch-2, only ch-1

Info :

Do not fasten off, continue with same yarn for border

β€” For border :

Side 1 :

2hdc in first side st, working hdcs evenly along the side of the bean sts and hdc sts, ending with 2hdc in last st

Side 2 :

2hdc in first st, working hdcs in each hdc st, ending with 2hdc in last st

Side 3 :

rep side 1

Side 4 :

rep side 2

Instruction :

sl st to first hdc from side 1

Finish :

Fasten off; weave in all ends

Assembly Instructions

  • Do not fasten off after completing the body; continue with the same yarn and work the border as written to create a continuous edge.
  • Work Side 1 border by placing 2hdc in the first side stitch and working hdcs evenly along the side of the bean stitches and hdc stitches, ending with 2hdc in the last stitch for a neat corner.
  • Work Side 2 border by placing 2hdc in the first stitch and working hdcs evenly across the hdc rows, ending with 2hdc in the last stitch; repeat sides 3 and 4 as instructed.
  • Join the border round by slip stitching to the first hdc from side 1, then fasten off and weave in all ends with a tapestry needle for a tidy finish.

Important Notes

  • πŸ’‘Finished size measures 45" wide x 53" long; adjust foundation chain to change the length.
  • πŸ’‘This blanket is worked lengthwise; chain any odd number to change length and add more rows to change width.
  • πŸ’‘ch 2 does not count as a stitch in this pattern; follow stitch counts as given to maintain proper gauge and width.
  • πŸ’‘The pattern uses the bean stitch worked into ch-1 spaces and hdcs to create vertical textured stripes; view the bean stitch video tutorial if you need extra guidance.

This throw is designed to be both stylish and so comforting β€” perfect for curling up with a book or gifting to someone special. The Finley Blanket uses simple repeats to build beautiful texture you can customize in size or color. Make one in Maize like the sample, or choose your favorite shades to match your home. πŸ§Άβœ¨πŸ›‹οΈ

You ask,

we answer.

FAQs

What size will the finished piece be?

The finished blanket measures approximately 45" wide x 53" long using the recommended yarn and hook size.

Can I use different yarn weights for this pattern?

You can substitute yarn weights, but this will significantly change the finished size and drape; adjust your hook size accordingly and make a swatch first.

Do I need prior crochet experience for this pattern?

This pattern is rated intermediate, so you should be comfortable with half double crochet and willing to learn the bean stitch; the included bean stitch instructions and video link will help.

How long does this project typically take to complete?

Most crocheters spend about 12-15 hours on this throw, though time may vary depending on experience and the pace you crochet.

How much yarn do I need?

The pattern lists approximately 3,060 yards total; the sample uses Lion Brand Pound of Love (3 skeins) and about 2 1/2 skeins are used so you will have leftover yarn.