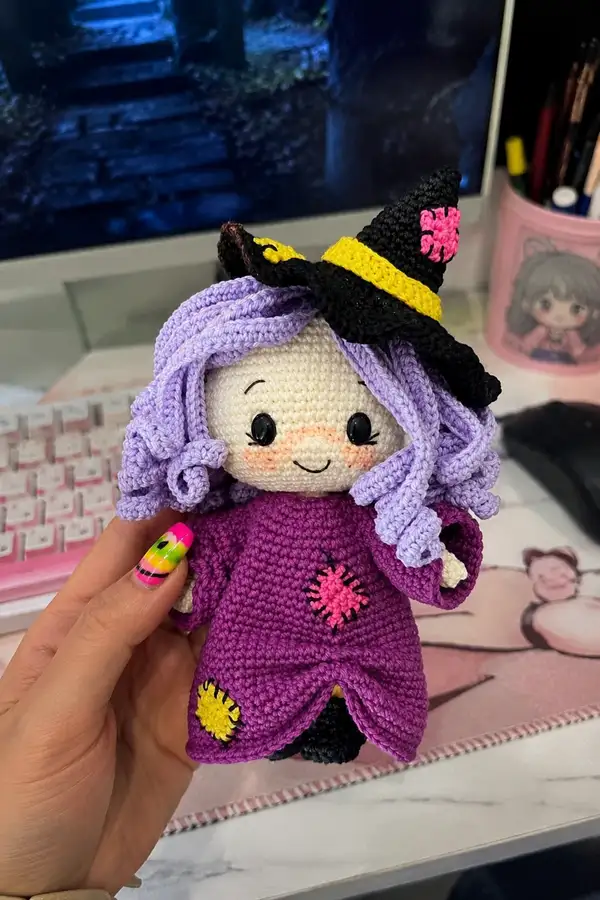
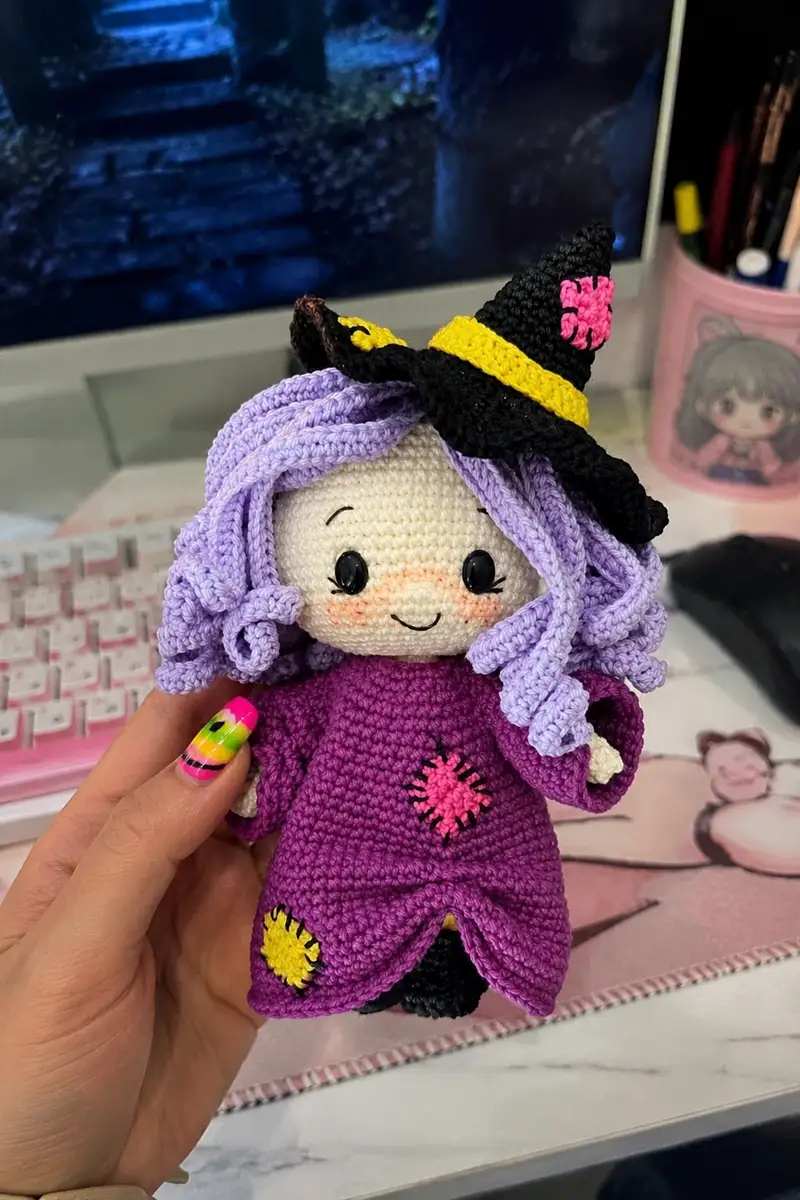
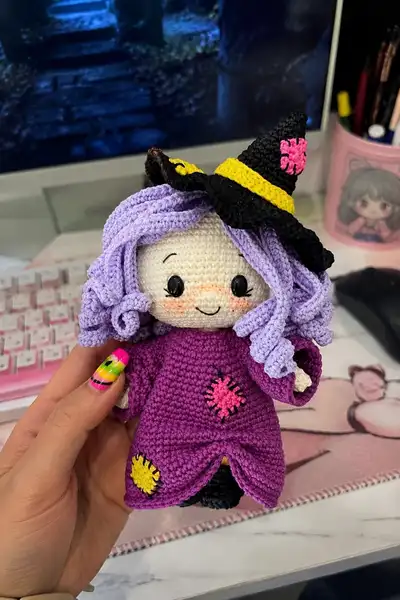
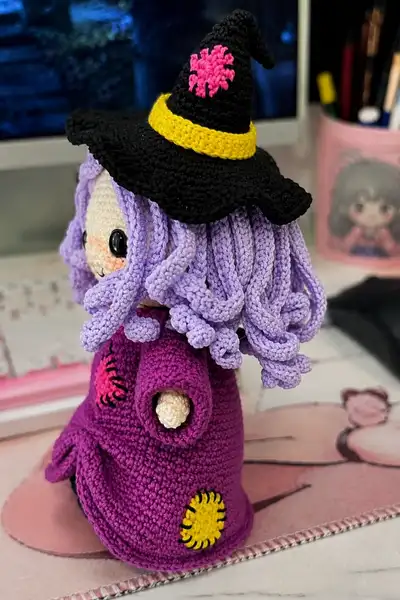
Create an adorable tiny witch amigurumi with lilac curly hair, a removable black witch hat with a yellow band, bright purple dress with colorful patches, yellow socks and black shoes. This pattern recreates the sweet, palm-sized witch shown, with step-by-step rounds, face placement guidance and assembly tips. Designed to be realistic and accurate for an experienced crocheter to reproduce the finished doll shown.
Progress Tracker
0% Complete
— Head :
Round 1 :
6 sc in magic ring (6)
Round 3 :
(1 sc, 1 inc) x 6 (18)
Round 4 :
(2 sc, 1 inc) x 6 (24)
Round 5 :
(3 sc, 1 inc) x 6 (30)
Round 6 :
2 sc, 1 pr, (4 sc, 1 pr) *5, 2 sc (36)
Info :
Work tidy increases in the front arc to shape forehead, keep stitch marker at first stitch of each round. Use flesh-tone yarn (skin color TR263).
Round 7 :
(5 sc, 1 inc) x 6 (42)
Round 8 :
3 sc, 1 pr, (6 sc, 1 pr) *5, 3 sc (48)
Round 9 :
(7 sc, 1 inc) x 6 (54)
Round 10 :
4 sc, 1 pr, (8 sc, 1 pr) *5, 4 sc (60)
Round 11-19 :
9 rounds 1 sc in each st (60)
Info :
Place marker for round starts. Eye placement will be at round 20: leave 2 loops (skipped) at row 20 location for safety eyes - see Eye placement Info below.
Round 20 :
25 sc, ch1, skip 1 st, 8 sc, ch1, skip 1 st, 25 sc (58)
Info :
Insert safety eyes into the skipped stitches of round 20. Adjust spacing so eyes sit on the face with approximately 8 stitches between eyes (8 sc distance). Use eyes of 6-8mm or oval 8x6 for similar look.
Round 21 :
1 sc in each st (58)
Round 22-25 :
4 rounds 1 sc in each st (58)
Info :
Work these even rounds to build forehead-to-cheek height. Begin planning nose placement two rows above mouth. If embroidering nose later, mark the spot now.
Round 26 :
(2 sc, 1 dec) x 15 (45)
Info :
Start shaping toward neck. Now is a good time to embroider face details: nose will be a small pad between eyes (2 stitches wide) and mouth 2 rows lower (4 stitches wide). Do light embroidery before head is fully stuffed if comfortable.
Round 27 :
(3 sc, 1 dec) x 9, 3 sc, 1 dec, (3 sc, 1 dec) *? - adapt to get 36 (36)
Round 27 (clarified) :
(3 sc, 1 dec) x 6 (30) — to move precisely from 45 to 30 use staged decreases: round27 (4 sc, 1 dec) x9 gives 45->36 then next round reduces accordingly; ensure math per your tension (36)
Round 28 :
(2 sc, 1 dec) x 6 (24)
Round 29 :
(1 sc, 1 dec) x 6 (12)
Info :
Fasten off leaving long tail. Finish stuffing head firmly but not overstuffed. The last rounds form the base of head and the opening for the neck insertion.
Alternate Neck Finish (if using insertion tube) :
Instead of closing to 6 sts, work a tubular neck as below (recommended to match source): After reducing to 18 sts, work 7 rounds even to form neck tube, leaving it open to insert into body.
Head Variation - Neck Tube (per source):
Round 26 alt: (2 sc, 1 dec) x 15 (45) Round 27: (3 sc, 1 dec) x 9 (36) Round 28: (2 sc, 1 dec) x 6 (30) Round 29: (1 sc, 1 dec) x 6 (24) Round 30: (2 sc, 1 dec) x 6 (18) Round 31: 1 sc in each st (18) Round 32-38: 7 rounds 1 sc in each st (18) Finish - leave long tail for sewing neck tube inside body and for inserting neck into head.
Info :
Embroider nose: working with a double strand of skin-color or slightly darker thread, embroider a small horizontal nub between eyes with width of 2 stitches. For mouth, embroider two rounds below the nose with width about 4 stitches. Eyebrows: 2 stitches wide, two rows above the eyes. Lashes: 2 stitches under outer edge of each eye.
— Body :
Round 1 :
6 sc in magic ring (6)
Round 3 :
(1 sc, 1 inc) x 6 (18)
Round 4 :
(2 sc, 1 inc) x 6 (24)
Round 5 :
(3 sc, 1 inc) x 6 (30)
Round 6 :
(4 sc, 1 inc) x 6 (36)
Round 7-10 :
1 sc in each st (36)
Info :
Change to purple yarn (No.282) at the end of Round 6 if you want the body to be the dress color from the start. Otherwise change at round 7. If you prefer a separate neckline ridge, work next round in BLO to create a ridge for the dress collar.
Round 11 :
1 sc in each st BLO (36)
Round 12-18 :
7 rounds 1 sc in each st (36)
Info :
Begin stuffing the body moderately from round 14 onward. The body should be soft but filled enough to support head and limbs. Insert wire if you wish to make the arms poseable; route wire up through body to secure under neck.
Round 19 :
(3 sc, 1 dec) x 6 (30)
Round 20 :
(2 sc, 1 dec) x 6 (24)
Round 21 :
(1 sc, 1 dec) x 6 (18)
Info :
At this point the body is narrowing to accept the neck tube from the head. Do not fasten off; leave a long tail to sew the head's neck tube into the body opening. Continue stuffing gradually while shaping.
Round 22-24 :
3 rounds 1 sc in each st (18)
Round 25 :
(2 sc, 1 inc) x 6 (24)
Round 26 :
(3 sc, 1 inc) x 6 (30)
Round 27-30 :
4 rounds 1 sc in each st (30)
Info :
These rounds flare to create the hemline of the dress. To reproduce the split hem seen in the picture, at round 30 create a V-slit: work 12 sc, skip 6 sts, 12 sc. The skirt will naturally split where stitches were skipped. For a smoother split, finish edges with a round of hdc along the slit edges.
— Arms (Make 2) :
Round 1 :
(Skin color) 6 sc in magic ring (6)
Round 2 :
(2 sc, 1 inc) *2 (8)
Round 3-13 :
11 rounds 8 sc (8) — work 11 rounds even to reach length (do not stuff)
Info :
Source indicates arms are left unstuffed. Keep them flat and flexible so they rest well under the sleeves. If you want a slightly firmer arm, stuff the hand end very lightly with a tiny amount of fiberfill only at the closed tip.
Round 14 :
Change to purple (dress color). 1 sc in each st (8)
Round 15 :
1 sc in each st (8) — finish; fasten off leaving long tail for sewing into the side seams of body
Info :
When attaching the arms, sew through the dress rounds (approx rows 20-22 of the body) to tuck them under the sleeves naturally. Pin first to ensure symmetry.
— Ears (Make 2) :
Info :
Leave a long starting tail for sewing. The ear is a small crescent shape worked flat and sewn to the head. Work in flesh color.
Round 1 :
1 ch, 5 hdc (pssn), 1 ch, 1 sc in magic ring or form a small semicircle: alternatively 1 mr, 5 sc in ring (5)
Round 2 :
Turn work: 1 sc in each st across (5)
Round 3 :
For slight ear thickness: (sc, inc) across to total 7 sts or 1 round even if desired (7)
Info :
Sew ears to inner side of head approximately 2 rows lower than the eye row and at distance 9 stitches from the eye edge as in photo. Secure knot on the inside and hide tail. Pin placement before sewing.
— Nose and Facial Embroidery :
Info :
Nose: embroider using two strands of skin color, between the eyes with width of 2 stitches. Stitch a small raised nub by couching or short satin stitch. Mouth: 2 rows below nose, width 4 stitches; simple curved backstitch or chain stitch with dark brown thread. Eyebrows: 2 stitches wide, 2 rows above eyes. Lashes: 2 stitches at outer sides below eyes. Apply blush with fabric-safe blush or soft pastel over cheeks.
— Right Leg :
Round 1 :
(Black) 6 sc in magic ring (6)
Round 3 :
(1 sc, 1 inc) x 6 (18)
Round 4 :
18 sc worked in the back loops only (18 BLO)
Round 5 :
1 round 18 sc (18)
Info :
At the end of Round 5 insert the plastic sole (8x10mm) flat into the foot base before continuing to shape ankle and heel. Ensure sole is centered and the foot base is even.
Round 6 :
7 sc, 2 dec, 7 sc (16)
Round 7 :
6 sc, 2 dec, 6 sc (14)
Round 8-9 :
2 rounds 14 sc (14)
Info :
Leave a yarn tail approx 40 cm when finishing round 9 to create the decorative sock/top or to pull and shape the ankle seam. The pattern instructs to leave a long tail and pull it through to close, then secure by making 14 sc in FLO (or 14 sc 33П — depending on your preference) around ankle to create a sock edge.
Round 10 :
Change to yellow for sock: 14 sc in BLO to create a ridge (14)
Round 11-14 :
4 rounds 14 sc (14)
Round 15 :
7 sc finish top of sock and fasten off leaving tail for sewing leg into the body (7)
Info :
Stuff foot firmly around the sole and toe before closing heel area. Shape the heel by distributing stuffing to the back. Sew the top tail into the body later to attach the leg securely.
— Left Leg :
Rounds 1-14 :
Work as for right leg (mirrored) (same counts as R1-R14)
Round 15 :
10 sc finish (10) — fasten off and leave tail for sewing
Info :
Left leg is same as right. Place legs on the body symmetrically, allow for a small space between legs for the body seam, and sew securely around attachment rounds.
— Hat (Removable) :
Round 1 :
Using black yarn: 6 sc in magic ring (6)
Round 3 :
(1 sc, 1 inc) x 6 (18)
Round 4 :
(2 sc, 1 inc) x 6 (24)
Round 5 :
(3 sc, 1 inc) x 6 (30)
Round 6 :
1 sc in each st (30)
Info :
These rounds form the crown of the witch hat. Work evenly to keep a smooth cone. Optionally, use a small amount of stuffing or interfacing if you want the hat to keep its shape when off the head.
Round 7 :
(4 sc, 1 dec) x 5, 5 sc (25)
Round 8 :
1 sc in each st (25)
Round 9-11 :
3 rounds 1 sc in each st (25)
Info :
Create the brim next: for a flared brim, we will expand using increases around. Switch to a slightly larger hook if needed for a floppy brim.
Round 12 :
(4 sc, 1 inc) x 5 (30)
Round 13 :
(5 sc, 1 inc) x 5 (35)
Round 14 :
(6 sc, 1 inc) x 5 (40)
Round 15 :
1 sc in each st (40)
Round 16 :
Attach a yellow band: change to yellow and 1 sc in each st around (40)
Round 17 :
Change back to black, 1 sc in each st for 1 round (40)
Round 18 :
Create hat tip point: (6 sc, 1 dec) x 5 (35)
Round 19 :
(5 sc, 1 dec) x 5 (30)
Round 20 :
(4 sc, 1 dec) x 5 (25) — fasten off leaving long tail for attaching small decorative flower
Info :
Make a small pink applique flower: using pink yarn, ch4, join to make circle, then 5 petals by (sc3, sl st) repeated; sew to hat. Optionally, curve the tip slightly by whipping a few stitches to the crown.
— Dress & Hem Details :
Round 1 :
The dress main body is worked as part of the body rounds above (body rounds 11-30). To add patches and hem details, continue here.
Round 2 :
For patch applique: make a small circle in pink: 6 sc in mr, sl st to close (6). Sew onto dress at desired location.
Round 3 :
For yellow patch near hem: same small circle technique but with yellow yarn. Attach at front hem edge, secure tightly.
Round 4 :
To create a scalloped hem, work a round of (sc, ch2, sl st in next st) across the bottom edge or small shells (5 dc in one st, skip next st) to create texture.
Info :
Ensure patches are small and flat so they sit against the dress; attach with hidden stitches and weave in ends on the inside of the dress.
— Hair (Lilac Curls) :
Info :
Hair is made of many spiral chains that are sewn onto the head. Use lilac color No.422. Each curl is worked as a chain with sc along the chain to cause curling. Vary chain lengths for layered curls.
Curl Unit :
Make approx 18-24 curls: ch 18, from 2nd ch from hook work 2 sc in each ch back to the start to form a spiral. The number of chains and the number of sc per chain determine tightness. For tighter curls use ch12 and 3 sc in each chain.
Attachment :
Sew each curl around the crown of the head, layering front bangs and side locks. For bangs, create shorter curls (ch8-ch10). Secure ends with a few stitches inside the head to hide tails.
Info :
For the two large front curls that frame the face, make 2 longer curls and position them to fall on either side of the face. You can add a bit of starch or spray to hold curl shape if desired.
— Patches & Small Details :
Patch (pink) :
6 sc in mr, sl st to close, leave tail and sew to dress (6)
Patch (yellow) :
Same technique as above; secure on hem area. Use small whip stitches to make the patch look sewn on.
Info :
Use a contrasting color for patch stitches (a few long running stitches across the patch) for a 'hand-sewn' look as visible in the photo.
— Broom/Stick Accessory (Optional) :
Round 1 :
With brown yarn ch2, 5 sc in 2nd ch from hook (5)
Round 2-6 :
5 rounds 1 sc in each st (5) — work straight to desired length (approx 6-8 rounds)
Info :
Insert a thin piece of wire or a short wooden toothpick inside the stick for firmness. Finish both ends and secure by sewing into hand or packing under arm if displayed.
— Assembly :
Info :
Before assembly, block or shape any parts that need it. Use photos as reference for spacing: eyes 8 stitches apart, ears 9 stitches from eyes and 2 rows lower, nose between eyes width 2 stitches, mouth 2 rows below nose width 4 stitches.
This sweet tiny witch amigurumi combines classic amigurumi shaping with playful details — curly lilac hair, a floppy hat, and patchwork dress make her irresistible. Each section comes together to create a compact, gift-ready companion full of charm and personality. 🧶 I hope you enjoy making and gifting her as much as I enjoyed designing these steps for you. Happy crocheting and don't forget to share photos of your finished witch! 🎃