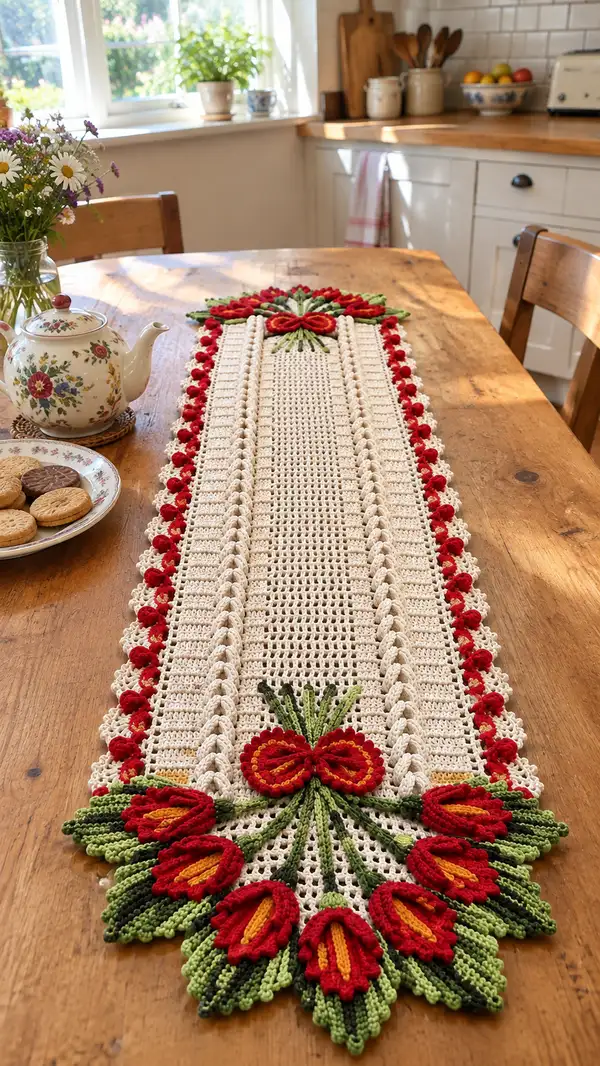
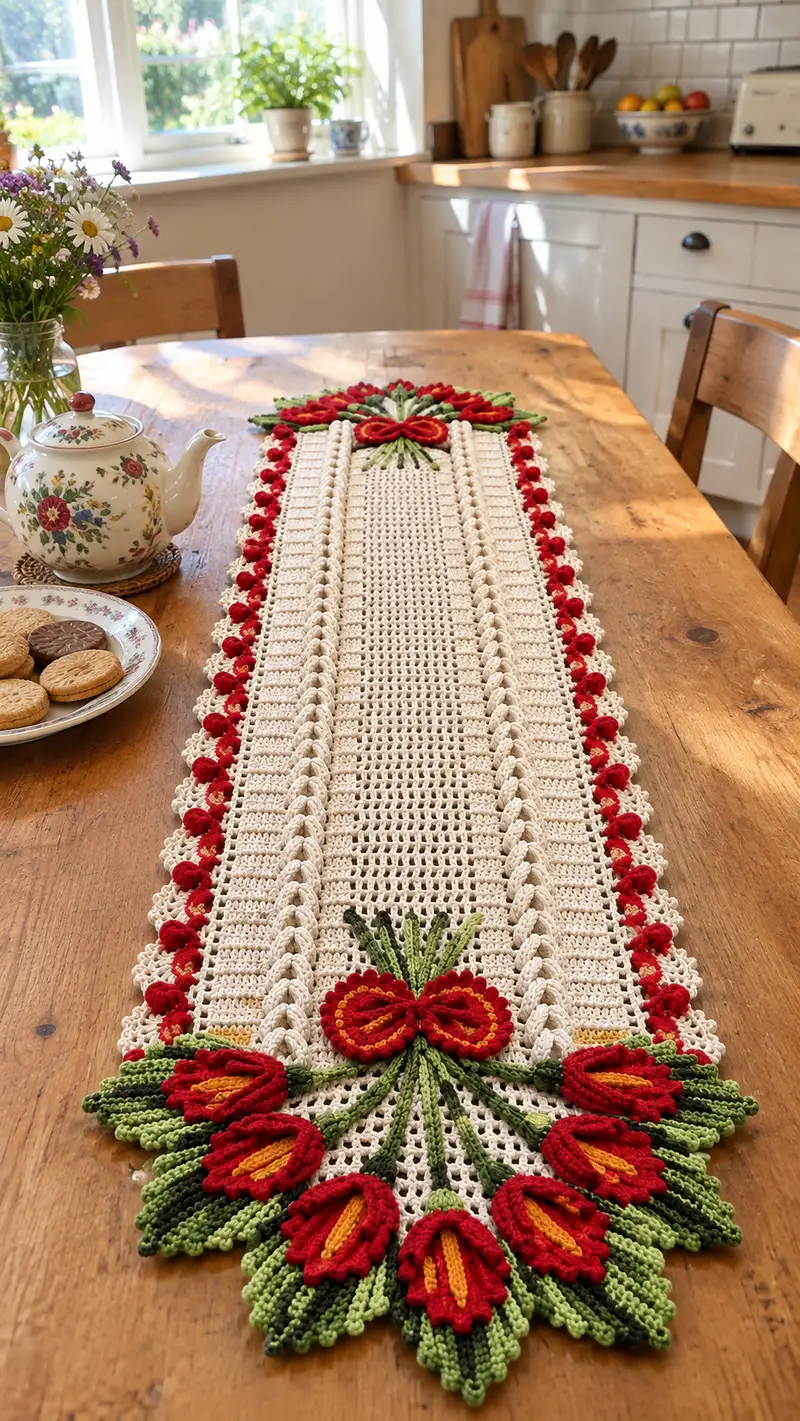
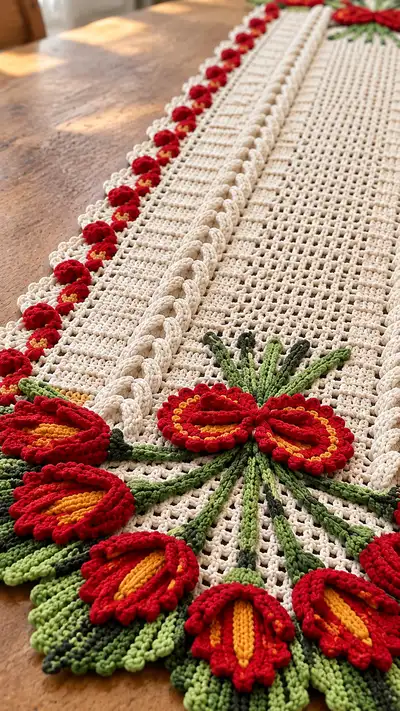
A long, elegant lace table runner featuring raised braided columns, delicate bobble edging and dramatic red tulip bouquets at each end. Worked in a warm cream base with bold red, golden yellow and graduated green for leaves, this runner combines filet-style openwork with textured overlay petals and braided cables to create a vintage-inspired centerpiece. Perfect for a farmhouse kitchen or seasonal table, the design is richly detailed yet constructed from repeatable modular pieces.
Progress Tracker
0% Complete
— Notes & Gauge :
Info :
Gauge is not critical for a table runner but affects finished size. Using 3.5mm hook with worsted cotton, the main filet ground should measure approximately 12 sc by 8 rows = 4 inches (10cm). Adjust hook to match your tension. Work tightly enough that the stuffing of appliques and bobbles do not show through.
— Center Panel (work flat in rows):
Row 1 :
With cream, ch 102 (this chain will make center panel width ~ 15-18cm depending on yarn). Turn. (102)
Row 2 :
Ch 2 (counts as hdc), hdc in 2nd ch from hook and in each ch to end. Turn. (102)
Row 3 :
Ch 1, sc in each st across. Turn. (102)
Row 4 :
Begin filet motif - ch 4 (counts as dc + ch1), skip next st, *dc in next st, ch1, skip next st; rep from * across to last st, dc in last st. Turn. (51 dc + 50 ch-1 spaces)
Row 5 :
Ch 1, sc in first st, *ch1, dc in next dc (over the dc), sc in next sc (over ch-space); rep across ending sc. Turn.
Row 6-12 :
Repeat Rows 4-5 alternately (open filet ground). This creates a neat openwork column that will be flanked by the raised braid later. Maintain stitch count of 102 where dc and sc align.
Info :
Place stitch markers to denote the center 10-stitch column if you want precise symmetry later for applique placement. Count carefully every 10 rows to ensure even tension.
Row 13 :
Ch 1, sc across in each st for a solid row to stabilize the filet (102). Turn.
Row 14-21 :
Repeat Rows 4-5 (open filet) for 4 full openwork repeats (8 rows) to build height (these are Rows 14-21). Keep even tension. End with a sc stabilizing row on Row 21.
Row 22 :
Ch 2, hdc across (102). Turn.
Row 23-30 :
Repeat Rows 4-5 alternately to reach the desired center length. In the pictured runner there are approximately 44-48 total worked rows for the main field; here continue filet repeats until your center measures desired length. For this pattern continue 18 more rows of filet (total center rows numbered here to 30).
Info :
Block the center panel flat before joining any side braids or affixing appliques. Blocking evens out stitches and ensures the braids sit neatly beside the filet.
— Raised Braided Columns (Make 2, work alongside center or separately and seam):
Info :
You can work braids attached as you go (recommended for a seamless look) or make them separately then sew. The braid is made by working repeat cable-like loops using FP/BP stitches and chains to create the rope effect.
Row 1 :
With cream, ch 22. Turn. (22)
Row 2 :
Ch1, sc in 2nd ch from hook and across (21). Turn.
Row 3 :
Ch2, hdc in each st across (21). Turn.
Row 4 :
Ch1, sc across (21). Turn.
Row 5 :
Ch 2 (counts as hdc), *FP hdc around next st, BP hdc around next st; rep across finishing hdc in last st. This creates alternating raised posts. Turn. (21)
Row 6 :
Ch 1, sc in each st BLO to form a ridge on the right edge (21). Turn.
Row 7 :
Ch 2, hdc across working FP/BP pattern offset from previous row to cause the posts to tilt: *BP hdc around previous FP, FP hdc around previous BP; rep across. Turn. (21)
Row 8-20 :
Repeat Rows 6-7 alternately for 7 cycles (14 rows) to create a tall braid-like cable. End with a solid sc row to match the center height. (21)
Info :
If working braids separately, leave a long tail for sewing. If working in situ, join the braid edge to the center filet with sc or slip stitch as you complete each row to join cleanly (see Assembly section for exact join rows).
— Small Bobble Border (Edge Row - Make continuous along both sides):
Info :
This decorative row of small red bobbles sits just outside the braid and alternates small yellow centers. Work along the side edges of the runner after braids are attached or along the long side chain edge of the center panel before braids are joined.
Row 1 :
With red, join at bottom right long edge, ch1, sc evenly along edge about every sc/space to end (approx 100 sc depending on length). Turn your work as you go and keep stitch spacing even.
Row 2 :
*Ch2, work a 5-dc bobble in next stitch (yo, insert, dc, do not finish; rep 5 times leaving last loop then yo and pull through all loops), ch1, sl st into next st; rep from * across for spaced bobbles. Fasten off leaving tail for weaving. This produces approx 40-50 small bobbles along the side depending on length.
Info :
Embroider a tiny yellow French knot or use a 3-sc tight flower in the ch1 space inside each bobble cluster for a golden center. To make a small yellow center, use golden yarn and sl st 3 times into the ch1 space then secure.
— Small Scalloped Lace Edge (outermost border):
Row 1 :
With cream, join to the outer edge next to the bobble row, ch1, sc evenly across edge (match stitch count). Turn.
Row 2 :
*Ch3, 3 dc in next stitch, ch3, sl st in next st; rep from * across to make small shells. This gives a delicate scallop which frames the bobbles. Fasten off and weave ends.
Info :
Blocking will open the scallops and set the bobbles upright. Pin shells gently to even points while damp-blocking.
— Tulip Petal Motifs (Make 10 per end; pattern shows 9-11, make 10 for this tutorial):
Info :
Each tulip is composed of an inner golden center petal, an outer red petal assembly of 6 overlapping petals (worked in relief), and a small backing circle. Work petals flat and join into a fan. Make 10 per end for a balanced look, leaving stems long to arrange.
Petal Center Row 1 :
With golden yellow, ch 12. Turn. (12)
Petal Center Row 2 :
Ch1, sc in 2nd ch from hook and in next 9 ch, 3 sc in last ch, continue working on opposite side of chain sc in next 9 ch, 2 sc in last ch (24). Slip st to join and fasten off. (24)
Petal Outer (Red) - Petal 1 Row 1 :
Join red to any front loop of center rim, ch4 (counts as tr), tr in same st, tr in next 3 sts, ch2, sl st to base creating a tapered petal. Fasten off. Petal measures ~2cm. Repeat 6 times evenly around center to form an overlapping circle of petals.
Petal Outer - Petal 1 Variation :
For fuller petals work ch4, (tr, tr) across 4 sts, ch3, sl st to base; fasten off. Repeat for each petal to produce a pronounced sculptural petal lip. Make 6 petals evenly spaced.
Petal Outer - Row Info :
Use surface slip stitch to slightly overlap petals, sewing the base of each petal to the neighbor with matching red yarn to produce a cupped tulip shape. Block with pins to shape into cup curve.
Petal Backing :
With cream, ch6, sc in 2nd ch from hook and next 3 ch, 4 sc in last ch, work back sc across previous chain to form a small semicircle (12 sc). Fasten off and whip-stitch to backside of assembled petal cluster to hide joins.
Info :
Work 10 identical tulip petals for one end. For a dynamic clustered look vary petal cup depth by stretching petals slightly before blocking. Leave a 12-15cm tail of green yarn attached to each tulip for stem placement and sewing to runner.
— Long Leaves (Make 20 per end, 40 total):
Leaf Row 1 :
With light green, ch 22. Turn. (22)
Leaf Row 2 :
Ch1, sc in 2nd ch from hook and across (21). Turn.
Leaf Row 3 :
Ch2, hdc across (21). Turn.
Leaf Row 4 :
Ch1, sc across in blo for serrated ridge (21). Turn.
Leaf Row 5 :
Change to dark green at tip: ch2, hdc in next 6 sts using dark green to create shaded tip. Fasten off dark green and continue with light green for remainder to create gradient. (21)
Leaf Row 6-10 :
Repeat shaping rows increasing slightly near base for fullness: Row 6 ch2 hdc across, Row 7 ch1 sc across, Row 8 ch2 hdc across, Row 9 ch1 sc across. At Row 10 decrease by working sc2tog at first and last st to taper the stem end. (19)
Info :
Leaves are worked narrow and long to echo the photo. Pin and steam-block leaves flat to get nice ridged veins. Make 20 leaves for each end, arranging in graduated layers behind the tulip clusters for fullness.
— Stem Cords (Make 10 long cords per end):
Stem Row 1 :
With dark green, ch 60 (or desired length to reach from tulip base to center panel). Turn. (60)
Stem Row 2 :
Sl st into each chain back to beginning to create a tight chain cord. Fasten off leaving long tail. Make 10 cords per end - these will be arranged in a fan and sewn to the tulip bases and into the center of the runner where the bouquet joins.
Info :
For added structure, make stem cords slightly thicker by making two chains and twisting and sewing them together. Use whip stitches to secure pairs so they lay flat when arranged under petals.
— Bow Accent (Make 2, one per end):
Bow Loop Row 1 :
With red, ch 16, turn. Ch1, sc in 2nd ch and next 14 ch. Turn. (15)
Bow Loop Row 2 :
Ch2, hdc across (15). Turn.
Bow Loop Row 3 :
Ch1, sc across. Fold the strip in half and whip-stitch the ends to create a neat loop. Make two loops and wrap with a short red band (ch6, sc across) to form bow center. Sew to tulip cluster center.
Info :
Bows are optional but add a finished decorative touch. Make the band snug and tack it to the center using small stitches, hiding ends behind the petals.
— Assembly Preparation :
Info :
Block center panel, braids, bobbles, tulips and leaves flat. Arrange each end cluster on the blocked runner to determine spacing before sewing. Use pins to hold placement: tulips should form a semi-circle with stems fanning from a centered knot, roughly 6-8cm from the end edge.
Info :
Sew stems first: position 10 stem cords fanned out, secure their inner ends to the runner center using concealed stab stitches in the filet column. Place tulips over the cord ends and tack them down at the base, then sew leaves underneath and between petals to cover raw joins.
— Final Border & Finishing Touches :
Row 1 :
With cream, join at end edge, ch1, sc evenly along full perimeter of runner to tidy edges. Make sure to sc into end rows and along braid side seams. Fasten off.
Row 2 :
Work a final decorative picot round: *sc in next st, ch3, sl st into 3rd ch to make picot, sk 1 st; rep across. This will give a delicate looped edge that complements the bobbles.
Info :
Weave all tails neatly into the wrong side using a yarn needle. Re-block the entire runner once complete to set shape and make sure appliques lie flat. Use a small amount of water and steam if necessary.
Info :
Optional: lightly starch the edges for extra crispness, especially if the runner will receive regular use. Use blocking pins to set the scallops and press gently with a steam iron at low heat over a cloth.
This tulip table runner is a beautiful blend of open lacework and sculptural floral appliques that makes a statement on any table. The raised braid, bobble edge and layered tulips give it a handcrafted vintage charm while remaining usable and washable with proper care. Whether given as a warm homemade gift or kept as a seasonal centerpiece, every stitch adds character and story to your home. 🌷🧶