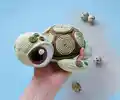
Make a charming hand-crocheted turtle using this complete, photo-supported amigurumi pattern. You will create a soft, detailed turtle shell with spiral motifs and a cuddly body using simple rounds and assembly techniques. This pattern includes full round-by-round instructions, materials, and clear assembly steps so you can reproduce the exact finished toy. Perfect for gifting or decorating your home with a handmade friend.
Progress Tracker
0% Complete
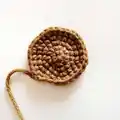
— Carapace (1) (Basic Color 82 Dark Green) :
Round 3 :
(1 SC, INC)*8 (24)
Round 4 :
1 SC, INC, (2 SC, INC)*7, 1 SC (32)
Round 5 :
(3 SC, INC)*8 (40)
Round 6 :
2 SC, INC, (4 SC, INC)*7, 2 SC (48)
Round 7 :
(5 SC, INC)*8 (56)
Round 10 :
3 SC, INC, (6 SC, INC)*7, 3 SC (64)
Round 11 :
(7 SC, INC)*8 (72)
Round 12 :
4 SC, INC, (8 SC, INC)*7, 4 SC (80)
Round 13 - 14 :
80 SC (80)
Round 15 :
(9 SC, INC)*8 (88)
Round 16 :
5 SC, INC, (10 SC, INC)*7, 5 SC (96)
Round 17 :
(11 SC, INC)*8 (104)
Round 18 - 19 :
104 SC (104)
Round 20 :
6 SC, INC, (12 SC, INC)*7, 6 SC (112)
Round 21 :
(13 SC, INC)*8 (120)
Round 22 :
7 SC, INC, (14 SC, INC)*7, 7 SC (128)
Round 23 - 27 :
128 SC (128)
Round 28 :
BLO: 128 SC (128)
Round 29 :
FLO: 128 SC (128)
Round 30 :
(15 SC, INC)*8 (136)
Round 32 :
(15 SC, DEC)*8 (128)
Info :
FASTEN AND CUT THE THREAD, LEAVE A YARN TAIL.
— Carapace (2) (Basic Color 67 Light Yellow) :
Round 3 :
BLO: (1 SC, INC)*8 (24)
Round 4 :
BLO: 1 SC, INC, (2 SC, INC)*7, 1 SC (32)
Round 5 :
BLO: (3 SC, INC)*8 (40)
Round 6 :
BLO: 2 SC, INC, (4 SC, INC)*7, 2 SC (48)
Round 7 :
BLO: (5 SC, INC)*8 (56)
Round 9 :
BLO: 3 SC, INC, (6 SC, INC)*7, 3 SC (64)
Round 10 :
BLO: (7 SC, INC)*8 (72)
Round 11 :
BLO: 4 SC, INC, (8 SC, INC)*7, 4 SC (80)
Round 12 :
BLO: 80 SC (80)
Round 13 :
BLO: (9 SC, INC)*8 (88)
Round 14 :
BLO: 5 SC, INC, (10 SC, INC)*7, 5 SC (96)
Round 15 :
BLO: (11 SC, INC)*8 (104)
Round 16 :
BLO: 104 SC (104)
Round 17 :
BLO: 6 SC, INC, (12 SC, INC)*7, 6 SC (112)
Round 18 :
BLO: (13 SC, INC)*8 (120)
Round 19 :
BLO: 7 SC, INC, (14 SC, INC)*7, 7 SC (128)
Round 20 :
BLO: 128 SC (128)
— Carapace (3) (Basic Color 67 Light Yellow) :
Round 3 :
(1 HDC, HDC INC)*8 (24)
Round 4 :
1 HDC, HDC INC, (2 HDC, HDC INC)*7, 1 HDC (32)
Round 5 :
(3 HDC, HDC INC)*8 (40)
Round 6 :
2 HDC, HDC INC, (4 HDC, HDC INC)*7, 2 HDC (48)
Round 8 :
(5 HDC, HDC INC)*8 (56)
Round 9 - 21 :
56 HDC (56)
— Carapace (4) (7 Pieces) (Basic Color 40 Brown) :
Round 3 :
BLO: (1 SC, INC)*8 (24)
Round 4 :
BLO: (2 SC, INC)*8 (32)
Round 5 :
BLO: (3 SC, INC)*8 (40)
Round 6 :
BLO: (4 SC, INC)*8 (48)
Round 7 :
BLO: (5 SC, INC)*8 (56)
Info :
CHANGE COLOR INTO LIGHT-GREEN ONE (COLOR 11) AND WORK SLIP STITCH FLO FROM 6-1 ROWS.
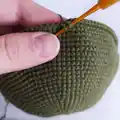
— Assembly (Carapace pieces) :
Info :
SEW THE 33RD ROW TO THE 28TH ONE. RETURN TO THE 1ST PIECE, SEW THE 33RD ROW TO THE 28TH ONE. THE REST OF PIECES ARE ATTACHED WITH TEMPORARY SEAM. IF YOU CAN'T ALLOCATE ALL THE PIECES, SEW IN 1 PIECE LESS. SEE THE PHOTO.
Info :
ATTACH PIECE (4) TO PIECE (1). BEGIN FROM THE TOP, BUT FIRSTLY FOLD THE PIECE TO MAKE 1ST ROWS TOGETHER. ATTACH ALL PIECES (4) TO PIECE (1).
Info :
FOLD PIECE (3) IN HALVES. PLACE THE MARKER TO THE FOLDED EDGE AS IT'S SHOWN IN THE PHOTO. THEN ATTACH LINE AB OF PIECE (3) TO PIECE (2).
Info :
MAKE SOME STITCHES BETWEEN PIECE (2) AND PIECE (3) TO ATTACH THEM TO EACH OTHER. ATTACH PIECE (3) TO PIECE (1) FROM POINT A TO POINT B.
Info :
SEW PIECE (1) TO PIECE (2). ATTENTION! DON'T ATTACH ALL THE PIECES AT ONCE. LEAVE A SMALL HOLE TO FILL THE PIECE WITH FIBER. DON'T FILL TOO MUCH FIBER. CARAPACE MUST BE FILLED WITH FIBER A BIT TO INSERT AN EGG WITH A LITTLE TURTLE INSIDE. IT'S BETTER TO PUT AN EGG IN PIECE (3) TO FIND OUT FIBER DENSITY.
Info :
ATTACH ALL PIECES (4) TO PIECE (1). SEE PHOTOS FOR POSITIONING AND ALIGNMENT.
— Tail (Basic Color 11 Light Green) :
Info :
FOLD THE PIECE IN HALVES AND WORK SC. SEW THE TAIL TO THE CARAPACE.
— Head (Basic Color 11 Light Green) :
Round 3 :
(1 SC, INC)*8 (24)
Round 4 :
1 SC, INC, (2 SC, INC)*7, 1 SC (32)
Round 5 :
(3 SC, INC)*8 (40)
Round 7 :
2 SC, INC, (4 SC, INC)*7, 2 SC (48)
Round 12 :
(5 SC, INC)*8 (56)
Round 13 - 14 :
56 SC (56)
Round 15 :
3 SC, INC, (6 SC, INC)*7, 3 SC (64)
Round 16 - 19 :
64 SC (64)
Round 20 :
(6 SC, DEC)*8 (56)
Round 21 - 22 :
56 SC (56)
Round 23 :
(5 SC, DEC)*8 (48)
Round 24 :
BLO: 48 SC (48)
Round 25 - 26 :
48 SC (48)
Round 27 :
(4 SC, DEC)*8 (40)
Round 29 :
(3 SC, DEC)*8 (32)
Round 30 :
(2 SC, DEC)*8 (24)
Round 31 :
(1 SC, DEC)*8 (16)
Info :
FASTEN OFF LEAVING A TAIL ABOUT 15 CM LONG AND CUT THE YARN.
Info :
USING A TAPESTRY NEEDLE, WEAVE THE YARN TAIL THROUGH THE FRONT LOOP OF EACH STITCH AND PULL TIGHT TO CLOSE.
— Eyes (1 Detail) (2 Pieces) (Basic Color 01 White) :
Round 3 :
(1 SC, INC)*8 (24)
Round 4 :
1 SC, INC, (2 SC, INC)*7, 1 SC (32)
Round 5 :
(3 SC, INC)*8 (40)
Round 7 :
2 SC, INC, (4 SC, INC)*7, 2 SC (48)
— Eyes (2 Detail) (2 Pieces) (Basic Color 53 Black, Color 40 Brown) :
Round 3 :
(1 SC, INC)*8 (24)
Info :
FASTEN AND CUT THE THREAD, LEAVE A YARN TAIL. NEW THREAD BROWN.
Round 3 (cont) :
BLO: 12 SC, (1 HDC, HDC INC)*6 (30)
Round 4 :
12 SC, 18 HDC (30)
Info :
FASTEN AND CUT THE THREAD, LEAVE A YARN TAIL. SEW DETAILS 2 TO DETAILS 1.
— Head Assembly :
Info :
SEW EYES TO HEAD. RETURN TO THE 9TH ROW AND WORK FLO WITH A NEW LIGHT GREEN THREAD (COLOR 11). WORK 3 ROWS - 48 SC. WORK THE 2ND EYELID IN THE SAME WAY, BEGINNING FROM THE 46TH ROW.
Info :
MAKE CONTRACTION: INSERT THREAD IN POINT A AND PULL THREAD OUT POINT C. LEAVE A LONG RAIL THREAD IN POINT A. PULL A NEEDLE OUTSIDE EYELID IN POINT D. SKIP 1 SC AND INSERT A NEEDLE IN POINT B. INSERT A NEEDLE IN POINT E AND PULL IT OUT POINT F. INSERT A NEEDLE THROUGH THE EYELID IN THE OPPOSITE SIDE AND PULL THREAD OUT POINT G. TIGHTEN THREAD AND MAKE SOME STRONG KNOT TO HAVE CONSTRICTION.
Info :
HIDE TAIL THREADS. EMBROIDER A MOUTH WITH THIN BLACK THREAD.
This cute turtle amigurumi pattern is a delightful project that combines small circular motifs into a realistic spiral shell design. It makes a heartfelt handmade gift or a charming nursery accent, crafted with care and attention to detail. Enjoy the slow, rewarding process and watch your turtle come to life stitch by stitch. 🐢🧶