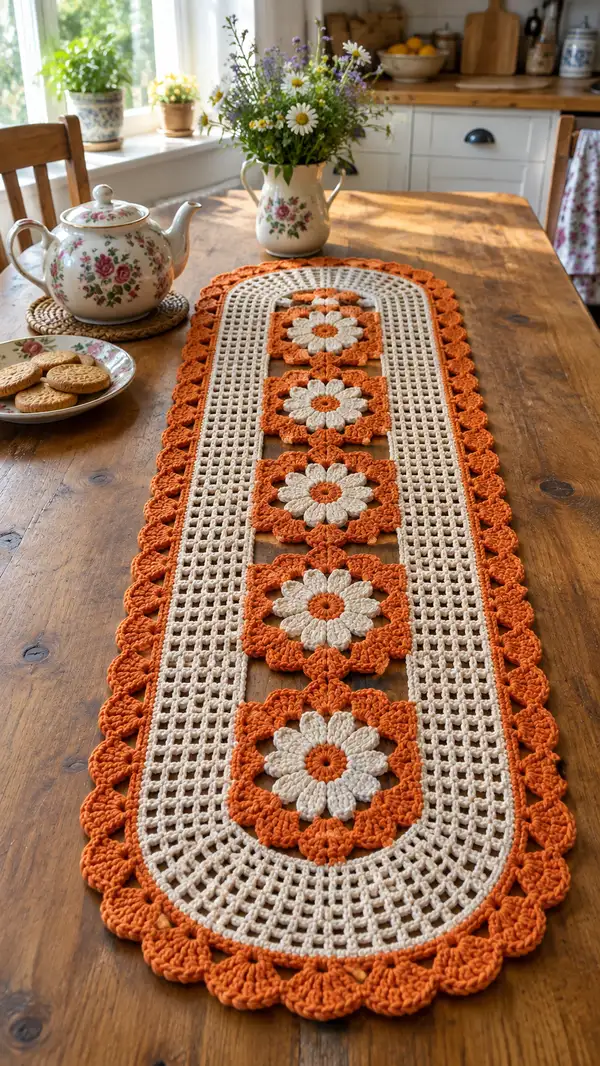
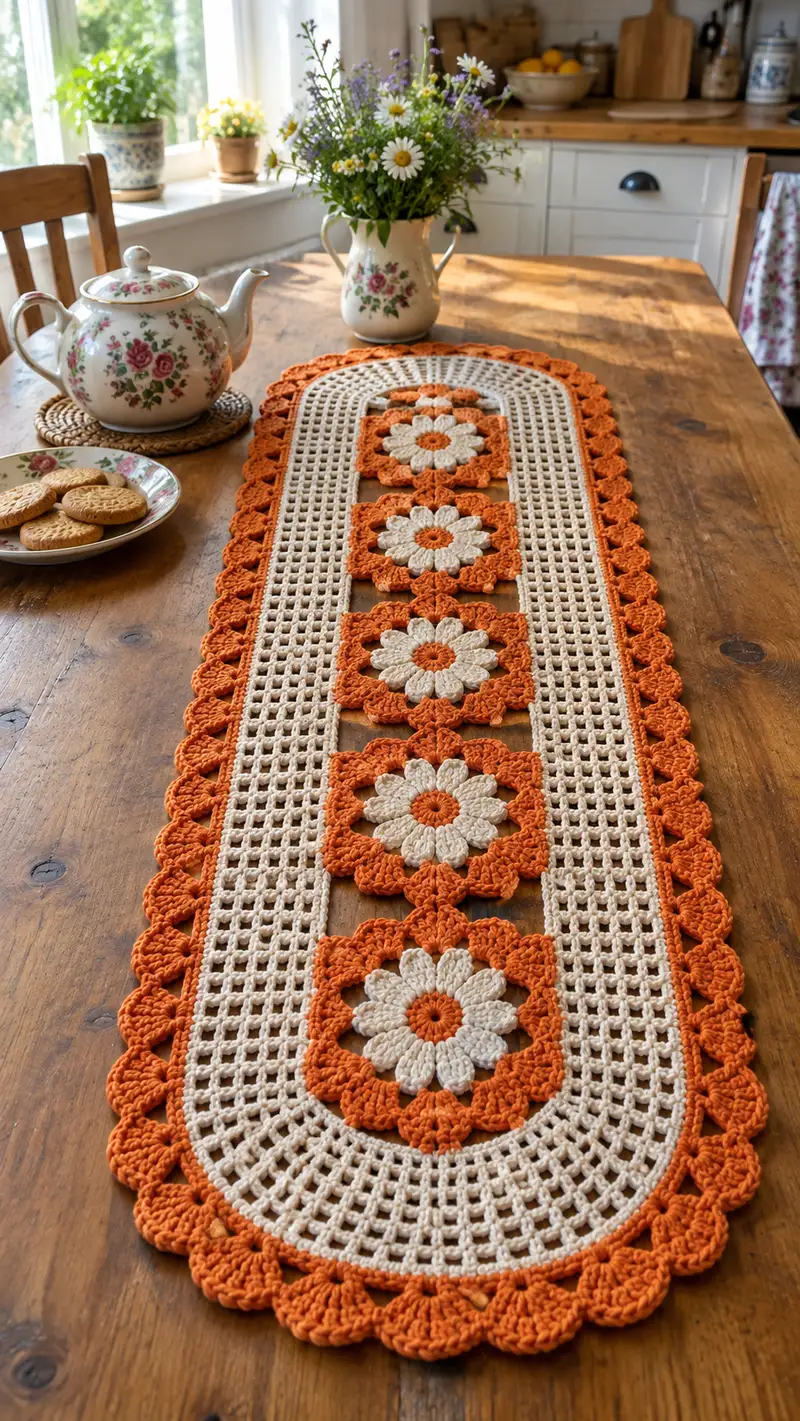
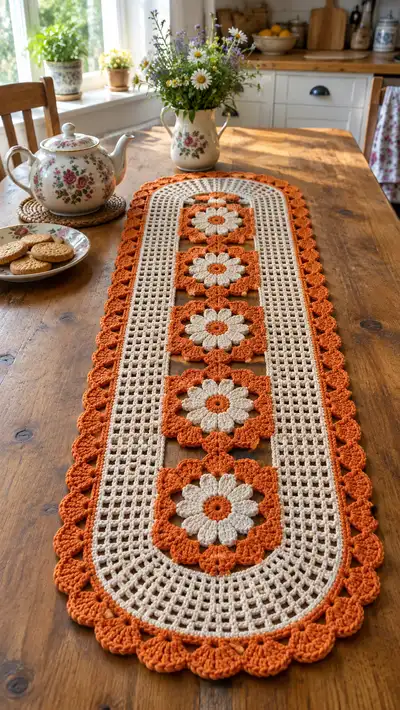
A charming vintage-inspired table runner featuring five daisy-in-a-square motifs linked by a delicate filet mesh and finished with a bold scalloped edge. Shown in warm pumpkin orange and soft cream, this runner brings cozy country style to any table. The pattern uses basic stitches and modular construction so you can customize length or color placement with ease. Perfect for seasonal decor, tea settings, or gifting to someone who loves cottagecore style.
Progress Tracker
0% Complete
— Notes & Gauge :
Info :
This runner is worked in modular motif squares joined into a central column, then surrounded by a filet mesh frame and finished with a scalloped shell border. Gauge is not critical for fit but affects finished size and yarn usage. Sample gauge: 16 dc x 10 rows = 10 cm using worsted cotton and 4.0 mm hook. The pictured runner measures approximately 110 cm long by 28 cm wide (43 x 11 inches) with 5 motif squares; adjust by adding or subtracting motifs.
— Daisy Motif (Make 5) :
Round 1 :
Using accent orange. MR, ch3 (counts as dc), 15 dc into MR. Pull ring closed and join with sl st to top of ch3. (16)
Round 2 :
Ch1, *sc in next dc, ch3, skip next dc* repeat from * to * around to make 8 ch-3 loops; join with sl st to first sc. (8 sc + 8 ch loops)
Round 3 :
In each ch-3 loop: (sc, 7 dc, sc) working around to form petals. Join with sl st to first sc. This round forms 8 tall petals. Total stitches around = 8 petals x (1 sc +7 dc +1 sc) = 72 stitches distributed as petal clusters.
Info :
Work petals gently to avoid pulling center too tight. Each petal is tall and will create a slight dome; keep tension even across petals so the square framing will be even.
Round 4 :
Change to cream color. Ch1, sc in first sc at base of petal, ch2, sc in next sc (this creates a corner loop between petal bases). *Sk next 7 dc of petal, sc in next base sc, ch2, sc in next base sc* repeat around to create 8 corner loops. Join with sl st to first sc. (16 sc + 8 ch-2 loops)
Round 5 :
Work into ch-2 corner loops to begin square frame: *(sc, ch3, 2 dc, ch3, sc) into same ch-2 loop; 4 sc evenly spaced along outer curve of next petal base* repeat around; join with sl st. This round starts forming four 'sides' between clusters. Approx stitch count: 8 corner shell clusters + 32 sc = roughly 40 stitches
Info :
Round 5 shapes the motif into a rough octagon that will become a square; place stitch markers at the centers of each side as you work to help keep next rounds even.
Round 6 :
Ch3 (counts as dc), 1 dc in same st, *(skip to next side center: 3 dc in each of next 4 sts along side; 3 dc in corner shell ch3 space, ch1, 3 dc in same corner ch3 space) repeat around; join with sl st to top of ch3. At end of this round you will have increased to a round of continuous dc clusters forming a rounded-square; total approx = 8 corners x (6 dc) + side clusters ≈ 64 dc.
Round 7 :
Ch1, sc in each of next 4 dc across side, (sc, ch3, sc) in corner ch1 space; repeat around placing sc across sides and ch3 corners. Join with sl st. Total sc approx 64 (work counts will vary slightly; main goal is an even square outline).
Info :
From Round 6 onwards we convert the circular petal round into a square frame by working clusters across petals and shell corners. If you prefer a larger square, add an extra round of dc clusters before starting the even sc round below.
Round 8 :
Ch3, dc in each st around (work 1 dc in each sc and 3 dc in each corner ch3 space) — this evens out the edge and prepares for the filet join rounds. Aim for a total stitch count divisible by 4; typical motif after this round = 64 dc (even number by side).
Round 9 :
Ch1, sc in same st, *ch5, sk 5 dc, sc in next dc* repeat around to create a spacing for joining later. Adjust ch count (ch5) to make square side spacing match neighboring motifs; join with sl st. Final perimeter will show 8 evenly spaced ch-5 loops (two per side) for joining. (8 corner ch-5 groups + sc anchors alternatively).
Round 10 :
Switch to accent orange for outside frame. Ch1, sc in same st, *sc in next 3 dc, ch3, sc in next dc* repeat to create a decorative edge. Join with sl st. This creates a visible orange frame around the cream square and ties motif color to the scalloped border color.
Round 11 :
Ch1, single crochet evenly around working 1 sc in each sc and 3 sc in corner ch-3 spaces to square the corners. Join with sl st. Final motif should measure approximately 18 x 18 cm (7 x 7 inches) before blocking in the pictured gauge.
Round 12 :
Optional textured round for added bulk: ch3, dc in each st for one round (use 3.5 mm hook if you prefer a firmer edge); join and fasten off leaving a 20-25 cm tail for weaving when joining. (Count ~72 dc)
Info :
Make five identical motifs. Block each motif flat, pinning corners to be square. When motifs are blocked consistently the joining and mesh panels will sit flat and even.
— Centre Column Join (Join motifs together in a vertical strip) :
Info :
Lay motifs right side up in a single vertical column with orange frames facing up and the petals aligned. Each motif will be joined to the next using a mattress or whip stitch through the orange frame, leaving equal spacing for the mesh panels to be worked later. Place pins at the midpoints of each adjacent edge to align.
Round 1 (Join Step) :
With long tails from Round 12 or a fresh strand of cream, fold motif B edge over motif A edge aligning ch-5 loop positions and stitch through both frames using a ladder or whip stitch across 6-8 stitches along the shared side so the motifs butt closely but allow a consistent gap of 1-2 cm for the mesh to pass through. Repeat joining until all five motifs are joined into a panel. (Do not fasten off between joins; weave and secure each tail after joining.)
Info :
Joining method: either seam the motifs directly for a close join or join with a line of sc across both motifs to create a flat seam. In the pictured sample motifs have small open spaces between them to show wooden tabletop beneath; to replicate that effect leave 6-8 chain spaces between motif frames when joining.
— Filet Mesh Frame (Work around the joined motif strip) :
Info :
We will work the mesh in joined rounds around the entire motif strip to create the lattice panels between the motifs and the long sides of the runner. The mesh is built from alternating rounds of dc and ch-1 filet blocks (a filet block = dc, ch1, sk1, dc). Work in the round with slip stitches at the end of each round to keep edges tidy. Maintain stitch multiples so that rows line up evenly; the pattern below assumes the motif strip width allows for 12 filet columns across each side of the motifs.
Round 1 :
Join cream yarn at a side midpoint of the motif strip with a standing dc. Ch3 (counts as dc), dc evenly spaced along the side edge of the outermost motif frames until you reach the end of the strip. At the curved ends work 2 dc in each corner to curve the mesh smoothly around end motif. Continue along opposite side and join with sl st to top of starting ch3. Aim for a total stitch count around the oval runner divisible by 4; typical total after this round ≈ 160 dc (example count in sample runner).
Round 2 :
Ch5 (counts as dc + ch2), *sk next dc, dc in next dc, ch2* repeat around following the previous round's dc spacing to create long ch-2 mesh loops, join with sl st to 3rd ch of ch5. This generates a large open filet grid. Each filet block will measure approx dc, ch2, sk next dc, forming a grid of squares roughly 1 cm across in the pictured gauge.
Info :
If your stitch count around the runner differs from sample, adjust the ch spacing to maintain even columns of filet across the runner width. Use stitch markers to mark every 10th dc to help keep count while working the long rounds.
Round 3 :
Ch3 (counts as dc), dc in each dc and dc in each chain space across, for every ch-2 space work (dc, ch1, dc) to establish a solid row for next filet round. Join with sl st. After this round your lace will feel stabilized and ready to accept more regular filet repeats. Aim total ≈ 160 sts.
Round 4 - 18 :
Repeat the filet mesh sequence: Rounds of filet (ch3 or ch5 turning and working dc, ch1 spaces) alternating with solid dc rows every other round. Specifically: Odd rounds = ch3, dc in each st and in each ch-1 space; Even rounds = ch5, then *(dc in next dc, ch2) repeat* to re-establish ch-2 grills. Work 15 rounds of mesh to reach the center section height equal to the stacked motif column (this builds the long parallel lattice rows between motifs). Keep stitch counts even; total around should remain consistent each round ≈160.
Info :
Every 4-6 rounds, pin the runner to the blocking surface and check that rows lie flat and even; correct small ripples by slightly adjusting tension or by adding a corrective round of dc where needed.
Round 19 :
When you reach the level of the motif tops and bottoms, work a shaped transition round to create small windows that expose the motif centers. To create windows, work dc across the mesh until you reach the side margin adjacent to a motif; then ch5, skip 3 dc to create a rectangular opening aligned with the motif; resume dc across. Repeat for each motif opening. Join with sl st. This round creates open spaces between motifs similar to the sample runner.
Round 20 :
Ch3, dc in each dc and in each ch-space around; at motif opening areas work (dc, ch1, dc) in ch5 spaces to define the rectangular window. Join. Maintain consistent spacing so windows align with motif squares below.
Info :
Take time to check motif alignment by laying the runner flat and matching windows with motif square centers. Adjust by adding or subtracting a dc or ch space in the transition rounds if needed for neat alignment.
Round 21 - 30 :
Resume filet repeats (even rounds ch5 filet, odd rounds solid dc) for the remaining height needed to reach the opposite end of motifs. Work 10 rounds of filet sequence, counting rows carefully so the arch ends will match when you shape the rounded runner ends. Keep total round stitch count consistent (≈160).
Info :
If your runner will be longer or shorter than pictured, add or subtract whole filet repeat pairs (2 rounds) to preserve the vertical rhythm of the mesh and motif spacing.
— Shaping Rounded Ends (Both Ends Symmetrical) :
Round 31 :
To shape the arched runner end, begin decreasing the number of filet columns gradually: ch3, dc in next 6 dc, dec over next 2 dc, dc in next 6 dc, (dc, ch2, dc) in corner curve space, mirror the decreases on the other side as you curve around the end. This round reduces the total dc count by 8-12 stitches to form a smooth semicircle.
Round 32 :
Ch3, dc around evenly across the now-smoothed arc, working 2 dc in corner spaces and evenly distributing increases/decreases to keep the curve even. Join. Aim for a count that transitions you to the smaller perimeter for the rounded top (approx 120-130 dc for the curved edge depending on adjustments).
Round 33 :
Ch5 filet round around the curved edge: work *(dc, ch2, sk 1) in mesh areas and (2 dc, ch2, 2 dc) in the corner arches) to create uniform ch-2 windows around the end curve. Join and continue.
Round 34 :
Ch3, dc around, placing 3 dc in the curve apexes to keep the arc smooth. Join. Repeat Round 33 and 34 if needed to layer the mesh smoothly over the arch; final curved perimeter should be slightly smaller than the long straight sides.
Info :
Work both ends symmetrically. Blocking will help even out any irregularities in the arch. Use pins spaced 1-2 cm apart along the curve when blocking to shape a uniform oval end.
— Edge Preparation for Scalloped Border :
Round 35 :
With orange, join at any point along runner edge. Ch1, sc evenly around entire runner edge working 1 sc in each dc and 3 sc in corner ch-2 spaces to prepare a neat base for scallops. Join with sl st. Typical count for base sc approx 160 (outer perimeter stabilized).
Info :
The sc base ensures shells sit on firm ground and makes shell spacing consistent. If you prefer a tighter, neater shell, use a 3.5 mm hook for this sc round to slightly pull in the edge before shelling.
— Scalloped Shell Border (Deep Scallops) :
Round 36 :
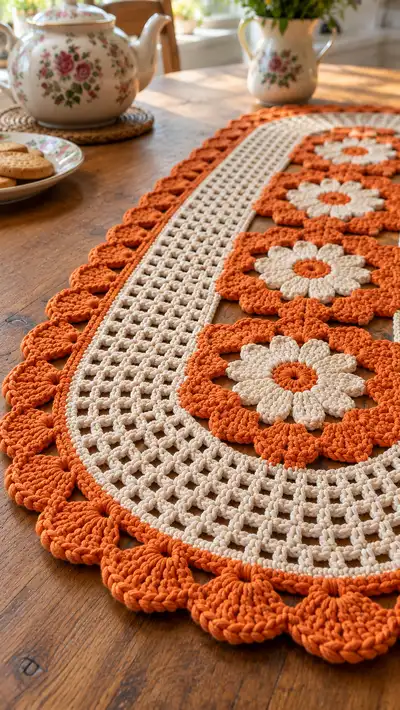
Switch to orange if not already. Ch3 (counts as dc), *skip 2 sc, shell in next sc (5 dc in same sc), skip 2 sc, sl st in next sc* repeat around. This forms large shells separated by sl sts. Join with sl st. Count shells across perimeter ~24-34 depending on your perimeter length; on the pictured runner there are 16-18 shells per long side and 6-8 shells across the curved end arc.
Round 37 :
To deepen the scallop, in each shell: sl st to center of shell, ch3, 2 dc in same st, ch1, 3 dc in same center st, sl st to next shell center. This clusters shells into bold rounded petals. Fasten off and weave ends. If you want a layered scallop, repeat a short round of picots between shells.
Info :
The pictured scallop is two-layered: a big 5-dc shell then a smaller 3-3 cluster on top to create the pronounced puffed scallop. If you want gentler scallops use single-round shells (Round 36) only.
Round 38 (Optional Picot Trim) :
Join cream at back of shell peaks, ch1, *sc at base between shells, ch3, picot (ch3, sl st into 3rd ch), sc into next base* repeat around to add a delicate pearled edge inside the orange scallops. Fasten off and weave ends.
Info :
Ensure each shell is symmetrical by using stitch markers at shell centers before working Round 36. Equal spacing yields a professional, even scalloped frame.
— Decorative Topstitching & Secure Finishing :
Round 39 :
Using cream, work a contrasting sc round inside the scallop edge along the runner interior: join with sl st to inner edge, ch1, sc evenly around working 1 sc in each filet dc and 3 sc in each corner to tidy the inner frame. Join and fasten off. This gives a neat internal border that frames motifs and keeps mesh edges tidy.
Info :
Weave all tails through adjacent stitches with a tapestry needle, pulling ends inside the mesh channels so they do not show on the front. Trim ends close to the fabric after weaving for a neat finish.
— Blocking & Final Touches :
Info :
Soak runner in cool water or use steam. Pin to blocking surface taut but not overstretched, especially along scallops — pin each scallop peak for an even ripple. When dry, optionally spray with a small amount of fabric-safe starch for a crisp farmhouse look. The runner will last longer and lie flat after blocking.
Round 40 :
Final inspection round: run a tapestry needle along shell joins and motif seams to secure any loose areas. Make sure mesh windows align with motif centers and that there are no gaps between motif frames and mesh edges. Reinforce seams with small hidden stitches if needed.
Info :
This completes the structural pattern. If you want to lengthen the runner simply make additional motifs and repeat the mesh rounds in pairs to extend the center column, then reshape the rounded ends and work the same scalloped border around the new perimeter.
— Variation Notes (Optional Extras) :
Info :
- To personalize, change every other motif to cream center and orange petals to create a checkerboard floral effect. - To make a table runner for a narrow table, reduce motif count to 3 and shrink the number of filet repeats between ends. - To create a placemat using this motif style, make one motif and frame it with 8-10 rounds of mesh then scallops for a matching set.
Round 41 :
If making a matching placemat: join one motif with four rounds of mesh and then work a proportionally smaller scallop edge (work shells of 3 dc instead of 5 dc). Fasten off and block.
Completing this runner is like giving your table a warm vintage hug — it's homey, handcrafted, and full of personality. The daisy motifs and scalloped edge are cheerful and elegant, perfect for tea-time or seasonal displays. I hope you enjoyed every repeating round and the satisfying finish of the scalloped border! 🧶🌼✨