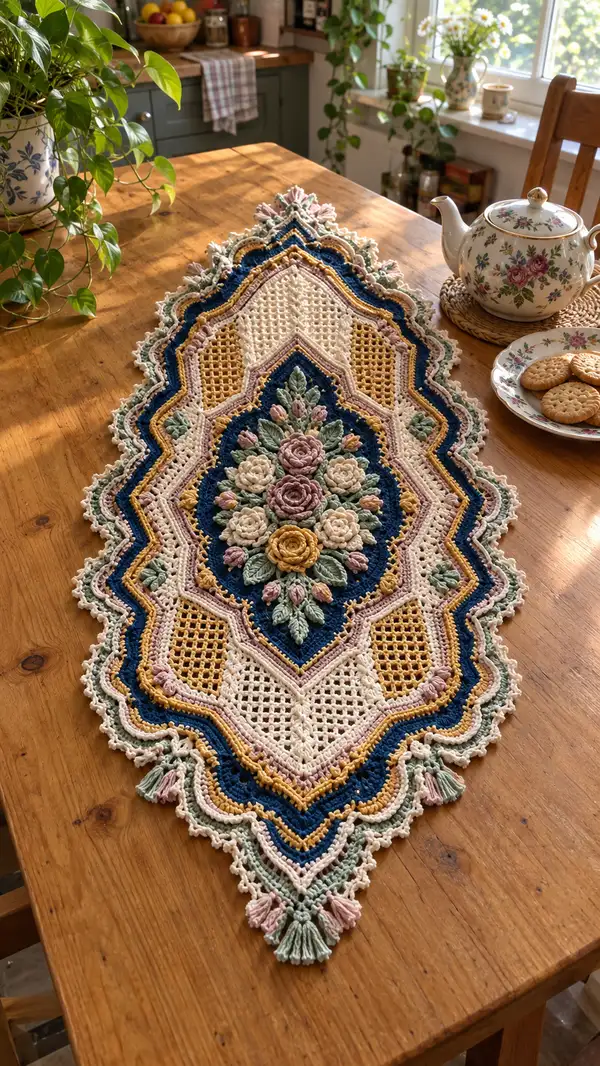
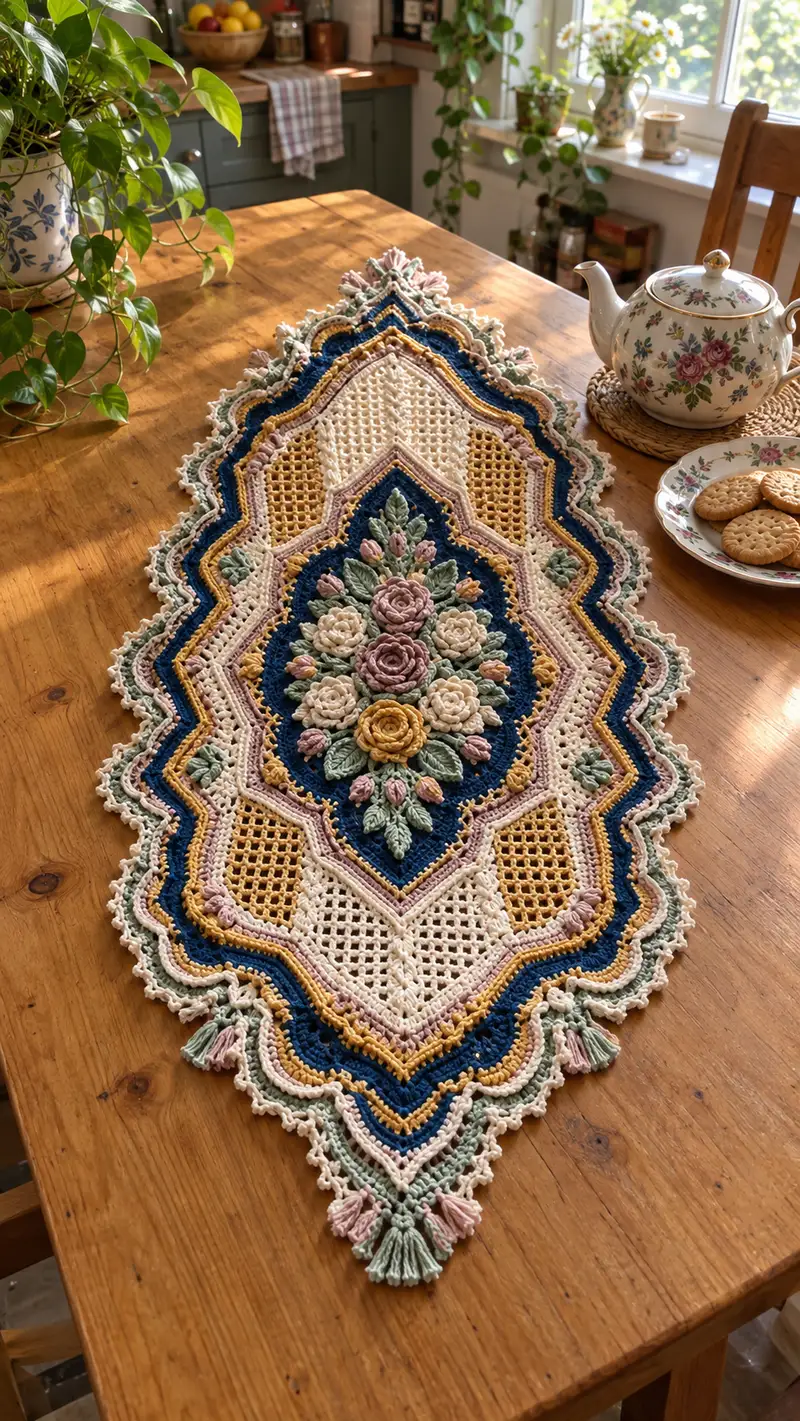
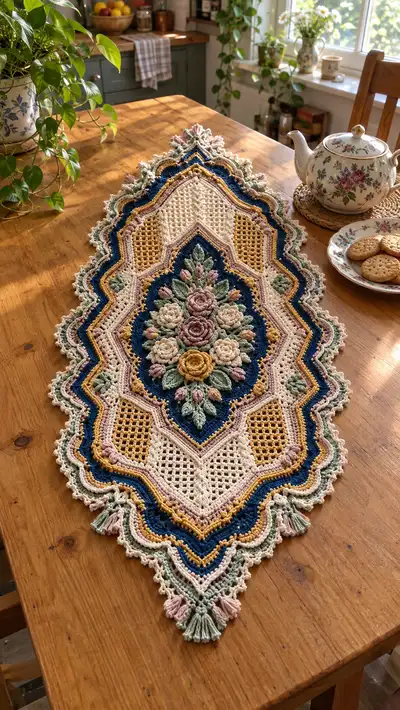
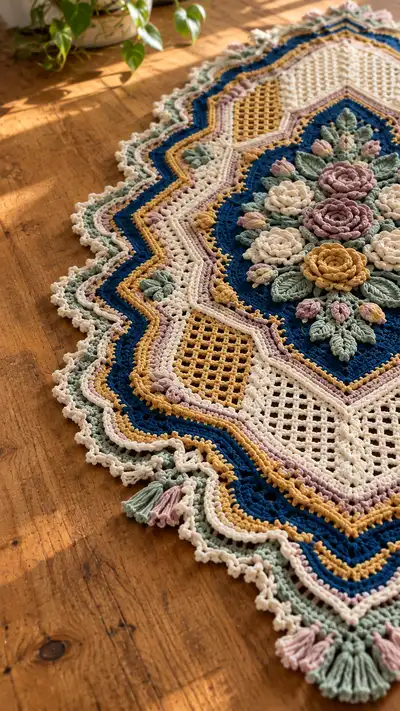
A richly textured, vintage-inspired floral table runner featuring an ornate central rose medallion, layered scalloped borders and delicate tassel points. This runner combines raised 3D flowers and leaves with open mesh panels in a harmonious palette of cream, navy, mustard, dusty pink and sage. Detailed stitchwork and layered borders give it a heirloom, hand-crafted look — perfect for a dining table or sideboard.
Progress Tracker
0% Complete
— Center Floral Medallion :
Round 1 :
Start with cream/ivory. 6 sc in magic ring (6)
Round 3 :
(1 sc, inc) x 6 (18)
Round 4 :
(2 sc, inc) x 6 (24)
Round 5 :
(3 sc, inc) x 6 (30)
Round 6 :
(4 sc, inc) x 6 (36)
Round 7 :
(5 sc, inc) x 6 (42)
Round 8 :
(6 sc, inc) x 6 (48)
Info :
Place a stitch marker at the first stitch of each round to keep track. Work tightly for a firm center base that will support 3D flowers.
Round 9 :
1 sc in each st around (48)
Round 10 :
Change to deep navy. 1 sc in each st around (48)
Round 11 :
Switch to cream/ivory. (6 sc, 1 inc) x 6 (54)
Round 12 :
1 sc in each st around (54)
Info :
Begin to build texture: we'll add a ring of raised stitches next to frame the floral cluster. Keep colors as pictured: navy inner ring to make flowers pop.
Round 13 :
Change to deep navy. *FPdc around next st, sc next st* rep around (54) (54)
Round 14 :
1 sc in each st BLO around to set the front post ridge (54)
Info :
This creates a low ridge to sit flowers on; chain 1 between petals when sewing for a neat foundation.
Round 15 :
Switch to cream. (4 sc, inc) x 9 (63)
Round 16 :
1 sc in each st around (63)
Round 17 :
Switch to mustard yellow. 1 hdc in next 3 sts, (picot on next st: ch3 sl st to 1st ch) rep around to create spaced picots (63)
Round 18 :
Change to dusty pink. 1 sc in each st around (63)
Info :
At this stage we have a solid circular medallion base about 18-22cm across depending on hook. This will be the substrate for rose clusters — pin placement guide below.
Round 19 :
Switch to navy. Work mesh foundation rows next: *ch3 (counts as dc), sk 1, dc in next st* around creating an even-textured inner field (63)
Round 20 :
1 sc in each st around to stabilize mesh (63)
Info :
Use a tapestry needle and spare yarn to mark 5 key placement points for the large rose (center) and four surrounding roses. These markers will be guides for sewing the 3D roses later.
Round 21 :
Switch to cream. (5 sc, inc) x 9 (72)
Round 22 :
1 sc in each st around (72)
Round 23 :
Switch to navy. Work fpdc around every 3rd st to create a textured ridge: *2 sc, fpdc* rep around (72)
Round 24 :
Change to cream. 1 sc in each st around (72)
Info :
We will now leave the medallion base and start making the 3D flowers and leaves separately. Secure ends and set base aside on a flat surface for assembly.
— Rose Spiral (Large) (Make 1 Center Rose) :
Round 1 :
With dusty pink on 3.5mm hook: mr, ch1, 7 sc in mr, sl st to first sc (7)
Round 2 :
Ch1, sc in same st, (2 sc in next) x3, sc in last 2 sts (10)
Round 3 :
Ch1, (1 sc, inc) x3, (sc in next 2) x2 (13)
Round 4 :
Change to mauve if you want a two-tone center; ch1, 1 sc around (13)
Round 5 :
Start spiral petal formation: ch3 (counts as dc), dc in next st, ch1, sl st in next st, rep around to create little petal loops; end with sl st in starting ch (13 petals)
Round 6 :
Form petal row: attach yarn to base of first petal, *ch2, (5 dc in same petal loop), ch2, sl st in next petal base* rep around (13 petals)
Round 7 :
Fold petals slightly and work a sc row around the petal bases to hold shape (13 + securing sts)
Round 8 :
Finish by sewing the spiral center tightly to close the base. Fasten off leaving long tail for sewing (no numeric stitch count required).
Info :
Blocking the rose lightly with a pin in the center gives a more open petal look. Use extra long tail to stitch the rose onto the medallion base by following placement markers.
— Rose Spiral (Medium) (Make 6)
Round 1 :
With cream on 3.5mm hook: mr, ch1, 6 sc in mr, sl st to first (6)
Round 2 :
Ch1, (sc, inc) x3 (9)
Round 3 :
Ch1, sc around (9)
Round 4 :
Create petal loops: ch3, sl st in next st; rep around to form 9 small loops, sl st to join
Round 5 :
In each loop: (5 dc in loop, sl st to next loop) rep around (9 petals)
Round 6 :
Sew center shut and leave long tail for attachment. Repeat to make six medium roses in cream.
Info :
These medium roses will surround the center rose. Arrange on the medallion with 1 center + 4-6 surrounding and pin before sewing to check symmetry.
— Small Buds (Make 10-12) :
Round 1 :
With blush on 3.5mm hook: ch4, sl st to first ch to form small ring, *(sc, ch2, sc) in ring* around 4 times; sl st to join. Finish and leave tail (small tulip bud)
Info :
Make a mix of closed and slightly-open buds by varying tension and number of dc petals. Use tails to stitch around the main cluster to tuck buds between roses.
— Leaves (Make 16-20) :
Round 1 :
With sage green on 3.5mm hook: ch7, sc in 2nd ch from hook, hdc, dc, tr, dc, hdc, sc across both sides of chain to form leaf outline; sl st to join (leaf shaped single piece)
Round 2 :
Work fpdc along center spine to define midrib: *fpdc in center chain turned area along the leaf center, sc around edge* to shape and firm leaf edge. Fasten off leaving long tail for sewing.
Info :
Use blocking pins to flatten leaves and add slight curve by pinning midrib higher when wet-blocking. Leaves will be sewn under and around the roses for a layered look.
— Medallion Assembly :
Info :
Lay medallion flat on a large table. Position center rose and surrounding medium roses with pins: 1 center rose, 4 medium roses around it, 4 cream roses between those, plus small buds filling gaps. Leaves are placed radiating out from between roses in symmetrical clusters of 3-4.
Instruction :
Sew each flower to the navy ridge created in Round 13-14 using long tails and a yarn needle; stitch through the medallion base and around the flower base to ensure secure attachment. Use hidden stitches to minimize visible thread on the navy surface.
Info :
Use thread of the same color as the medallion for invisible joins. If adding small French-knot-like embroidered centers, use a contrasting thread to add tiny seed-bead stitches.
— Inner Mesh Panels (Make 2 symmetric panels) :
Round 1 :
With cream on 4.0mm hook: attach to medallion where marked for mesh begins. Ch3 (counts as dc), *ch2, sk 2 sc, dc in next st*, rep across panel base to form mesh row. Turn and continue rows to build a rectangular filet mesh approximately 14-18 rows high depending on final runner length.
Round 2-10 :
Repeat mesh rows: ch3, dc in dc, ch2, sk ch2 or chain-space and dc into space to keep consistent 2-ch mesh (approx 9-11 spaces per row depending on panel width)
Info :
Filet mesh tension determines final panel size. Keep your ch2 spaces consistent. Block panels flat after completion for crisp squares.
— Transitional Frame & Corner Motifs :
Round 1 :
Change to dusty pink. Work a round of sc around medallion and mesh join: 1 sc in each visible st to join pieces together (approx 200 sts around at this stage — adjust count to match your medallion circumference)
Info :
When joining, make sure mesh is evenly stretched so the border rounds sit flat later. Use extra sc at points where the runner narrows to shape diamond points.
Round 2 :
Change to mustard yellow. *ch3, sk 2, 1 sc in next st* around to create a beaded chain effect adjacent to the inner frame (count will follow previous round so maintain same number of repeats; if you have 200 sts, you'll have approx 67 chain scallop repeats).
Round 3 :
Switch to navy. 1 sc in each st around (approx same number as previous round)
Info :
At the four outer points of the diamond silhouette, add 3 extra sc to create gentle points; mark these increases with stitch markers to be consistent on all four corners.
— Outer Field Rounds (Build silhouette outward) :
Round 1 :
Change to cream. (6 sc, inc) x around to enlarge the field evenly and start shaping into the leaf-like diamond shape (increase pattern will be adjusted at the four cardinal points: at each point add one extra inc every 6 rounds to accentuate the point). Example: if working 72 sts base, do (5 sc, inc) x12 to reach 84 (adjust math to your current circumference).
Round 2 :
1 sc in each st around (resulting stitch count maintained from previous increase)
Round 3 :
Switch to navy. Work a round of (3 sc, 1 fpdc) rep to add vertical texture to the field edge (same stitch count)
Round 4-8 :
Repeat alternating 1 sc rounds and textured rounds, changing color each round as follows: cream, mustard, dusty pink, cream, navy (total 5 rounds). Maintain same stitch count; this builds thickness and layered color around the medallion base.
Info :
Every 4th round, at the four corner points add 2 extra sc to accentuate the pointed silhouette. This will create the diamond/leaf outline visible in the finished runner. Keep notes of increases at corner markers so all points match.
— Lattice Inset Rows (Decorative open squares) :
Round 1 :
Change to mustard. Work an outline around two side panels where lattice sits by switching to dc mesh: *dc, ch2, sk 2* across each panel to make a lattice section of evenly spaced squares (repeat for both side panels)
Round 2-6 :
Continue lattice mesh rows for 5 rows high (or adjust based on your runner proportions). At the top and bottom of lattice panels, secure with a round of sc in cream to anchor panels to frame.
Info :
Lattice panels provide an airy contrast to the sculpted center. Keep two side lattice panels identical and mirrored on the runner; this symmetry is critical to the visual balance.
— Raised Bobble & Petal Accents (Repeated Motifs) :
Round 1 :
Using mustard and dusty pink alternately, work small raised bobble clusters into the outer frame: *ch1, bobble (5 dc bobble) in next st, sc in next 4 sts* rep to create spaced bobbles (place these at marked positions around medallion).
Round 2 :
Secure with a sc round in cream to stabilize bobbles (same overall stitch count)
Info :
Bobble placement is visual — pin them in a staggered formation before stitching. These tiny flowers echo the central rose cluster and add dimensional rhythm to the field.
— First Scalloped Border Suite :
Round 1 :
Switch to navy. Work *5 dc in next st, sk 2, sc in next* repeating around to form large scallops. If your previous round had 200 sts, you'll have approx 28 scallops (math: 200/(5+1) = ~33; adjust counts to match your working circumference — keep scallop count divisible evenly at corners).
Round 2 :
Change to mustard. Work behind each scallop: sl st into 3rd dc of each scallop and create a raised loop using 7 hdc loop stitch (wrap yarn around finger once then 7 hdc into same st), sl st to next scallop center. This gives the rope-like ridge visible in photo.
Round 3 :
Switch to dusty pink. Single crochet around scallop edges to stabilize and define shape (sc in each dc and sc across scallop) (stitch count will match number of dc + sc in scallop pattern)
Info :
Use stitch markers to note scallop centers and keep symmetry on all sides. These border rounds create the bold colored stripes around the runner perimeter.
— Second Scalloped Border Suite (Layered Ridge) :
Round 1 :
Change to cream. Work 1 sc in each st around into the scallop foundation (same total stitch count)
Round 2 :
Switch to sage green. *Ch5, sl st to form small picot loops between scallops, sk 3 sc then sc in 4th* rep around. This creates a delicate looped edge just inside the final outer edge.
Round 3 :
Change to navy. Work a round of (2 sc, inc) x around to slightly enlarge and buffer the edge for the final edging. If you had 200 stitches, aim for 240 by spacing increases uniformly (math: (2 sc + inc) x 60 = 180? Adjust pattern: use (3 sc, inc) x N to reach desired circumference). Increase carefully with even spacing until the edge flares slightly.
Info :
Layering color and texture creates the thick border shown. Keep counts consistent; if you find the outer scallops pulling inward, add a few extra increases on outermost points to allow border to lay flat.
— Final Picot & Loop Edging (Lace Finish) :
Round 1 :
Change to cream. *ch3, sl st into same base st to make a tiny picot, ch2, sc into next st* rep around. This creates the small delicate lace-like edging on the very rim of the runner.
Round 2 :
Switch to sage green for tiny raised loops: *ch6, sl st in 3rd ch back toward base to make a loop, sl st to anchor in next base st* rep around. This forms the soft scalloped fringe you can see just inside the tassels.
Round 3 :
Change to dusty pink and work one final round of sl st in every 3rd base st to tidy the outermost edge and unify color transitions.
Info :
Blocking after this round will open the tiny picots and loops. Pin each outer point separately to keep runner symmetrical during blocking.
— Tassels and Corner Finishing :
Instruction :
Cut yarn strands about 12cm long. Group 20-26 strands for each tassel using a mix of sage, dusty pink and cream for the layered look. Fold in half and use a crochet hook to pull loop base through outermost chain space at each corner, then pull tails through the loop to knot tassel to runner.
Instruction :
Trim tassels evenly and comb lightly. Make 4 tassels and attach one at each diamond point matching the photo placement. Consider wrapping a short coordinating yarn strand around the top of each tassel to create a tidy head.
Info :
Tassel thickness and length determine the final visual weight — keep them medium in thickness to avoid overpowering the delicate border.
— Additional Decorative Embellishments :
Instruction :
Sew small clusters of leaves and buds along the inner navy ring to visually bridge the floral cluster and border. Use whip stitch with long tails to secure and hide joins under the flowers. Add tiny embroidered French knots in mustard for extra tiny dotted highlights among leaves.
Info :
If you prefer a flatter runner, skip the 3D roses and use surface crocheted spiral motifs worked flat and joined directly to the surface instead.
— Blocking & Finishing :
Instruction :
Wet block the entire runner: dampen, pin to shape on a blocking board (or thick towel on a flat surface), stretch gently to achieve symmetrical diamond shape. Pin each scallop and point carefully. Allow to dry fully (12-24 hours) before removing pins.
Info :
Use mild starch sprayed lightly on the outer border if you desire a crisper edge, but test first on yarn scrap to ensure no discoloration. After blocking, weave in all ends of yarn and trim neatly.
— Pattern Notes & Color Change Guidance :
Info :
Carry unused colors inside a few stitches only when working short rows to avoid long floats; for longer outer rounds, fasten off and reattach for cleaner color transitions. Always secure color joins with a small knot or weaving the tail inside the back loop of the next round to prevent slipping.
Info :
When making matching runners, keep a scrap gauge square so color and tension remain consistent between pieces. The design is intentionally layered so small tension variations can be adjusted in outer increases/decreases.
This ornate floral runner is a delightful mix of texture and detail that becomes an instant table centerpiece. The 3D roses and layered scallops create an heirloom feel, while the open mesh keeps it light and airy. Blocking and careful finishing transform separate parts into a harmonious whole — a labor of love worth every stitch. 🧶🌸✨