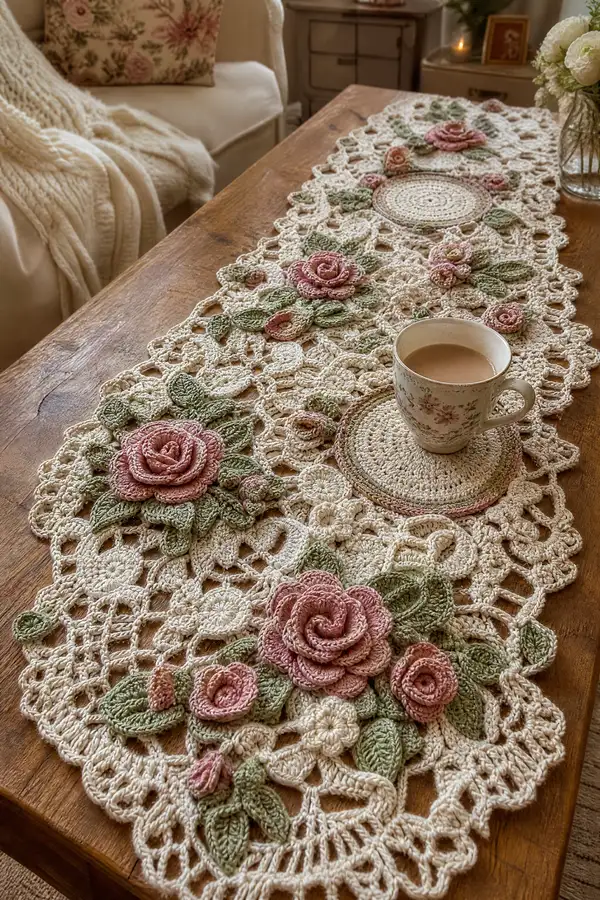
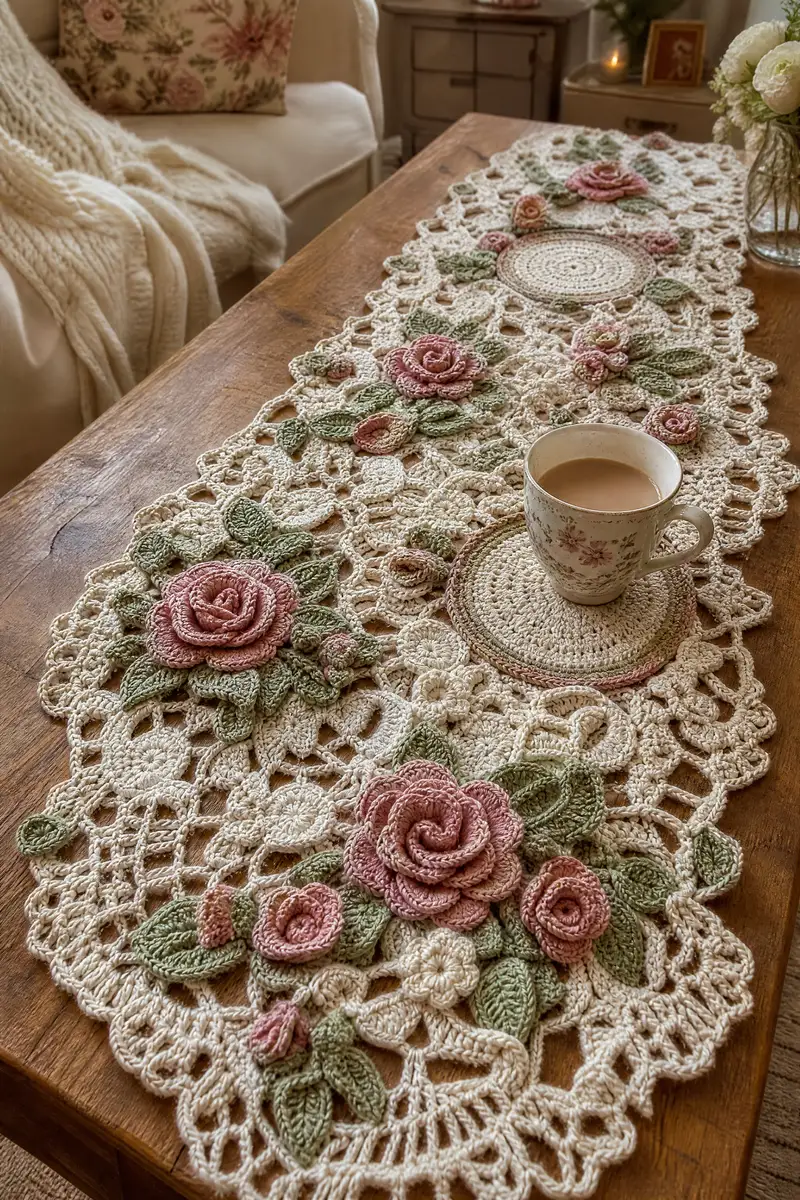
Create an heirloom-quality vintage rose lace table runner featuring raised rosettes, layered leaves, openwork lace panels and a scalloped border. This pattern recreates the delicate, French-inspired look seen in the photo with detailed motif instructions and assembly guidance. It uses small-gauge cotton and simple motif joins to build a long, romantic runner that lays beautifully on a wooden surface. Perfect as a centerpiece or a gift for a lover of cottage and vintage decor.
Progress Tracker
0% Complete
— Center Medallion (make 3 for runner length) :
Round 3 :
(1 sc, 1 inc) x 6 (18)
Round 4 :
(2 sc, 1 inc) x 6 (24)
Round 5 :
(3 sc, 1 inc) x 6 (30)
Info :
We are working in continuous rounds for a smooth spiral; use a stitch marker to mark the first stitch and move it each round. Use cream thread for the medallion center.
Round 6 :
1 sc in each st (30)
Round 7 :
(4 sc, 1 inc) x 6 (36)
Round 8 :
1 sc in each st (36)
Round 9 :
(5 sc, 1 inc) x 6 (42)
Round 10 :
1 sc in each st (42)
Round 11 :
(6 sc, 1 inc) x 6 (48)
Round 12 :
1 sc in each st (48)
Round 13 :
*(3 ch, sk 1 st, sc in next) repeat around creating an open picot-like ring between rounds (48 openings)
Info :
For the decorative ring: keep tension a bit looser for even openwork. This ring will later join to the lace background. If you prefer a closer fabric, replace 3 ch with 2 ch.
Round 14 :
Attach cream and work along outer edge: *sc in sc, (ch 3, dc, ch 3) in each open sp; rep around (48 cluster areas)
Round 15 :
1 sc in each sc and 3 ch sp around, forming a scalloped base (48)
Round 16 :
*(sc, hdc, 2 dc, hdc, sc) in each scallop to create a shallow petal texture (48 petals)
Info :
Block medallion flat after finishing this round to set the shape before joining. Make three medallions spaced evenly along your runner length: these are the feature centers that will take a rose arrangement above them.
Round 17 :
Work a decorative picot row: *sc in each petal base, ch 5, sl st in tip of next petal; rep to create large loops (48)
Round 18 :
Finish with a final sc round along original outer edge to create an even join line (48)
— Small Round Motifs (make 8-10 for filler, five large for coaster elements) :
Round 3 :
(1 sc, 1 inc) x 6 (18)
Round 4 :
(2 sc, 1 inc) x 6 (24)
Round 5 :
1 sc in each st around (24)
Info :
These small rounds act as secondary anchors for rose clusters. Make a mix of sizes: stop at round 4 for very small medallions or work to round 6 (increase to 30) for coaster miniatures.
Round 6 :
(3 sc, 1 inc) x 6 (30)
Round 7 :
*ch 4, sl st into next st to create rope-like loops around (30 loops)
Round 8 :
Work sc around base and into loops to form a lacy edge (30)
Round 9 :
Optionally, change to dusty rose and work a spiral row of sc around the center for subtle color (30)
Info :
For coaster-like rounds make two contrasting color rounds and then join them together back-to-back for thickness. For lace inserts keep one thin round only.
— Rolled Rose Spiral (make 12 large roses and 8 small roses) :
Round 1 :
Join dusty rose: ch 41 (or desired width for rose) — foundation chain method recommended to create an even strip
Round 2 :
Row across chain: 1 sc in 2nd ch from hook and each ch across (40 sc)
Round 3 :
Turn and work 1 sc in BLO across to create a defined lower ridge (40)
Round 4 :
Turn and work a second ridge: *3 ch (counts as tr), tr in next st across to create taller petals across the strip (40 tr)
Info :
Rose strips are made as long scalloped bands that you coil into a rose and sew at the base. For large roses chain 41; for medium roses chain 31; for small roses chain 21. Use tighter tension on the strip so the spiral holds shape.
Round 5 :
Edging row: *sc, ch2, sk 1 st, sc in next — creates a shelled edge along one long side for a more petal-like roll (20 shells)
Round 6 :
Fasten off leaving a long tail for sewing. Gently roll the strip starting from one end, coiling to form the rose. Use the long tail to whip stitch the base as you roll, catching the back loops only to hold a soft spiral (no exact count).
Info :
When stitching the spiral, secure every 6-8 mm of roll; vary how many stitches you take on inner turns (fewer) vs outer turns (more) to allow the outer petals to relax and open. Adjust tightness for fuller or flatter roses.
— Layered Petal Rose (alternate rose style) :
Round 1 :
mr, 6 sc in mr (6)
Round 3 :
(1 sc, inc) x 6 (18)
Round 4 :
Work petals around: *ch 3, (2 dc, ch 2, 2 dc) in same st, sl st in next; rep around creating 18 tiny petal fans
Round 5 :
Attach a second dusty rose round at base of fans and work a larger fan: *sl st into center of each fan, ch 4, (3 tr, ch 3, 3 tr) in same sp; rep around
Round 6 :
Fasten off leaving long tail and sew small inner spiral layer before placing the large petals. Shape with fingers and block lightly if needed.
Info :
This layered petal style produces flatter, fuller roses excellent for grouping. Combine with rolled roses for visual variation.
— Leaf (make 30-40 leaves) :
Round 1 :
Ch 12, sc in 2nd ch from hook and next 4 ch (5 sc), 3 sc in next ch (center tip), continue down opposite side: sc in next 4 ch, 2 sc in last ch (14)
Round 2 :
Turn and work 1 sc in each st but in FLO across the shaped leaf to create a distinct ridge (14)
Round 3 :
Edge: *sc, hdc, dc, tr, dc, hdc, sc around to create a pointed venated perimeter (14)
Info :
For larger leaves ch 16 and use additional dc/tr for deeper curve. For veining, embroider a central vein with contrasting thread using backstitch after blocking.
Round 4 :
Fasten off leaving long tail for sewing. Block leaf flat with central fold to give lifelike curvature.
— Leaf Vein Embroidery (per leaf) :
Info :
Thread a yarn needle with contrast taupe or same sage and embroider 1 or 2 running stitches from base to tip, catching only the outer loops so embroidery sits on surface.
— Tiny Bud (make 18-24 buds) :
Round 1 :
mr, 5 sc in mr (5)
Round 3 :
1 sc in each st (10)
Round 4 :
*ch 3, sl st in next, rep around to form tiny loops (10)
Info :
Sew these tiny buds in clusters around roses to add dimensional interest. Stuff a tiny bit of cotton if you want a firmer bud center before closing.
Round 5 :
Fasten off leaving long tail for sewing
— Lace Connector Panel (make 7-9 panels depending on runner length) :
Round 1 :
mr, 8 sc in mr (8)
Round 3 :
(1 sc, 1 inc) x 8 (24)
Round 4 :
(2 sc, 1 inc) x 8 (32)
Round 5 :
1 sc in each st (32)
Round 6 :
*ch 5, sk 2 st, sc in next 2, repeat around to create a trellis of ch-5 loops (32 loops)
Round 7 :
Join across loops: *sl st, ch4, (3 dc, ch2, 3 dc) in next ch-5 sp, ch4, sl st; rep to create circular shell clusters across the panel
Info :
These panels form the airy laceground between motifs. Work loosely for open lace — change hook to 1.75mm for more drape if desired. Make the number of panels to suit your preferred runner length.
Round 8 :
Work connecting chains: *ch 6, sc into center of next shell to create diamond openings (32)
Round 9 :
Reinforce panel edge with sc around (32)
Round 10 :
Optional picot decoration: *sc, ch3, sl st in same st across outer edge (32)
Info :
Block each panel individually, stretching open diamond holes evenly for consistent look. Panels will be joined to medallions, small motifs and to each other using whip stitch or sc join.
— Lace Filler Rosette (petite) :
Round 1 :
mr, 6 sc in mr (6)
Round 3 :
*(1 sc, ch 3, sl st in next) rep to make small decorative loops (12)
Round 4 :
sl st through loops to shape into flat rosette, fasten off (12)
Info :
Use these tiny rosettes between larger elements to fill gaps and create additional texture across the runner surface.
— Connecting Chains and Joins (general technique) :
Info :
Pin all motifs in the desired layout onto a blocking board. Use matching thread and whip stitch to attach where motifs meet. For visible joins you may use a sc join: align two motif edges and work 1 sc through both loops of each motif edge stitch. For invisible joins use sl st or mattress stitch with matching thread.
Info :
When crocheting a sc join, keep tension loose enough so lace does not pull in but tight enough to avoid gaps. Start joining from center medallions outward for even tension distribution.
— Edge Scallop and Final Border :
Round 1 :
After assembly, work an edging around the entire runner: *sc around all outer edge stitches to create a neat border (count varies by runner size)
Round 2 :
*(ch 5, sc in 3rd sc from base) around creating large scallops spaced evenly (estimate 60 scallops, adjust to fit)
Round 3 :
Work petal shells on each scallop: (sc, hdc, 3 dc, hdc, sc) into each scallop (60 petals)
Round 4 :
Decorative picot row: *ch3, sl st in tip of petal then sl st into base; rep to finish
Info :
Measure as you work the scallops; adjust ch counts so scallops sit flat and do not pucker. If scallops pull inward, add an extra ch in the scallop foundation.
Round 5 :
Fasten off and weave in all ends. Block entire runner generously to open lace and set rose shapes.
— Alternate Stitch Textures and Decorative Variations :
Info :
To create raised ribs inside lace panels, substitute rows with BLO sc rounds so ridges appear. For a more vintage look add a slim taupe round between medallion center and outer ring to replicate aged shading visible in the image.
Info :
To vary rose fullness, change the chain length for rolled roses: each additional 10 chains equals roughly one extra petal wrap. Combine rolled roses and layered petal roses for natural cluster variation.
— Finishing and Blocking :
Info :
Wash runner gently in lukewarm water with a mild soap, then pin flat to blocking board to the exact final dimensions. Shape each rose and leaf during blocking with pins, using a small amount of diluted fabric starch for extra crispness if desired. Allow to dry completely overnight before removing pins.
Info :
After blocking, reinforce joins if any feel loose with hidden slip stitches or small whip stitches along seam lines. Weave in ends securely and trim close to work.
— Sizing and Adjustments :
Info :
Scale your runner by adding or removing central medallions, lace panels and filler motifs. Each center medallion + lace panel module (as written) yields approximately 14-16 inches in length. Add or remove modules until desired length is reached.
Info :
If you prefer a denser runner, work fewer open ch-5 trellis rows and replace with tighter sc rounds which will reduce length slightly but increase weight and opacity.
This vintage rose lace table runner brings a touch of timeless elegance to any table with its layered roses, textured leaves, and airy lacework. Each motif is a little piece of art that, when assembled together, becomes a romantic centerpiece you will treasure. The process is meditative and rewarding — every rose you roll and leaf you block becomes part of a beautiful family heirloom. 🧶🌸 Share your finished runner with friends and enjoy the compliments it will surely bring! ✨