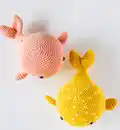
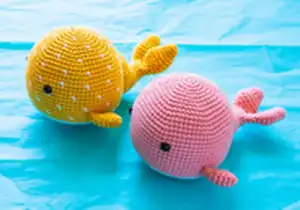
About This Wallace and Wanda Whales Amigurumi Pattern
This pattern creates two charming whale amigurumi — Wallace (with fair isle color dots) and Wanda (solid color). The whales are worked top-to-bottom with separate fins and a joined tail for neat shaping. You will learn how to carry color on the wrong side for the dot pattern and how to shape the body with invisible decreases.
Pattern includes full round-by-round instructions, finishing and assembly notes, and terminology. Designed for DK weight cotton yarn and a 2.75 mm hook for a compact, sturdy finish.
Why You'll Love This Wallace and Wanda Whales Amigurumi Pattern
I absolutely love this pattern because it combines simple amigurumi construction with a playful fair isle technique that adds personality without complicated colorwork. I enjoy how the top-to-bottom construction creates a perfectly rounded body that is satisfying to stuff and shape. The separate fins and joined tail give the whales a polished, handmade look that I find really charming. I also appreciate that the pattern is versatile — you can make a matched set or customize colors to suit any nursery or gift.
Switch Things Up
I love changing up the colors to create different personalities—try soft pastels for a nursery pair or bold brights for playful decor.
You can make the whales larger or smaller by switching yarn weight and hook size; bulky yarn will make a chunky cuddly whale while sport weight gives a tiny collectible.
I often swap the cotton yarn for acrylic to make a softer, fluffier finish that is easier to wash for toys.
Try different safety eye sizes or embroider eyes for a gentler, baby-safe option.
Add tiny embroidered smiles, freckles, or different spot patterns to give each whale unique expressions.
I sometimes add a small loop at the top to turn the whale into an ornament or mobile using a matching yarn tail.
For a coastal theme, use stripes or ombre yarn for the body instead of the dot pattern for a nautical look.
If I want a poseable toy, I add lightweight wire to the fins during assembly to bend them slightly for personality.
Create matching accessories like a tiny crochet hat, bow, or scarf to make a set—perfect for gifting multiple whales with different outfits.
Experiment with different tail shapes by adjusting the fin rounds or joining technique to create wider or narrower tails to suit your aesthetic.
Common Mistakes & How to Fix Them
✗ Skipping the stitch marker when working continuous rounds will make it hard to identify the beginning of rounds; place a stitch marker at the first stitch of every round to keep accurate counts.
✗ Not inserting safety eyes before stuffing enough can distort placement later; insert the safety eyes between the recommended rounds and stuff as you go to maintain correct positioning.
✗ Overstuffing or stuffing only at the end causes lumps and misshapen curves; stuff firmly as you work and overstuff slightly before finishing each section for smooth shaping.
✗ Changing colors incorrectly for the fair isle dots may leave loose floats on the right side; carry the yarn on the wrong side and work over the unused strand to keep the right side neat.
✗ Using visible decreases can leave gaps in the fabric when closing the body; use an invisible decrease technique as recommended for a seamless finish.