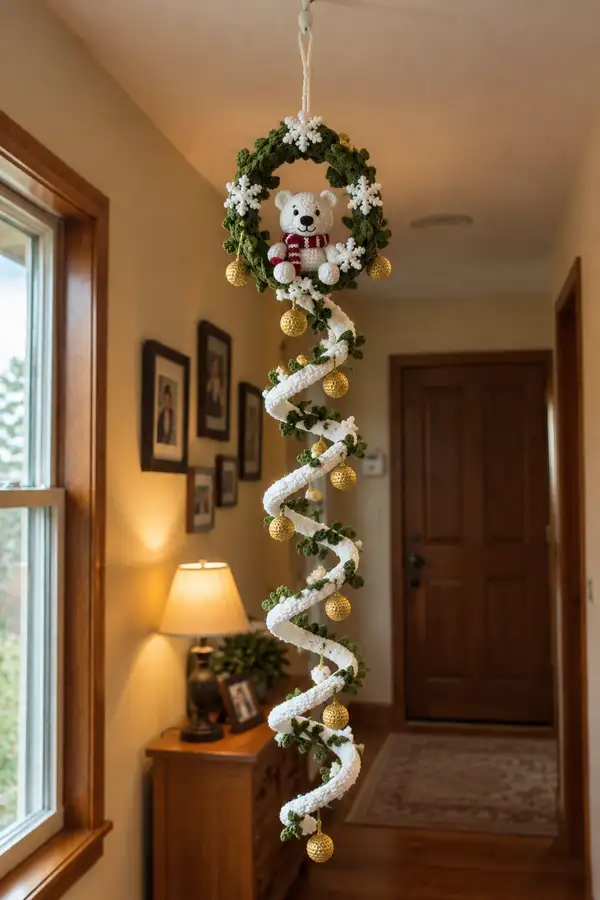
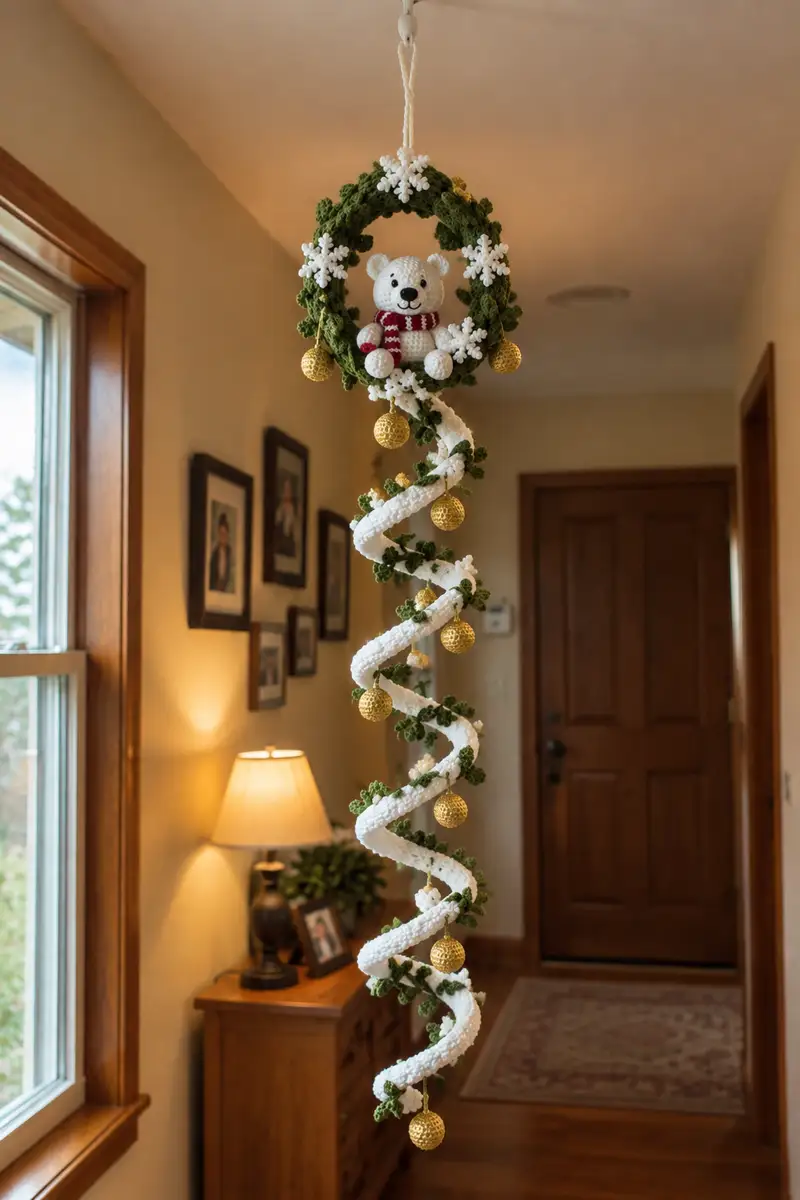
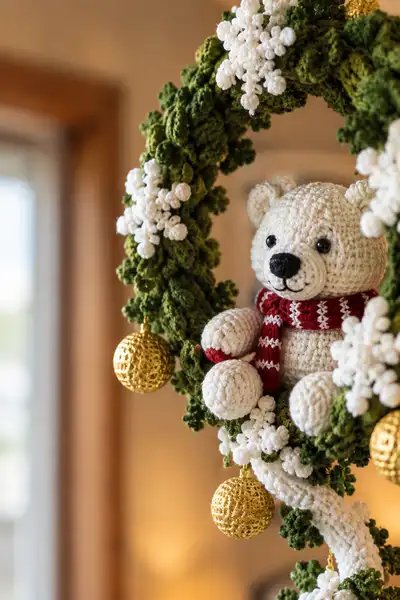
A festive hanging wreath featuring a cuddly polar bear nestled inside a lush, crocheted evergreen ring, accented with snowflake clusters and shimmering golden baubles. The long spiraling garland hangs below with plush white texture and tiny leafy sprigs for added depth. This pattern walks you through each amigurumi piece and decorative motif so you can recreate this seasonal statement piece for your home or as a special handmade gift.
Progress Tracker
0% Complete
— Head :
Round 1 :
6 sc in magic ring (6)
Round 3 :
(1 sc, inc) x 6 (18)
Round 4 :
(2 sc, inc) x 6 (24)
Round 5 :
(3 sc, inc) x 6 (30)
Round 6 :
(4 sc, inc) x 6 (36)
Round 7 :
(5 sc, inc) x 6 (42)
Round 8 :
(6 sc, inc) x 6 (48)
Round 9-14 :
1 sc in each st (48)
Info :
Place safety eyes between rounds 12-13, approximately 10-12 stitches apart depending on desired expression. If using 8mm eyes, place them closer (about 10 sts). Mark eye position with safety eye placement pins before locking.
Round 15 :
(6 sc, dec) x 6 (42)
Round 16 :
(5 sc, dec) x 6 (36)
Round 17 :
(4 sc, dec) x 6 (30)
Info :
Begin stuffing head firmly with small amounts of fiberfill, focusing first under the eyes and cheeks to create a rounded face. Continue to add stuffing as you work decreases to keep shape even.
Round 18 :
(3 sc, dec) x 6 (24)
Round 19 :
(2 sc, dec) x 6 (18)
Round 20 :
(1 sc, dec) x 6 (12)
Round 21-24 :
1 sc in each st (12)
Round 25 :
(1 sc, inc) x 6 (18)
Round 26-28 :
1 sc in each st (18)
Round 29 :
(1 sc, dec) x 6 (12)
Round 30 :
1 sc in each st (12) - Leave head open for sewing to body; do not fasten off yet
Info :
Leave a tail long enough to sew to the body. You will finish stuffing and close partially after attaching muzzle and ears. Use smaller hook (3.0mm) if your stitches are loose to prevent stuffing showing.
— Muzzle :
Round 1 :
6 sc in magic ring (6)
Round 3 :
(1 sc, inc) x 6 (18)
Round 4-5 :
1 sc in each st (18)
Round 6 :
(2 sc, dec) x 6 (12)
Round 7 :
1 sc in each st (12)
Round 8 :
Sl st to next st and fasten off leaving a long tail for sewing. Add a small bit of stuffing but keep muzzle slightly flat to sew onto face.
Info :
Sew muzzle centered between the eyes, slightly below round 13 of the head. Use the remaining tail to stitch the muzzle in place, pulling slightly to create a rounded snout. Embroider nose using black yarn or felt and secure.
— Body :
Round 1 :
6 sc in magic ring (6)
Round 3 :
(1 sc, inc) x 6 (18)
Round 4 :
(2 sc, inc) x 6 (24)
Round 5 :
(3 sc, inc) x 6 (30)
Round 6 :
(4 sc, inc) x 6 (36)
Round 7-12 :
1 sc in each st (36)
Info :
If you prefer a slightly larger body than head, continue 2-3 extra rounds here before decreasing. This is also the place to change color if you want the belly or clothing contrast (not required for polar bear).
Round 13 :
(4 sc, dec) x 6 (30)
Round 14 :
(3 sc, dec) x 6 (24)
Round 15 :
(2 sc, dec) x 6 (18)
Round 16-20 :
1 sc in each st (18)
Info :
Begin stuffing the body firmly from the bottom up. Leaving the top opening large enough for attaching the head later will make assembly easier. Stuff moderately firm so wreath will sit and the bear won't flop forward.
Round 21 :
(1 sc, dec) x 6 (12)
Round 22-26 :
1 sc in each st (12) - Leave opening for sewing; do not fasten off
Info :
When attaching head, have body top open and align round 30 of head with top opening of body. Use mattress stitch or whip stitch through both rounds to create a neat seam.
— Arms (Make 2) :
Round 1 :
6 sc in magic ring (6)
Round 3 :
(1 sc, inc) x 6 (18)
Round 4-6 :
1 sc in each st (18)
Info :
Stuff the hand portion firmly now to create a rounded paw shape. If you plan to pose the arms, insert a short length of craft wire inside before continuing to the upper arm.
Round 7 :
(2 sc, dec) x 6 (12)
Round 8-12 :
1 sc in each st (12)
Round 13 :
(1 sc, inc) x 6 (18)
Round 14-16 :
1 sc in each st (18)
Round 17 :
(2 sc, dec) x 6 (12)
Round 18 :
1 sc in each st (12) - Fasten off leaving long tail for sewing
Info :
Attach arms to body at rounds 18-20 on each side. Sew through the body rounds and the flat top of the arm using an invisible ladder stitch for a seamless join. Pin in place before sewing to check positioning.
— Legs (Make 2) :
Round 1 :
6 sc in magic ring (6)
Round 3 :
(1 sc, inc) x 6 (18)
Round 4 :
(2 sc, inc) x 6 (24)
Round 5-8 :
1 sc in each st (24)
Info :
Stuff the foot portion firmly so the bear can sit well on the wreath ring. Use pea-sized amounts of stuffing to shape the toes and sole area, then fill the ankle and leg moderately.
Round 9 :
(3 sc, dec) x 6 (18)
Round 10-14 :
1 sc in each st (18)
Round 15 :
(1 sc, dec) x 6 (12)
Round 16-20 :
1 sc in each st (12) - Fasten off leaving long tail for sewing
Info :
Sew legs to the base of the body slightly forward-facing so the bear appears seated inside the wreath. Use stuffing to angle the leg attachment for a natural drape over the wreath ring.
— Ears (Make 2) :
Round 1 :
6 sc in magic ring (6)
Round 3 :
(1 sc, inc) x 6 (18)
Round 4 :
1 sc in each st (18)
Round 5 :
(2 sc, dec) x 6 (12)
Round 6-7 :
1 sc in each st (12)
Round 8 :
Fold ear slightly and sl st through front loops only for a cupped shape, fasten off leaving tail for sewing
Round 9-10 :
Optional: embroider or sc a small inner ear in a lighter shade and sew inside each ear
Info :
Sew ears to top of head between rounds 7-9, spacing them around 8-10 stitches apart and angling slightly forward for a friendly expression.
— Scarf :
Info :
This scarf is worked flat in rows to create a rectangular band that is then wrapped and sewed in place. Use red main yarn with contrasting white stripes by alternating rows.
Row 1 :
Ch 22, sc in 2nd ch from hook and across (21)
Row 2 :
Ch 1, turn, sc in each st across (21)
Row 3-18 :
Rep Row 2 alternating colors every 2 rows for a striped effect. End after row 18 or when length measures approx 12cm (5 in)
Info :
Fold the scarf and sew a small seam so it sits snugly around the bear's neck. Let ends hang to show stripes. Embroider small fringe if desired.
— Wreath Tube Base (Make 1 long tube, then shape into ring) :
Round 1 :
6 sc in magic ring (6)
Round 3 :
(1 sc, inc) x 6 (18)
Round 4 :
(2 sc, inc) x 6 (24)
Round 5 :
(3 sc, inc) x 6 (30)
Round 6-8 :
1 sc in each st (30)
Info :
This creates the circumference of the tube. From now on you will work in continuous rounds to produce a long tube. Work in spiral (do not join) to produce a smooth seam-free tube.
Round 9-68 :
1 sc in each st (30) - Work continuously until your tube measures approximately 35-40 inches (90-100 cm) in length (or desired circumference for a 10-12 inch wreath)
Info :
Keep the tube flexible by not stuffing it strongly. A moderately stuffed tube will hold shape but still be pliable for forming into a ring. You can optionally crochet a braided cable inside or add craft wire through the center for stability.
Round 69 :
Stop here and fold tube into a circle joining the two ends together with a slip stitch seam. Fasten off and weave ends to secure a continuous ring.
Info :
Pin the ring on a flat surface and adjust until circular. Use a few large blind stitches to hold the join; the live stitches will be covered with foliage later so neatness, not perfection, is fine.
— Leaf Cluster Module (Make approx 40-60 clusters) :
Round 1 :
Ch 3, 3 sc in 2nd ch from hook and last ch, turn - make a small petal base (3 sts)
Round 2 :
In same starting spot: ch 2, (hdc, dc, hdc) in same st to create a leaf spike, sl st to base
Round 3 :
Ch 1, sc around the base and make 3 small popcorns along the edge: For each popcorn - (5 dc in same st, remove hook, insert into first dc, pull loop through, sl st to close), sl st to finish
Info :
The leaf cluster is intentionally textured: make many and sew densely to cover the wreath base. Vary the orientation of each leaf cluster to add depth and avoid repeating patterns.
Round 4 :
Fasten off leaving tail for sewing. Use tail to attach cluster to wreath ring by stitching through tube and around cluster base. Make clusters in both dark and medium greens for variety.
— Snowflake Motif (Make 6-8) :
Round 1 :
6 sc in magic ring (6)
Round 2 :
(ch 4, sl st into next st) x 6 to create 6 arms (work around) (6 arms)
Round 3 :
In each ch-4 arm work: (sc, hdc, 3 dc, hdc, sc) then sl st back to center and move to next arm
Round 4 :
Between each arm add a small picot cluster: ch 3, picot (ch 3, sl st in first ch), sl st to next arm base
Round 5 :
Fasten off leaving tail for sewing. Add tiny bead or french knot center if desired
Info :
Sew snowflakes spaced evenly around the top of the ring and occasionally along the spiral garland. Use white yarn with a little puff (plush yarn) for a frosted look.
— Spiral Garland (Long, plush white spiral) :
Info :
This spiral is made by crocheting a puff/loop tube and then allowing it to spiral around a lightweight cord or pipe cleaner. You will create a narrow tube circumference and work many rounds for length; the rounds below represent circular rounds along the tube length.
Round 1 :
6 sc in magic ring (6)
Round 3 :
(1 sc, inc) x 6 (18)
Round 4 :
(2 sc, inc) x 6 (24)
Round 5-8 :
1 sc in each st (24)
Info :
Begin stuffing only lightly as the spiral should be flexible. If adding an internal cord for structure, pull it through the center of the tube now and continue crocheting around it. Keep tension slightly loose to allow the spiral to wrap easily.
Round 9-88 :
1 sc in each st (24) - Continue working in spiral until the tube measures desired length (approx 90-110 cm for the hanging spiral pictured). Note: 80-90 rounds will give a long spiral; reduce for shorter versions.
Info :
Once length is reached, fasten off leaving long tail and a length of cord or wire that will allow you to attach the spiral at the wreath base and hang freely. Twist the tube around the cord to form the spiral and secure with tack stitches every 5-8 cm to keep coils even.
— Small Green Sprigs for Spiral (Make 30-40) :
Round 1 :
Ch 6, sc in 2nd ch from hook, sc in next 3 ch, 3 sc in last ch, turn and sc back along chain to create a small textured sprig (approx 10-12 sts total)
Round 2 :
Work small popcorns at the tip: (5 dc in st, pull through to close) x 3 along outer edge then fasten off leaving tail
Info :
Sew these small sprigs to the spiral at irregular intervals to mimic greenery poking from the snow. Use darker shades near the base and lighter shades toward the tips for natural contrast.
— Gold Bauble Ornament (Make 6) :
Round 1 :
6 sc in magic ring (6)
Round 3 :
(1 sc, inc) x 6 (18)
Round 4 :
(2 sc, inc) x 6 (24)
Round 5-6 :
1 sc in each st (24)
Round 7 :
(2 sc, dec) x 6 (18)
Round 8 :
(1 sc, dec) x 6 (12)
Round 9 :
6 dec (6) - Fasten off, pull tail to close tightly, insert a small bead or fiberfill core so bauble keeps round shape then secure
Info :
Add a small loop of metallic yarn or a jewelry eye-pin before closing to create a hanging point. You can also use small store-bought plastic gold baubles instead and stitch them into place.
— Hanging Loop and Finishing Rope :
Round 1 :
Ch 40 (or length desired for hanging), sl st into a loop to make a rope. Fasten off leaving ends to sew to top of wreath ring securely
Info :
Reinforce hanging loop by sewing through multiple rounds at ring top and optionally inserting a small metal ring inside before final stitches for extra strength.
— Assembly & Decoration Notes :
Info :
Arrange leaf clusters densely over the entire wreath ring. Sew clusters overlapping so the ring surface is fully covered and no base shows through. Add snowflakes at top and around the bear. Attach gold baubles with short decorative yarn loops and stitch through the bauble loop to anchor them securely.
Info :
Position the bear so its bottom and legs rest naturally on the lower inside of the ring. Sew the bear body through the ring base at rounds 22-26 on the body to secure. Use extra stitches to ensure the bear cannot pull free when hanging.
Info :
Wrap the spiral garland around the ring and secure the top coil to the bottom of the wreath by sewing through the coil and ring. Space gold baubles along the spiral evenly and add leaf sprigs and small snowflake clusters to the spiral for cohesion.
Info :
Weave in all yarn tails inside the pieces so they are hidden. For extra security on any ornaments used as hanging decorations, knot and glue a small backing disk inside the ornament before stitching through.
This festive amigurumi wreath combines playful character design with seasonal decoration to create a truly special piece you will enjoy making and displaying. The teddy bear peekaboo and spiraling snowy garland make a charming statement in any entryway. The detailed instructions help you craft every small element with confidence, and the finished hanging wreath will delight guests and family. 🧶✨ Hang it proudly and enjoy the cozy holiday vibes you created by hand. 🎁