🧢 Beautiful ✨ Detailed πŸ’ Adorable

Winter is Coming Beanie Pattern

Winter is Coming Beanie Pattern
4.8β˜… Rating
2-3 Hours Time Needed
3.3K Made This
βœ‚οΈ

Beginner Friendly Level

Perfect for those just starting their crochet journey, with clear instructions and simple techniques

⏱️

Bite-Sized Project

Finishes in 2-4 hoursβ€”perfect for an afternoon of creative relaxation.

πŸ‘•

Casual Chic

Relaxed style with a modern twist, perfect for everyday wear while maintaining that handcrafted uniqueness.

About This Winter is Coming Beanie Pattern

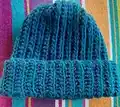
This pattern creates a crocheted cap worked flat to reproduce a fisherman's rib look using half double crochet through the back loop. You can customize the circumference and height to fit any head. The beanie is simple, fast to make and gives a stretchy, knit-like texture without knitting needles. It uses a bulky hook and about 100 g of yarn for a warm, cozy finish.

Winter is Coming Beanie Pattern crochet pattern - detailed view of completed project

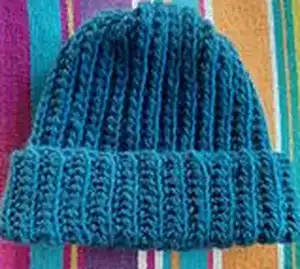
Worked back and forth in rows and joined to form a tube, the ribs are formed by HDC made through the back loop. The final top is gathered and fastened for a neat finish.

Why You'll Love This Winter is Coming Beanie Pattern

I absolutely love this pattern because it gives a knit-look fishermans rib using only crochet stitches, which is perfect for beginners who want a textured result. I love how quickly the piece grows when using a large hook and bulky yarn, making it a satisfying quick project. The design is highly customizable so I can easily adjust size and cuff height to suit different heads. I also enjoy that the ribbed fabric is naturally stretchy and comfortable, making the beanie practical as well as stylish.

Winter is Coming Beanie Pattern step 1 - construction progress Winter is Coming Beanie Pattern step 2 - assembly progress Winter is Coming Beanie Pattern step 3 - details and accessories Winter is Coming Beanie Pattern step 4 - final assembly and finishing

Switch Things Up

I love experimenting with color when I make this beanie; try a two-tone cuff by changing color after folding to add a modern contrast.

I sometimes change yarn weight and hook size to make a mini or oversized version; a thinner yarn with a smaller hook gives a delicate, smaller hat.

I often add a pom-pom at the top for a playful finish and to give the hat extra character.

I like to adjust cuff height by folding more or less of the tube before finishing to change the style from slouchy to snug.

I sometimes work the same stitch pattern but alternate colors every two rows to create subtle striping without changing the texture.

I recommend trying both tighter and looser tension on a small swatch to see how the rib elasticity changes before making the full piece.

I occasionally add a small applied patch or embroidered initial on the cuff for personalization and gifting.

I also experiment with different finishing techniques for the top gather, like a neat invisible closure or a decorative buttoned tab.

I like to vary the yarn fiber for different seasons: acrylic or wool blends for warmth, cotton blends for a lighter beanie version.

I encourage you to mix techniques like adding a simple earflap or turning it into a slouch beanie by adding extra length at the top; dont be afraid to make it your own.

Common Mistakes & How to Fix Them

βœ— Choosing the wrong chain length for your starting foundation; measure the head circumference and subtract about 4 cm, then chain to that measurement to ensure a snug fit. βœ— Crocheting HDC through both loops instead of the back loop only; always work HDC in the back loop to create the fishermans rib texture and check each row for consistency. βœ— Using inconsistent tension across rows which makes ribs uneven; maintain the same tension and practice a swatch to match the feel of the sample before making the whole piece. βœ— Failing to join the two short edges evenly when making the tube; align the edges carefully and slip stitch with equal spacing to avoid puckering along the seam. βœ— Stopping before youve reached the correct tube width; continually measure against the intended head circumference and continue repeating rows 2 and 3 until you reach the target width.

Winter is Coming Beanie Pattern

Make a cozy, knit-look beanie worked flat using half double crochet through the back loop for a fishermans rib effect. This pattern is fully customizable to any head size and uses simple stitches so you can finish quickly. Youll get clear step-by-step instructions and tips to adapt circumference and height for a perfect fit. Ideal for gifting or making a warm staple for your winter wardrobe.

Beginner Friendly 2-3 Hours

Materials Needed for Winter is Coming Beanie Pattern

β€” Main Fabric

  • 01
    Morelfil BigBall (100 g used in sample)
  • 02
    Approximately 100 g of wool (bulky weight suggested for similar result)

β€” Tools Required

  • 01
    Crochet hook size 8 mm
  • 02
    Scissors
  • 03
    Yarn needle for finishing

Progress Tracker

0% Complete

β€” Winter Is Coming Beanie :

Infos :

Description: Winter is coming Beanie is a crocheted cap, worked in flat, completely customisable to any size, reproducing the fishermans rib stitch knitted with two needles. Gauge: No gauge required; you can work adapting the shape to the head dimension. In my case the gauge was 14 lines x 20 stitches for 10x10 cm. My final dimension was: 49 cm for the circumference and 32 cm for the height. Yarn: I used 100 gr of Morelfil BigBall. Hook: 8 mm, I used this size, but you can use any size according to the yarn used, bigger is your hook, bigger will appear your ribs. Techniques used: slip stitch, half double crochet. Level: Beginner.

Infos :

Abbreviations: Chain: ch. Half Double Crochet: hdc. Slip Stitch: slt.

Info :

Materials: with a hook of 8 mm, I used 100 gr of wool.

Info :

Chain to reach about 35 cm, in my case 40 ch.

Info :

Lets crochet in rows, back and forth. All rows except for the last one will be made with HDC stitch made through the back loop.

Row 1 :

40 hdc

Row 2 :

chain, 40 hdc through the back loop

Row 3 :

chain, 40 hdc through the back loop

Repeat :

Repeat *Row 2 and 3* until reach a width of 53 cm; in my case I worked 56 rows. You can adjust your width measuring the head less 4 cm.

Last row :

Join the two sides in vertical with 40 slt. You will now have a tube.

Info :

See pictures in the original pattern for reference on folding and seam alignment.

Finish :

Cut the yarn and pull yarn through the remaining stitches, tighten together and fasten. Your beanie is ready!

Assembly Instructions

  • Chain to reach about 35 cm (in the sample chain 40 stitches) to form the foundation width for the beanie.
  • Work back-and-forth rows: all rows except the last are HDC worked through the back loop to form the fishermans rib texture.
  • When you have reached the target width (sample 53 cm, sample worked 56 rows), align the two short edges and join them vertically using 40 slip stitches to form a tube.
  • Close the top by cutting the yarn, pulling the working yarn through the remaining stitches, tightening the gathered stitches, and fastening off securely.

Important Notes

  • πŸ’‘Measure the head circumference and subtract about 4 cm to get the correct width before chaining; this helps the beanie sit snugly.
  • πŸ’‘Work HDC through the back loop for all rows except the final joining row to achieve the knit-look fishermans rib effect.
  • πŸ’‘Using a larger hook will make your ribs more pronounced and create a looser, more open fabric; choose hook size according to desired look.

This Winter Is Coming Beanie is a delightful, speedy project that gives a classic fishermans rib look using simple crochet techniques. Make it for yourself or as a heartfelt handmade gift that warms both head and heart. Customize the size easily and enjoy the stretchy, knit-like texture every time. 🧢🎁

You ask,

we answer.

FAQs

What size will the finished piece be?

The sample finished with a circumference of 49 cm and a height of 32 cm when using an 8 mm hook and approximately 100 g of yarn; you can adapt dimensions to fit any head.

Can I use different yarn weights for this pattern?

Yes, you can use different yarn weights, but that will change the final size and fabric drape; adjust your hook size and chain length to match your desired measurements.

Do I need prior crochet experience for this pattern?

This pattern is rated beginner-friendly and requires basic stitches like chain, half double crochet and slip stitch; familiarity with working through the back loop will be helpful.

How long does this project typically take to complete?

Most crocheters finish this beanie in about 2-3 hours using the recommended bulky yarn and 8 mm hook, though time may vary depending on experience and customization.