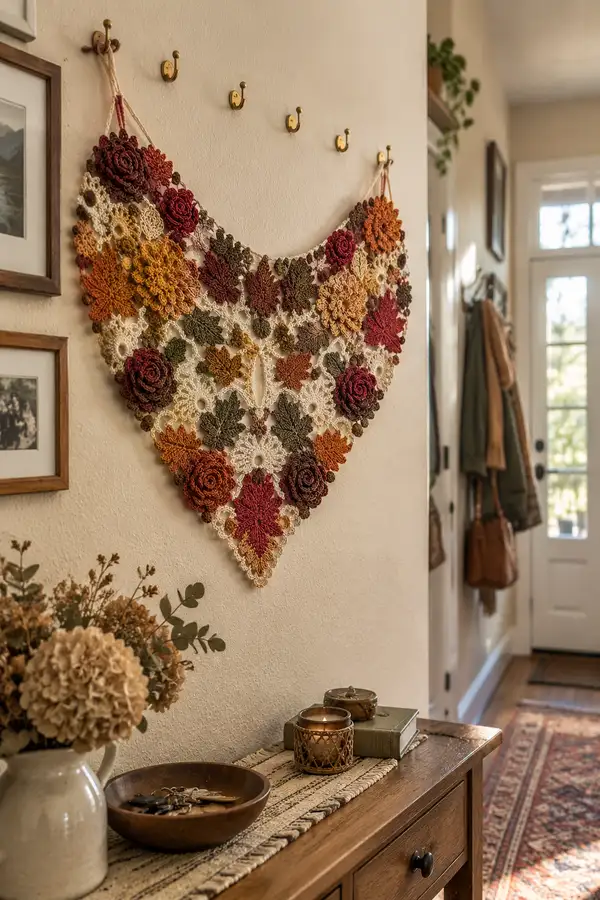
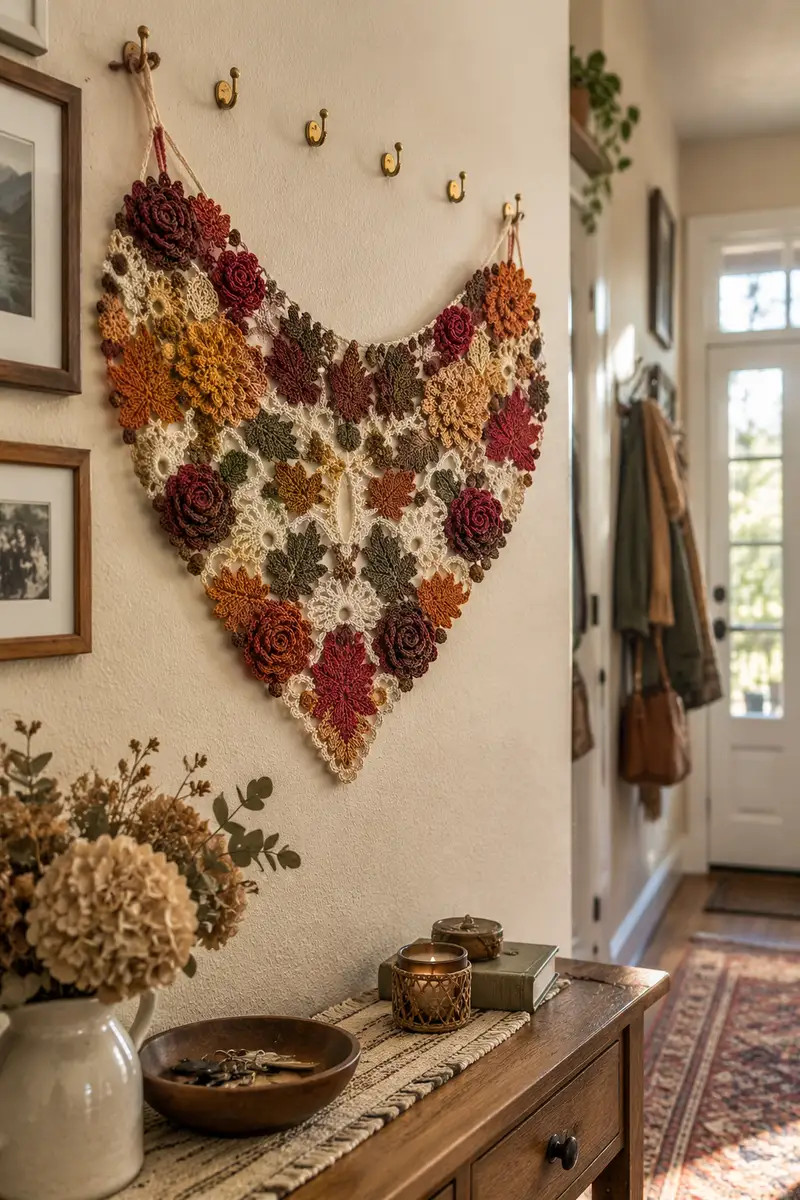
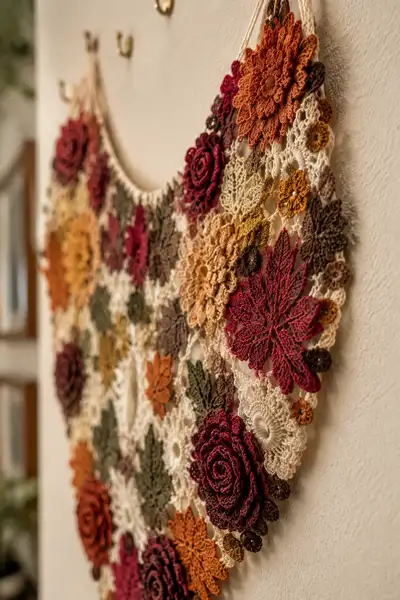
A warm, floral-inspired triangular wall runner composed of many joined motifs — layered roses, textured flowers, and delicate leaves in autumnal hues. Finished size hangs like a heart-shaped shawl and adds cozy seasonal charm to any entryway. Uses fine-weight cotton or light DK for crisp motif definition with a mix of 3D and flat elements. Perfect for decorating a foyer or tabletop as a statement autumn accent.
Progress Tracker
0% Complete
— Pattern Notes :
Info :
This runner is constructed from multiple motif types: 3D Rose, Large Sunburst Flower, Medium Daisy/Snowflake Connector, Maple Leaf, Small Round Flower, and a Lace Join motif. Make motifs in colors listed, block each motif flat (or shape roses) then join-as-you-go or stitch them together later. Gauge varies with yarn and hook but motifs shown were made with fingering/sport cotton and a 2.5mm hook for crisp texture. Finished runner height about 30-34" from tip to hanging point depending on motif size and join spacing.
Info :
Abbreviations used throughout are standard (sc, dc, tr, ch). Use stitch markers for round starts. For 3D roses, you'll work spiral rounds to form the layered petals. For large flowers, petals are made with clusters and picots to give definition.
— Rose Motif (3D Layered Rose) :
Round 1 :
Make a mr, ch1, 8 sc into ring. Pull ring closed. Join with sl st to first sc (8)
Round 2 :
Ch1, inc in each st around. (16)
Round 3 :
Ch1, (1 sc, inc) x8. (24)
Round 4 :
Ch1, (2 sc, inc) x8. (32)
Info :
Rounds 1-4 create a solid disc base. Keep tension slightly loose to allow petals to gather. Do not over tighten the magic ring; leave small hole to secure later with a few stitches.
Round 5 :
Ch2 (counts as first dc), *skip 1 st, (dc3 cluster) in next st, ch1, sl st in next st* rep around. Aim for 10 clusters evenly spaced. End with sl st to base of ch2. (approx 10 clusters)
Round 6 :
Working behind round 5 clusters, ch1, sc in same st, *ch3, sc in next cluster space* rep around to create spacer loops. (approx 20 loop spaces)
Round 7 :
Turn the piece to work petals: working into ch3 loops, *(sc, hdc, dc, tr, picot, tr, dc, hdc, sc) in each loop* rep around. This forms taller inner petals. (20 large petals)
Info :
After round 7 fold petals outward and press lightly while warm to shape. Use a small amount of stuffing under center if you want more volume but keep minimal to prevent bulging.
Round 8 :
Working behind the tall petals, ch2, *sl st in base between petals, ch4* rep around to form loops for outer layer. (20 ch4 loops)
Round 9 :
Into each ch4 loop work (sc, hdc, dc, tr, dc, hdc, sc) to make outer ruffled petals. Fasten off leaving long tail for sewing. (20 ruffled petals)
Round 10 :
Optional: For extra dimensionality, with smaller hook and same color, create a tight spiral tube: ch30 (or long enough to wrap), sl st back along chain to form a cord, then coil this cord into a tight spiral and stitch to center of rose. Fasten and weave in ends.
Info :
Block rosette lightly on a curved surface to keep petals lifted. When attaching to the runner, center each rose on a lace connector and tack in 6 places for stability.
— Large Sunburst Flower Motif :
Round 1 :
mr, ch3 (counts as dc), 11 dc into ring, sl st to top of ch3. (12)
Round 2 :
Ch1, sc in same st, *ch5, sc in next st* around creating 12 ch5 loops. Join. (12 loops)
Round 3 :
Into each ch5 loop work (sc, hdc, dc3, hdc, sc) to form elongated petals. (12 petals)
Info :
Keep petals consistent in height by counting stitches. Large sunbursts are focal motifs; use slightly larger hook (3mm) if you want very open petals.
Round 4 :
Rotate piece and work a round of reverse ridge: *ch2, sl st at base between petals* around to create raised base. Fasten off. (12 ch2 loops)
Round 5 :
Using contrasting or same color, join in any petal base, ch1, sc around entire outer edge working 3 sc in top of each petal to create scalloped outline. (approx 60 sc)
Round 6 :
Decorative round: *ch3, picot, sc in next st* repeat around. Fasten off and block petals outward. (approx 20 picots)
Info :
Optionally sew a small wooden bead or button to center for texture. If using a bead, secure with matching thread and glue for durability.
— Medium Daisy / Snowflake Connector Motif :
Round 1 :
mr, ch1, 10 sc into ring. (10)
Round 2 :
Ch3 (counts as dc), *ch2, dc in next st* repeat around to create 10 dc separated by ch2. Join. (10)
Round 3 :
In each ch2 space work (sc, hdc, 3dc, hdc, sc) to make 10 dense petals. (10 petals)
Round 4 :
Ch1, sc in each st around working 2 sc in the top of each petal to create a compact rim. (approx 40 sc)
Round 5 :
Join color cream: ch6, sl st in every 4th sc around to create looped connectors for join-as-you-go points. Fasten off. (approx 10 loops)
Info :
These medium motifs form the open background; arrange them in triangular grid to get the heart-shaped outline. Use these as base points to attach leaves and roses.
— Small Round Flower Motif :
Round 1 :
mr, ch1, 6 sc into ring. (6)
Round 2 :
Ch2, 2 dc in each sc around. (12)
Round 3 :
Ch1, *sc in next dc, ch2* around to make airy lacy shape. Fasten off. (12 ch2 loops)
Info :
Make many small flowers in accent colors (mustard, brown) to fill gaps and anchor larger motifs visually.
— Maple/Decorative Leaf Motif :
Round 1 :
Ch6, sl st to form ring (or mr, ch3, 6 sc). For a flat leaf I use ch foundation: ch9 for leaf length base.
Round 2 :
Working along ch base: sc in 2nd ch from hook, hdc next, 2 dc, 3 tr (center tip), 2 dc, hdc, sc. Turn and work along other side: sc, hdc, 2 dc, tr in same top, 2 dc, hdc, sc. Sl st to base. (leaf shape formed)
Round 3 :
Edge round: ch1, sc around entire leaf, working 3 sc at tip to keep shape. Fasten off. (approx 30 sc)
Round 4 :
Decorative veins: With contrast thread, embroider central vein using sl st and small hdc stitches or use surface slip stitch to add veins. Block flat.
Info :
Leaves are worked in olive or brown; make both single and double leaves (two leaves worked together) to create clusters. Use slightly smaller hook to make crisp edges.
— Join Motif (Square Lace Connector) :
Round 1 :
mr, ch3, 11 dc into ring, sl st to top of ch3. (12)
Round 2 :
Ch1, sc in same st, ch5, skip next dc, sc in next dc, rep to form 6 ch5 loop pairs across. Join. (6 loop pairs)
Round 3 :
Into each ch5 loop work (sc, hdc, dc3, hdc, sc) creating 12 petals total. (12)
Round 4 :
Form square shape: ch1, sc in each petal top across 3 petals, ch3, sl st across to form corner, continue to form 4 corners; adjust counts so motif lies square-ish (approx 48 sc total around).
Round 5 :
Work open lace round: *ch7, skip 3 sc, sl st in next sc* rep to create big joining loops on four sides. (approx 16 loops)
Info :
These square connectors are the scaffolding between larger motifs. When joining-as-you-go, slip stitch into appropriate ch-loops of previously made motifs to attach seamlessly. Keep squares blocked to ensure even joins.
Round 6 :
Fasten off leaving long tail to sew if not join-as-you-go. Make required quantity to form triangular grid: center lines require more squares than edges.
— Edge Scallop and Lace Border :
Round 1 :
Once motifs are joined into the triangular shape, work continuous round of sc around entire outside edge in cream: sc evenly around all outer motif edges, placing 2 sc at each outer petal tip. (st count varies by motif layout)
Round 2 :
Work scallops: *5 dc in next st, sl st in next sc* repeat across edge points to form large scallops. (approx 30 scallops depending on size)
Round 3 :
Picot round: *ch3, sl st in base of ch3 for picot, sl st in center of next scallop* rep to give delicate finished edge. Fasten off and weave ends. (approx 30 picots)
Info :
Blocking is essential after this round to set scallops. Pin scallops to desired curve and steam/wet block until dry to get crisp edge.
— Hanging Cord and Finishing Touches :
Round 1 :
Braid three 1.5m strands of cream yarn for hanging cord or make 3 long twisted chains using a larger hook: ch240, sl st back to form rope if preferred. Make two cords and sew ends through the top row of motifs leaving a 6-8" drop for loop. Fasten securely.
Round 2 :
Optional tassels: gather 10-15 small ch30 loops in cluster and attach to bottom tip of runner. Wrap base with matching yarn and stitch firmly.
Info :
Secure the hanging cords by stitching through several connector motifs behind the top row. Reinforce with a few stitches of upholstery thread if hanging on wall with weight of motifs.
— Assembly & Join-As-You-Go Instructions :
Info :
Layout plan: Arrange medium connector motifs in a triangular grid with the tip pointing down. Place large sunbursts and roses on top of this grid at focal points. Use small flowers and leaves to fill gaps and create a gradual heart curve. Pin everything in place on a blocking board before final joining. Reference photos for spacing: expect 6–9 medium connectors along the center vertical line, with edges tapering.
Round 1 :
Join-as-you-go technique: On final round of a connector motif, instead of sl st joining, align adjacent motif and sl st through ch-loops of both motifs at intended join points to attach. Use the connector's ch-loops or picots as anchor points. Space joins every 3–5 stitches depending on motif size to ensure a stable join.
Round 2 :
If sewing later, use a matching yarn and whip stitch through outer chains or sl st loops, making sure to catch both motifs at multiple points for secure attachment. For raised roses, tack in at least 6 evenly spaced stitches under the rose base to prevent shifting.
Info :
Pin and measure frequently: maintain a straight top line where hanging cords will attach. Use a ruler or measuring tape to keep symmetry left-to-right. After joining, re-block entire runner so joins settle flat and scalloped edge shapes are clear.
— Detailed Round Totals & Suggested Quantities :
Info :
Suggested motif counts for similar-sized runner: 12–18 medium connector motifs, 6 large sunburst flowers, 6–8 3D roses, 12–18 leaves, 18–30 small round flowers and tiny fillers. Exact counts will vary by how densely you place motifs. This plan yields roughly 100–120+ total construction rounds across motifs and joins depending on repeats and edging chosen.
Info :
When you make each motif, label and stack them by color group to speed assembly. Keep extra small flowers to fill holes that become obvious during the pinning stage — it's easier to add than to remove large motifs.
— Final Blocking and Care :
Info :
Gently wet-block the entire runner pinned to desired dimensions. Use rust-proof pins and a ceramic or foam board. Allow to dry flat overnight. For cotton yarn, light steam blocking is safe; avoid excessive heat. Hand wash gently later, reshape while damp, and dry flat to preserve structure.
Info :
To store, fold carefully with acid-free tissue between layers or roll loosely to avoid crushing 3D roses. Spot-clean with damp cloth if needed and re-steam shape lightly.
Completing this Autumn Blossom Heart runner is so satisfying — every petal and leaf adds scale and depth to a living, seasonal artwork. The warm rusts, golds, and olive greens pair beautifully against the cream lace background. Each motif is a mini project in itself, and together they create a piece that feels handmade and heirloom. Hang it in an entryway to welcome guests with cozy, fall charm. 🍁🧶