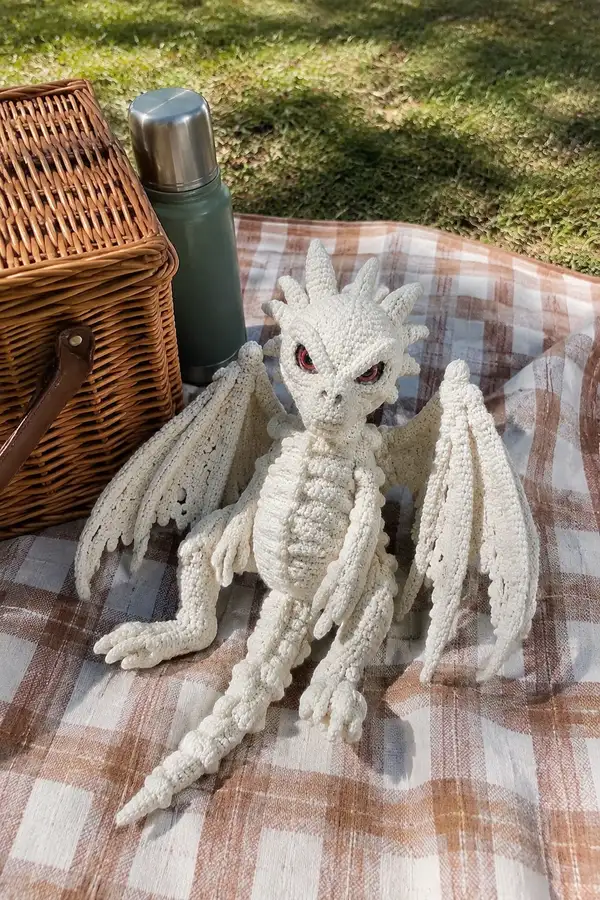
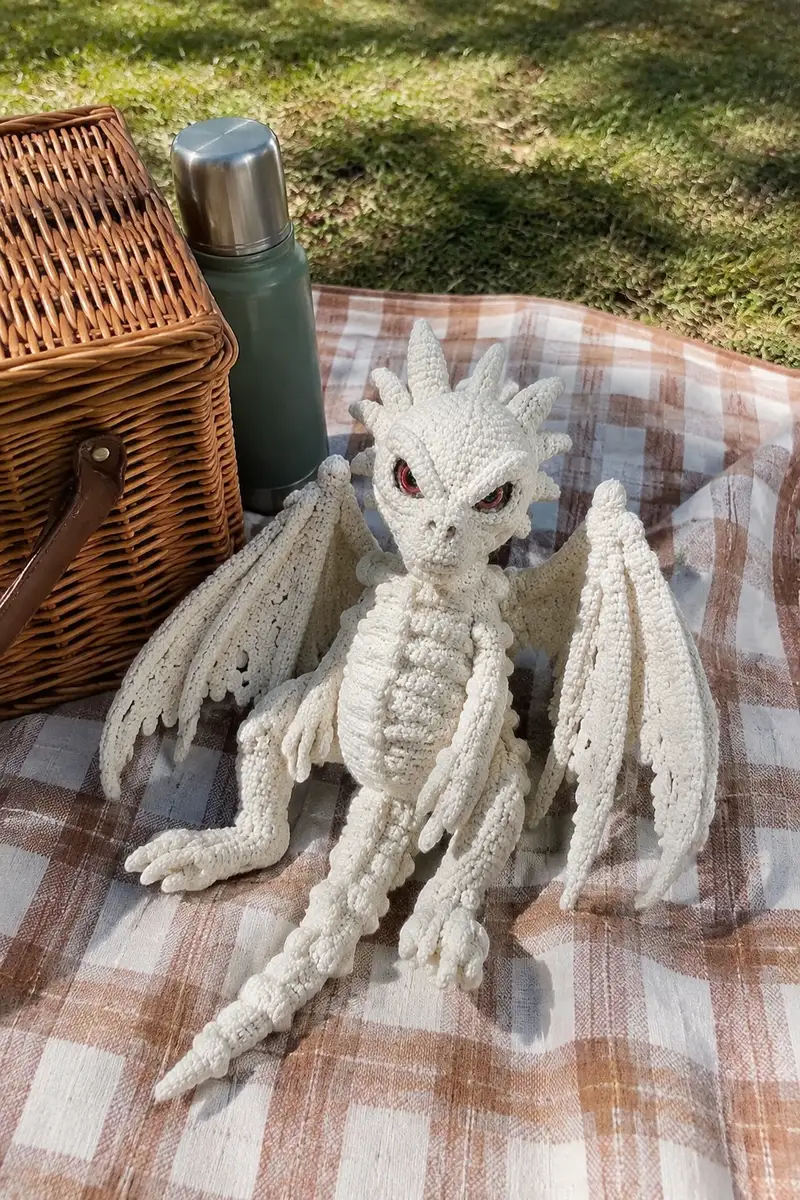
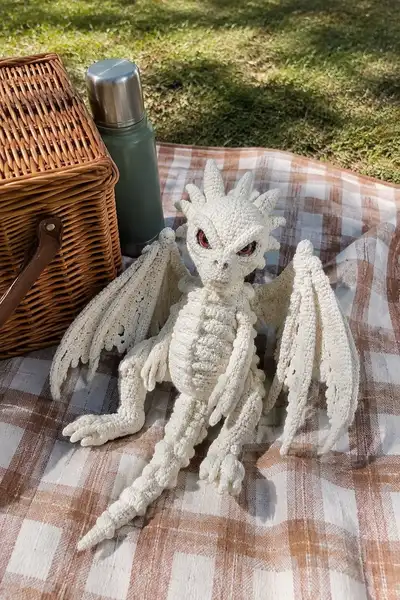
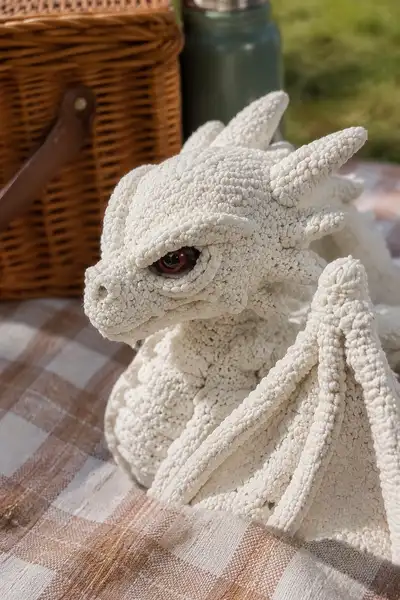
Create a hauntingly adorable bone-white ghost dragon with fierce red eyes and delicate wing membranes. This detailed amigurumi pattern recreates the textured scale effect, segmented belly, curled tail and expressive eyebrow ridges visible in the photos. Designed with textured chenille-style yarn and carefully placed spikes and facial details to give the dragon personality and presence. Perfect as a spooky display piece or a collectible plush with great posture and poseable limbs.
Progress Tracker
0% Complete
— Head :
Round 1 :
6 sc in magic ring (6)
Round 3 :
(1 sc, 1 inc) x 6 (18)
Round 4 :
(2 sc, 1 inc) x 6 (24)
Round 5 :
(3 sc, 1 inc) x 6 (30)
Round 6 :
(4 sc, 1 inc) x 6 (36)
Round 7 :
(5 sc, 1 inc) x 6 (42)
Round 8 :
(6 sc, 1 inc) x 6 (48)
Round 9-12 :
1 sc in each st (48)
Info :
Work tightly with your hook to keep the chenille stitches closed so stuffing does not show through. Insert a stitch marker at the first stitch of round 9 and move up each round. The head will be worked mostly in the round; the muzzle will be attached later. Place eye placement marks now: mark where rounds 11 and 12 intersect with the 14th and 34th stitch to help find centers of eye sockets.
Round 13 :
(6 sc, 1 inc) x 6 (54)
Round 14-16 :
1 sc in each st (54)
Info :
Between rounds 13-14 we will create a subtle eyebrow ridge. To do this later, you will crochet two short eyebrow strips and sew them on top of the brow area between rounds 13 and 15 centered above the eye placement markers. Do not stuff the head yet; wait until muzzle is attached to get proper shape.
Round 17 :
(6 sc, 1 dec) x 6 (48)
Round 18 :
(5 sc, 1 dec) x 6 (42)
Round 19 :
(4 sc, 1 dec) x 6 (36)
Info :
Begin light stuffing at this point: add only a small amount to keep the top of the head rounded; the majority of stuffing will be done after muzzle attachment and before final neck decreases. If you plan to use safety eyes, prepare them now; eyes will be secured through an eye-socket rim later.
Round 20 :
(3 sc, 1 dec) x 6 (30)
Round 21 :
(2 sc, 1 dec) x 6 (24)
Round 22 :
(1 sc, 1 dec) x 6 (18)
Info :
Fasten off leaving a long tail for sewing the head to the body later. Do NOT entirely close the opening if you will attach the muzzle before closing — instead leave enough room to insert muzzle base and sew securely. Set head aside for final assembly after snout, eyebrow ridges and spikes are made and positioned.
— Muzzle / Snout :
Round 1 :
6 sc in magic ring (6)
Round 3 :
(1 sc, 1 inc) x 6 (18)
Round 4 :
(2 sc, 1 inc) x 6 (24)
Round 5 :
1 sc in each st (24)
Round 6 :
(3 sc, 1 dec) x 6 (18)
Round 7 :
(2 sc, 1 dec) x 6 (12)
Info :
The muzzle should be a defined cone; fill lightly but leave it flexible so you can flatten and sculpt the nostril area. Embroider or crochet small nostril bumps after attaching. If your muzzle feels too long for the head proportion, reduce rounds 4-5 to shorten.
Round 8 :
(1 sc, 1 dec) x 6 (6)
Round 11 :
(1 sc, inc) x 3 (9)
Round 12 :
1 sc in each st (9)
Info :
Rounds 11-12 create a slightly flared nose tip and flattened nasal bridge area; these rounds help the muzzle sit and sew onto the head without gapping. Use a blunt darning needle to sew the muzzle base to the head between rounds 19-22 of the head for a natural bossing effect.
Round 13 :
Work 9 sc, then shape nostril by 3 sc forming a small bump on either side using surface slip stitches or a tiny embroidered loop (9)
Round 14 :
Finish with 9 sc; fasten off leaving long tail for sewing (9)
Info :
Sew muzzle to the head by aligning the wider ring of the muzzle with the head opening left earlier. Pin in place, then sew around with mattress or whip stitch, pulling slightly to create a smooth transition. Embroider nostrils using black yarn: use small satin stitches and cut tiny yarn tails to push into the nostril for depth.
— Eye Rims and Brow :
Round 1 :
Ch 6, join to form small loop, 6 sc into loop (6) — make 2 for eye rims
Round 2 :
(1 sc, 1 inc) x 3 (9) (make 2)
Round 3 :
1 sc in each st (9) (make 2)
Round 4 :
(2 sc, 1 inc) x 3 (12) (make 2)
Info :
Sew eye rims into the prepared eye sockets between rounds 11-13 of the head. Use safety eyes sized 16mm or custom-painted eyes positioned behind these rims. The rims build dimension and create the deep-set eye look seen in the photo.
Round 5 :
Work a shallow eyelid strip: ch 8, sc back along chain; fasten off and make 2 mirror pieces for upper eyelids
Round 6 :
Sew eyelid strips over the top of each eye rim, shaping with small tucks to make the angry brow; secure ends invisibly (no stitch count)
Info :
Place and secure the eyes now if using safety eyes: position through the eye rim piece, press the back washer firmly and then add a dab of glue behind the washer if you want extra security. Embroider tiny dark line at the inner corner for a more realistic look.
— Head Spikes / Horns (Make 8 medium, 4 small) :
Spike Round 1 :
6 sc in magic ring (6)
Spike Round 2 :
6 inc (12)
Spike Round 3 :
(1 sc, 1 inc) x 6 (18)
Spike Round 4 :
1 sc in each st (18)
Spike Round 5 :
(1 sc, 1 dec) x 6 (12)
Spike Round 6 :
1 sc in each st (12)
Spike Round 7 :
(1 sc, 1 dec) x 4 (8)
Info :
Make 8 medium spikes with the rounds above; make 4 smaller spikes by omitting rounds 3 and 4 (start at 12 stitches and work rounds 5-9). Stuff spikes lightly and close with invisible decrease. Arrange the spikes along the crown of the head and upper neck seam: 3 pairs along the skull (left/right), 2 smaller pairs near the nape. Sew with strong thread, anchoring each spike with extra passes at the base to hold up against handling.
— Neck Connector (worked as short tube) :
Round 1 :
6 sc in magic ring (6)
Round 3-6 :
1 sc in each st (12)
Info :
This short neck tube will be used to connect head to body. Do not stuff; leave it flat. When assembling, insert the neck tube into the body opening and whip stitch around to anchor the head. If you prefer, you can crochet the neck as part of the body instead of a separate connector — this method provides easier shaping and an invisible join.
— Body :
Round 1 :
6 sc in magic ring (6)
Round 3 :
(1 sc, 1 inc) x 6 (18)
Round 4 :
(2 sc, 1 inc) x 6 (24)
Round 5 :
(3 sc, 1 inc) x 6 (30)
Round 6 :
(4 sc, 1 inc) x 6 (36)
Round 7 :
(5 sc, 1 inc) x 6 (42)
Round 8-12 :
1 sc in each st (42)
Info :
The body uses a slightly larger tube than the head to give a robust torso. At round 9 consider beginning the belly ribbing in BLO for several rounds to create the segmented chest seen in the photo. To create a firm base for legs and tail, stuff as you go starting at round 10; the body should be moderately firm.
Round 13 :
1 sc in each st BLO (42)
Round 14 :
1 sc in each st (42)
Round 15 :
1 sc in each st BLO (42)
Round 16-18 :
1 sc in each st (42)
Info :
To build the prominent segmented belly, work alternating BLO rounds every 2 rounds for 6-8 rounds total. Each BLO round creates a visible ridge. Use a second stitch marker to mark the belly center and later place legs symmetrically either side of this marker for even posture.
Round 19 :
(5 sc, 1 dec) x 6 (36)
Round 20 :
(4 sc, 1 dec) x 6 (30)
Round 21 :
(3 sc, 1 dec) x 6 (24)
Round 22 :
1 sc in each st (24)
Round 23 :
(2 sc, 1 dec) x 6 (18)
Round 24 :
(1 sc, 1 dec) x 6 (12)
Info :
Leave the body opening at the top large enough to sew the neck connector in. Do not fasten off: use the long tail to sew head and neck in place. Before closing the bottom, insert a short piece of wire (optional) into the torso if you want a poseable spine; otherwise finish stuffing firmly and close with invisible decrease. Keep the belly moderately firm to allow legs and wings to attach cleanly.
— Front Legs / Arms (Make 2) :
Round 1 :
6 sc in magic ring (6)
Round 3 :
(1 sc, 1 inc) x 6 (18)
Round 4-5 :
1 sc in each st (18)
Info :
Create a toe separation by crocheting a short flap at the end of the foot: ch 6, sc back along chain, leave last st open. This will become the inner claw formation. Work the frontline of the claw using surface slip stitch if you want sharper definition.
Round 6 :
(2 sc, 1 dec) x 6 (12)
Round 7 :
1 sc in each st (12)
Round 8 :
(1 sc, 1 dec) x 4 (8)
Round 10 :
(1 sc, inc) x 4 (12)
Round 11-15 :
1 sc in each st (12)
Info :
Stuff hands/upper paws firmly at round 11 to give a solid hand. If you want poseable arms, insert thin wire through the center before closing the last 2 rounds. Create 3 small claw tips separately (see Claws section) and sew to the front edge of the paw so they splay naturally. Leave a long tail for sewing arms to body at rounds 14-16 of the body for even proportion.
Round 16 :
(1 sc, 1 dec) x 4 (8)
Round 18 :
Stuff and close, fasten off leaving long tail for sewing (0)
— Hind Legs / Feet (Make 2) :
Round 1 :
6 sc in magic ring (6)
Round 3 :
(1 sc, 1 inc) x 6 (18)
Round 4 :
(2 sc, 1 inc) x 6 (24)
Round 5 :
1 sc in each st (24)
Round 6 :
(3 sc, 1 inc) x 6 (30)
Round 7-9 :
1 sc in each st (30)
Info :
The hind foot is larger and will be shaped into a flattened paw. At round 8 begin adding surface texture by working single crochet in FLO for 2 rounds to create a little step where the toes meet the foot pad. This creates the flattened toe sculpt seen in the photos.
Round 10 :
(4 sc, 1 dec) x 5 (25)
Round 11 :
(3 sc, 1 dec) x 5 (20)
Round 12 :
1 sc in each st (20)
Round 13 :
(2 sc, 1 dec) x 5 (15)
Round 14 :
(1 sc, 1 dec) x 5 (10)
Round 15 :
5 dec (5) - leave opening slightly for stuffing
Info :
Stuff the feet very firmly so they will sit and support the dragon. Add claw tips and toe definition by crocheting small nub claws (see Claws). When sewing to the body, place hind legs at rounds 8-10 of the body, 6-8 stitches out from the belly center marker (one on each side) for a natural seated posture.
— Claws (Make 10) :
Round 1 :
4 sc in magic ring (4)
Round 3 :
(1 sc, inc) x 2 (6)
Round 5 :
(1 sc, dec) x 2 (4)
Round 6 :
4 sc, fasten off leaving tail for sewing (4)
Info :
Sew claws to the tips of both front and hind feet. For front paws attach 3 claws; for hind feet attach 3 or 4 claws depending on how many toes you configured. Make sure claws are evenly spaced and angled outward for a natural splay.
— Tail (Segmented) :
Round 1 :
6 sc in magic ring (6)
Round 3 :
(1 sc, 1 inc) x 6 (18)
Round 4-6 :
1 sc in each st (18)
Round 7 :
(1 sc, 1 dec) x 6 (12)
Round 8 :
1 sc in each st (12)
Round 9 :
(1 sc, 1 dec) x 4 (8)
Round 11-16 :
Repeat segment motif: (1 sc in each st for 2 rounds, then (1 sc, 1 dec) x 2) x 1 — this creates a ribbed segmented look (8)
Info :
Create 6-8 segments total to match the photo length; for a longer tail repeat the 3-round segment sequence more times. Insert a thin flexible wire through the center of the tail before closing the final few rounds if you want the tail poseable. Stuff each segment lightly, focusing heavier stuffing near the base and lighter toward the tip to produce a tapered look.
Round 17 :
2 dec, then 4 sc (6)
Round 18 :
1 sc in each st (6) - finish with tip shaping if desired; fasten off leaving tail for sewing
— Wing Fingers (Make 4 per wing, 8 total) :
Finger Round 1 :
6 sc in magic ring (6)
Finger Round 2 :
6 inc (12)
Finger Round 3-18 :
1 sc in each st (12) — work a long tube to required wing finger length (approx 14-18 rounds depending on desired wing size)
Info :
Work each wing finger as a long tube: the photo shows long narrow ribs that give the wing structure. Keep them firm by stuffing lightly as you go or insert wire inside each finger for poseability. Make 4 lengths for each wing: the longest finger is the topmost rib, the others taper progressively shorter. When making the fingers maintain identical length pairs for symmetrical wings.
Finger Round 19 :
Decrease to 8 sc by doing (1 sc, 1 dec) x 4 (8)
Finger Round 20 :
4 dec (4)
Info :
Fasten off and leave long tails for sewing fingers into the wing membrane. Position them along the wing's top inner seam so they radiate outward like fingers. Reinforce attachment with extra sewing passes to ensure fingers hold the membrane tautly.
— Wing Membrane (Make 2) :
Round 1 :
Ch 14, sc into 2nd ch from hook and across (13)
Round 2 :
Sc in each st, ch 1 turn (13)
Round 3 :
At the start of round, ch 2 (counts as hdc), hdc across into each stitch to the end (13) — now you have a small rectangle that will grow into a triangular membrane
Round 4 :
Increase shaping: at the end of round 3, ch 2, 2 hdc in first st, 1 hdc in each st to last st, 2 hdc in last st (15)
Round 5 :
Repeat increase at beginning and end of row to widen membrane evenly (17)
Round 6-10 :
Continue widening by adding 2 stitches per row (approx 19,21,23,25) stopping when membrane reaches desired width matching the longest finger length
Info :
Once you have a base membrane, join the wing fingers by sewing them along the top edge of the membrane at even intervals. After fingers are sewn, use shell stitches along the outer edge to create the scalloped fringe seen in the photo: (sc, ch 2, sc) repeated across the edge works well to create little scallops.
Round 11 :
Work a decorative scalloped edge: *sc in next 2 sts, ch 3, skip 1, sc in next 2* repeat across border — turn (stitch count will vary by membrane size)
Round 12 :
Attach fingers: position 4 finger tubes along top edge and sew through outer loop and membrane firmly; reinforce with extra passes (no stitch count)
Info :
Block the wing membranes flat by pinning to shape on a towel and lightly steaming or spraying with water and letting dry pinned. This helps the scalloped edges hold their shape and gives a delicate lace-like appearance compared to the chunky body.
— Wing Joiner / Shoulder Tabs (Make 2) :
Round 1 :
6 sc in magic ring (6)
Round 3-4 :
1 sc in each st (12)
Info :
Sew this tab to the top side of the body at the shoulder area (rounds 10-14) and then sew the wing membrane into this tab. Use strong secure sewing so wings sit naturally and maintain posture. If using wire inside fingers or shoulders, conceal the wire ends and wrap with tape before sewing to avoid sharp edges.
— Belly Ridge Detail (worked on body) :
Round 1 :
From belly center marker, work 12 sc downward in FLO to create an inner ridge (12)
Round 2 :
Work 1 sc in each st BLO to create a raised ridge; repeat for 8 horizontal segments across length of belly (12)
Info :
To create the pronounced ribbed chest in the photo, work a sequence of 8 short ridges by alternating FLO and BLO across 16-18 rounds. These are worked directly onto the body tube, sewn down with small tacking stitches at the base of each ridge so they remain raised and sculptural.
— Final Assembly & Finishing :
Info :
Before sewing everything together, position and pin all parts: head, neck, front legs, hind legs, wings and tail. Check proportions and symmetry. When satisfied, sew parts securely using mattress stitch and reinforce high-stress areas with extra passes. Hide all loose ends by weaving at least 6cm (2.5") into the body and snip close.
Info :
Sew the head to the neck connector by pinning connector into the body neck opening and then sewing connector to the head base. Attach muzzle first if it was left detachable, then finish closing the head seam so the muzzle is snugly integrated. Add a final set of light stuffing as you close the neck so the shoulders maintain a solid silhouette.
Info :
Use a thin felt pad behind safety eyes (optional) to keep them from sinking into the chenille texture. If you used glass eyes without a washer, glue the inside of the eye housing to secure them. For the furrowed brow impression, stitch a few vertical tacking stitches between the brow strip and the head to create the deep-set, frowning expression.
Info :
Optional weathering: very lightly surface embroider small details (veins on wings, soft shading around nostrils) with a contrasting dark grey yarn to emphasize sculpted lines. This subtle shading considerably enhances depth without overpowering the soft bone color.
You've just completed a dramatic and textural ghost dragon that doubles as both a spooky collectible and a delightful handmade keepsake. Every ridge, spike and fold adds character — from the furrowed brow to the scalloped wing edges — and the pattern teaches satisfying shaping techniques along the way. I hope you enjoyed sculpting the personality of this dragon as much as I did designing it. 🐉🧶 Share a photo of your finished dragon — I would love to see your unique variations! ✨